

小小博客项目(servlet实战演练)
目录
MVC模式简介
项目概述
🍑Model(模型层)
🍑View(视图层)
🍑Controller(控制器层)
项目实战
上面pom.xml代码参考
一、模型层
🌰User代码:对应数据库中的User表
🌰Blog类:对应数据库中的Blog表
🌰DButil类:连上数据库
🌰UserDao类:对数据库中User表的操作:
🌰BlogDao类:对数据库中的Blog表的操作:
二、Controller控制层:用来处理我们前端发来的请求。
🏀前后端交互接口举例说明
🏀BlogServlet代码
相关联的视图层代码
博客列表页blog_home.html:
博客详情页blog_detail代码
🏀DeleteBlogServlet代码
相关联的视图层代码
博客详情页(blog_detail.html)]
🏀UserServlet代码
与之相关的视图层的代码
博客列表页(blog_home.html)
博客详情页(blog_detail.html)
🏀LoginServlet代码
相关联的视图层的代码
博客登录页(blog_login.html)
博客列表页(blog_home.html)
博客详情页(blog_detail.html)
🏀LoginOutServlet代码
🏀RegServlet代码
三、视图层(view)总代码展示
🍑博客登录页
🍑博客注册页
🍑博客列表页
🍑博客详情页
🍑博客编辑页
🔔视图层对应的css代码
MVC模式简介
在开始介绍这个项目之前,首先我们要知道什么是MVC模式
MVC 模式,全称为 Model-View-Controller(模型-视图-控制器)模式,它是一种软件架构模式,其目标是将软件的用户界面(即前台页面)和业务逻辑分离,使代码具有更高的可扩展性、可复用性、可维护性以及灵活性。
通常情况下,一个完整的 Java Web 应用程序,其结构如下图所示
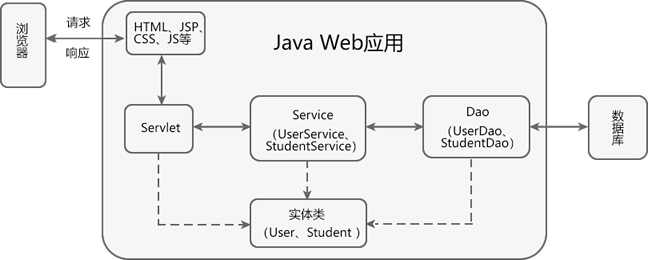
MVC 模式将应用程序划分成模型(Model)、视图(View)、控制器(Controller)等三层,如下图所示。
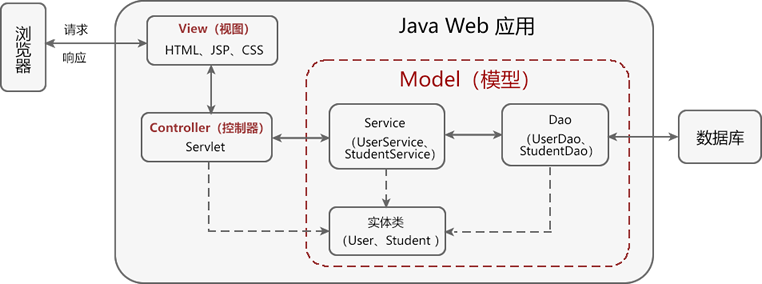
| 分层 | 描述 |
|---|---|
| Model(模型) | 它是应用程序的主体部分,主要由以下 2 部分组成:
一个模型可以为多个视图(View)提供数据,一套模型(Model)的代码只需写一次就可以被多个视图重用,有效地减少了代码的重复性,增加了代码的可复用性。 |
| View(视图) | 指在应用程序中专门用来与浏览器进行交互,展示数据的资源。在 Web 应用中,View 就是我们常说的前台页面,通常由 HTML、JSP、CSS、JavaScript 等组成。 |
| Controller(控制器) | 通常指的是,应用程序的 Servlet。它负责将用户的请求交给模型(Model)层进行处理,并将 Model 层处理完成的数据,返回给视图(View)渲染并展示给用户。 在这个过程中,Controller 层不会做任何业务处理,它只是 View(视图)层和 Model (模型)层连接的枢纽,负责调度 View 层和 Model 层,将用户界面和业务逻辑合理的组织在一起,起粘合剂的效果。 |
MVC 的工作流程如下:
- 用户发送请求到服务器;
- 在服务器中,请求被控制层(Controller)接收;
- Controller 调用相应的 Model 层处理请求;
- Model 层处理完毕将结果返回到 Controller;
- Controller 再根据 Model 返回的请求处理结果,找到相应的 View 视图;
- View 视图渲染数据后最终响应给浏览器。
可以说,Controller就是View视图层和Model层之间的桥梁,我们接下来的这个小小项目就用到了MVC思想。
项目概述
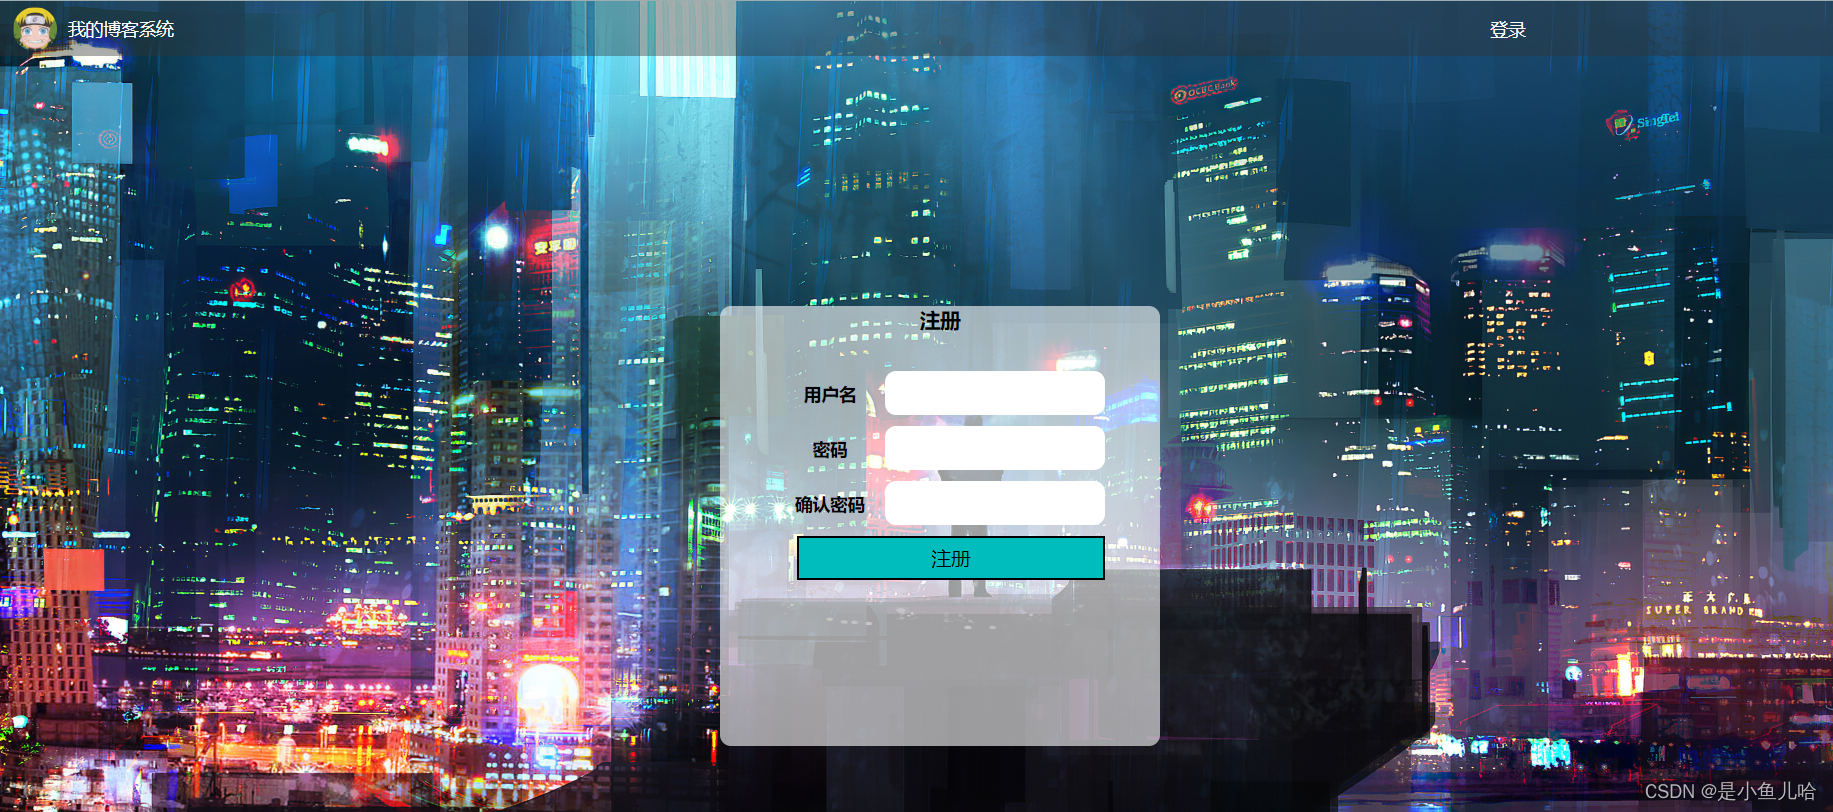
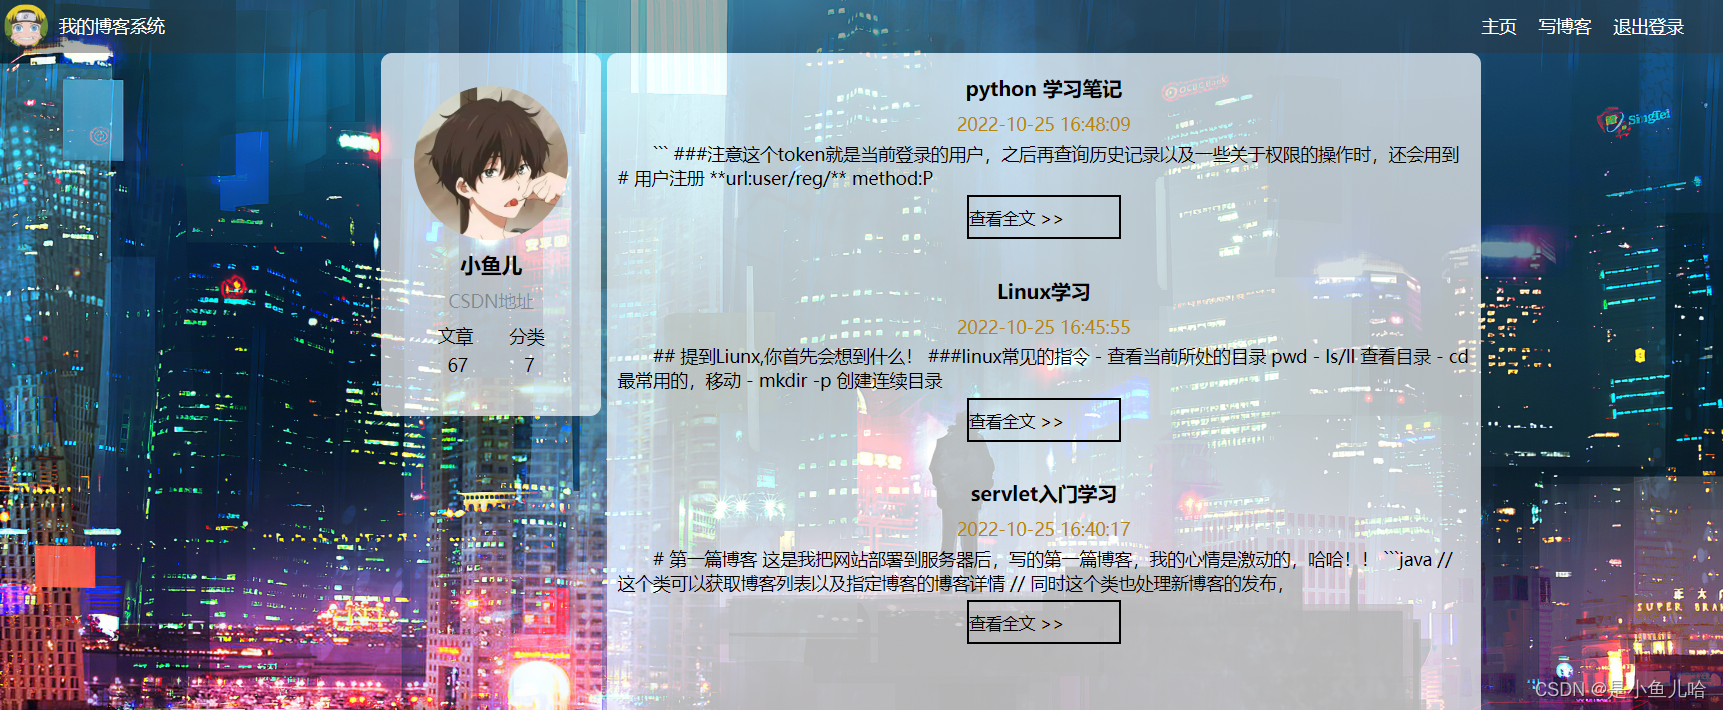
总的来说,我们当前的项目有这样几个页面:登录页、注册页、博客列表页、博客详情页、博客编辑页。
登录页
注册页
博客列表页
博客详情页
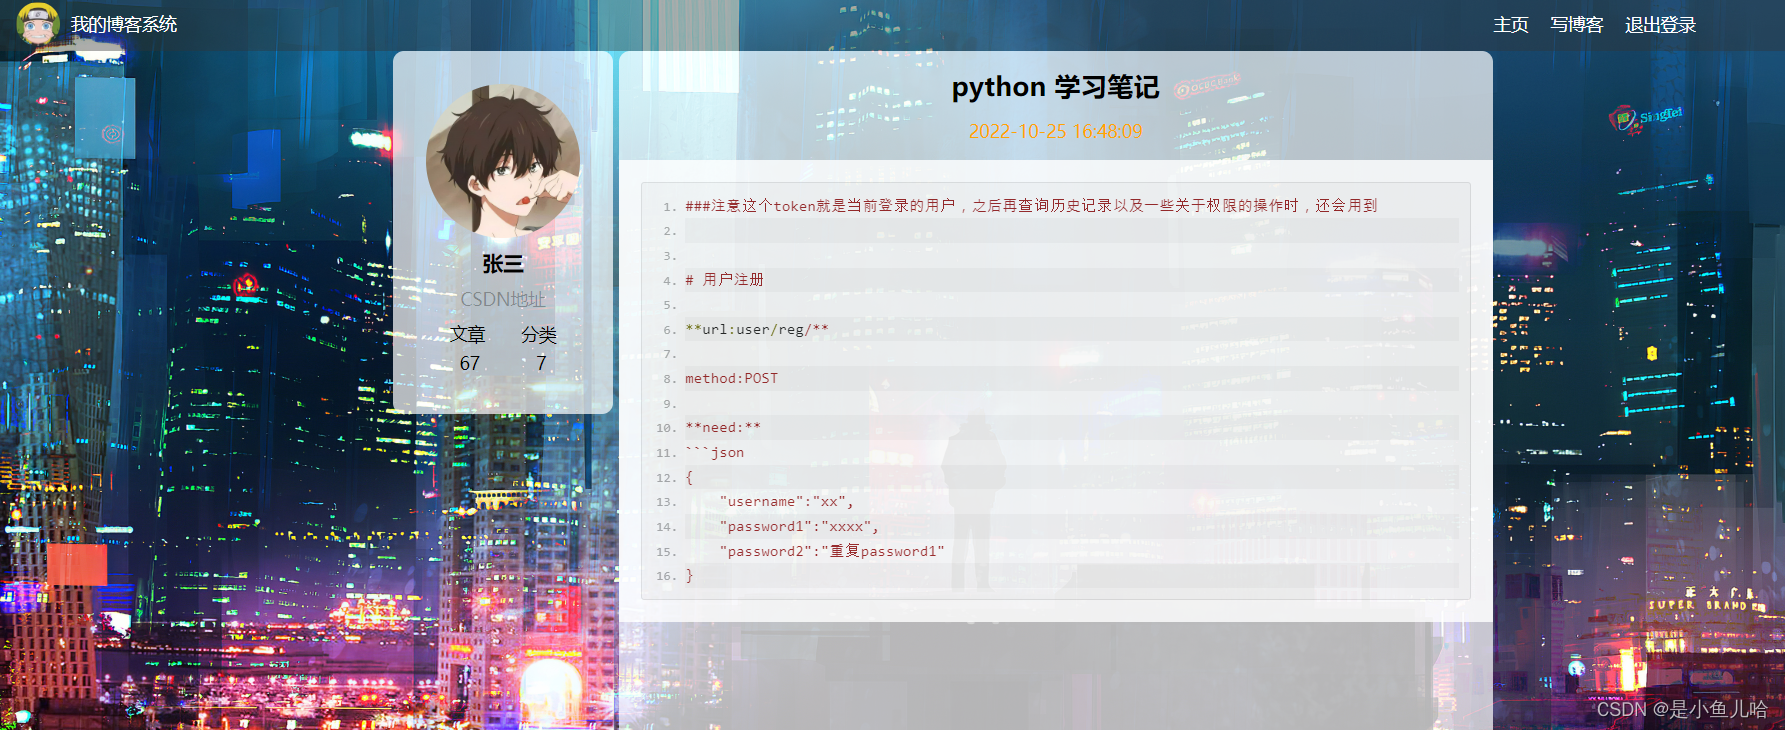
博客编辑页
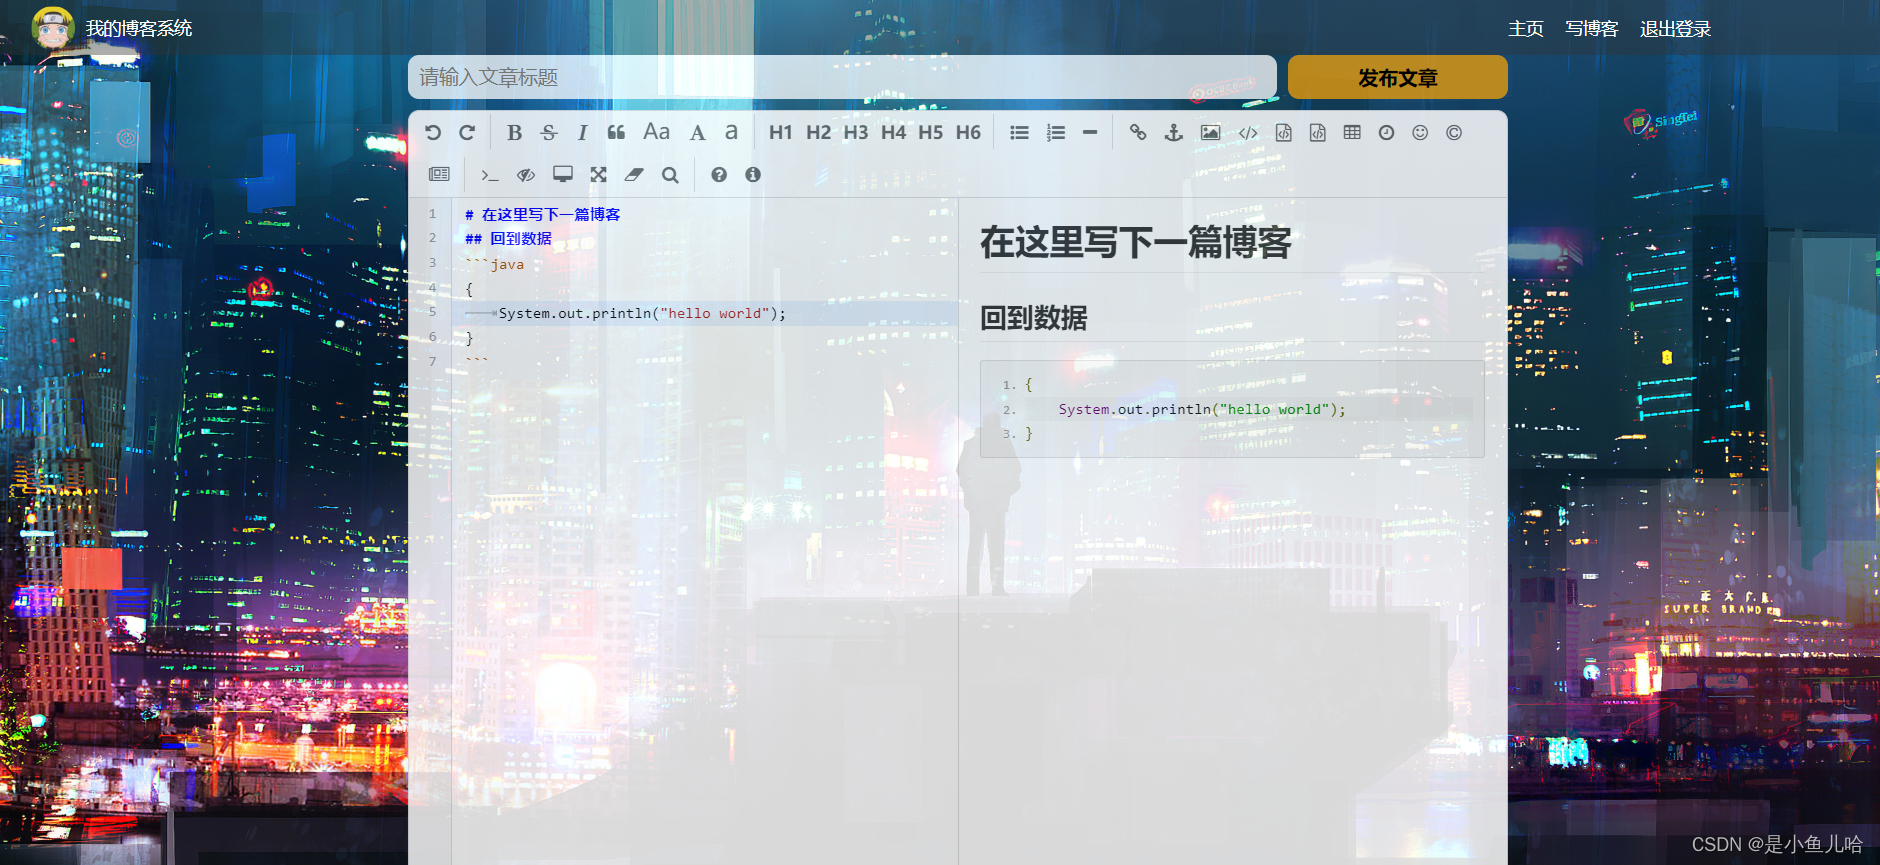
功能已经大概流程大概如下:
首先登录注册不用多说
🌰在博客列表页,看到的左侧的用户名必须是我们当前登录的用户名,右侧了博客列表显示的所有用户所写的博客简介。
🌰在博客详情页,我们看到的左侧的用户名是我们当前所查看博客的作者,此外如果这篇博客的作者是当前登录的用户的话,该用户还有权限在博客详情页中删除该博客(删除后就跳转到博客列表页,此时博客列表页已经没有了刚才删除的博客简介),反之则没有权限。
🌰在博客编辑页,当你新写了一篇博客,发布成功后就会跳转到博客列表页,同时在博客列表页的开头就显示出了你刚刚所写的那篇博客的博客简介)
另外,我们要在博客列表页、博客详情页和博客编辑页,检查用户当前的登录状态,如果是为未登录,页面就强制跳转到登录页。
既然我们是按MVC的模式来写的,那么我们就来看看在这个项目中M层、V层和C层都分别做了什么吧!
🍑Model(模型层)
首先对于M层,即我们的模型层。他需要接收C(控制层)对他的调控,完成对数据的操作。
再来看看这张图
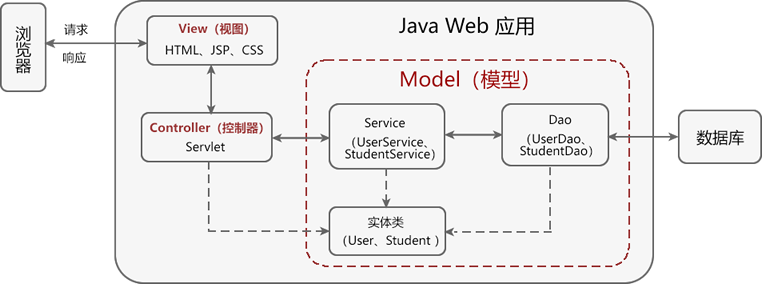
我们这个项目需要用到两张表:User用户表和Blog博客表,M层应该有分别对应这两张表的实体类User类和Blog类。另外还应该有对这两张表中数据分别处理的UserDao类、BlogDao类,用来对完成数据的处理(新增、删除、查询等)
🍑View(视图层)
从上图也可以看出,view负责我们用户界面的展示,其实就是前端(HTML、CSS、JS的相关代码)前端把用提交的数据或或者说操作以HTTP请求的方式通过服务器发给我们的Controller(控制器层),然后控制器再对请求做对应的处理,再把处理的结果以相应的形式返回给前端。
🍑Controller(控制器层)
控制器是视图层和模型层之间的桥梁,按前面所说:好像都是控制器层来和视图层(前端)来做交互。那么模型层干什么了呢?
你可不要误会了模型层,他才是处理数据的幕后之人,我们的控制器层只是把视图层(用户)发来的请求,交给模型层来干,同时把模型层辛辛苦苦处理的数据结果返回视图(view)渲染并展示给用户。
在这个过程中,Controller 层不会做任何业务数据上处理,它只是 View(视图)层和 Model (模型)层连接的枢纽,负责调度 View 层和 Model 层,将用户界面和业务逻辑合理的组织在一起,起粘合剂的效果。
光说他们三个之间的关系可能还不清楚,让我们来举例说明
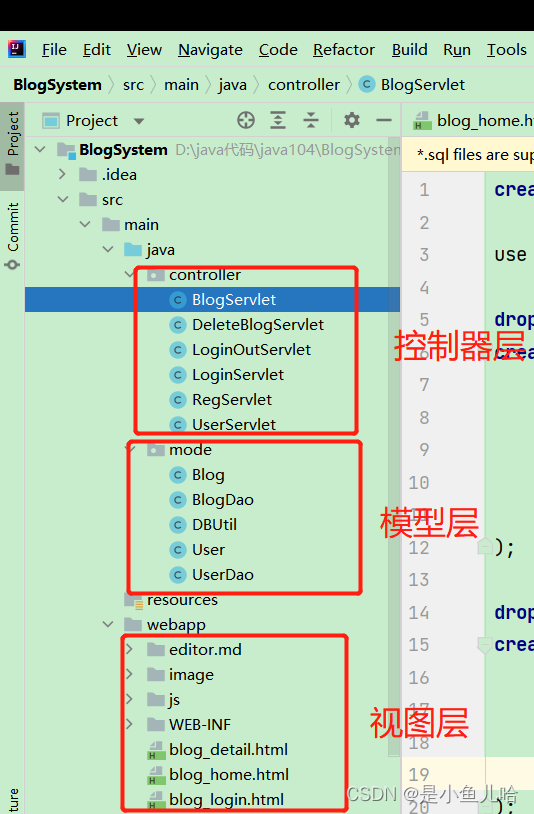
这个我们博客系统实际这三个层所处的位置关系,比如我们现在在进入了博客列表页, 前端(我们的视图层)发来了一个请求要我们返回当前数据库里所有的数据。于是我们的控制层(BlogServlet)代码接收了这个请求,并调用了我们的模型层(BlogDao)让我们的模型层处理了这个数据(在数据库中进行了相关的增删查改)。之后呢,控制层就把处理结果返回给视图(view)渲染并展示给用户。
项目实战
我们是通过maven来创建项目的(项目创建的具体流程,以及要引入的包和依赖参看我的上一篇文章servlet实现表白墙
1、创建项目
2、引入依赖
3、创建必要目录
4、编写代码
5和6、打包和部署:配置Smart Tomcat
7、测试验证
Model(模型层)
先看看一下项目实现后的目录结构
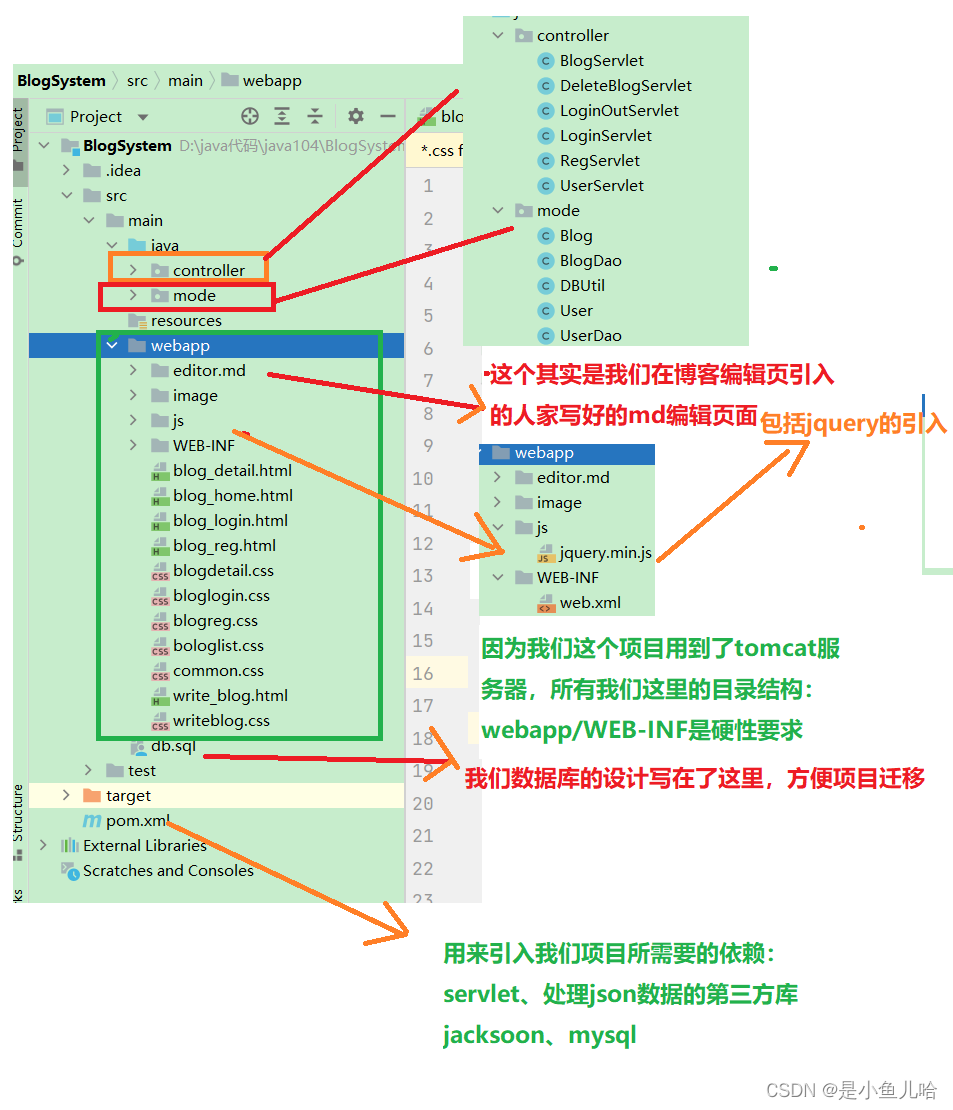
注意我们上面wepapp/WEB-INF/web.xml这个目录和文件是需要我们自己建的。web.xml里面的内容可以直接复制下面的代码
Archetype Created Web Application
上面pom.xml代码参考
4.0.0 org.example BlogSystem 1.0-SNAPSHOT 8 8 javax.servlet javax.servlet-api 3.1.0 provided com.fasterxml.jackson.core jackson-databind 2.13.4 mysql mysql-connector-java 5.1.49 war BlogSystem 一、模型层
两部分:
实体类——对应我们数据库中的表
业务处理操作类——对应我们对数据库的操作
🌰User代码:对应数据库中的User表
package mode;
// 实体类,每个实体类对应数据库中一张表public class User {private int userId; // 当前登录的用户idprivate String username; // 用户名字private String password;// 但注意我们这个属性并没有放在数据库中,因为这个是随时都会改变的(随着你当前所查看博客的不同、当前登录用户的不同)private int isYourBlog;  // 通过这个属性,在博客详情页,我们判断是否能够删除该博客public int getIsYourBlog() {return isYourBlog;}public void setIsYourBlog(int isYourBlog) {this.isYourBlog = isYourBlog;}public int getUserId() {return userId;}public void setUserId(int userId) {this.userId = userId;}public String getUsername() {return username;}public void setUsername(String username) {this.username = username;}public String getPassword() {return password;}public void setPassword(String password) {this.password = password;}
}
🌰Blog类:对应数据库中的Blog表
package mode;import java.sql.Timestamp;
import java.text.SimpleDateFormat;
import java.util.SimpleTimeZone;// 实体类是我们进行增删改查的基本单位
// 这个对象的实例就表示一篇博客
public class Blog {private int blogId;  // 博客idprivate String title;private String content;private int userId; // 这篇博客的作者的idprivate Timestamp postTime;public int getBlogId() {return blogId;}public void setBlogId(int blogId) {this.blogId = blogId;}public String getTitle() {return title;}public void setTitle(String title) {this.title = title;}public String getContent() {return content;}public void setContent(String content) {this.content = content;}public int getUserId() {return userId;}public void setUserId(int userId) {this.userId = userId;}//   // 这里返回的不再是一个时间戳,而是格式化好的String
//    public String getDatetime() {
//        // return datetime; 如果我们不改这里返回的是一个时间戳,而不是格式化好的时间
//        // Java中SimpleDateFormat类就可以 进行时间格式的转换,但需要我们在构造方法中指定转换的时间格式
//        SimpleDateFormat simpleDateFormat = new SimpleDateFormat("yyyy-MM-dd HH:mm:ss");
//        return simpleDateFormat.format(this.postTime);
//    }// 把这个方法魔改一下!! 在方法里面把时间戳构造成格式化时间. 以 String 的方式来返回.public String getPostTime() {SimpleDateFormat simpleDateFormat = new SimpleDateFormat("yyyy-MM-dd HH:mm:ss");return simpleDateFormat.format(this.postTime);}public void setPostTime(Timestamp postTime) {this.postTime = postTime;}
}
既然表创建好了,我们是不是就应该对数据库中的表进行操作了呀!
别慌,我们还要连上数据库
🌰DButil类:连上数据库
用来连接上数据库(主要因为我们这个项目是要部署到云服务器上的,所以我们连接的也是云服务上的数据库)
package mode;import javax.sql.DataSource;
import java.sql.Connection;
import java.sql.PreparedStatement;
import java.sql.ResultSet;
import java.sql.SQLException;
// 如果找不到包而爆红,尝试着刷新一些pom.xml依赖文件
import com.mysql.jdbc.jdbc2.optional.MysqlDataSource;// 通过这个类来实现对数据库的连接
public class DBUtil {Connection connection = null;private static DataSource dataSource = null;// 这里我们采用了懒汉模式,会有线程安全问题,要注意加锁// 登录数据库,并获取数据源public static DataSource getDataSource() {if (dataSource == null) {  // 锁内外判断,如果已经创建了数据源,就不进行加锁操作了synchronized (DBUtil.class) { // 对类对象加锁if (dataSource == null) {dataSource = new MysqlDataSource(); // 创建数据源((MysqlDataSource)dataSource).setUrl("jdbc:mysql://127.0.0.1:3306/BlogSystem?characterEncoding=utf8&useSSL=false");((MysqlDataSource)dataSource).setUser("root");((MysqlDataSource)dataSource).setPassword(""); //  当我们要把代码部署到云服务器上,我们这里设置的密码的云服务器上的mysql的密码}}}return dataSource;}// 与数据源(数据库)建立连接public static Connection getConnection() throws SQLException {return getDataSource().getConnection();}// 关闭连接,释放资源public static void close(Connection connection, PreparedStatement preparedStatement, ResultSet resultSet) {if (resultSet != null) {try {resultSet.close();} catch (SQLException e) { // 用try catch比较合理一点e.printStackTrace();}}if (preparedStatement != null) {try {preparedStatement.close();} catch (SQLException e) {e.printStackTrace();}}if (connection != null) {try {connection.close();} catch (SQLException e) {e.printStackTrace();}}}
}
🌰UserDao类:对数据库中User表的操作:
package mode;import javax.servlet.annotation.WebServlet;
import java.sql.Connection;
import java.sql.PreparedStatement;
import java.sql.ResultSet;
import java.sql.SQLException;// 这个类我们是来操作用户表,进行用户表的增删改查
public class UserDao {// 新增用户public static int insertUser(User user) {Connection connection = null;PreparedStatement statement = null;ResultSet resultSet = null;try {// 1、与数据库建立连接connection = DBUtil.getConnection();// 2、构造sql语句String sql = "insert into user values(null, ?, ?)";statement = connection.prepareStatement(sql);statement.setString(1, user.getUsername());statement.setString(2, user.getPassword());// 执行语句// 但执行新增用户前,我们要检查当前用户名,是否已经被注册过String check = "select * from user where username <=> ?";PreparedStatement statementTest = connection.prepareStatement(check);statementTest.setString(1, user.getUsername());ResultSet test = statementTest.executeQuery();// 如果test.next(),可以进入说明test不为空,我们在遍历博客列表时,也是通过test.next来遍历查询到的博客列表的if (test.next()) { // 因为这个test是ResultSet,我们不能用他是否为null判断查询结果为空// 说明数据库中已经有了该用户,不能重复注册System.out.println("@@@@@@@@@@@@@");return 1;  // 我们用返回值来代表插入的成功与失败,1失败,0成功}int ret = statement.executeUpdate();if (ret == 1) {System.out.println("新增用户成功!");}else {System.out.println("新增失败!");}} catch (SQLException e) {e.printStackTrace();}finally {DBUtil.close(connection, statement, resultSet);}return 0; // return 0 说明插入成功:注册用户成功}// 根据用户名,查看用户的详细信息public static User selectByName(String name) {Connection connection = null;PreparedStatement statement = null;ResultSet resultSet = null;try {connection = DBUtil.getConnection();String sql = "select * from user where username <=> ?";statement = connection.prepareStatement(sql);statement.setString(1, name);// 执行语句resultSet = statement.executeQuery();if (resultSet.next()) {User user = new User();user.setUserId(resultSet.getInt("userId"));user.setUsername(resultSet.getString("username"));user.setPassword(resultSet.getString("password"));return user;}} catch (SQLException e) {e.printStackTrace();}finally {DBUtil.close(connection, statement, resultSet);}return null;}// 根据用户id, 查看用户的详细信息public static User selectById (int userId) {Connection connection = null;PreparedStatement statement = null;ResultSet resultSet = null;try {connection = DBUtil.getConnection();String sql = "select * from user where userId <=> ?";statement = connection.prepareStatement(sql);statement.setInt(1, userId);// 执行语句resultSet = statement.executeQuery();if (resultSet.next()) {User user = new User();user.setUserId(resultSet.getInt("userId"));user.setUsername(resultSet.getString("username"));user.setPassword(resultSet.getString("password"));return user;}} catch (SQLException e) {e.printStackTrace();}finally {DBUtil.close(connection, statement, resultSet);}return null;}
}
🌰BlogDao类:对数据库中的Blog表的操作:
package mode; // 这个类来实现对博客的增删改查 // 针对博客要实现的功能: // 1. 新增博客 (博客编辑页) // 2. 查询出博客列表 (博客列表页) // 3. 查询出指定博客的详情 (博客详情页) // 4. 删除指定的博客 (可以在博客详情页中加入)import java.sql.Connection; import java.sql.PreparedStatement; import java.sql.ResultSet; import java.sql.SQLException; import java.util.ArrayList; import java.util.List;public class BlogDao {// 新增博客public static void insertBlog(Blog blog) {Connection connection = null;PreparedStatement preparedStatement = null;ResultSet resultSet = null;try {// 先和数据库建立起连接connection = DBUtil.getConnection();// 构造sql语句String sql = "insert into blog value(null, ?, ?, ?, now())";preparedStatement = connection.prepareStatement(sql);preparedStatement.setString(1, blog.getTitle());preparedStatement.setString(2, blog.getContent());preparedStatement.setInt(3, blog.getUserId());// 执行语句int ret = preparedStatement.executeUpdate();if (ret == 1) {System.out.println("插入成功!!!");}} catch (SQLException e) {e.printStackTrace();}finally {DBUtil.close(connection, preparedStatement, resultSet);}}// 查询博客列表public static ListgetList() {Connection connection = null;PreparedStatement statement = null;ResultSet resultSet = null;List blogs = new ArrayList<>();try {// 与数据库建立连接connection = DBUtil.getConnection();// 构造sql语句,按时间查询排列String sql = "select * from blog order by postTime desc";statement = connection.prepareStatement(sql);// 执行语句resultSet = statement.executeQuery(); // 用来执行查询操作while (resultSet.next()) {Blog blog = new Blog();blog.setBlogId(resultSet.getInt("blogId"));blog.setTitle(resultSet.getString("title"));String content = resultSet.getString("content");// 如果内容过长,就截取内容的一部分if (content.length() > 100) {content = content.substring(0, 100);}blog.setContent(content);blog.setUserId(resultSet.getInt("userId"));blog.setPostTime(resultSet.getTimestamp("postTime"));blogs.add(blog);}} catch (SQLException e) {e.printStackTrace();}finally {// 与数据库断开连接,释放资源DBUtil.close(connection, statement, resultSet);}return blogs;}// 查看博客详情,当前前端传给我们的博客对象,根据博客Id,获取当前博客的博客详情public static Blog getDetail(int blogId) {Connection connection = null;PreparedStatement preparedStatement = null;try {// 1、与数据库建立连接connection = DBUtil.getConnection();// 2、构造sql语句String sql = "select * from blog where blogID <=> ?";preparedStatement = connection.prepareStatement(sql);preparedStatement.setInt(1, blogId);// 3、执行语句ResultSet resultSet = preparedStatement.executeQuery();if (resultSet.next()) {Blog blog = new Blog();blog.setBlogId(resultSet.getInt("blogId"));blog.setTitle(resultSet.getString("title"));blog.setContent(resultSet.getString("content"));blog.setUserId(resultSet.getInt("userId"));blog.setPostTime(resultSet.getTimestamp("postTime"));return blog;}} catch (SQLException e) {e.printStackTrace();}finally {DBUtil.close(connection, preparedStatement, null);}return null;}public static void deleteBlog(int blogId) {Connection connection = null;PreparedStatement statement = null;ResultSet resultSet = null;try {// 1、与数据库建立连接connection = DBUtil.getConnection();// 2、执行sql语句String sql = "delete from blog where blogId = ?";// 通过PreparedStatement对象来表示要执行的一个sql语句,// 这个操作就是要告诉PreparedStatement对象,要执行的sql语句是什么、该语句要交给xx数据库服务器来执行,通过connection与dataSource建立连接statement = connection.prepareStatement(sql);statement.setInt(1, blogId); // 把sql语句补充完整int ret = statement.executeUpdate();// 通过上面我们也不难发现,我们执行构建sql、执行sql语句都是有PreparedStatement对象statement来执行的// connection的作用仅仅只是建立与数据库建立连接,把要执行的sql语句交给PreparedStatement对象if (ret == 1) { // ret代表执行该sql语句所改变的行数System.out.println("删除成功!");}else {System.out.println("删除失败!");}} catch (SQLException e) {e.printStackTrace();}finally {DBUtil.close(connection, statement, resultSet);}} }
二、Controller控制层:用来处理我们前端发来的请求。
事实上,在项目中我们如果想要实现一个功能,有以下三步
1、约定前后端交互接口
2、编写服务器端代码(其实主要编写的就是我们这里控制层的代码)
3、编写客户端代码(即视图层,我们的前端)
我们大致说以下我们这个项目中所用到的交互接口(详细的可以看我们表白墙的那一篇博客)
🏀前后端交互接口举例说明
🍑博客列表获取(博客列表页中)
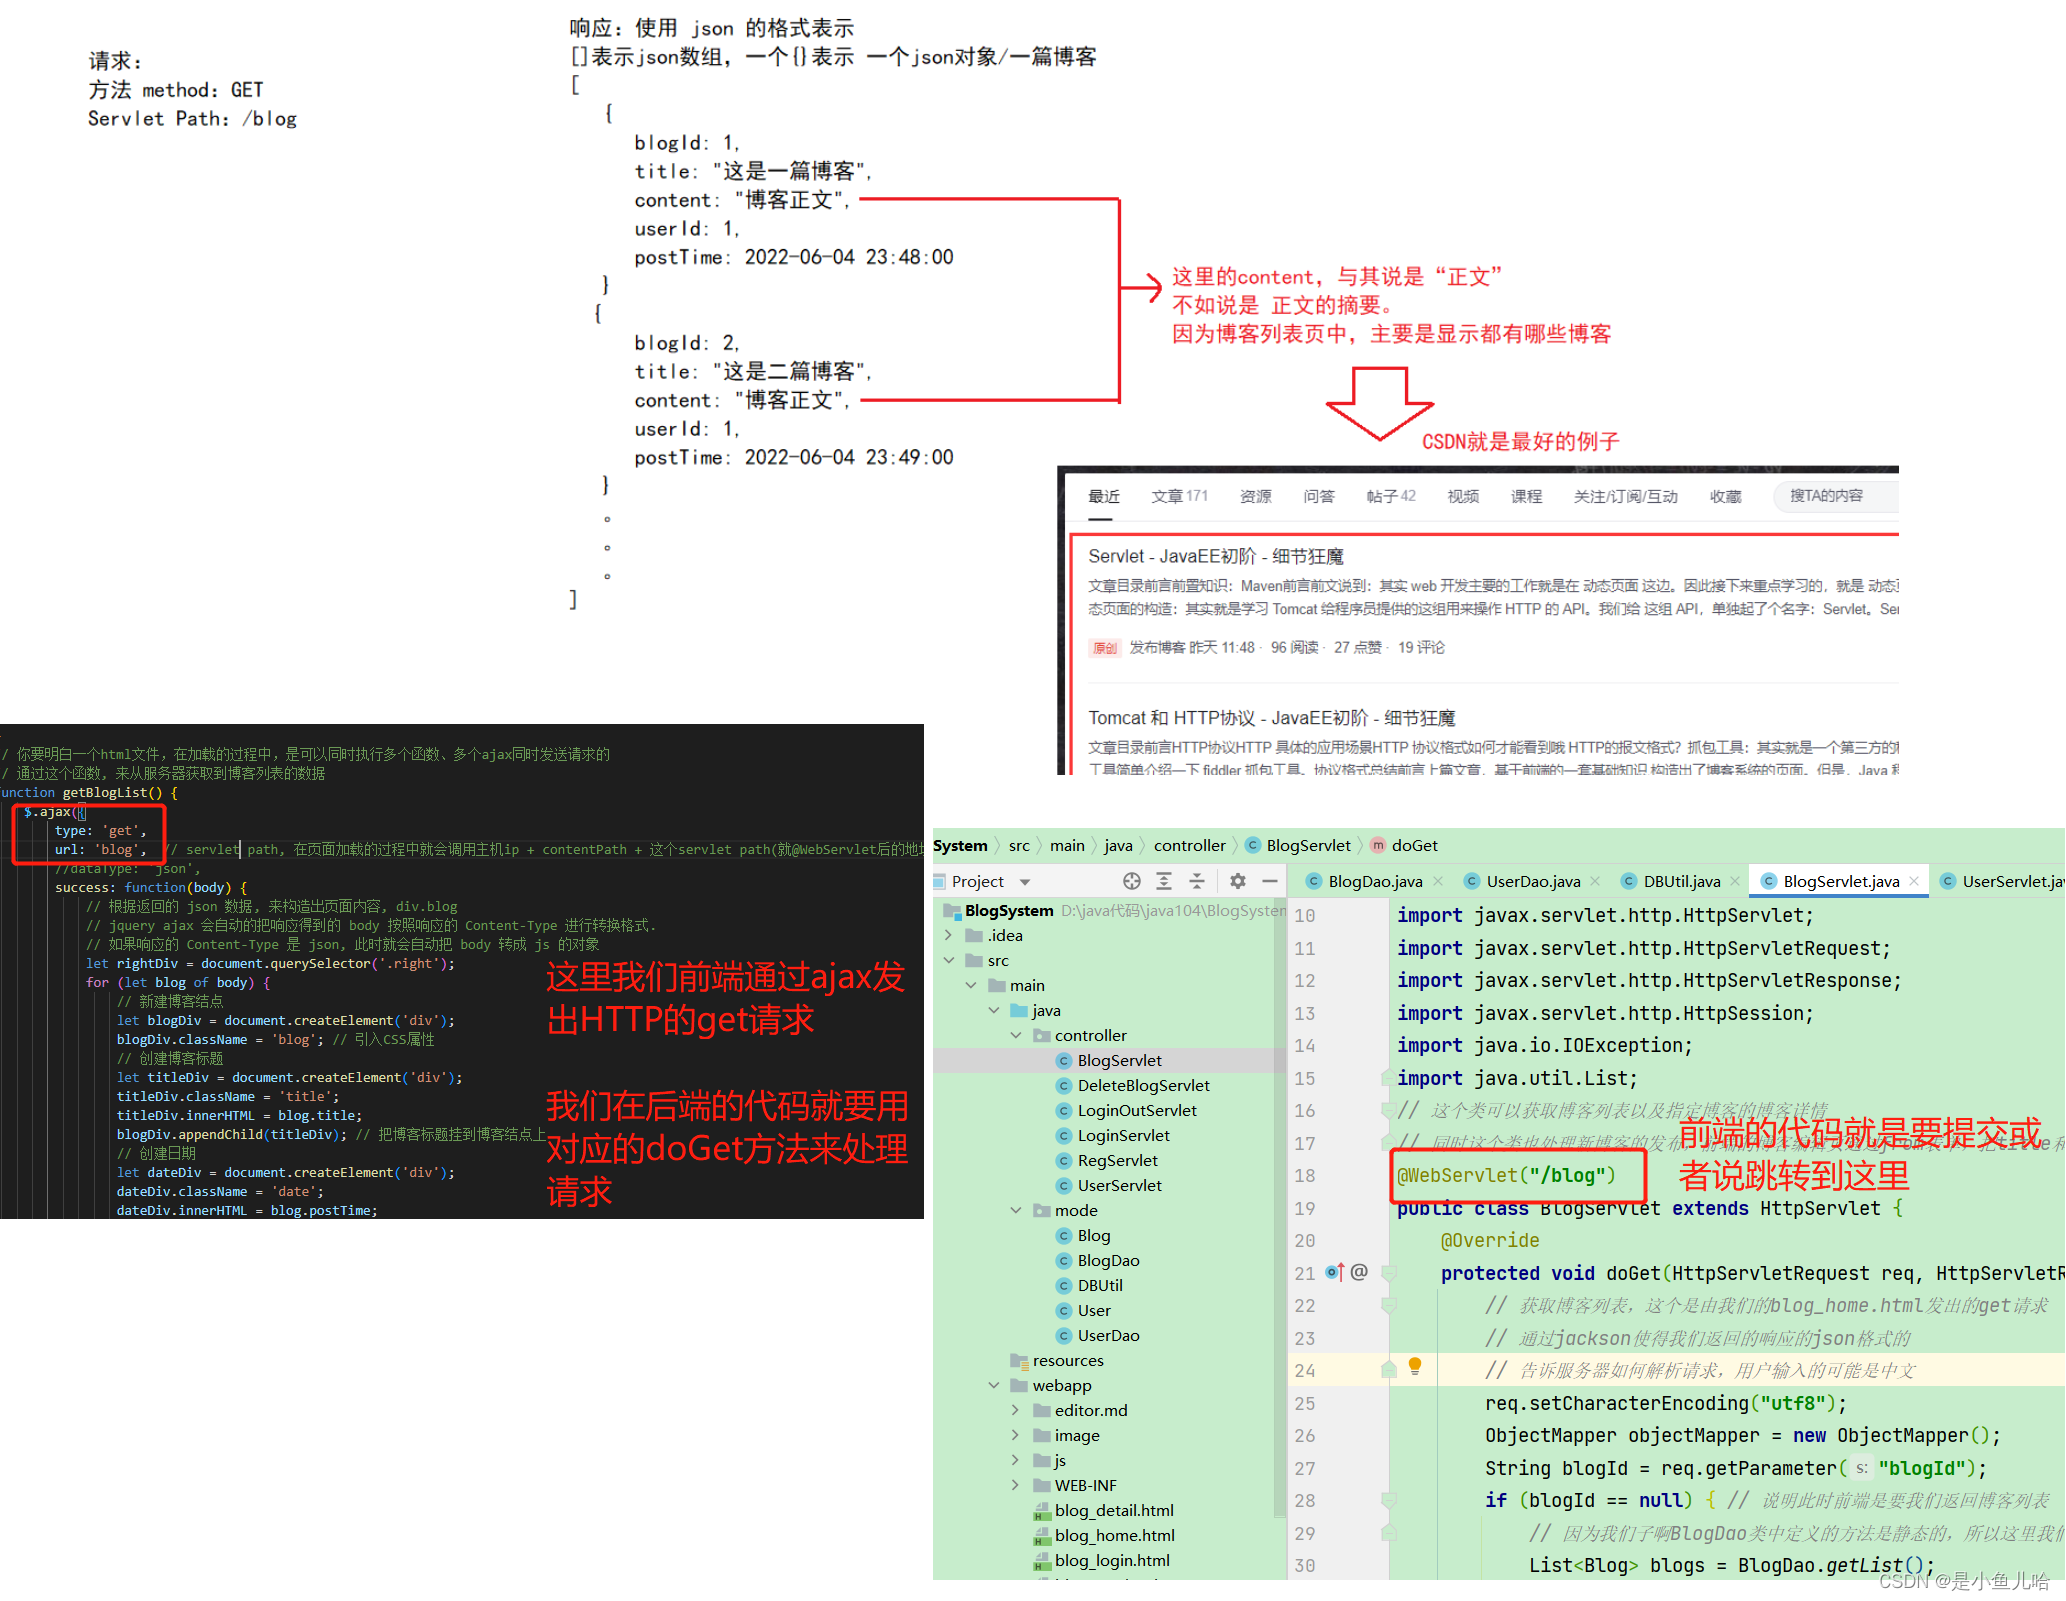
接下来我们对Controller层的这几个类做一下解析
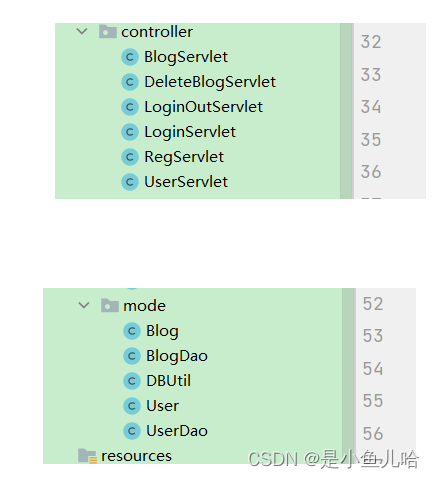
🏀BlogServlet代码
首先看我们的BlogServlet代码(与博客列表页、博客详情页、博客编辑页相关联)
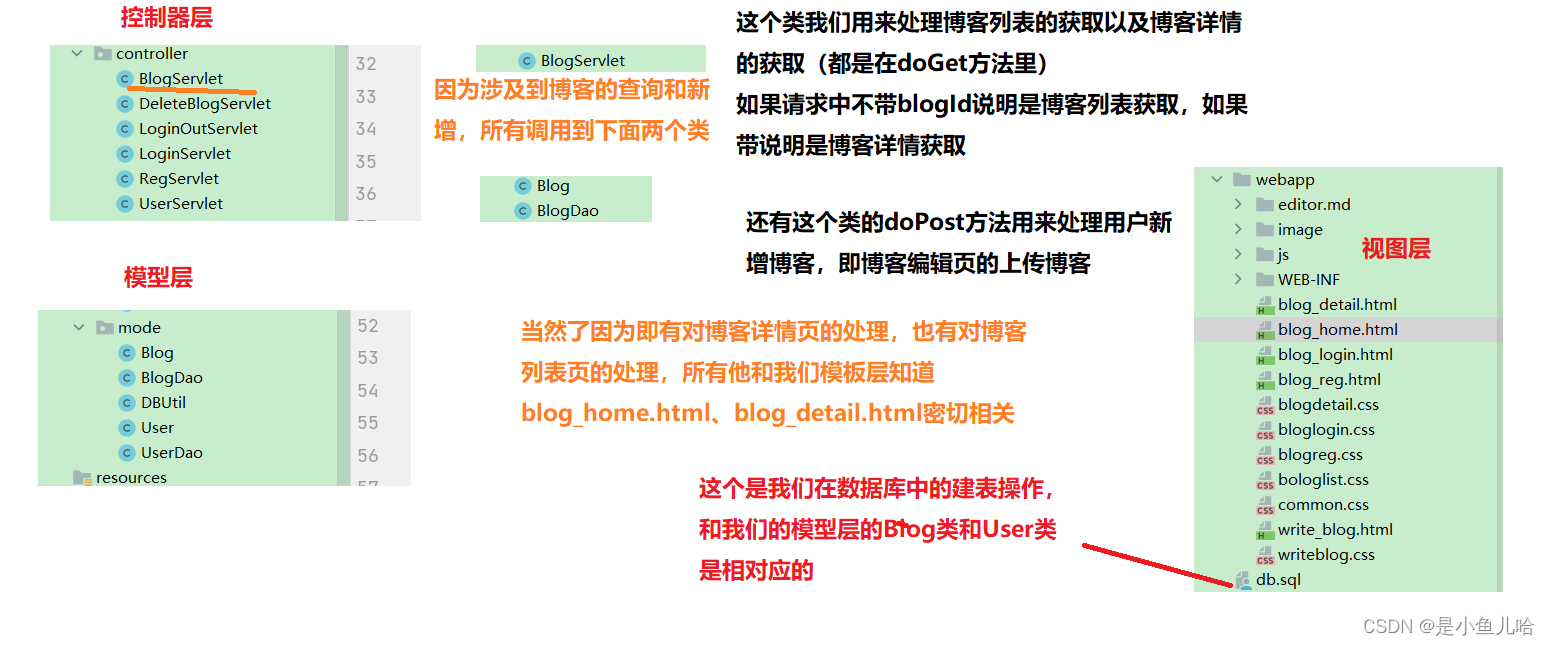
BlogServlet代码
package controller;import com.fasterxml.jackson.databind.ObjectMapper; import mode.Blog; import mode.BlogDao; import mode.User;import javax.servlet.ServletException; import javax.servlet.annotation.WebServlet; import javax.servlet.http.HttpServlet; import javax.servlet.http.HttpServletRequest; import javax.servlet.http.HttpServletResponse; import javax.servlet.http.HttpSession; import java.io.IOException; import java.util.List; // 这个类可以获取博客列表以及指定博客的博客详情 // 同时这个类也处理新博客的发布,前端的博客编辑页通过from表单,把title和content发给我们,方法是post @WebServlet("/blog") public class BlogServlet extends HttpServlet {@Overrideprotected void doGet(HttpServletRequest req, HttpServletResponse resp) throws ServletException, IOException {// 获取博客列表,这个是由我们的blog_home.html发出的get请求// 通过jackson使得我们返回的响应的json格式的// 告诉服务器如何解析请求,用户输入的可能是中文req.setCharacterEncoding("utf8");ObjectMapper objectMapper = new ObjectMapper();String blogId = req.getParameter("blogId");if (blogId == null) { // 说明此时前端是要我们返回博客列表// 因为我们子啊BlogDao类中定义的方法是静态的,所以这里我们不用实例化对象就能调用Listblogs = BlogDao.getList();// 把blogs转成json数组的格式String respJson = objectMapper.writeValueAsString(blogs);// 告诉浏览器以json格式来读取响应数据,如果没写这行,浏览器会把他当作是一个普通的字符串来处理resp.setContentType("application/json; charset=utf-8");resp.getWriter().write(respJson);}else { // 说明前端此时是要我们返回指定blogId的博客详情Blog blog = BlogDao.getDetail(Integer.parseInt(blogId));String respJson = objectMapper.writeValueAsString(blog);// 告诉浏览器以json格式来读取响应数据,如果没写这行,浏览器会把他当作是一个普通的字符串来处理resp.setContentType("application/json; charset=utf-8");resp.getWriter().write(respJson);}}@Override// 发表新的博客,新增博客protected void doPost(HttpServletRequest req, HttpServletResponse resp) throws ServletException, IOException {// 告诉服务器如何解析请求,用户输入的可能是中文req.setCharacterEncoding("utf8");// 接收前端提交是数据String title = req.getParameter("title");String content = req.getParameter("content");// 我们还需要一个author信息,当前发布该文章的作者就当前的登录用户HttpSession session = req.getSession(false);User user = (User) session.getAttribute("user");int authorId = user.getUserId(); // 因为当前在博客编辑页面,用户一点是登陆过的,所以不用判断当前用户是否登录// 构建新的博客对象Blog blog = new Blog();blog.setTitle(title);blog.setContent(content);blog.setUserId(authorId);// 在数据库中添加刚新建的博客BlogDao.insertBlog(blog);// 新增完成后,跳转到博客列表页resp.sendRedirect("blog_home.html");} }
对应的模板层的代码代码在上面,下面我们列出对应视图层的代码
相关联的视图层代码
博客列表页blog_home.html:
博客主页
博客详情页blog_detail代码
博客详情页
🏀DeleteBlogServlet代码
对应了删除操作,处理了前端的博客详情页(blog_detail.html中)发来的get请求。
当然了在这个类中也少不了对模型层中代码的使用(Blog和BlogDao)
package controller;import mode.Blog;
import mode.BlogDao;
import mode.User;import javax.servlet.ServletException;
import javax.servlet.annotation.WebServlet;
import javax.servlet.http.HttpServlet;
import javax.servlet.http.HttpServletRequest;
import javax.servlet.http.HttpServletResponse;
import javax.servlet.http.HttpSession;
import java.io.IOException;// 这个类用来删除指定博客,再前端的博客详情可以看到这个按钮
// 但注意我们只能删除我们自己的博客,也就是说要删除的博客作者必须和我们当前登录的用户一致
// 我们要在后端代码做相应的逻辑判断
@WebServlet("/delete")
public class DeleteBlogServlet extends HttpServlet {// 因为我们是通过a标签来跳转到这里的,发的请求是get// 前端在给我们传HTTP的get请求时,带上了当前博客详情页中,当前所访问的blogId@Overrideprotected void doGet(HttpServletRequest req, HttpServletResponse resp) throws ServletException, IOException {// 告诉浏览器读取响应数据的格式resp.setContentType("text/html; charset=utf8");HttpSession session = req.getSession(false);if (session == null) {resp.setStatus(403);System.out.println("当前你还未登录,无删除权限!");resp.getWriter().write("当前你还未登录,无删除权限");return;}User user = (User) session.getAttribute("user");if (user == null) {resp.setStatus(403);System.out.println("当前你还未登录,无删除权限!");resp.getWriter().write("当前你还未登录,无删除权限");return;}int blogId = Integer.parseInt(req.getParameter("blogId"));Blog blog = BlogDao.getDetail(blogId);if (blog == null) {resp.setStatus(403);System.out.println("没有你要删除的博客,删除失败!");resp.getWriter().write("没有你要删除的博客,删除失败");}else {// 其实我们这里判断是否能删除没必要,因为只有在能删除的情况下,前端才会显示删除按键,跳到我们这里if (blog.getUserId() == user.getUserId()) {// 此时说明通过blogId而获取的当前的博客作者id和当前登录用户的id相同,可以删除BlogDao.deleteBlog(blogId);// 删除成功后,自动跳转到博客列表页resp.sendRedirect("blog_home.html");}resp.setStatus(403);System.out.println("你要删除的博客不是你自己所写的博客删除失败!");resp.getWriter().write("你要删除的博客不是你自己所写的博客, 删除失败");}}
}
相关联的视图层代码
博客详情页(blog_detail.html)]
博客详情页
🏀UserServlet代码
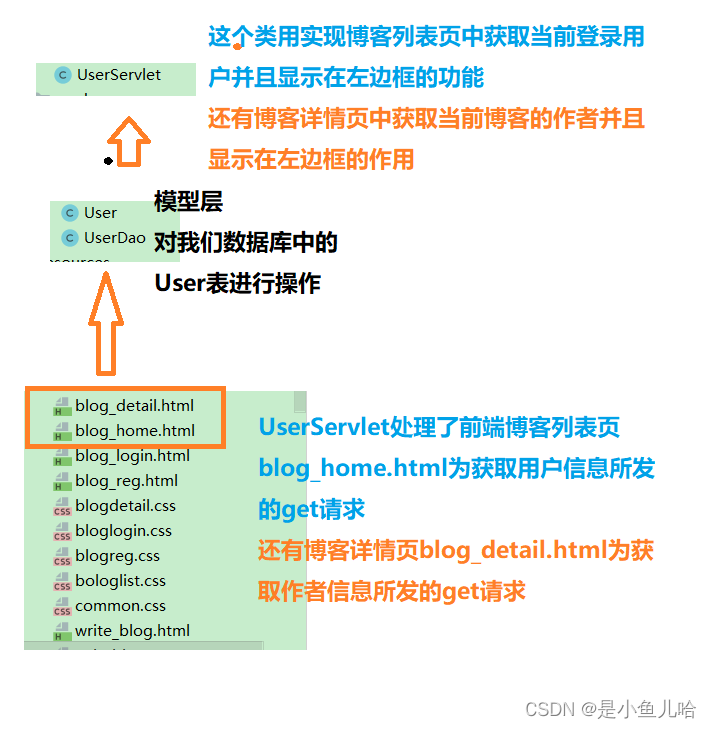
UserServlet代码
package controller;import com.fasterxml.jackson.databind.ObjectMapper;
import mode.Blog;
import mode.BlogDao;
import mode.User;
import mode.UserDao;import javax.servlet.ServletException;
import javax.servlet.annotation.WebServlet;
import javax.servlet.http.HttpServlet;
import javax.servlet.http.HttpServletRequest;
import javax.servlet.http.HttpServletResponse;
import javax.servlet.http.HttpSession;
import java.io.IOException;
import java.sql.Struct;@WebServlet("/user")
public class UserServlet extends HttpServlet {public static boolean isYourBlog = false;@Overrideprotected void doGet(HttpServletRequest req, HttpServletResponse resp) throws ServletException, IOException {// 返回当前的用户// String user// 如果前端带的请求中没有带blogId,说明是列表页的String blogId = req.getParameter("blogId");// 处理博客列表页if (blogId == null) {HttpSession session = req.getSession(false);if (session == null) {resp.setContentType("text/html; charset=utf-8");//resp.getWriter().write("当前用户未登录请重新登录");resp.setStatus(403); // 返回给前端403,让前端在error回调函数中强制跳转到登录页面return;}User user = (User) session.getAttribute("user");// 这里的判断是否是多次一举呢? 我们再登录的servlet代码中,再创建会话的时候,已经把当前登录的user对象给存在session的value中的键值对里了// 因为我们接下来的退出登录操作其实就是把session中的user的对象给删除了,但session本身并没有删除,因为req中没有直接提供删session的方法// 这样的话,就是即使session存在,但用户还未登录,此时的user为空if (user == null) {resp.setContentType("text/html; charset=utf-8");resp.setStatus(403);  // 表示服务器拒绝你的访问,意思的为登录的用户禁止访问该界面}// 为了能用ObjectMapper,我们要在web.xml中引用jackson这个第三方库ObjectMapper objectMapper = new ObjectMapper();resp.setContentType("application/json; charset=utf-8");// 把我们后端要返回的数据转换json格式String retJson = objectMapper.writeValueAsString(user);resp.getWriter().write(retJson);}// 处理博客详情页,获取到了blogId,根据他获取到当前的博客作者,并返回数据给前端else {// 告诉浏览器以json格式来读取响应数据,如果没写这行,浏览器会把他当作是一个普通的字符串来处理resp.setContentType("application/json; charset=utf-8");// 获取该blogId,所对应的博客详情Blog blog = BlogDao.getDetail(Integer.parseInt(blogId));if (blog == null) {resp.setStatus(403); // 后端在查询失败的时候不要返回200,避免前端触发ajax中的sucess回调函数resp.setContentType("text/html; charset=utf-8");resp.getWriter().write("当前的blogId有误!!");}else {int userId = blog.getUserId();  // 这个userId是我们当前这篇博客的作者Id// 这个userId不仅在博客表里有,在用户表里也有,所以我们就可以借助这个userId,找到该篇博客所对应的作者名,也就是你通过userId在user表中找到用户名User author = UserDao.selectById(userId);if (author == null) {resp.setStatus(403);}HttpSession session = req.getSession(false);if (session == null) {resp.setStatus(403);}User user = (User) session.getAttribute("user");if (user == null) {resp.setStatus(403);}// 当前user.getUserId()的值,就是当前登录用户的id值,如果这两个值一样就说明当前我们查看博客详情的这篇博客的作者id和当前登录用户的id// 是一个人,就可以进行删除操作,所以我们给这个类添加一个属性,来表示可以删除if (author.getUserId() == user.getUserId()) {author.setIsYourBlog(1);  // 接下来我们前端还要依赖这个属性来操作——是否显示删除按钮}ObjectMapper objectMapper = new ObjectMapper();// 把我们后端要返回的数据转换json格式String retJson = objectMapper.writeValueAsString(author);System.out.println(retJson);resp.getWriter().write(retJson);}}}}
与之相关的视图层的代码
博客列表页(blog_home.html)
博客主页
博客详情页(blog_detail.html)
博客详情页
🏀LoginServlet代码
用来处理前端登录页(blog_login.html)发来的发来的post请求
此外这个类还额外处理了一个验证当前用户是否已经登录的get请求
(前端的博客列表页blog.home、博客详情页blog_detail.html和博客编辑页都发送一个这样的验证用户是否登录的get请求)
用到了模型层的User、UserDao
package controller;import mode.User;
import mode.UserDao;import javax.servlet.ServletException;
import javax.servlet.annotation.WebServlet;
import javax.servlet.http.HttpServlet;
import javax.servlet.http.HttpServletRequest;
import javax.servlet.http.HttpServletResponse;
import javax.servlet.http.HttpSession;
import java.io.IOException;@WebServlet("/login")
public class LoginServlet extends HttpServlet {@Override// 处理用户提交登录登陆信息,进行302跳转,跳转到博客列表页,即博客首页protected void doPost(HttpServletRequest req, HttpServletResponse resp) throws ServletException, IOException {resp.setContentType("text/html; charset=utf-8");// 告诉服务器如何解析请求,用户输入的密码可能是中文req.setCharacterEncoding("utf8");String username = req.getParameter("username");String password = req.getParameter("password");if (username == null || password == null) {resp.getWriter().write("你输入的账号或密码错误");return;}User user = UserDao.selectByName(username);if (user == null || !user.getPassword().equals(password)) {System.out.println("这是因为浏览器默认按GDK来解读我们HTTP请求发过来的参数吗");resp.getWriter().write("你输入的账号或密码错误");}else {// tomcat把会话存到 内存中,服务器一重启,会话就消失了// 登录之后,构造会话HttpSession session = req.getSession(true); // 参数为true说明如果当前没有会话,就新建立一个会话// 把刚才获取到的user对象给存到session里,方便后续使用session.setAttribute("user", user);// 返回一个重定向报文,跳转到博客列表页resp.sendRedirect("blog_home.html");}}@Override// 检查用户是否登录,没登陆强转返回登录页面protected void doGet(HttpServletRequest req, HttpServletResponse resp) throws ServletException, IOException {// 看能不能从请求中取到session,也接是看看请求中有没有cookie,是否存了sessionIdHttpSession session = req.getSession(false);if (session == null) {// resp.sendRedirect("blog_login.html"); 为啥在后端就直接跳转不了,的确302了,但就是跳转不了// 当前用户还为登录,可以在这里跳转,也可以设置设置一个状态值,返回给前端,让前端跳转resp.setStatus(403);//resp.sendRedirect("blog_login.html"); // 强转跳转到登录页面}else {// 不做任何处理// resp.setStatus(200);}}
}
相关联的视图层的代码
博客登录页(blog_login.html)
用户登录
博客列表页(blog_home.html)
博客主页
博客详情页(blog_detail.html)
博客详情页
🏀LoginOutServlet代码
用来应对视图层发来的注销登录的请求,当然也用到了模型层(User、UserDao)
package controller;import javax.servlet.ServletException;
import javax.servlet.annotation.WebServlet;
import javax.servlet.http.HttpServlet;
import javax.servlet.http.HttpServletRequest;
import javax.servlet.http.HttpServletResponse;
import javax.servlet.http.HttpSession;
import java.io.IOException;@WebServlet("/logout")
public class LoginOutServlet extends HttpServlet {// 我们是通过a标签跳转到这里来的,所以这里是get方法@Overrideprotected void doGet(HttpServletRequest req, HttpServletResponse resp) throws ServletException, IOException {// 获取当前的session,因为只有在用户以及登录的情况下,才会出现这个退出登录的按键,所以这里我们不考虑session为空// 因为在req类中没有直接提供删除session的操作,所以为了简便我们这里就不删session// 我们这里的退出登录只是把session里的user键值对中的值给删除了,但session还在,sessionId还在,也就是请求中的cookie还在// 这也是为啥我们在判断当前用户是否登录是还要专门判断session在的user的值还在不在(user是否为空),如果不再说明我们已经通过这种方式,退出了登录HttpSession session = req.getSession(false);session.setAttribute("user", null);// 重定向报文,强制跳转到登录页面,既然以及退出登录了,肯定要重新登录呀!!resp.sendRedirect("blog_login.html");}
}
🏀RegServlet代码
用来注册用户,当然和视图层(注册页)和模型层(User、UserDao)也有联系
package controller;import mode.User; import mode.UserDao;import javax.servlet.ServletException; import javax.servlet.annotation.WebServlet; import javax.servlet.http.HttpServlet; import javax.servlet.http.HttpServletRequest; import javax.servlet.http.HttpServletResponse;import java.io.IOException;// 处理用户注册 @WebServlet("/reg") public class RegServlet extends HttpServlet {@Overrideprotected void doPost(HttpServletRequest req, HttpServletResponse resp) throws ServletException, IOException {req.setCharacterEncoding("utf-8");String username = req.getParameter("username");String password1 = req.getParameter("password1");String password2 = req.getParameter("password2");if (username == null | password1 == null | password2 == null) {resp.setStatus(403);resp.setContentType("text/html; charset=utf-8");resp.getWriter().write("你的输入不能为空!请重新输入!!");// resp.sendRedirect("blog_reg.html");// 因为我们是用from表单提交的,前端跳转后,我们无法给用户提示信息// 在有跳转的情况下,我们的提示信息显示不出来,所以我们干脆就不跳转,让用户手动跳转,重新注册}// 密码不一致也不行else if (!password1.equals(password2)) { // 注意因为这里是字符所以我们,要用equalsresp.setStatus(403);resp.setContentType("text/html; charset=utf-8");// 下面是返回了一个js弹窗//resp.getWriter().write("");resp.getWriter().write("两次输入的密码不一致!请重新输入!!");//resp.sendRedirect("blog_reg.html");} else {// 如果程序走到这里说明,说明用户的提交没什么问题,我们可以开始给用户注册了User user = new User();user.setUsername(username);user.setPassword(password1);int ret = UserDao.insertUser(user);if (ret == 0) {// 注册成功,跳转到登录页面System.out.println("注册成功!");resp.sendRedirect("blog_login.html");}else {// 注册失败,新增用户失败,当前用户名已经被注册过了resp.setStatus(403);System.out.println("注册失败!");resp.setContentType("text/html; charset=utf-8");resp.getWriter().write("当前用户已存在,请重新输入!!");//resp.sendRedirect("blog_reg.html");}}} }
三、视图层(view)总代码展示
🍑博客登录页
用户登录
🍑博客注册页
用户注册
🍑博客列表页
博客主页
🍑博客详情页
博客详情页
🍑博客编辑页
开始书写吧
🔔视图层对应的css代码
还有他们各自对应的css代码,注意css代码和html代码在同一个目录下
共同的样式
common.css
/* 导航栏的样式 */
* {margin: 0;padding: 0;box-sizing: border-box;
}
html, body {height: 100%;background-image: url(image/未来风\(1\).jpg);background-repeat: no-repeat;background-position: center center;background-size: cover;
}
.navigation {width: 100%;height: 50px;background-color: rgba(50, 50, 50, 0.4);color: rgb(255, 255, 255);display: flex;/* 实现元素垂直居中 */align-items: center;
}
.navigation img {height: 40px;width: 40px;border-radius: 50%;margin-left: 30px;margin-right: 10px;
}
.navigation .space {width: 68%;
}
.navigation a {/* 去掉下划线 */text-decoration: none;color: rgb(255, 255, 255);justify-content: space-between;padding: 0 10px;display: flex;}
.container {width: 1000px;height: calc(100% - 50px);/* 要弄成弹性布局,要不然右块内容就另起一行了 */display: flex;/* 水平居中 */margin: 0 auto;/* 左右两块中间留出间距 */justify-content: space-between;/* 想一下为啥justify-content: center不能让两块居中; */}
.container .left {height: 100%;width: 200px;}
.container .right {height: 100%;width: 795px;background-color: rgba(255, 255, 255, 0.7);border-radius: 10px;/* 处理异常问题 */overflow:auto;
}
.card {/* card的宽度默认是200px,与父类相同 */background-color: rgba(255, 255, 255, 0.7);/* 注意棱角 */border-radius: 10px;/* 通过内边距使得头像水平居中,200 = 140 + 2 * 30 */padding: 30px;
}/* 用户头像 */
.card img {width: 140px;height: 140px;border-radius: 70px;
}
.card h3 {text-align: center;margin: 5px;
}
.card a{/* 行级元素变成块级元素,因为行级元素无法指定大小 */display: block;/* 去掉下划线 */text-decoration: none;/* 文本居中 */text-align: center;color: rgba(50, 50, 50, 0.4);padding: 5px;
}
.card .counter {display: flex;/* 使得他们左右进行分离排列 */justify-content: space-around;margin: 5px;
}
博客登录页所对应的css代码
/* .dialog {width: 400px;height: 400px;display: flex;justify-content: center;align-items: center;注意不能之间用弹性布局,我们弹性布局用在父子之间,写在父元素中
} */
.container_login {width: 100%;/* 要注意减去导航栏的高度 */height: calc(100% - 50px); display: flex;align-items: center;justify-content: center;
}
.container_login .dialog {width: 400px;height: 400px;background-color: rgba(255, 255, 255, 0.6);/* 边框圆角 */border-radius: 10px;
}
.dialog h3 {margin: 30px;text-align: center;
}.dialog .row {width: 100%;height: 50px;display: flex;justify-content: center;align-items: center;padding: 20px;
}
.dialog .row span {display: block;width: 100px;height: 40px;font-weight: 700;/* 文本水平居中 */text-align: center;padding-top: 10px;padding-bottom: 10px;}
/* 输入框格式设置 */
.dialog .row #username, #password {display: block;width: 200px;height: 40px;border-radius: 10px;/* 设置左内边距,使得输入的数据与边框隔开 */padding-left: 10px;/* 去掉边框线,和轮廓线 */border: none;outline: none;/* 设置字体大小,和输入时字体的位置 */font-size: 22px;/* 文本垂直居中 */line-height: 40px;
}
/*登录提交框*/
.row #submit {width: 300px;height: 40px;margin-left: 50px;margin-right: 30px;background-color: rgb(0, 189, 189);font-size: large;/*设置边框中的文本位置*/text-align: center; padding-top: 5px;padding-bottom: 5px;}/*注册框*/
.row #reg {width: 300px;height: 40px;margin-left: 50px;margin-right: 30px;background-color: rgb(0, 189, 126);font-size: large;/*设置边框中的文本位置*/text-align: center; padding-top: 5px;padding-bottom: 5px;}
/*去掉下划线
.navigation a {text-decoration: none;color: rgb(255, 255, 255);justify-content: space-between;padding: 0 10px;display: flex;} * /
博客注册页对应的css
.container_reg {width: 100%;/* 要注意减去导航栏的高度 */height: calc(100% - 50px);display: flex;align-items: center;justify-content: center;
}
.container_reg .dialog {width: 400px;height: 400px;background-color: rgba(255, 255, 255, 0.6);/* 边框圆角 */border-radius: 10px;
}
.dialog h3 {margin: 30px;text-align: center;
}.dialog .row {width: 100%;height: 50px;display: flex;justify-content: center;align-items: center;padding: 20px;
}
.dialog .row span {display: block;width: 100px;height: 40px;font-weight: 700;/* 文本水平居中 */text-align: center;padding-top: 10px;padding-bottom: 10px;}
.dialog .row #username, #password1, #password2 {display: block;width: 200px;height: 40px;border-radius: 10px;/* 设置左内边距,使得输入的数据与边框隔开 */padding-left: 10px;/* 去掉边框线,和轮廓线 */border: none;outline: none;/* 设置字体大小,和输入时字体的位置 */font-size: 22px;/* 文本垂直居中 */line-height: 40px;
}
/*注册提交框*/
.dialog .row #submit {width: 300px;height: 40px;margin-left: 50px;margin-right: 30px;background-color: rgb(0, 189, 189);font-size: large;/*设置边框中的文本位置*/text-align: center;padding-top: 5px;padding-bottom: 5px;}
博客列表页对应的css
/* 博客主页中博客概述、博客列表中的页面个数 */
.blog {width: 100%;/* blog的宽度和父元素right是一样的,而高度如果不设定的话,就取决于内容高度的总和所以我们在这里不设置高度 */padding: 10px;/* 当我们要注意设置每一篇博客的间距 */
}
.blog .title {/* 设置字体大小和粗细 */font-size: 18px;font-weight: 600;/* 居中 */text-align: center;padding-top: 10px;padding-bottom: 5px;
}
.blog .date {padding: 5px;color: darkgoldenrod;text-align: center;
}
.blog .desc, p{/* 首行缩进, 注意在博客详情页的每一段落也要首行缩进*/text-indent: 2em;
}
.blog a {width: 140px;height: 40px;text-decoration: none;color: #000;/* 行级元素无法改变高度和宽度 */display: block;font-size: 15px;font-weight: 300px;/* 文本内容水平居中 */text-align: center;/* 文本框垂直居中 */line-height: 40px;/* 边框的上下边距5px,水平居中 */margin: 5px auto;display: flex;/* 边框线条粗细2px,颜色黑色,边框线条:实线 */border: 2px black solid;/* 当用户点击文本框:查看全文时,产生渐变效果 */transition: all 1.5s;
}
.blog a:hover {/* 设置渐变效果的颜色 */background-color: orange;
}
博客详情页对应的css
/* 博客详情页的格式 */p {text-indent: 2em;/* 给自然段和自然段之间设置间距 */padding: 10px;
}
.right h2 {padding: 15px;text-align: center;
}
.right .date {text-align: center;color: orange;/* 水平居中 */padding-top: 0x;padding-bottom: 15px;
}
博客编辑页对应的css
.blog-edit-container {width: 1000px;height: calc(100% - 50px);/* 水平居中 */margin: 0 auto;
}
.blog-edit-container .title {width: 100%;height: 50px;/* 垂直居中 */align-self: center;display: flex;/* 使子元素输入框和按钮靠两边放置,中间留个缝 */justify-content: space-between;}
.title #title {width: 790px;height: 40px;border-radius: 10px;display: block;/* 去掉边框和轮廓线条 */border: none;outline: none;padding-left: 10px;font-size: large;background-color: rgba(255, 255, 255, 0.75);align-items: center;
}
.title #submit {width: 200px;height: 40px;background-color: rgba(255, 165, 0, 0.7);border-radius: 10px;font-size: large;font-weight: 600;display: block;/* 去掉边框和轮廓线条 */border: none;outline: none;
}.blog-edit-container #editor {border-radius: 10px;background-color: rgba(255, 255, 255, 0.7);/* 设置半透明 */opacity: 85%;
}
项目gitee连接 https://gitee.com/shen-xiao-yu/java104/tree/master/BlogSystem