

尚医通_第11章_医院排班管理和搭建用户系统环境
尚医通_第11章_医院排班管理和搭建用户系统环境
文章目录
- 尚医通_第11章_医院排班管理和搭建用户系统环境
- 第一节、-医院排班管理需求分析
- 一、医院排班管理需求
- 1、页面效果
- 2、接口分析
- 第二节、医院排班管理-科室列表
- 一、科室列表(接口)
- 1、添加service接口和实现
- 2、添加DepartmentController方法
- 二、科室列表(前端)
- 1、添加隐藏路由
- 2、封装api方法
- 3、添加/views/hosp/schedule.vue组件
- 第三节、医院排班管理-排班日期列表
- 一、排班日期列表(接口)
- 1、在ScheduleService添加方法和实现
- 二、排班日期列表(前端)
- 1、封装api方法
- 2、页面显示
- 第四节、医院排班管理-排班详情列表
- 一、排班详情列表(接口)
- 1、添加service接口和实现
- 2、添加ScheduleRepository方法
- 3、添加根据部门编码获取部门名称
- 二、排班详情列表(前端)
- 1、封装api请求**在api/yygh/schedule.js添加
- 第五节、搭建平台用户系统前端环境
- 一、服务端渲染技术NUXT
- 1、什么是服务端渲染
- 2、什么是NUXT
- 二、NUXT环境初始化
- 1、下载压缩包
- 2、解压
- 3、修改package.json
- 4、修改nuxt.config.js
- 5、在命令提示终端中进入项目目录
- 6、安装依赖
- 8、NUXT目录结构
- 9、封装axios
第一节、-医院排班管理需求分析
一、医院排班管理需求
1、页面效果
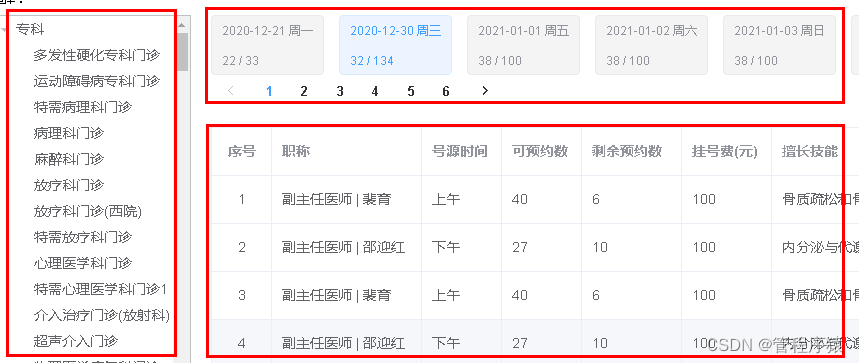
排班分成三部分显示:
- (1)科室信息(大科室与小科室树形展示)
- (2)排班日期,分页显示,根据上传排班数据聚合统计产生
- (3)排班日期对应的就诊医生信息
2、接口分析
- (1)科室数据使用el-tree组件渲染展示,需要将医院上传的科室数据封装成两层父子级数据;
- (2)聚合所有排班数据,按日期分页展示,并统计号源数据展示;
- (3)根据排班日期获取排班详情数据
虽然是一个页面展示所有内容,但是页面相对复杂,我们分步骤实现
- 第一,先实现左侧科室树形展示;
- 第二,其次排班日期分页展示
- 第三,最后根据排班日期获取排班详情数据
第二节、医院排班管理-科室列表
一、科室列表(接口)
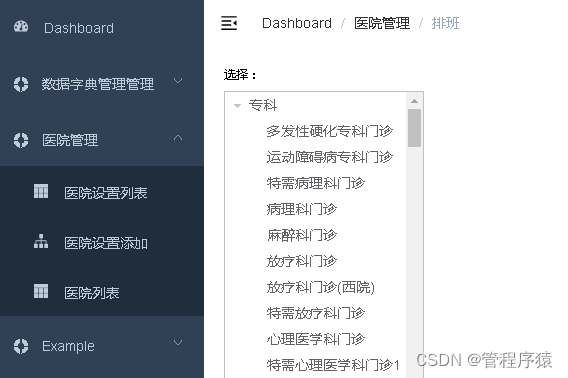
1、添加service接口和实现
(1)在DepartmentService定义方法
//根据医院编号,查询医院所有科室列表
List findDeptTree(String hoscode);
(2)在DepartmentServiceImpl实现方法
//根据医院编号,查询医院所有科室列表
@Override
public List findDeptTree(String hoscode) {//创建list集合,用于最终数据封装List result = new ArrayList<>();//根据医院编号,查询医院所有科室信息Department departmentQuery = new Department();departmentQuery.setHoscode(hoscode);Example example = Example.of(departmentQuery);//所有科室列表 departmentListList departmentList = departmentRepository.findAll(example);//根据大科室编号  bigcode 分组,获取每个大科室里面下级子科室Map> deparmentMap =departmentList.stream().collect(Collectors.groupingBy(Department::getBigcode));//遍历map集合 deparmentMapfor(Map.Entry> entry : deparmentMap.entrySet()) {//大科室编号String bigcode = entry.getKey();//大科室编号对应的全局数据List deparment1List = entry.getValue();//封装大科室DepartmentVo departmentVo1 = new DepartmentVo();departmentVo1.setDepcode(bigcode);departmentVo1.setDepname(deparment1List.get(0).getBigname());//封装小科室List children = new ArrayList<>();for(Department department: deparment1List) {DepartmentVo departmentVo2 =  new DepartmentVo();departmentVo2.setDepcode(department.getDepcode());departmentVo2.setDepname(department.getDepname());//封装到list集合children.add(departmentVo2);}//把小科室list集合放到大科室children里面departmentVo1.setChildren(children);//放到最终result里面result.add(departmentVo1);}//返回return result;
}
2、添加DepartmentController方法
@RestController
@RequestMapping("/admin/hosp/department")
public class DepartmentController {@Autowiredprivate DepartmentService departmentService;//根据医院编号,查询医院所有科室列表@ApiOperation(value = "查询医院所有科室列表")@GetMapping("getDeptList/{hoscode}")public R getDeptList(@PathVariable String hoscode) {List list = departmentService.findDeptTree(hoscode);return R.ok().data("list",list);}
}
二、科室列表(前端)
1、添加隐藏路由
{path: 'hospital/schedule/:hoscode',name: '排班',component: () => import('@/views/hosp/schedule'),meta: { title: '排班', noCache: true },hidden: true
}
2、封装api方法
//查看医院科室
getDeptByHoscode(hoscode) {return request ({url: `/admin/hosp/department/getDeptList/${hoscode}`,method: 'get'})
},
3、添加/views/hosp/schedule.vue组件
选择:说明:底部style标签是为了控制树形展示数据选中效果的
第三节、医院排班管理-排班日期列表
一、排班日期列表(接口)
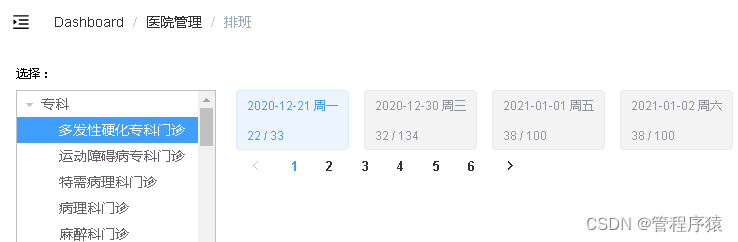
根据医院编号 和 科室编号 ,查询排班规则数据
1、在ScheduleService添加方法和实现
(1)ScheduleService定义方法
//根据医院编号 和 科室编号 ,查询排班规则数据
Map getRuleSchedule(long page, long limit, String hoscode, String depcode);
(2)ScheduleServiceImpl实现方法
@Autowired
private ScheduleRepository scheduleRepository;
@Autowired
private MongoTemplate mongoTemplate;
@Autowired
private HospitalService hospitalService;
@Override
public Map getRuleSchedule(long page, long limit, String hoscode, String depcode) {//1 根据医院编号 和 科室编号 查询Criteria criteria = Criteria.where("hoscode").is(hoscode).and("depcode").is(depcode);//2 根据工作日workDate期进行分组Aggregation agg = Aggregation.newAggregation(Aggregation.match(criteria),//匹配条件Aggregation.group("workDate")//分组字段.first("workDate").as("workDate")//3 统计号源数量.count().as("docCount").sum("reservedNumber").as("reservedNumber").sum("availableNumber").as("availableNumber"),//排序Aggregation.sort(Sort.Direction.ASC,"workDate"),//4 实现分页Aggregation.skip((page-1)*limit),Aggregation.limit(limit));//调用方法,最终执行AggregationResults aggResults =mongoTemplate.aggregate(agg, Schedule.class, BookingScheduleRuleVo.class);List bookingScheduleRuleVoList = aggResults.getMappedResults();//分组查询的总记录数Aggregation totalAgg = Aggregation.newAggregation(Aggregation.match(criteria),Aggregation.group("workDate"));AggregationResults totalAggResults =mongoTemplate.aggregate(totalAgg,Schedule.class, BookingScheduleRuleVo.class);int total = totalAggResults.getMappedResults().size();//把日期对应星期获取for(BookingScheduleRuleVo bookingScheduleRuleVo:bookingScheduleRuleVoList) {Date workDate = bookingScheduleRuleVo.getWorkDate();String dayOfWeek = this.getDayOfWeek(new DateTime(workDate));bookingScheduleRuleVo.setDayOfWeek(dayOfWeek);}//设置最终数据,进行返回Map result = new HashMap<>();result.put("bookingScheduleRuleList",bookingScheduleRuleVoList);result.put("total",total);//获取医院名称Hospital hospital = hospitalService.getByHoscode(hoscode);//其他基础数据Map baseMap = new HashMap<>();baseMap.put("hosname",hospital.getHosname());result.put("baseMap",baseMap);return result;
}
(3)添加日期转换星期方法
### 引入依赖
joda-time joda-time
(4)HospService添加医院编号获取医院名称方法
//定义方法
String getHospName(String hoscode);
//实现方法
@Override
public String getHospName(String hoscode) {Hospital hospital = hospitalRepository.getHospitalByHoscode(hoscode);if(null != hospital) {return hospital.getHosname();}return "";
}
(5)ScheduleController添加方法
@RestController
@RequestMapping("/admin/hosp/schedule")
public class ScheduleController {@Autowiredprivate ScheduleService scheduleService;//根据医院编号 和 科室编号 ,查询排班规则数据@ApiOperation(value ="查询排班规则数据")@GetMapping("getScheduleRule/{page}/{limit}/{hoscode}/{depcode}")public R getScheduleRule(@PathVariable long page,@PathVariable long limit,@PathVariable String hoscode,@PathVariable String depcode) {Map map= scheduleService.getRuleSchedule(page,limit,hoscode,depcode);return R.ok().data(map);}
}
二、排班日期列表(前端)
1、封装api方法
在api/yygh创建schedule.js
getScheduleRule(page, limit, hoscode, depcode) {return request({url: `/admin/hosp/schedule/getScheduleRule/${page}/${limit}/${hoscode}/${depcode}`,method: 'get'})
}
2、页面显示
修改/views/hosp/schedule.vue组件
选择:{{ item.workDate }} {{ item.dayOfWeek }}
{{ item.availableNumber }} / {{ item.reservedNumber }} 第四节、医院排班管理-排班详情列表
一、排班详情列表(接口)
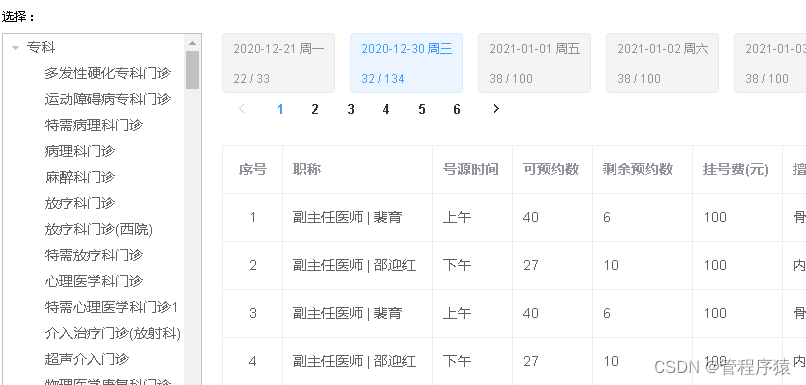
1、添加service接口和实现
根据医院编号 、科室编号和工作日期,查询排班详细信息
(1)在ScheduleService定义方法
//根据医院编号 、科室编号和工作日期,查询排班详细信息
List getDetailSchedule(String hoscode, String depcode, String workDate);
(2)在ScheduleServiceImpl实现方法
//根据医院编号 、科室编号和工作日期,查询排班详细信息
@Override
public List getDetailSchedule(String hoscode, String depcode, String workDate) {//根据参数查询mongodbList scheduleList =scheduleRepository.findScheduleByHoscodeAndDepcodeAndWorkDate(hoscode,depcode,new DateTime(workDate).toDate());//把得到list集合遍历,向设置其他值:医院名称、科室名称、日期对应星期scheduleList.stream().forEach(item->{this.packageSchedule(item);});return scheduleList;
}
//封装排班详情其他值 医院名称、科室名称、日期对应星期
private void packageSchedule(Schedule schedule) {//设置医院名称schedule.getParam().put("hosname",hospitalService.getHospName(schedule.getHoscode()));//设置科室名称schedule.getParam().put("depname",departmentService.getDepName(schedule.getHoscode(),schedule.getDepcode()));//设置日期对应星期schedule.getParam().put("dayOfWeek",this.getDayOfWeek(new DateTime(schedule.getWorkDate())));
}
2、添加ScheduleRepository方法
//根据医院编号 、科室编号和工作日期,查询排班详细信息
List findScheduleByHoscodeAndDepcodeAndWorkDate(String hoscode, String depcode, Date toDate);
3、添加根据部门编码获取部门名称
(1)DepartmentService添加方法
//根据科室编号,和医院编号,查询科室名称
String getDepName(String hoscode, String depcode);
(2)DepartmentServiceImpl实现方法
//根据科室编号,和医院编号,查询科室名称
@Override
public String getDepName(String hoscode, String depcode) {Department department = departmentRepository.getDepartmentByHoscodeAndDepcode(hoscode, depcode);if(department != null) {return department.getDepname();}return null;
}
(3)、在ScheduleController添加方法**
//根据医院编号 、科室编号和工作日期,查询排班详细信息
@ApiOperation(value = "查询排班详细信息")
@GetMapping("getScheduleDetail/{hoscode}/{depcode}/{workDate}")
public R getScheduleDetail( @PathVariable String hoscode,@PathVariable String depcode,@PathVariable String workDate) {List list = scheduleService.getDetailSchedule(hoscode,depcode,workDate);return R.ok().data("list",list);
}
二、排班详情列表(前端)
1、封装api请求**在api/yygh/schedule.js添加
//查询排班详情
getScheduleDetail(hoscode,depcode,workDate) {return request ({url: `/admin/hosp/schedule/getScheduleDetail/${hoscode}/${depcode}/${workDate}`,method: 'get'})
}
2、页面显示``修改/views/hosp/schedule.vue组件
选择:{{ item.workDate }} {{ item.dayOfWeek }}
{{ item.availableNumber }} / {{ item.reservedNumber }} {{ scope.$index + 1 }}{{ scope.row.title }} | {{ scope.row.docname }} {{ scope.row.workTime == 0 ? "上午" : "下午" }} 第五节、搭建平台用户系统前端环境
一、服务端渲染技术NUXT
1、什么是服务端渲染
服务端渲染又称SSR (Server Side Render)是在服务端完成页面的内容,而不是在客户端通过AJAX获取数据。
服务器端渲染(SSR)的优势主要在于:更好的 SEO,由于搜索引擎爬虫抓取工具可以直接查看完全渲染的页面。
如果你的应用程序初始展示 loading,然后通过 Ajax 获取内容,抓取工具并不会等待异步完成后再进行页面内容的抓取。也就是说,如果 SEO 对你的站点至关重要,而你的页面又是异步获取内容,则你可能需要服务器端渲染(SSR)解决此问题。
另外,使用服务器端渲染,我们可以获得更快的内容到达时间(time-to-content),无需等待所有的 JavaScript 都完成下载并执行,产生更好的用户体验,对于那些「内容到达时间(time-to-content)与转化率直接相关」的应用程序而言,服务器端渲染(SSR)至关重要。
2、什么是NUXT
Nuxt.js 是一个基于 Vue.js 的轻量级应用框架,可用来创建服务端渲染 (SSR) 应用,也可充当静态站点引擎生成静态站点应用,具有优雅的代码结构分层和热加载等特性。
官网网站:
https://zh.nuxtjs.org/
二、NUXT环境初始化
1、下载压缩包
https://github.com/nuxt-community/starter-template/archive/master.zip
2、解压
将template中的内容复制到yygh_site
3、修改package.json
name、description、author(必须修改这里,否则项目无法安装)
"name": "yygh","version": "1.0.0","description": "尚医通","author": "atguigu",
4、修改nuxt.config.js
修改title: ‘{{ name }}’、content: ‘{{escape description }}’
这里的设置最后会显示在页面标题栏和meta数据中
module.exports = {/*** Headers of the page*/head: {title: 'yygh-site',meta: [{ charset: 'utf-8' },{ name: 'viewport', content: 'width=device-width, initial-scale=1' },{ hid: 'description', name: 'description', content: '尚医通' }],
…
5、在命令提示终端中进入项目目录
6、安装依赖
npm install

npm run dev
8、NUXT目录结构
(1)资源目录 assets
用于组织未编译的静态资源如 LESS、SASS 或 JavaScript。
(2)组件目录 components
用于组织应用的 Vue.js 组件。Nuxt.js 不会扩展增强该目录下 Vue.js 组件,即这些组件不会像页面组件那样有 asyncData 方法的特性。
(3)布局目录 layouts
用于组织应用的布局组件。
(4)页面目录 pages
用于组织应用的路由及视图。Nuxt.js 框架读取该目录下所有的 .vue 文件并自动生成对应的路由配置。
(5)插件目录 plugins
用于组织那些需要在 根vue.js应用 实例化之前需要运行的 Javascript 插件。
(6)nuxt.config.js 文件
nuxt.config.js 文件用于组织Nuxt.js 应用的个性化配置,以便覆盖默认配置。
9、封装axios
(1)执行安装命令
npm install axios
(2)创建utils文件夹,创建request.js
import axios from 'axios'
import { MessageBox, Message } from 'element-ui'
// 创建axios实例
const service = axios.create({baseURL: 'http://localhost',timeout: 15000 // 请求超时时间
})
// http request 拦截器
service.interceptors.request.use(config => {// token 先不处理,后续使用时在完善return config
},err => {return Promise.reject(err)
})
// http response 拦截器
service.interceptors.response.use(response => {if (response.data.code !== 200) {Message({message: response.data.message,type: 'error',duration: 5 * 1000})return Promise.reject(response.data)} else {return response.data}},error => {return Promise.reject(error.response)
})
export default service
nfig.js 文件用于组织Nuxt.js 应用的个性化配置,以便覆盖默认配置。#### 9、封装axios **(1)执行安装命令**npm install axios**(2)创建utils文件夹,创建request.js**```vue
import axios from 'axios'
import { MessageBox, Message } from 'element-ui'
// 创建axios实例
const service = axios.create({baseURL: 'http://localhost',timeout: 15000 // 请求超时时间
})
// http request 拦截器
service.interceptors.request.use(config => {// token 先不处理,后续使用时在完善return config
},err => {return Promise.reject(err)
})
// http response 拦截器
service.interceptors.response.use(response => {if (response.data.code !== 200) {Message({message: response.data.message,type: 'error',duration: 5 * 1000})return Promise.reject(response.data)} else {return response.data}},error => {return Promise.reject(error.response)
})
export default service
上一篇:从0实现线性回归