

使用 Spring Cloud Loadbalancer 实现客户端负载均衡
使用 Spring Cloud Loadbalancer 实现客户端负载均衡
作者:Grey
原文地址:
博客园:使用 Spring Cloud Loadbalancer 实现客户端负载均衡
CSDN:使用 Spring Cloud Loadbalancer 实现客户端负载均衡
背景
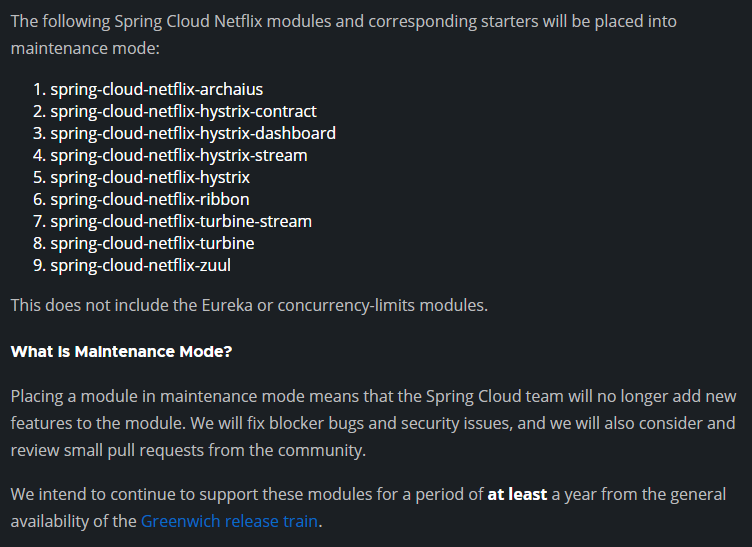
在Spring Cloud G 版发布时提到,
Spring Cloud Netflix 那套组件很多都进入了维护期,如下表所示
同时,针对一些组件,Spring 官方给出了一些替代方案
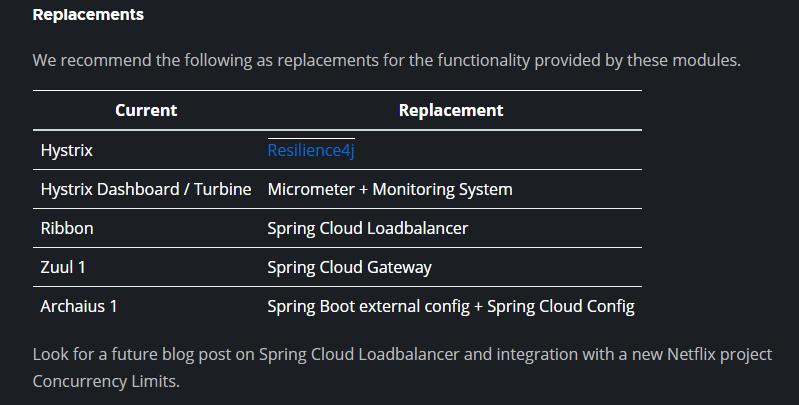
针对 spring-cloud-ribbon 这个负载均衡组件,Spring 官方提出的替换解决方案是 Spring Cloud Loadbalancer。本文主要通过一个示例介绍了 Spring Cloud Loadbalancer 的基础使用。
环境
-
JDK 1.8+
-
Maven 3.5+
-
Spring Boot 版本:2.7.5
-
Spring Cloud 版本:2021.0.5
项目结构和说明
- spring-cloud-loadbalanced-usage:父项目名称
- server : 服务端端模块
- src/
- pom.xml
- client : 客户端模块
- src/
- pom.xml
- pom.xml:父项目 pom 配置
- server : 服务端端模块
流程
整个过程如下示例图
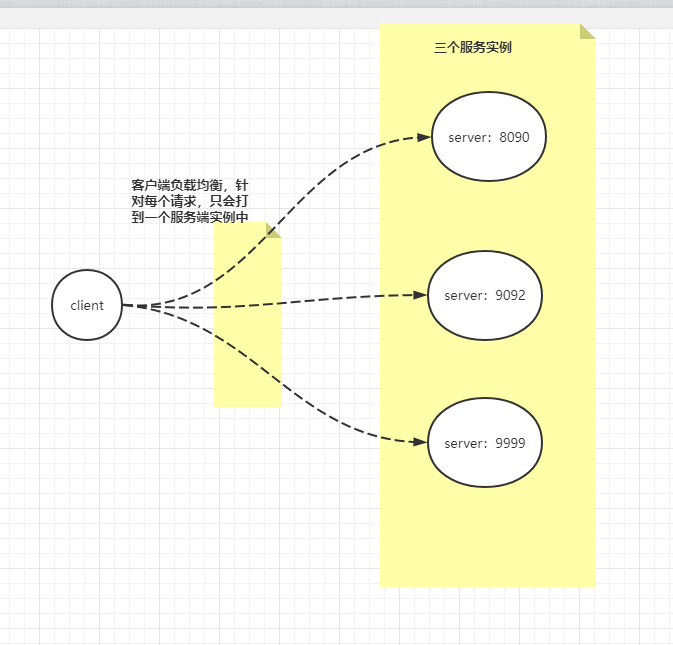
注:Spring Cloud Loadbalancer 是在客户端实现负载均衡策略。
代码说明
服务端主要暴露一个服务,未做特殊配置
@GetMapping("/greeting")public String greet() {log.info("Access /greeting");int randomNum = rand.nextInt(greetings.size());return greetings.get(randomNum);}
客户端的核心配置如下,主要是针对负载均衡配置:
package git.snippet.client.config;import org.springframework.cloud.client.DefaultServiceInstance;
import org.springframework.cloud.client.ServiceInstance;
import org.springframework.cloud.client.loadbalancer.LoadBalanced;
import org.springframework.cloud.loadbalancer.annotation.LoadBalancerClient;
import org.springframework.cloud.loadbalancer.core.ServiceInstanceListSupplier;
import org.springframework.context.annotation.Bean;
import org.springframework.context.annotation.Configuration;
import org.springframework.context.annotation.Primary;
import org.springframework.web.reactive.function.client.WebClient;
import reactor.core.publisher.Flux;import java.util.Arrays;
import java.util.List;@Configuration
@LoadBalancerClient(name = "server")
public class WebClientConfig {@LoadBalanced@BeanWebClient.Builder webClientBuilder() {return WebClient.builder();}@Bean@PrimaryServiceInstanceListSupplier serviceInstanceListSupplier() {return new ServiceInstanceListSupplier() {@Overridepublic String getServiceId() {return "server";}@Overridepublic Flux> get() {return Flux.just(Arrays.asList(new DefaultServiceInstance(getServiceId() + "1", getServiceId(), "localhost", 8090, false),new DefaultServiceInstance(getServiceId() + "2", getServiceId(), "localhost", 9092, false),new DefaultServiceInstance(getServiceId() + "3", getServiceId(), "localhost", 9999, false)));}};}
}
其中 @LoadBalancerClient(name = "server") 指定了 服务端的名称;
getServiceId()指定了服务端的服务 ID;
serviceInstanceListSupplier()方法中列出了三个服务端实例的地址;
new DefaultServiceInstance(getServiceId() + "1", getServiceId(), "localhost", 8090, false)
new DefaultServiceInstance(getServiceId() + "2", getServiceId(), "localhost", 9092, false)
new DefaultServiceInstance(getServiceId() + "3", getServiceId(), "localhost", 9999, false)
有了这个配置,在客户端的 Controller 中,做如下注入即可
package git.snippet.client.controller;import org.springframework.cloud.client.loadbalancer.reactive.ReactorLoadBalancerExchangeFilterFunction;
import org.springframework.web.bind.annotation.RequestMapping;
import org.springframework.web.bind.annotation.RequestParam;
import org.springframework.web.bind.annotation.RestController;
import org.springframework.web.reactive.function.client.WebClient;
import reactor.core.publisher.Mono;@RestController
public class HiController {private final WebClient.Builder loadBalancedWebClientBuilder;private final ReactorLoadBalancerExchangeFilterFunction lbFunction;public HiController(WebClient.Builder loadBalancedWebClientBuilder, ReactorLoadBalancerExchangeFilterFunction lbFunction) {this.loadBalancedWebClientBuilder = loadBalancedWebClientBuilder;this.lbFunction = lbFunction;}@RequestMapping("/hi")public Mono hi(@RequestParam(value = "name", defaultValue = "Mary") String name) {return loadBalancedWebClientBuilder.build().get().uri("http://server/greeting").retrieve().bodyToMono(String.class).map(greeting -> String.format("%s, %s!", greeting, name));}@RequestMapping("/hello")public Mono hello(@RequestParam(value = "name", defaultValue = "John") String name) {return WebClient.builder().filter(lbFunction).build().get().uri("http://server/greeting").retrieve().bodyToMono(String.class).map(greeting -> String.format("%s, %s!", greeting, name));}
}
启动并测试
首先启动 server,注意:
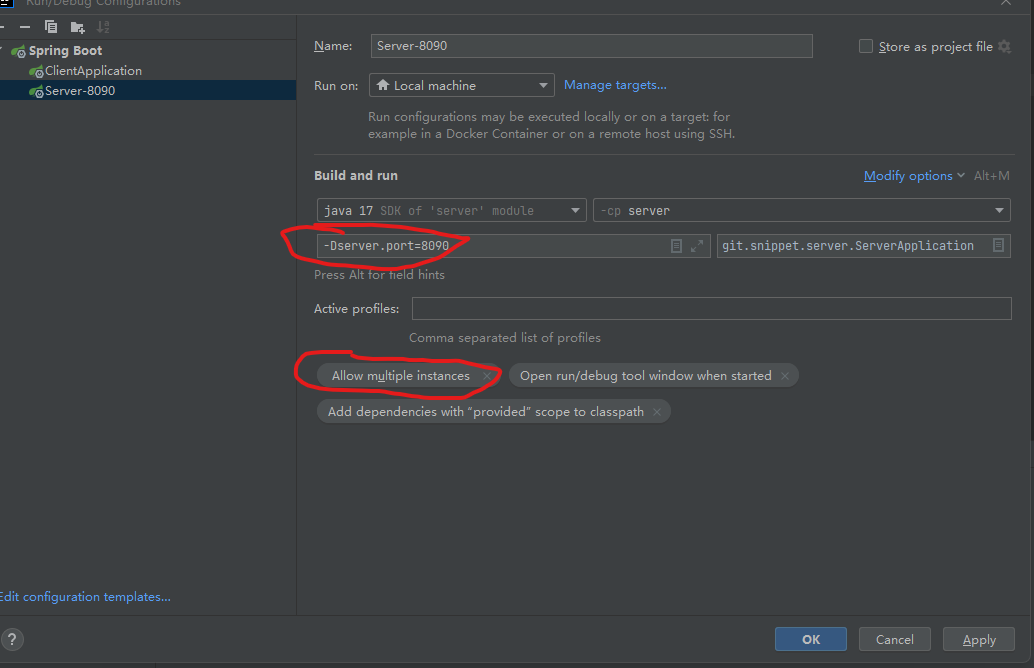
启动 server 的时候,需要启动多实例,且每个实例要定义 VM options
实例一定义 VM options 为 -Dserver.port=8090;
实例二定义 VM options 为 -Dserver.port=9092;
实例三定义 VM options 为 -Dserver.port=9999。
如果使用 IDEA Intellij,配置方式如下
三个 Server 启动后,接下来启动 client,运行 ClientApplication,启动完毕后,多次访问: http://localhost:8888/hi
可以通过每个 server 实例的运行日志,查看到每个实例都轮流获取到了请求,实现了负载均衡。
完整代码
见:spring-cloud-loadbalancer-usage
参考文档
Spring Tips: Spring Cloud Loadbalancer
Spring Cloud Greenwich.RELEASE is now available
Client-Side Load-Balancing with Spring Cloud LoadBalancer
下一篇:杜宇生不忍心闻