

【树莓派不吃灰】命令篇③ 学习Shell脚本

目录
- 1. Shell 脚本
- 2. Shell 环境
- 3. 运行 Shell 脚本
- 3.1 方式1
- 3.2 方式2
- 4. Shell变量
- 4.1 定义变量
- 4.2 使用变量
- 4.3 只读变量
- 4.4 删除变量
- 4.5 字符串
- 4.5.1 获取字符串长度
- 4.5.2 提取子字符串
- 4.5.3 查找子字符串
- 4.6 Shell 数组
- 4.6.1 定义数组
- 4.6.2 读取数组
- 4.6.3 获取数组的长度
- 4.6.4 关联数组(类似Map用法)
- 5. 注释
- 5.1 单行注释
- 5.2 多行注释
- 6. Shell 传递参数
- 7. Shell 基本运算符
- 7.1 算数运算符
- 7.2 关系运算符
- 7.3 布尔运算符
- 7.4 逻辑运算符
- 7.5 字符串运算符
- 7.6 文件测试运算符
- 8. Shell echo命令
- 9. Shell printf 命令
- 10. Shell test 命令
- 10.1 数值测试
- 10.2 字符串测试
- 10.3 文件测试
- 11. Shell 流程控制
- 11.1 if条件语句
- 11.2 for循环
- 11.3 while语句
- 11.4 until 循环
- 11.5 case ... esac 语句
- 11.6 break 、continue跳出循环
- 12. Shell 函数
- 12.1 函数参数
- 13. Shell 输入/输出重定向(重要性高)
- 13.1 输出重定向
- 13.2 输入重定向
- 13.3 重定向深入讲解
- 13.4 /dev/null 文件
- ❤️ 博客主页 单片机菜鸟哥,一个野生非专业硬件IOT爱好者 ❤️
- ❤️ 本篇创建记录 2022-11-17 ❤️
- ❤️ 本篇更新记录 2022-11-17 ❤️
- 🎉 欢迎关注 🔎点赞 👍收藏 ⭐️留言 📝
- 🙏 此博客均由博主单独编写,不存在任何商业团队运营,如发现错误,请留言轰炸哦!及时修正!感谢支持!
- 🔥 Arduino ESP8266教程累计帮助过超过1W+同学入门学习硬件网络编程,入选过选修课程,刊登过无线电杂志🔥
- https://www.runoob.com/linux/linux-shell.html
1. Shell 脚本
Shell 是一个用 C 语言编写的程序,它是用户使用 Linux 的桥梁。
Shell 是指一种应用程序,这个应用程序提供了一个界面,用户通过这个界面访问操作系统内核的服务。
而 Shell 脚本(shell script),是一种为 shell 编写的脚本程序。
注意区分:
- shell 和 shell script 是两个不同的概念。
2. Shell 环境
Shell 编程跟 JavaScript、php 编程一样,只要有一个能编写代码的文本编辑器和一个能解释执行的脚本解释器就可以了。
最常见三种shell类型:
- Bourne Shell(
/usr/bin/sh或/bin/sh) - Bourne Again Shell(
/bin/bash) - Shell for Root(
/sbin/sh)
一般我们会用 #! 告诉系统其后路径所指定的程序即是解释此脚本文件的 Shell 程序。比如:
#!/bin/bash
#!/bin/sh
我们进入到树莓派的命令行就是bash。
3. 运行 Shell 脚本
先把代码保存为sh文件,比如叫做test.sh
3.1 方式1
chmod +x ./test.sh  #使脚本具有执行权限
./test.sh  #执行脚本
- 先给文件添加可执行权限
- 直接运行文件
注意,一定要写成 ./test.sh,而不是 test.sh,运行其它二进制的程序也一样,直接写 test.sh,linux 系统会去 PATH 里寻找有没有叫 test.sh 的,而只有 /bin, /sbin, /usr/bin,/usr/sbin 等在 PATH 里,你的当前目录通常不在 PATH 里,所以写成 test.sh 是会找不到命令的,要用 ./test.sh 告诉系统说,就在当前目录找。
3.2 方式2
/bin/sh test.sh
直接运行解释器,其参数就是 shell 脚本的文件名。
注意:这种方式运行的脚本,不需要在第一行指定解释器信息,写了也没用。
4. Shell变量
4.1 定义变量
变量名=变量值
注意,变量名和等号之间不能有空格。同时,变量名的命名须遵循如下规则:
- 命名只能使用
英文字母,数字和下划线,首个字符不能以数字开头 - 中间不能有空格,可以使用下划线 _
- 不能使用
标点符号 - 不能使用bash里的
关键字(可用help命令查看保留关键字)
合法变量:
var=123
name=“dpjcn”
非法变量:
?var=123
除了显式地直接赋值,还可以用语句给变量赋值,如:
for file in `ls /etc`
或
for file in $(ls /etc)
将 /etc 下目录的文件名循环出来。
4.2 使用变量
使用一个定义过的变量,只要在变量名前面加美元$符号即可,如:
pi@raspberrypi:~ $ your_name="dpjcn"
pi@raspberrypi:~ $ echo $your_name
dpjcn
pi@raspberrypi:~ $ echo ${your_name}
dpjcn
pi@raspberrypi:~ $
pi@raspberrypi:~ $ for skill in Ada Coffe Action Java; do
> echo "I am good at ${skill}Script"
> done
I am good at AdaScript
I am good at CoffeScript
I am good at ActionScript
I am good at JavaScript
pi@raspberrypi:~ $ 推荐给所有变量加上花括号。
已定义的变量,可以被重新定义,如:
pi@raspberrypi:~ $ your_name="dpjcn"
pi@raspberrypi:~ $ echo $your_name
dpjcn
pi@raspberrypi:~ $ echo ${your_name}
dpjcn
pi@raspberrypi:~ $ your_name="alibaba"
pi@raspberrypi:~ $ echo ${your_name}
alibaba
pi@raspberrypi:~ $
4.3 只读变量
使用 readonly 命令可以将变量定义为只读变量,只读变量的值不能被改变。
pi@raspberrypi:~ $ myUrl="https://www.google.com"
pi@raspberrypi:~ $ readonly myUrl
pi@raspberrypi:~ $ myUrl="https://www.runoob.com"
-bash: myUrl: readonly variable
pi@raspberrypi:~ $
4.4 删除变量
使用 unset 命令可以删除变量(unset 命令不能删除只读变量)。语法:
unset variable_name
pi@raspberrypi:~ $ myUrl1="https://www.runoob.com"
pi@raspberrypi:~ $ unset myUrl1
pi@raspberrypi:~ $ echo $myUrl1pi@raspberrypi:~ $
没有任何输出。
变量类型:
运行shell时,会同时存在三种变量:
局部变量局部变量在脚本或命令中定义,仅在当前shell实例中有效,其他shell启动的程序不能访问局部变量。环境变量所有的程序,包括shell启动的程序,都能访问环境变量,有些程序需要环境变量来保证其正常运行。必要的时候shell脚本也可以定义环境变量。shell变量shell变量是由shell程序设置的特殊变量。shell变量中有一部分是环境变量,有一部分是局部变量,这些变量保证了shell的正常运行。
4.5 字符串
字符串可以用单引号,也可以用双引号,也可以不用引号。
str=‘this is a string’
str=“Hello, I know you are “$your_name”! \n”
注意点:
- 单引号里的任何字符都会原样输出,单引号字符串中的变量是无效的;
- 单引号字串中不能出现单独一个的单引号(对单引号使用转义符后也不行),但可成对出现,作为字符串拼接使用。
建议统一用双引号。
4.5.1 获取字符串长度
string="abcd"
echo ${#string}   # 输出 4
4.5.2 提取子字符串
string="runoob is a great site"
echo ${string:1:4} # 输出 unoo
从字符串第 2(0,1下标) 个字符开始截取 4 个字符。
4.5.3 查找子字符串
string="runoob is a great site"
echo `expr index "$string" io`  # 输出 4
以上脚本中 ` 是反引号,而不是单引号 '。
- Linux expr命令
4.6 Shell 数组
bash支持一维数组(不支持多维数组),并且没有限定数组的大小。
4.6.1 定义数组
用括号来表示数组,数组元素用"空格"符号分割开。定义数组的一般形式为:
array_name=(value0 value1 value2 value3)
或者
array_name=(
value0
value1
value2
value3
)
4.6.2 读取数组
valuen=${array_name[n]}
使用 @ 符号可以获取数组中的所有元素,例如:
echo ${array_name[@]}
pi@raspberrypi:~ $ array_name=(value0 value1 value2 value3)
pi@raspberrypi:~ $ echo ${array_name[@]}
value0 value1 value2 value3
pi@raspberrypi:~ $
4.6.3 获取数组的长度
获取数组长度的方法与获取字符串长度的方法相同,例如:
# 取得数组元素的个数
length=${#array_name[@]}
# 或者
length=${#array_name[*]}
# 取得数组单个元素的长度
lengthn=${#array_name[n]}
pi@raspberrypi:~ $ array_name=(value0 value1 value2 value3)
pi@raspberrypi:~ $ echo ${array_name[@]}
value0 value1 value2 value3
pi@raspberrypi:~ $ echo ${#array_name[@]}
4
pi@raspberrypi:~ $ echo ${#array_name[*]}
4
pi@raspberrypi:~ $ echo ${#array_name[3]}
6
pi@raspberrypi:~ $
4.6.4 关联数组(类似Map用法)
Bash 支持关联数组,可以使用任意的字符串、或者整数作为下标来访问数组元素。
关联数组使用 declare 命令来声明,语法格式如下:
declare -A array_name
-A 选项就是用于声明一个关联数组。
关联数组的键是唯一的。
使用 @ 或 * 可以获取数组中的所有元素。
在数组前加一个感叹号 ! 可以获取数组的所有键。
#!/bin/bash
declare -A site
site["google"]="www.google.com"
site["runoob"]="www.runoob.com"
site["taobao"]="www.taobao.com"
# 或者
# declare -A site=(["google"]="www.google.com" # ["runoob"]="www.runoob.com" ["taobao"]="www.taobao.com")# 访问元素
echo "数组的runoob元素为: ${site["runoob"]}"
echo "数组的全元素为: ${site[*]}"
echo "数组的全元素为: ${site[@]}"
echo "数组的键为: ${!site[*]}"
echo "数组的键为: ${!site[@]}"
pi@raspberrypi:~ $ sudo touch testArray.sh
pi@raspberrypi:~ $ sudo nano testArray.sh
pi@raspberrypi:~ $ sudo chmod +x testArray.sh
pi@raspberrypi:~ $ ./testArray.sh
数组的runoob元素为: www.runoob.com
数组的全元素为: www.google.com www.runoob.com www.taobao.com
数组的全元素为: www.google.com www.runoob.com www.taobao.com
数组的键为: google runoob taobao
数组的键为: google runoob taobao
pi@raspberrypi:~ $
5. 注释
5.1 单行注释
以 # 开头的行就是注释,会被解释器忽略。
通过每一行加一个 # 号设置多行注释,像这样:
#--------------------------------------------
# 这是一个注释
# author:xxxx
#--------------------------------------------
##### 用户配置区 开始 #####
#
#
# 这里可以添加脚本描述信息
#
#
##### 用户配置区 结束  #####
5.2 多行注释
多行注释还可以使用以下格式:
:<EOF只是一种标识,可以用其他的,建议不改。
6. Shell 传递参数
我们可以在执行 Shell 脚本时,向脚本传递参数,脚本内获取参数的格式为:$n。n 代表一个数字,1 为执行脚本的第一个参数,2 为执行脚本的第二个参数,以此类推……
#!/bin/bash
# author:菜鸟教程
# url:www.runoob.comecho "Shell 传递参数实例!";
echo "执行的文件名:$0";
echo "第一个参数为:$1";
echo "第二个参数为:$2";
echo "第三个参数为:$3";
保存文件,并添加可执行权限。
pi@raspberrypi:~ $ sudo touch test.sh
pi@raspberrypi:~ $ sudo nano test.sh
pi@raspberrypi:~ $ chmod +x test.sh
chmod: changing permissions of 'test.sh': Operation not permitted
pi@raspberrypi:~ $ sudo chmod +x test.sh
pi@raspberrypi:~ $ ./test.sh 1 2 3
Shell 传递参数实例!
执行的文件名:./test.sh
第一个参数为:1
第二个参数为:2
第三个参数为:3
pi@raspberrypi:~ $
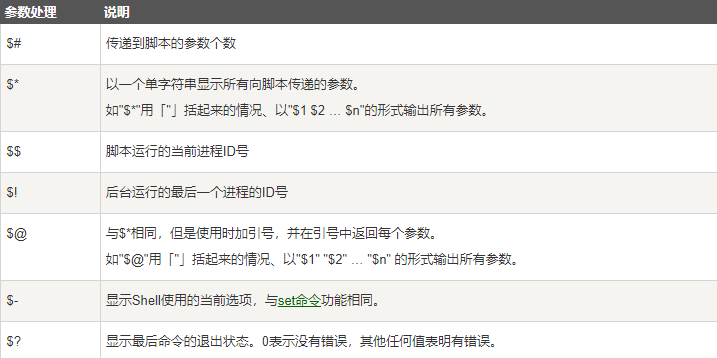
$* 与 $@ 区别:
- 相同点:都是引用所有参数。
- 不同点:只有在双引号中体现出来。假设在脚本运行时写了三个参数 1、2、3,,则 " * " 等价于 “1 2 3”(传递了一个参数),而 “@” 等价于 “1” “2” “3”(传递了三个参数)。
创建一个 testParam.sh文件:
#!/bin/bashecho "Shell 传递参数实例!";
echo "第一个参数为:$1";
echo "参数个数为:$#";
echo "传递的参数作为一个字符串显示:$*";echo "-- \$* 演示 ---"
for i in "$*"; do echo $i
done echo "-- \$@ 演示 ---"
for i in "$@"; do echo $i
done
树莓派上执行。
pi@raspberrypi:~ $ sudo touch testParam.sh
pi@raspberrypi:~ $ sudo nano testParam.sh
pi@raspberrypi:~ $ sudo chmod +x testParam.sh
pi@raspberrypi:~ $ ./testParam.sh 1 2 3
Shell 传递参数实例!
第一个参数为:1
参数个数为:3
传递的参数作为一个字符串显示:1 2 3
-- $* 演示 ---
1 2 3
-- $@ 演示 ---
1
2
3
pi@raspberrypi:~ $
7. Shell 基本运算符
Shell 和其他编程语言一样,支持多种运算符,包括:
- 算数运算符
- 关系运算符
- 布尔运算符
- 字符串运算符
- 文件测试运算符
原生bash不支持简单的数学运算,但是可以通过其他命令来实现,例如 awk 和 expr,expr 最常用。
expr 是一款表达式计算工具,使用它能完成表达式的求值操作。
例如,两个数相加(注意使用的是`反引号 而不是单引号 '):
pi@raspberrypi:~ $ val=`expr 2 + 2`
pi@raspberrypi:~ $ echo "两数之和为 : $val"
两数之和为 : 4
pi@raspberrypi:~ $
7.1 算数运算符
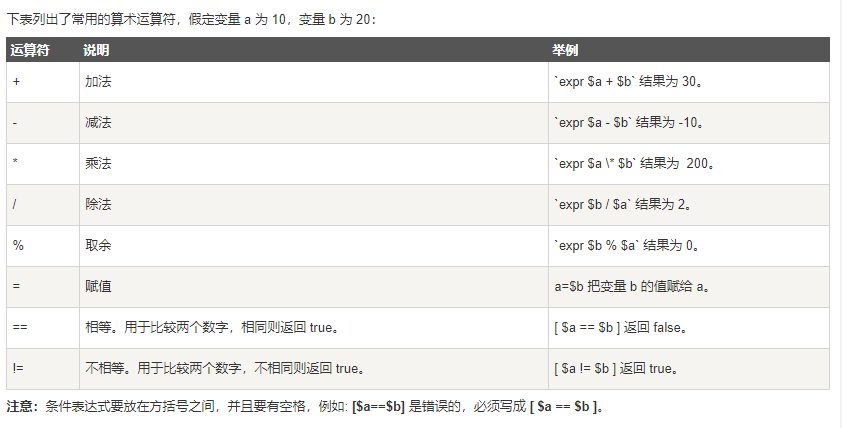
创建一个testLogic.sh文件。
#!/bin/basha=$1 b=$2
val=`expr $a + $b`
echo "a + b : $val"
val=`expr $a - $b`
echo "a - b : $val"
val=`expr $a \* $b`
echo "a * b : $val"
val=`expr $b / $a`
echo "b / a : $val"
val=`expr $b % $a`
echo "b % a : $val" if [ $a == $b ]
thenecho "a 等于 b"
fi if [ $a != $b ]
then echo "a 不等于 b"
fi
树莓派执行。
pi@raspberrypi:~ $ sudo touch testLogic.sh
pi@raspberrypi:~ $ sudo nano testLogic.sh
pi@raspberrypi:~ $ sudo chmod +x testLogic.sh
pi@raspberrypi:~ $ ./testLogic.sh 20 20
a + b : 40
a - b : 0
a * b : 400
b / a : 1
b % a : 0
a 等于 b
pi@raspberrypi:~ $ ./testLogic.sh 20 40
a + b : 60
a - b : -20
a * b : 800
b / a : 2
b % a : 0
a 不等于 b
pi@raspberrypi:~ $
乘号(*)前边必须加反斜杠()才能实现乘法运算;
7.2 关系运算符
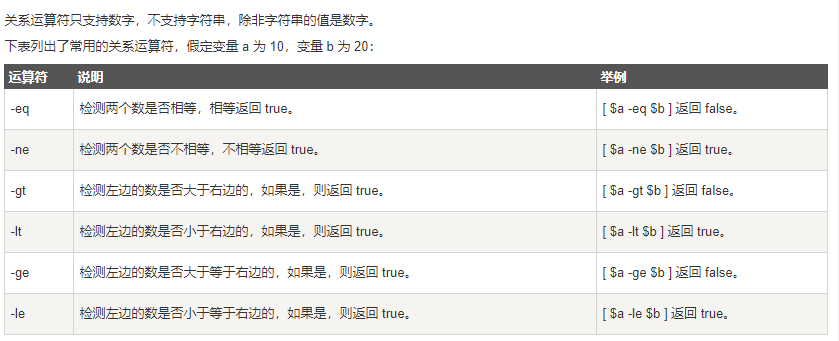
创建testRelation.sh 文件:
  GNU nano 5.4                                            testRelation.sh
#!/bin/basha=$1 b=$2
if [ $a -eq $b ]
then echo "$a -eq $b : a 等于 b"
else echo "$a -eq $b: a 不等于 b"
fi if [ $a -ne $b ]
then echo "$a -ne $b: a 不等于 b"
else echo "$a -ne $b : a 等于 b"
fi if [ $a -gt $b ]
then echo "$a -gt $b: a 大于 b"
else echo "$a -gt $b: a 不大于 b"
fi if [ $a -lt $b ]
thenecho "$a -lt $b: a 小于 b"
else echo "$a -lt $b: a 不小于 b"
fi if [ $a -ge $b ]
then echo "$a -ge $b: a 大于或等于 b"
else echo "$a -ge $b: a 小于 b"
fi
树莓派执行。
pi@raspberrypi:~ $ sudo touch testRelation.sh
pi@raspberrypi:~ $ sudo nano testRelation.sh
pi@raspberrypi:~ $ sudo chmod +x testRelation.sh
pi@raspberrypi:~ $ ./testRelation.sh 20 20
20 -eq 20 : a 等于 b
20 -ne 20 : a 等于 b
20 -gt 20: a 不大于 b
20 -lt 20: a 不小于 b
20 -ge 20: a 大于或等于 b
20 -le 20: a 小于或等于 b
pi@raspberrypi:~ $ ./testRelation.sh 1 2
1 -eq 2: a 不等于 b
1 -ne 2: a 不等于 b
1 -gt 2: a 不大于 b
1 -lt 2: a 小于 b
1 -ge 2: a 小于 b
1 -le 2: a 小于或等于 b
pi@raspberrypi:~ $ ./testRelation.sh "a" "b"
./testRelation.sh: line 4: [: a: integer expression expected
a -eq b: a 不等于 b
./testRelation.sh: line 11: [: a: integer expression expected
a -ne b : a 等于 b
./testRelation.sh: line 18: [: a: integer expression expected
a -gt b: a 不大于 b
./testRelation.sh: line 25: [: a: integer expression expected
a -lt b: a 不小于 b
./testRelation.sh: line 32: [: a: integer expression expected
a -ge b: a 小于 b
./testRelation.sh: line 39: [: a: integer expression expected
a -le b: a 大于  b
pi@raspberrypi:~ $ ./testRelation.sh "1" "2"
1 -eq 2: a 不等于 b
1 -ne 2: a 不等于 b
1 -gt 2: a 不大于 b
1 -lt 2: a 小于 b
1 -ge 2: a 小于 b
1 -le 2: a 小于或等于 b
pi@raspberrypi:~ $
7.3 布尔运算符

创建一个testBool.sh文件:
#!/bin/basha=$1
b=$2if [ $a != $b ]
thenecho "$a != $b : a 不等于 b"
elseecho "$a == $b: a 等于 b"
fi if [ $a -lt 100 -a $b -gt 15 ]
thenecho "$a 小于 100 且 $b 大于 15 : 返回 true"
else echo "$a 小于 100 且 $b 大于 15 : 返回 false"
fi if [ $a -lt 100 -o $b -gt 100 ]
thenecho "$a 小于 100 或 $b 大于 100 : 返回 true"
else echo "$a 小于 100 或 $b 大于 100 : 返回 false"
fi if [ $a -lt 5 -o $b -gt 100 ]
thenecho "$a 小于 5 或 $b 大于 100 : 返回 true"
else echo "$a 小于 5 或 $b 大于 100 : 返回 false"
fi
pi@raspberrypi:~ $ sudo touch testBool.sh
pi@raspberrypi:~ $ sudo nano testBool.sh
pi@raspberrypi:~ $ sudo chmod +x testBool.sh
pi@raspberrypi:~ $ ./testBool.sh 10 30
10 != 30 : a 不等于 b
10 小于 100 且 30 大于 15 : 返回 true
10 小于 100 或 30 大于 100 : 返回 true
10 小于 5 或 30 大于 100 : 返回 false
pi@raspberrypi:~ $ ./testBool.sh 30 10
30 != 10 : a 不等于 b
30 小于 100 且 10 大于 15 : 返回 false
30 小于 100 或 10 大于 100 : 返回 true
30 小于 5 或 10 大于 100 : 返回 false
pi@raspberrypi:~ $ 7.4 逻辑运算符

创建testLogic2.sh文件
#!/bin/basha=$1
b=$2if [[ $a -lt 100 && $b -gt 100 ]]
thenecho "返回 true"
elseecho "返回 false"
fiif [[ $a -lt 100 || $b -gt 100 ]]
thenecho "返回 true"
elseecho "返回 false"
fi
树莓派运行。
pi@raspberrypi:~ $ sudo touch testLogic2.sh
pi@raspberrypi:~ $ sudo nano testLogic2.sh
pi@raspberrypi:~ $ sudo chmod +x testLogic2.sh
pi@raspberrypi:~ $ ./testLogic2.sh 1 1
返回 false
./testLogic2.sh: line 13: conditional binary operator expected
./testLogic2.sh: line 13: syntax error near `-gt100'
./testLogic2.sh: line 13: `if [[ $a -lt 100 || $b -gt100 ]]'
pi@raspberrypi:~ $ sudo nano testLogic2.sh
pi@raspberrypi:~ $ ./testLogic2.sh 1 1
返回 false
返回 true
pi@raspberrypi:~ $ ./testLogic2.sh 1 100
返回 false
返回 true
pi@raspberrypi:~ $ ./testLogic2.sh 50 100
返回 false
返回 true
pi@raspberrypi:~ $
7.5 字符串运算符
创建testString.sh文件
#!/bin/basha=$1
b=$2if [ $a = $b ]thenecho "$a = $b : a 等于 b"elseecho "$a = $b: a 不等于 b"
fiif [ $a != $b ]
thenecho "$a != $b : a 不等于 b"
elseecho "$a != $b: a 等于 b"
fiif [ -z $a ]
then echo "-z $a : 字符串长度为 0"
else echo "-z $a : 字符串长度不为 0"
fiif [ -n "$a" ]
thenecho "-n $a : 字符串长度不为 0"
else echo "-n $a : 字符串长度为 0"
fiif [ $a ]
then echo "$a : 字符串不为空"
else echo "$a : 字符串为空"
fi
树莓派执行。
pi@raspberrypi:~ $ sudo touch testString.sh
pi@raspberrypi:~ $ sudo nano testString.sh
pi@raspberrypi:~ $ sudo chmod +x testString.sh
pi@raspberrypi:~ $ ./testString.sh "ab" "cd"
ab = cd: a 不等于 b
ab != cd : a 不等于 b
-z ab : 字符串长度不为 0
-n ab : 字符串长度不为 0
ab : 字符串不为空
pi@raspberrypi:~ $ ./testString.sh "ab" "ab"
ab = ab : a 等于 b
ab != ab: a 等于 b
-z ab : 字符串长度不为 0
-n ab : 字符串长度不为 0
ab : 字符串不为空
pi@raspberrypi:~ $
7.6 文件测试运算符
文件测试运算符用于检测 Unix 文件的各种属性。
创建testFile.sh文件
#!/bin/bashfile=$1if [ -r $file ]
then echo "文件可读"
else echo "文件不可读"
fi if [ -w $file ]
then echo  "文件可写"
else echo "文件不可写"
fi if [ -x $file ]
then echo "文件可执行"
else echo "文件不可执行"
fi if [ -f $file ]
then echo "文件为普通文件"
else echo "文件为特殊文件"
fi if [ -d $file ]
then echo "文件是个目录"
else echo "文件不是个目录"
fi
树莓派执行。
pi@raspberrypi:~ $ sudo nano testFile.sh
pi@raspberrypi:~ $ sudo chmod +x testFile.sh
pi@raspberrypi:~ $ ./testFile.sh "/etc/"
文件可读
文件不可写
文件可执行
文件为特殊文件
文件是个目录
文件不为空
文件存在
pi@raspberrypi:~ $ ./testFile.sh "/etcxxxx"
文件不可读
文件不可写
文件不可执行
文件为特殊文件
文件不是个目录
文件为空
文件不存在
pi@raspberrypi:~ $ ./testFile.sh "/home/pi/testFile.sh"
文件可读
文件不可写
文件可执行
文件为普通文件
文件不是个目录
文件不为空
文件存在
pi@raspberrypi:~ $
8. Shell echo命令
Shell 的 echo 指令用于字符串的输出。命令格式:
echo string
- 显示普通字符串
echo “It is a test”
- 显示转义字符
echo ““It is a test””
- 显示变量
#!/bin/sh
read name
echo "$name It is a test"
- 显示换行
echo -e “OK! \n” # -e 开启转义
echo “It is a test”
- 显示不换行
echo -e “OK! \c” # -e 开启转义 \c 不换行
echo “It is a test”
- 显示结果定向至文件
echo “It is a test” > myfile
- 原样输出字符串,不进行转义或取变量(用单引号)
echo ‘$name"’
- 显示命令执行结果
这里使用的是反引号 `, 而不是单引号 '。
echo
date
pi@raspberrypi:~ $ echo "It is a test"
It is a test
pi@raspberrypi:~ $ echo "\"It is a test\""
"It is a test"
pi@raspberrypi:~ $ read name
dpjcn
pi@raspberrypi:~ $ echo "$name It is a test"
dpjcn It is a test
pi@raspberrypi:~ $ echo -e "OK! \n"
OK! pi@raspberrypi:~ $ echo "It is a test"
It is a test
pi@raspberrypi:~ $ echo "It is a test" > myfile
pi@raspberrypi:~ $ ls -al | grep myfile
-rw-r--r--  1 pi   pi      13 Nov 16 14:09 myfile
pi@raspberrypi:~ $ echo '$name\"'
$name\"
pi@raspberrypi:~ $ echo `date`
Wed 16 Nov 14:09:53 GMT 2022
pi@raspberrypi:~ $
9. Shell printf 命令
printf 命令模仿 C 程序库(library)里的 printf() 程序。
printf 由 POSIX 标准所定义,因此使用 printf 的脚本比使用 echo 移植性好。
printf 使用引用文本或空格分隔的参数,外面可以在 printf 中使用格式化字符串,还可以制定字符串的宽度、左右对齐方式等。默认的 printf 不会像 echo 自动添加换行符,我们可以手动添加 \n。
printf 命令的语法:
printf format-string [arguments…]
参数说明:
- format-string: 为格式控制字符串
- arguments: 为参数列表
- 测试换行:
pi@raspberrypi:~ $ printf "Hello, Shell"
Hello, Shellpi@raspberrypi:~ $ printf "Hello, Shell\n"
Hello, Shell
pi@raspberrypi:~ $
- 测试格式化1:
#!/bin/bashprintf "%-10s %-8s %-4s\n" 姓名 性别 体重kg
printf "%-10s %-8s %-4.2f\n" 郭靖 男 66.1234
printf "%-10s %-8s %-4.2f\n" 杨过 男 48.6543
printf "%-10s %-8s %-4.2f\n" 郭芙 女 47.9876
%s %c %d %f 都是格式替代符,%s 输出一个字符串,%d 整型输出,%c 输出一个字符,%f 输出实数,以小数形式输出。
%-10s 指一个宽度为 10 个字符(- 表示左对齐,没有则表示右对齐),任何字符都会被显示在 10 个字符宽的字符内,如果不足则自动以空格填充,超过也会将内容全部显示出来。
%-4.2f 指格式化为小数,其中 .2 指保留2位小数。
pi@raspberrypi:~ $ sudo touch testPrintf.sh
pi@raspberrypi:~ $ sudo nano testPrintf.sh
pi@raspberrypi:~ $ sudo chmod +x testPrintf.sh
pi@raspberrypi:~ $ ./testPrintf.sh
姓名     性别   体重kg
郭靖     男      66.12
杨过     男      48.65
郭芙     女      47.99
pi@raspberrypi:~ $
- 测试格式2:
#!/bin/bash# format-string为双引号
printf "%d %s\n" 1 "abc"
# 单引号与双引号效果一样
printf '%d %s\n' 1 "abc"
# 没有引号也可以输出
printf %s abcdef
# 格式只指定了一个参数,但多出的参数仍然会按照该格式输出,format-string 被重用
printf %s abc def
printf "%s\n" abc def
printf "%s %s %s\n" a b c d e f g
# 如果没有 arguments,那么 %s 用NULL代替,%d 用 0 代替
printf "%s and %d \n"
pi@raspberrypi:~ $ sudo touch testPrintf1.sh
pi@raspberrypi:~ $ sudo nano testPrintf1.sh
pi@raspberrypi:~ $ sudo chmod +x testPrintf1.sh
pi@raspberrypi:~ $ ./testPrintf1.sh
1 abc
1 abc
abcdefabcdefabc
def
a b c
d e f
g  and 0
pi@raspberrypi:~ $
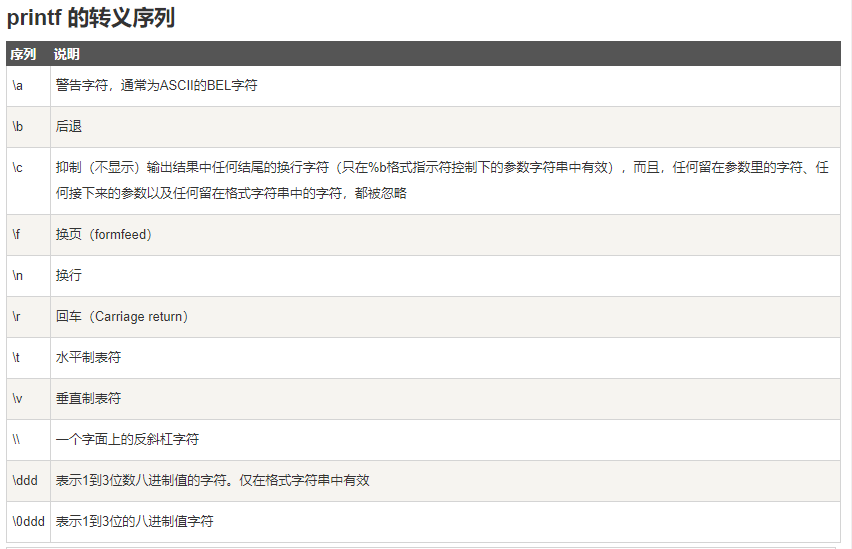
10. Shell test 命令
Shell中的 test 命令用于检查某个条件是否成立,它可以进行数值、字符和文件三个方面的测试。
10.1 数值测试
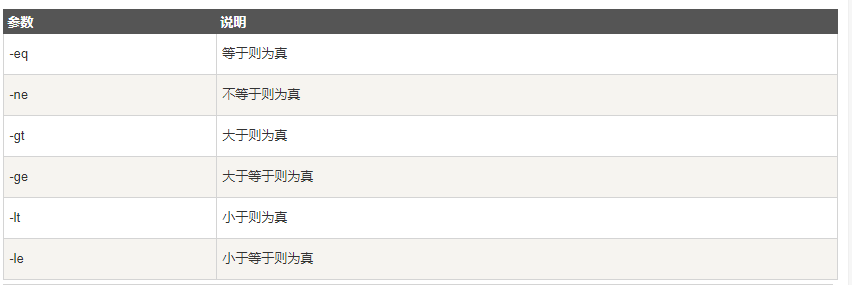
#!/bin/bash
num1=$1
num2=$2
if test $[num1] -eq $[num2]
then echo '两个数相等!'
else echo '两个数不相等!'
fi
pi@raspberrypi:~ $ sudo touch testNum.sh
pi@raspberrypi:~ $ sudo nano testNum.sh
pi@raspberrypi:~ $ sudo chmod +x testNum.sh
pi@raspberrypi:~ $ ./testNum.sh 100 200
两个数不相等!
pi@raspberrypi:~ $ ./testNum.sh 100 100
两个数相等!
pi@raspberrypi:~ $
10.2 字符串测试
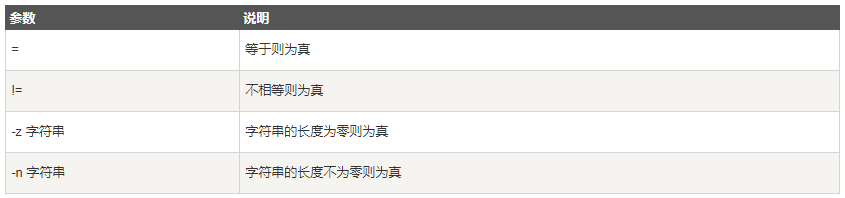
#!/bin/bashnum1=$1
num2=$2 if test $num1 = $num2
then echo '两个字符串相等!'
else echo '两个字符串不相等!'
fi
pi@raspberrypi:~ $ sudo touch testStringTest.sh
pi@raspberrypi:~ $ sudo nano testStringTest.sh
pi@raspberrypi:~ $ sudo chmod +x testStringTest.sh
pi@raspberrypi:~ $ ./testStringTest.sh "abc" "abc"
两个字符串相等!
pi@raspberrypi:~ $ ./testStringTest.sh "abc" "abd"
两个字符串不相等!
pi@raspberrypi:~ $
10.3 文件测试
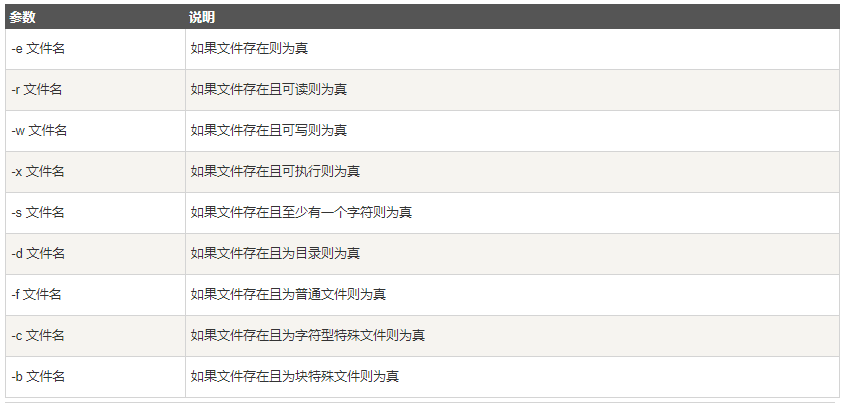
#!/bin/bashcd /bin
if test -e ./bash
then echo '文件已存在!'
elseecho '文件不存在!'
fi# Shell 还提供了与( -a )、或( -o )、非( ! )三个逻辑操作符用于将测试条件连接起来,其优先级为: ! 最高, -a 次之, -o 最低cd /bin
if test -e ./notFile -o -e ./bash
then echo '至少有一个文件存在!'
else echo '两个文件都不存在'
fi
pi@raspberrypi:~ $ sudo touch testFileTest.sh
pi@raspberrypi:~ $ sudo nano testFileTest.sh
pi@raspberrypi:~ $ sudo nano testFileTest.sh
pi@raspberrypi:~ $ sudo chmod +x testFileTest.sh
pi@raspberrypi:~ $ ./testFileTest.sh
文件已存在!
至少有一个文件存在!
pi@raspberrypi:~ $
11. Shell 流程控制
11.1 if条件语句
- if 语句语法格式:
if condition
thencommand1 command2...commandN
fi
- if else 语法格式:
if condition
thencommand1 command2...commandN
elsecommand
fi
- if else-if else 语法格式:
if condition1
thencommand1
elif condition2
then command2
elsecommandN
fi
创建一个sh文件:
#!/bin/bashecho "a=10,b=20"a=10
b=20
if [ $a == $b ]
then echo "a 等于 b"
elif [ $a -gt $b ]
then echo "a 大于 b"
elif [ $a -lt $b ]
then echo "a 小于 b"
else echo "没有符合的条件"
fiecho "使用 ((...)) 作为判断语句"
# 使用 ((...)) 作为判断语句
a=10 b=20
if (( $a == $b ))
then echo "a 等于 b"
elif (( $a > $b ))
then echo "a 大于 b"
elif (( $a < $b ))
then echo "a 小于 b"
elseecho "没有符合的条件"
fi
pi@raspberrypi:~ $ sudo touch testIf.sh
pi@raspberrypi:~ $ sudo nano testIf.sh
pi@raspberrypi:~ $ sudo chmod +x testIf.sh
pi@raspberrypi:~ $ ./testIf.sh
a=10,b=20
a 小于 b
使用 ((...)) 作为判断语句
a 小于 b
pi@raspberrypi:~ $ 11.2 for循环
for循环一般格式为:
for var in item1 item2 ... itemN
docommand1command2...commandN
done或者一行for var in item1 item2 ... itemN; do command1; command2… done;
直接执行:
- 例子1
for loop in 1 2 3 4 5
doecho "The value is: $loop"
done
pi@raspberrypi:~ $ for loop in 1 2 3 4 5
> do
>     echo "The value is: $loop"
> done
The value is: 1
The value is: 2
The value is: 3
The value is: 4
The value is: 5
pi@raspberrypi:~ $ - 例子2
for str in This is a string
doecho $str
done
pi@raspberrypi:~ $ for str in This is a string
> do
>     echo $str
> done
This
is
a
string
pi@raspberrypi:~ $
11.3 while语句
while 循环用于不断执行一系列命令,也用于从输入文件中读取数据。其语法格式为:
while condition
docommand
done
- 例子1
# 如果 int 小于等于 5,那么条件返回真。int 从 1 开始,每次循环处理时,int 加 1。运行上述脚本,返回数字 1 到 5,然后终止。int=1
while(( $int<=5 ))
doecho $intlet "int++"
done
pi@raspberrypi:~ $ int=1
pi@raspberrypi:~ $ while(( $int<=5 ))
> do
>     echo $int
>     let "int++"
> done
1
2
3
4
5
pi@raspberrypi:~ $ - 例子2
# 输入信息被设置为变量FILM,按结束循环echo '按下  退出'
echo -n '输入你最喜欢的网站名: '
while read FILM
doecho "是的!$FILM 是一个好网站"
done
pi@raspberrypi:~ $ echo -n '输入你最喜欢的网站名: '
输入你最喜欢的网站名: pi@raspberrypi:~ $ while read FILM
> do
>     echo "是的!$FILM 是一个好网站"
> done
da^H^H^H
是的! 是一个好网站
dpjcn
是的!dpjcn 是一个好网站
134134132
是的!134134132 是一个好网站
ggggggggg
是的!ggggggggg 是一个好网站
pi@raspberrypi:~ $
11.4 until 循环
until 循环执行一系列命令直至条件为 true 时停止。
until 循环与 while 循环在处理方式上刚好相反。
一般 while 循环优于 until 循环,但在某些时候—也只是极少数情况下,until 循环更加有用。
until 语法格式:
until condition
docommand
done
- 例子1
# 使用 until 命令来输出 0 ~ 9 的数字
a=0until [ ! $a -lt 10 ]
doecho $aa=`expr $a + 1`
done
pi@raspberrypi:~ $ a=0
pi@raspberrypi:~ $
pi@raspberrypi:~ $ until [ ! $a -lt 10 ]
> do
>    echo $a
>    a=`expr $a + 1`
> done
0
1
2
3
4
5
6
7
8
9
pi@raspberrypi:~ $
11.5 case … esac 语句
case … esac 为多选择语句,与其他语言中的 switch … case 语句类似,是一种多分支选择结构,每个 case 分支用右圆括号开始,用两个分号 ;; 表示 break,即执行结束,跳出整个 case … esac 语句,esac(就是 case 反过来)作为结束标记。
可以用 case 语句匹配一个值与一个模式,如果匹配成功,执行相匹配的命令。
case … esac 语法格式如下:
case 值 in
模式1)command1command2...commandN;;
模式2)command1command2...commandN;;
esac
- 例子1:
#!/bin/bashecho '输入 1 到 4 之间的数字:'
echo '你输入的数字为:'
read aNum
case $aNum in1)  echo '你选择了 1';;2)  echo '你选择了 2';;3)  echo '你选择了 3';;4)  echo '你选择了 4';;*)  echo '你没有输入 1 到 4 之间的数字';;
esac
pi@raspberrypi:~/shellTest $ sudo touch case.sh
pi@raspberrypi:~/shellTest $ sudo nano case.sh
pi@raspberrypi:~/shellTest $ sudo chmod +x case.sh
pi@raspberrypi:~/shellTest $ ./case.sh
输入 1 到 4 之间的数字:
你输入的数字为:
4
你选择了 4
- 例子2
site="runoob"case "$site" in"runoob") echo "菜鸟教程";;"google") echo "Google 搜索";;"taobao") echo "淘宝网";;
esac
pi@raspberrypi:~/shellTest $ site="runoob"
pi@raspberrypi:~/shellTest $
pi@raspberrypi:~/shellTest $ case "$site" in
>    "runoob") echo "菜鸟教程"
>    ;;
>    "google") echo "Google 搜索"
>    ;;
>    "taobao") echo "淘宝网"
>    ;;
> esac
11.6 break 、continue跳出循环
在循环过程中,有时候需要在未达到循环结束条件时强制跳出循环,Shell 使用两个命令来实现该功能:break 和 continue。
- 例子1:脚本进入死循环直至用户输入数字大于5。要跳出所有循环,返回到shell提示符
while :
doecho -n "输入 1 到 5 之间的数字:"read aNumcase $aNum in1|2|3|4|5) echo "你输入的数字为 $aNum!";;*) echo "你输入的数字不是 1 到 5 之间的! 游戏结束"break;;esac
done
pi@raspberrypi:~/shellTest $ sudo touch break.sh
pi@raspberrypi:~/shellTest $ sudo nano break.sh
pi@raspberrypi:~/shellTest $ sudo chmod +x break.sh
pi@raspberrypi:~/shellTest $ ./break.sh
输入 1 到 5 之间的数字:1
你输入的数字为 1!
输入 1 到 5 之间的数字:2
你输入的数字为 2!
输入 1 到 5 之间的数字:3
你输入的数字为 3!
输入 1 到 5 之间的数字:6
你输入的数字不是 1 到 5 之间的! 游戏结束
pi@raspberrypi:~/shellTest $ - 例子2:脚本进入死循环直至用户输入数字大于5。要跳出单次循环
while :
doecho -n "输入 1 到 5 之间的数字: "read aNumcase $aNum in1|2|3|4|5) echo "你输入的数字为 $aNum!";;*) echo "你输入的数字不是 1 到 5 之间的!"continueecho "游戏结束";;esac
done
pi@raspberrypi:~/shellTest $ sudo mv break.sh continue.sh
pi@raspberrypi:~/shellTest $ sudo nano continue.sh
pi@raspberrypi:~/shellTest $ ./continue.sh
输入 1 到 5 之间的数字:1
你输入的数字为 1!
输入 1 到 5 之间的数字:6
你输入的数字不是 1 到 5 之间的! 游戏结束
输入 1 到 5 之间的数字:5
你输入的数字为 5!
输入 1 到 5 之间的数字:1
你输入的数字为 1!
输入 1 到 5 之间的数字:6
你输入的数字不是 1 到 5 之间的! 游戏结束
输入 1 到 5 之间的数字:^Z
[1]+  Stopped                 ./continue.sh
pi@raspberrypi:~/shellTest $
12. Shell 函数
shell中函数的定义格式如下:
[ function ] funname [()]{action;[return int;]}
说明:
-
可以带function fun() 定义,也可以直接fun() 定义,不带任何参数。
-
参数返回,可以显示加:return 返回,如果不加,将以最后一条命令运行结果,作为返回值。
-
例子1
#!/bin/bashdemoFun(){echo "这是我的第一个 shell 函数!"
}
echo "-----函数开始执行-----"
demoFun
echo "-----函数执行完毕-----"
pi@raspberrypi:~/shellTest $ sudo touch testFunction.sh
pi@raspberrypi:~/shellTest $ sudo nano testFunction.sh
pi@raspberrypi:~/shellTest $ sudo chmod +x testFunction.sh
pi@raspberrypi:~/shellTest $ ./testFunction.sh
-----函数开始执行-----
这是我的第一个 shell 函数!
-----函数执行完毕-----
pi@raspberrypi:~/shellTest $ - 例子2
#!/bin/bashfunWithReturn(){echo "这个函数会对输入的两个数字进行相加运算..."echo "输入第一个数字: "read aNumecho "输入第二个数字: "read anotherNumecho "两个数字分别为 $aNum 和 $anotherNum !"return $(($aNum+$anotherNum))
}
funWithReturn
echo "输入的两个数字之和为 $? !"
pi@raspberrypi:~/shellTest $ sudo nano testFunctionReturn.sh
pi@raspberrypi:~/shellTest $ sudo chmod +x testFunctionReturn.sh
pi@raspberrypi:~/shellTest $ ./testFunctionReturn.sh
这个函数会对输入的两个数字进行相加运算...
输入第一个数字:
10
输入第二个数字:
20
两个数字分别为 10 和 20 !
输入的两个数字之和为 30 !
pi@raspberrypi:~/shellTest $
函数返回值在调用该函数后通过 $? 来获得。
注意:所有函数在使用前必须定义。这意味着必须将函数放在脚本开始部分,直至shell解释器首次发现它时,才可以使用。调用函数仅使用其函数名即可。
12.1 函数参数
在Shell中,调用函数时可以向其传递参数。在函数体内部,通过 $n 的形式来获取参数的值,例如,$1表示第一个参数,$2表示第二个参数…
#!/bin/bashfunWithParam(){echo "第一个参数为 $1 !"echo "第二个参数为 $2 !"echo "第十个参数为 $10 !"echo "第十个参数为 ${10} !"echo "第十一个参数为 ${11} !"echo "参数总数有 $# 个!"echo "作为一个字符串输出所有参数 $* !"
}
funWithParam 1 2 3 4 5 6 7 8 9 34 73
pi@raspberrypi:~/shellTest $ sudo nano testFunctionParam.sh
pi@raspberrypi:~/shellTest $ sudo chmod +x testFunctionParam.sh
pi@raspberrypi:~/shellTest $ ./testFunctionParam.sh
第一个参数为 1 !
第二个参数为 2 !
第十个参数为 10 !
第十个参数为 34 !
第十一个参数为 73 !
参数总数有 11 个!
作为一个字符串输出所有参数 1 2 3 4 5 6 7 8 9 34 73 !
pi@raspberrypi:~/shellTest $ 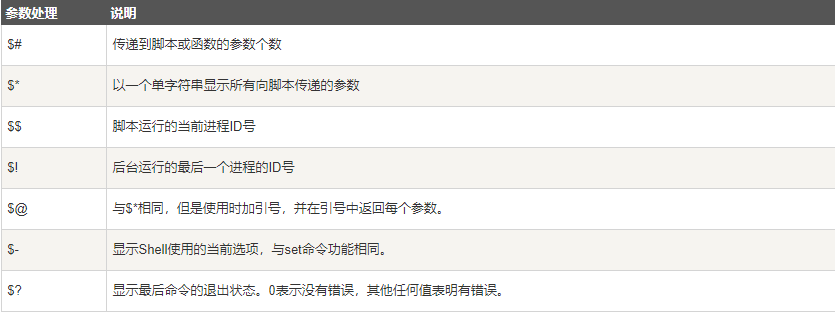
13. Shell 输入/输出重定向(重要性高)
大多数 UNIX 系统命令从你的终端接受输入并将所产生的输出发送回到您的终端。一个命令通常从一个叫标准输入的地方读取输入,默认情况下,这恰好是你的终端。同样,一个命令通常将其输出写入到标准输出,默认情况下,这也是你的终端。
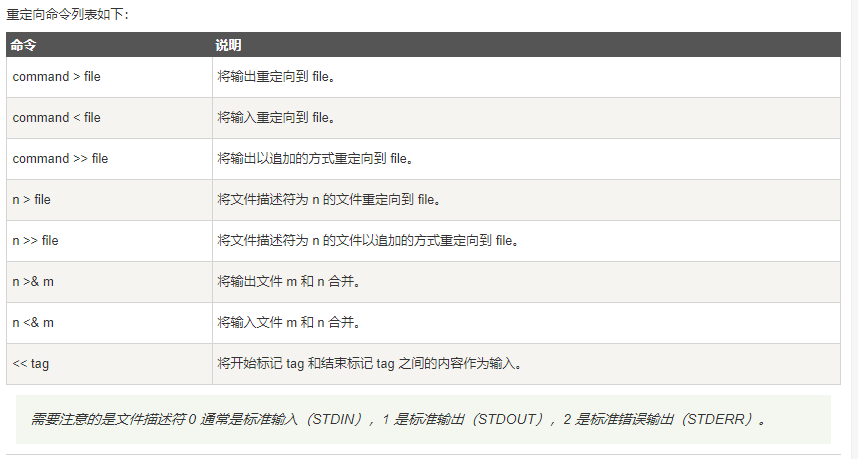
注意的是文件描述符 0 通常是标准输入(
STDIN),1 是标准输出(STDOUT),2 是标准错误输出(STDERR)。
13.1 输出重定向
command1 > file1
command1 >> file1
上面这个命令执行command1然后将输出的内容存入file1。
pi@raspberrypi:~/shellTest $ sudo bash -c "ls -al > redirect1.txt"
pi@raspberrypi:~/shellTest $ ls -al
total 96
drwxr-xr-x  2 root root 4096 Nov 17 01:59 .
drwxr-xr-x 22 pi   pi   4096 Nov 17 00:32 ..
-rwxr-xr-x  1 root root  319 Nov 17 00:53 case.sh
-rwxr-xr-x  1 root root  312 Nov 17 01:03 continue.sh
-rw-r--r--  1 root root 1327 Nov 17 01:59 redirect1.txt
-rw-r--r--  1 root root 1271 Nov 17 01:59 redirect.txt
-rwxr-xr-x  1 root root  461 Nov 15 15:12 testArray.sh
需要root权限执行。
如果不希望文件内容被覆盖,可以使用 >> 追加到文件末尾。
pi@raspberrypi:~/shellTest $ sudo bash -c "ls -al >> redirect1.txt"
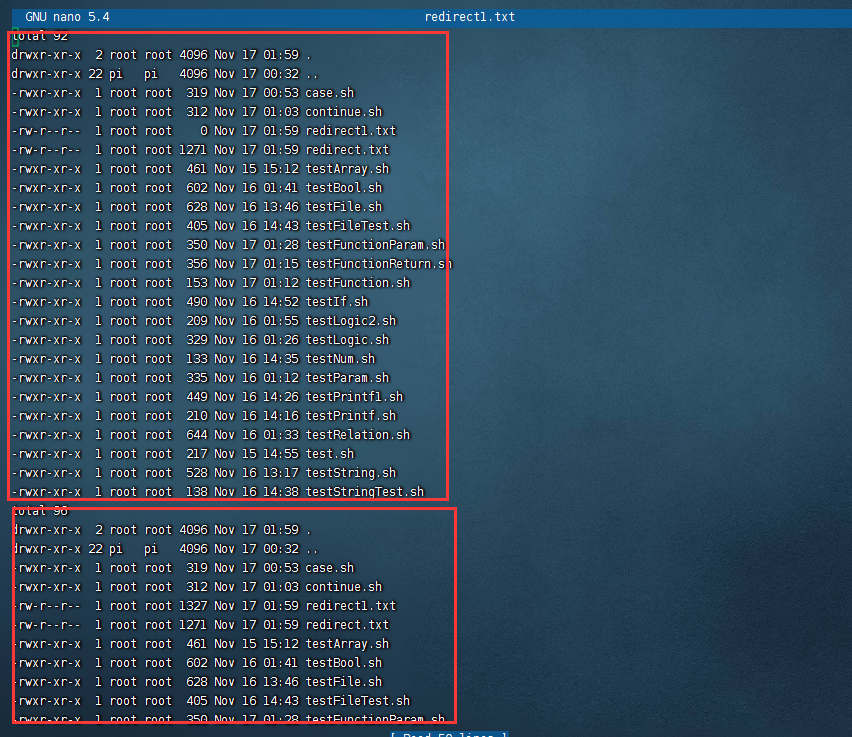
注意任何file1内的已经存在的内容将被新内容替代。如果要将新内容添加在文件末尾,请使用>>操作符。
额外知识点:
利用
tee来代替重定向输出 >
tee经常和管道符一起使用.
比如上面案例 可以改成ls -al | sudo tee redirect.txt
13.2 输入重定向
和输出重定向一样,Unix 命令也可以从文件获取输入,语法为:
command1 < file1
本来需要从键盘获取输入的命令会转移到文件读取内容。
使用场景:
- sql 导入建表语句
- 一些自动化脚本
13.3 重定向深入讲解
一般情况下,每个 Unix/Linux 命令运行时都会打开三个文件:
- 标准输入文件(
stdin):stdin的文件描述符为0,Unix程序默认从stdin读取数据。 - 标准输出文件(
stdout):stdout 的文件描述符为1,Unix程序默认向stdout输出数据。 - 标准错误文件(
stderr):stderr的文件描述符为2,Unix程序会向stderr流中写入错误信息。
默认情况下,command > file 将 stdout 重定向到 file,command < file 将stdin 重定向到 file。
如果希望 stderr 重定向到 file,可以这样写:
command 2>file
如果希望 stderr 追加到 file 文件末尾,可以这样写:
command 2>>file
如果希望将 stdout 和 stderr 合并后重定向到 file,可以这样写:
command > file 2>&1
如果希望对 stdin 和 stdout 都重定向,可以这样写:
command < file1 >file2
13.4 /dev/null 文件
如果希望执行某个命令,但又不希望在屏幕上显示输出结果,那么可以将输出重定向到 /dev/null:
command > /dev/null
/dev/null 是一个特殊的文件,写入到它的内容都会被丢弃;如果尝试从该文件读取内容,那么什么也读不到。但是 /dev/null 文件非常有用,将命令的输出重定向到它,会起到"禁止输出"的效果。
如果希望屏蔽 stdout 和 stderr,可以这样写:
command > /dev/null 2>&1
注意:0 是标准输入(STDIN),1 是标准输出(STDOUT),2 是标准错误输出(STDERR)。
这里的 2 和 > 之间不可以有空格,2> 是一体的时候才表示错误输出。