

限流的几种方式及简单实现
创始人
2024-01-29 15:56:10
文章目录
- 计数器
- 信号量
- 滑动窗口
- 漏桶
- 令牌桶
- 测试
- 示例代码
计数器
计数器限流方式比较粗暴,一次访问就增加一次计数,在系统内设置每 N 秒的访问量,超过访问量的访问直接丢弃,从而实现限流访问。
具体大概是以下步骤:
- 将时间划分为固定的窗口大小,例如 1 s;
- 在窗口时间段内,每来一个请求,对计数器加 1;
- 当计数器达到设定限制后,该窗口时间内的后续请求都将被丢弃;
- 该窗口时间结束后,计数器清零,从新开始计数。
这种算法的弊端
在开始的时间,访问量被使用完后,1 s 内会有很长时间的真空期是处于接口不可用的状态的,同时也有可能在一秒内出现两倍的访问量。
T窗口的前1/2时间 无流量进入,后1/2时间通过5个请求;
- T+1窗口的前 1/2时间 通过5个请求,后1/2时间因达到限制丢弃请求。
- 因此在 T的后1/2和(T+1)的前1/2时间组成的完整窗口内,通过了10个请求。
代码实现
private final Semaphore count = new Semaphore(5);@PostConstructpublic void init() {//初始化定时任务线程池ScheduledExecutorService service = new ScheduledThreadPoolExecutor(2, t -> {Thread thread = new Thread(t);thread.setName("limit");return thread;});// 每10s执行5次service.scheduleAtFixedRate(() -> count.release(5), 10, 10, TimeUnit.SECONDS);}/*** 计数器限流*/public void count() {try {count.acquire();System.out.println("count");} catch (InterruptedException e) {e.printStackTrace();}}
信号量
控制并发访问量
具体大概是以下步骤:
- 初始化信号量
- 每个请求获取信号量,请求完释放
代码实现
private final Semaphore flag = new Semaphore(5);/*** 信号量限流*/public void flag() {try {flag.acquire();System.out.println("flag");int i = new Random().nextInt(10);TimeUnit.SECONDS.sleep(i);} catch (InterruptedException e) {e.printStackTrace();} finally {flag.release();}}
滑动窗口
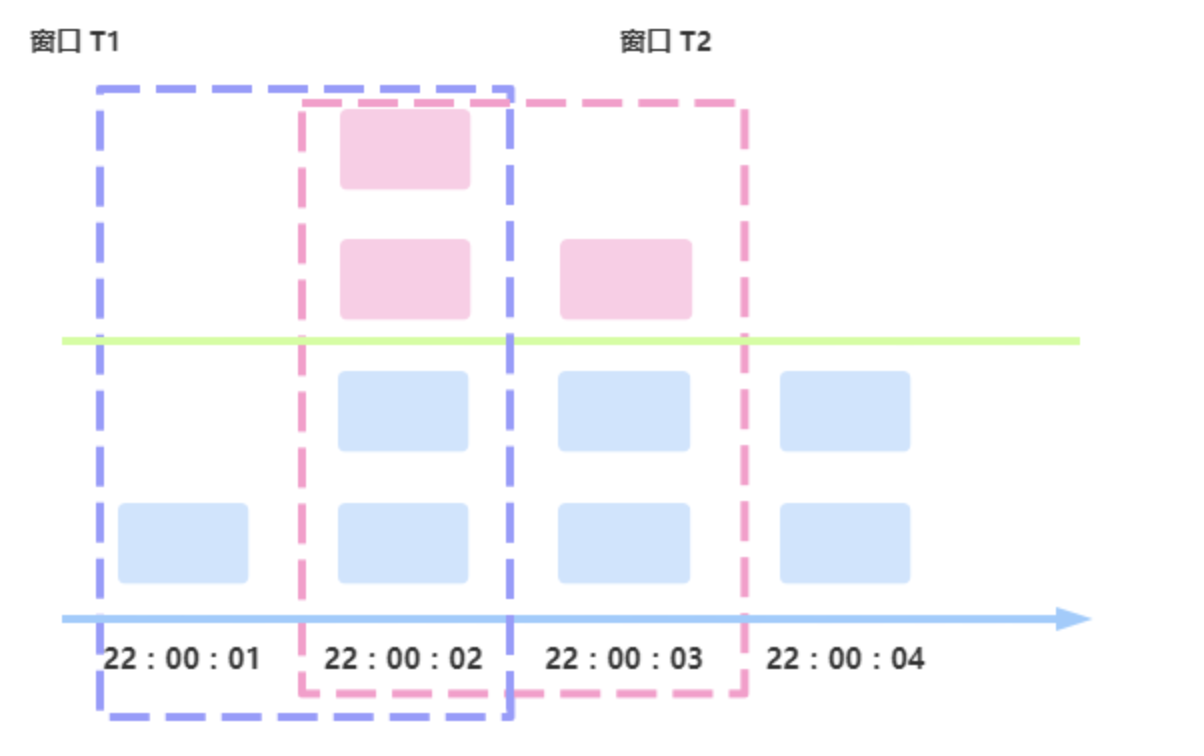
具体大概是以下步骤:
- 将时间划分为细粒度的区间
- 每个区间维持一个计数器,每进入一个请求则将计数器加一;
- 多个区间组成一个时间窗口,每流逝一个区间时间后,则抛弃最老的一个区间,纳入新区间。如图中示例的窗口 T1 变为窗口 T2;
- 若当前窗口的区间计数器总和超过设定的限制数量,则本窗口内的后续请求都被丢弃。
代码实现
  private final AtomicInteger[] window = new AtomicInteger[10];@PostConstructpublic void init() {//初始化定时任务线程池ScheduledExecutorService service = new ScheduledThreadPoolExecutor(2, t -> {Thread thread = new Thread(t);thread.setName("limit");return thread;});// 10个窗口,每次滑动1sArrays.fill(window, new AtomicInteger(0));service.scheduleAtFixedRate(() -> {int index = (int) (System.currentTimeMillis() / 1000 % 10);window[index] = new AtomicInteger(0);}, 1, 1, TimeUnit.SECONDS);
}/*** 滑动窗口*/public void window() {int sum = 0;for (int i = 0; i < window.length; i++) {sum += window[i].get();}if (sum > 10) {return;}System.out.println("window");int index = (int) (System.currentTimeMillis() / 1000 % 10);window[index].getAndAdd(1);}
漏桶
具体大概是以下步骤:
- 初始化一个队列,做桶
- 每个请求入队列,队列满则阻塞
- 启动定时任务,以固定的速率执行,执行时判读一下入队时间,如果延迟太久,直接丢弃(有可能客户端已经超时,服务端还没有处理)
代码实现
private final BlockingQueue queue = new LinkedBlockingDeque<>(5);@PostConstructpublic void init() {//初始化定时任务线程池ScheduledExecutorService service = new ScheduledThreadPoolExecutor(2, t -> {Thread thread = new Thread(t);thread.setName("limit");return thread;});// 一恒定的速率执行service.scheduleAtFixedRate(() -> {try {if (System.currentTimeMillis() - queue.take() > 1000L) {process();}} catch (InterruptedException e) {e.printStackTrace();}}, 100, 100, TimeUnit.MILLISECONDS);}/*** 漏桶限流*/public void bucket() {try {queue.put(System.currentTimeMillis());} catch (InterruptedException e) {e.printStackTrace();}}private void process() {System.out.println("process");}
令牌桶
令牌桶算法是漏斗算法的改进版,为了处理短时间的突发流量而做了优化,令牌桶算法主要由三部分组成:令牌流、数据流、令牌桶。
名词释义:
- 令牌桶:流通令牌的管道,用于生成的令牌的流通,放入令牌桶中。
- 数据流:进入系统的数据流量。
- 令牌桶:保存令牌的区域,可以理解为一个缓冲区,令牌保存在这里用于使用。
具体大概是以下步骤:
- 初始化一个队列做桶,大小为通的大小
- 启动定时任务,以一定的速率往队列中放入令牌
- 每个请求来临,去队列中获取令牌,获取成功正执行,否则阻塞
代码实现
private final BlockingQueue token = new LinkedBlockingDeque<>(5);@PostConstructpublic void init() {//初始化定时任务线程池ScheduledExecutorService service = new ScheduledThreadPoolExecutor(2, t -> {Thread thread = new Thread(t);thread.setName("limit");return thread;});// 以恒定的速率放入令牌service.scheduleAtFixedRate(() -> {try {token.put(1);} catch (InterruptedException e) {e.printStackTrace();}}, 1, 1, TimeUnit.SECONDS);}public void token() {try {token.take();System.out.println("token");} catch (InterruptedException e) {e.printStackTrace();}}
测试
@Resourceprivate LimitDemo demo;@Testpublic void count() throws InterruptedException {process(() -> demo.count());}@Testpublic void flag() throws InterruptedException {process(() -> demo.flag());}@Testpublic void window() throws InterruptedException {process(() -> demo.window());}@Testpublic void bucket() throws InterruptedException {process(() -> demo.bucket());}@Testpublic void token() throws InterruptedException {process(() -> demo.token());}private void process(Process process) throws InterruptedException {CompletableFuture[] objects = IntStream.range(0, 10).mapToObj(i -> CompletableFuture.runAsync(() -> {while (true) {process.execute();}})).collect(Collectors.toList()).toArray(new CompletableFuture[] {});CompletableFuture.allOf(objects);new CountDownLatch(1).await();}@FunctionalInterfacepublic interface Process {void execute();}
示例代码
源码地址 https://github.com/googalAmbition/googol/tree/master/limit
上一篇:家人陪伴幸福的句子
下一篇:Nginx下载安装以及简单使用
相关内容
热门资讯
埃菲尔铁塔在哪 中国仿建埃菲尔...
2019年4月26日,广西南宁市,街头惊现一座巨型山寨版埃菲尔铁塔,高约20米,白色塔身,造型逼真,...
苗族的传统节日 贵州苗族节日有...
【岜沙苗族芦笙节】岜沙,苗语叫“分送”,距从江县城7.5公里,是世界上最崇拜树木并以树为神的枪手部落...
函授本科是什么 自考本科还是函...
很多小伙伴在选择学历提升方式的时候,可能会感到很迷茫,不知道报考自考本科还是函授本科,两者有什么区别...
北京的名胜古迹 北京最著名的景...
北京从元代开始,逐渐走上帝国首都的道路,先是成为大辽朝五大首都之一的南京城,随着金灭辽,金代从海陵王...
长白山自助游攻略 吉林长白山游...
昨天介绍了西坡的景点详细请看链接:一个人的旅行,据说能看到长白山天池全凭运气,您的运气如何?今日介绍...
应用未安装解决办法 平板应用未...
---IT小技术,每天Get一个小技能!一、前言描述苹果IPad2居然不能安装怎么办?与此IPad不...
脚上的穴位图 脚面经络图对应的...
人体穴位作用图解大全更清晰直观的标注了各个人体穴位的作用,包括头部穴位图、胸部穴位图、背部穴位图、胳...
猫咪吃了塑料袋怎么办 猫咪误食...
你知道吗?塑料袋放久了会长猫哦!要说猫咪对塑料袋的喜爱程度完完全全可以媲美纸箱家里只要一有塑料袋的响...
世界上最漂亮的人 世界上最漂亮...
此前在某网上,选出了全球265万颜值姣好的女性。从这些数量庞大的女性群体中,人们投票选出了心目中最美...
埃菲尔铁塔在哪 中国仿建埃菲尔...
2019年4月26日,广西南宁市,街头惊现一座巨型山寨版埃菲尔铁塔,高约20米,白色塔身,造型逼真,...
苗族的传统节日 贵州苗族节日有...
【岜沙苗族芦笙节】岜沙,苗语叫“分送”,距从江县城7.5公里,是世界上最崇拜树木并以树为神的枪手部落...
安徒生童话有哪些 安徒生童话的...
从德国汉堡港乘轮船渡波罗的海抵丹麦王国,就到了安徒生的祖邦。安徒生(1805-1875)以童话作品闻...
北京的名胜古迹 北京最著名的景...
北京从元代开始,逐渐走上帝国首都的道路,先是成为大辽朝五大首都之一的南京城,随着金灭辽,金代从海陵王...