

九、Vue3基础之九
文章目录
- 一、可视化
- 1.1 接口API 也是后端项目
- 1.2 前端项目开始
- 1.2.1 echarts
- 二、Vue3 Router
- 2.1 Router的初步应用
- 2.2 路由模式、Router原理
- 2.3 命名路由、编程式导航
- 2.4 历史记录
- 2.5 路由传参
- 2.6 嵌套路由
- 2.7 命名视图
- 2.8 重定向、别名
- 2.9 导航守卫(前置守卫)
- 2.10 全局后置守卫
- 2.11 路由元信息
- 2.12 滚动行为
- 2.13 动态路由
一、可视化
1.1 接口API 也是后端项目
新建一个文件夹,在里面建一个index.ts
安装依赖包
npm install ts-node -g
npm init -y
npm install @types/node -D
npm install express -S
npm install @types/express -D
npm install axios -S
index.ts
// Express 基于Node.js平台,快速,开放、极简的web开发框架
import express, {Express, Router, Request, Response} from 'express'
import axios from 'axios'
const app:Express = express ()
// 请求跨域,协议,主机,端口任意一个都是跨域请求const router:Router = express.Router()// 中间件注册一个路由
app.use('/api', router)// 用路由来写我们的请求了,req前端传过来的,res返给前端的
router.get('/list', async (req:Request, res:Response)=>{const result = await axios.post('https://api.inews.qq.com/newsqa/v1/query/inner/publish/modules/list?modules=statisGradeCityDetail,diseaseh55helf')res.json({data: result.data})
})// 开一个服务
app.listen(3333, ()=>{console.log('success server http://localhost:3333')
})
package.json加一行代码可以执行npm run dev
{"name": "demo005","version": "1.0.0","description": "","main": "index.js","scripts": {"test": "echo \"Error: no test specified\" && exit 1",// 这行代码加在这里"dev": "ts-node index.ts"},"keywords": [],"author": "","license": "ISC","devDependencies": {"@types/express": "^4.17.14","@types/node": "^18.11.9"},"dependencies": {"axios": "^1.1.3","express": "^4.18.2"}
}
1.2 前端项目开始
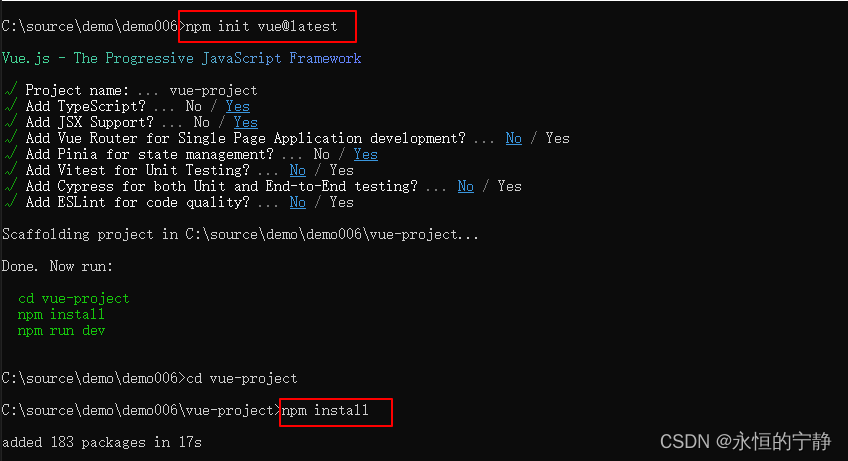
使用脚手架安装vue项目
安装依赖包
npm install sass sass-loader -D
在src下建一个server用来请求api接口
安装axios
npm install axios -S
在server下建一个index.ts
import axios from 'axios'const server = axios.create({baseURL: "http://localhost:3333"
})export const getApiList = () => server.get('/api/list').then(res=>res.data)
在@/store下建一个index.ts用来存放pinia配置
import { defineStore } from 'pinia'
import { getApiList  } from '@/server'
export const useStore = defineStore({id: 'apilist',state: ()=>({list: {}}),actions: {async getList(){const result = await getApiList()console.log(result)}}
})
在app.vue中测试是还在pinia中拿到请求的数据
app.vue
hehehehehehe
1.2.1 echarts
安装依赖包
npm install echarts -S
二、Vue3 Router
vue是单页应用不会有那么多html让我们跳转,所以需要使用路由做页面的跳转,vue路由允许我们通过不同的URL访问不同的内容,通过vue路由可以实现多视图的单页web应用。
构建前端项目
npm init vue@latest
# 或者
npm init vite@latest
使用vue3安装对应的router4版本
使用vue2安装对应的router3版本
npm install vue-router@4
npm install vue-router -S
2.1 Router的初步应用
在src下建一个router文件夹,然后在下面再建一个index.ts,用来做router的配置
import { createRouter, createWebHistory, RouteRecordRaw } from 'vue-router'// 创建路由规则及对应的组件
const routes:Array = [{path: '/', component:()=>import('../components/Login.vue')},{path: '/reg', component:()=>import('../components/Reg.vue')},
]const router = createRouter({history:createWebHistory(),routes
})export default router
将组件Login.vue及Reg.vue建好
在main.ts中引入router
import { createApp } from 'vue'
// import './style.css'
import App from './App.vue'
// 将写的路由规则加载进来
import router from './router'createApp(App).use(router).mount('#app')
在App.vue中使用路由
hello,vite vue!
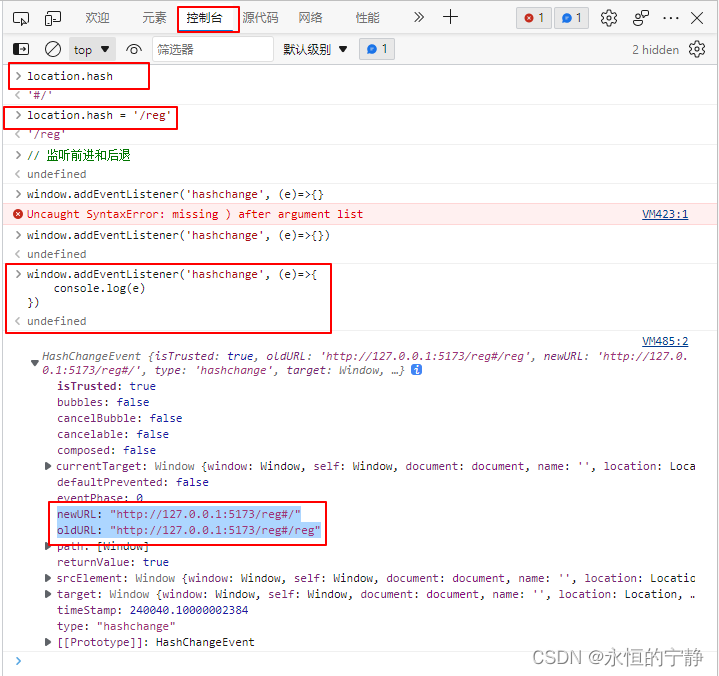
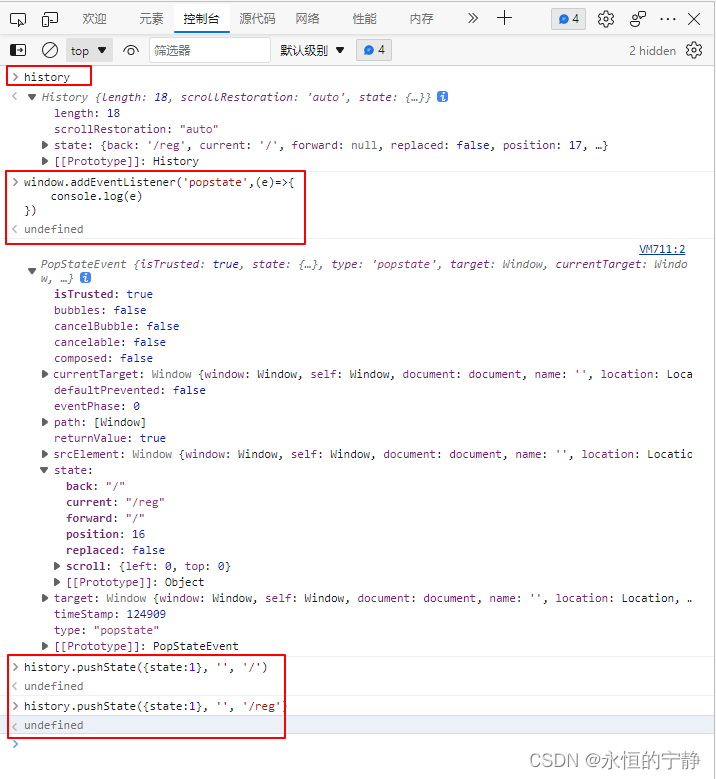
Login Register 2.2 路由模式、Router原理
vue2叫mode,vue3叫history
vue2 mode history vue3 createWebHistory
vue2 mode hash vue3 createWebHashHistory
vue2 mode abstract vue3 createMemoryHistory SSR服务器渲染会开启这种模式
createWebHashHistory
createWebHashHistory
2.3 命名路由、编程式导航
定义命名路由
import { createRouter, createWebHistory, RouteRecordRaw, createWebHashHistory } from 'vue-router'// 创建路由规则及对应的组件
const routes:Array = [{path: '/', name: 'Login',  //命名路由component:()=>import('../components/Login.vue')},{path: '/reg', name: 'Reg', //命名路由component:()=>import('../components/Reg.vue')},
]const router = createRouter({history:createWebHistory(),routes
})export default router
使用命名路由
App.vue
hello,vite vue!
Login Register 使用js的方式跳转路由
App.vue — 直接传字符串路径的方式跳转
hello,vite vue!
App.vue — 传命名路由、对象方式跳转
hello,vite vue!
2.4 历史记录
hello,vite vue!
Login router-link Reg router-link 2.5 路由传参
建一个数据文件,模拟数据 list.json
{"data" : [{"name" : "iphone手机","price": 8000,"id": 1},{"name" : "华为手机","price": 6000,"id": 2},{"name" : "小米手机","price": 2000,"id": 3}]
}
安装插件JSON to TS,将json转换成TS的类型
选中json中的代码按ctrl + shift + alt + s
跳转用useRouter,用路由中的数据用useRoute
跳转路由传参到一个组件,并在这个组件中读取传过来的参数
使用Query传参
展示数据组件
列表
品牌 价格 操作 {{item.name}} {{item.price}}
详情页组件
Register 详情页
名称:{{route.query.name}}价格:{{route.query.price}}ID:{{route.query.id}}
使用params传参,必须是命名路由
2.6 嵌套路由
import { createRouter, createWebHistory, RouteRecordRaw, createWebHashHistory } from 'vue-router'// 创建路由规则及对应的组件
const routes:Array = [{path: '/',component: () => import('../components/parent.vue'),children:[{path: '', name: 'Login',  //命名路由component:()=>import('../components/Login.vue')},{path: 'reg', name: 'Reg', //命名路由component:()=>import('../components/Reg.vue')},]}]const router = createRouter({history:createWebHistory(),routes
})export default router
2.7 命名视图
命名视图可以在同一级(同一个组件)中展示更多的路由视图,而不是嵌套显示。命名视图可以让一个组件中具有多个路由渲染出口,这对于一些特定的布局组件非常有用。命名视图的概念非常类似于"具名插槽",并且视图的默认名称也是default。
一个视图使用一个组件渲染,因此对于同个路由,多个视图就需要多个组件,确保正确使用components配置(加上s)
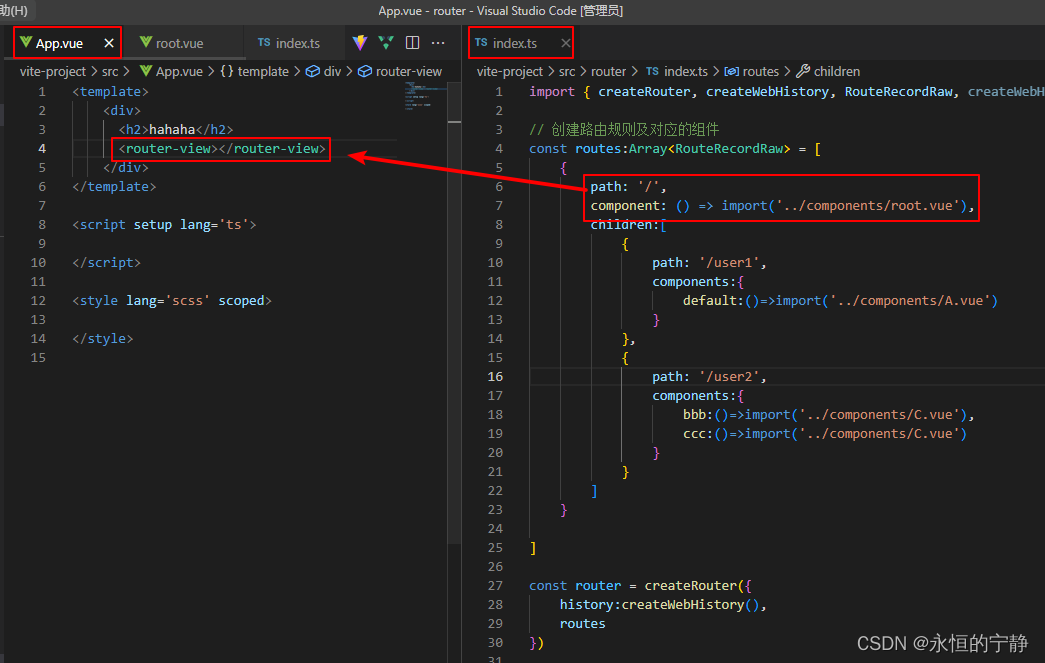
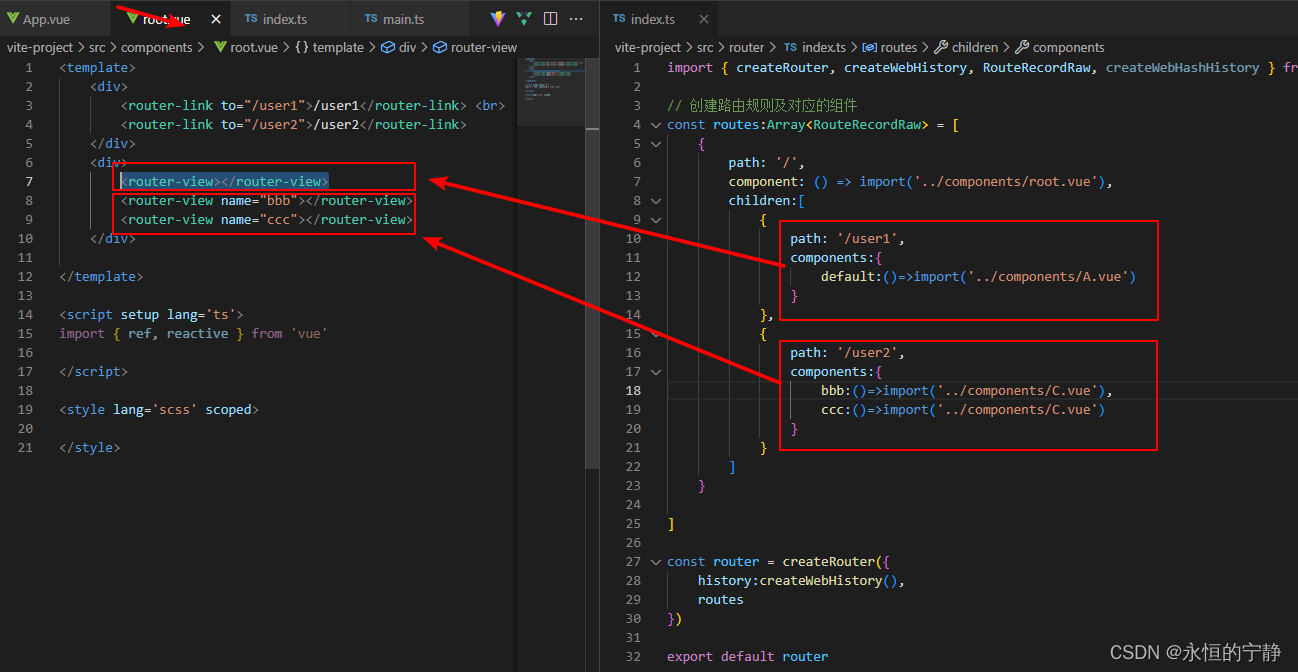
注意组件与路由之间的关系
2.8 重定向、别名
重定向redirect:字符串形式配置,访问/重定向到/user(地址栏显示/,内容为/user路由的内容)
import { createRouter, createWebHistory, RouteRecordRaw, createWebHashHistory } from 'vue-router'// 创建路由规则及对应的组件
const routes:Array = [{path: '/',component: () => import('../components/root.vue'),// 重定向方式一// redirect: {//     path: '/user1'// },// 重定向方式二// redirect:to=>{//     console.log(to)//     return '/user1'// },// 重定向方式三redirect:to=>{console.log(to)return {path: '/user1',query: {name: 'kk'}}},//别名 给path:'/'命别名alias: ['/root', '/haha'],children:[{path: '/user1', components:{default:()=>import('../components/A.vue')}},{path: '/user2', components:{bbb:()=>import('../components/C.vue'),ccc:()=>import('../components/C.vue')}}]}]const router = createRouter({history:createWebHistory(),routes
})export default router
2.9 导航守卫(前置守卫)
全局前置守卫,也可叫中间件,我们的路由跳转,前进、后退都会走这个函数,所以可以叫做中间件
做路由权限设置时经常用到
每个守卫方法接收三个参数
- to: Route,即将要进入的目标路由对象
- from:Route,当前导航正要离开的路由对象
- next:进行管道中的下一个钩子,如果全部钩子执行完了,则导航的状态是confirmed(确认的)
- next(false): 中断当前的导航,如果浏览器的URL改变了(可能是用户手动或者浏览器后退按钮),那么URL会重置到from的状态。
- next(“/”)或者next({path: ‘/’}):跳转到一个不同的地址,当前的导航被中断,然后进行一个新的导航。
step1:在main.ts中建一个前置守卫(也可叫中间件)对请求进行过滤
import { createApp } from 'vue'
// import './style.css'
import App from './App.vue'
// 将写的路由规则加载进来
import router from './router'// 白名单
const whileList = ['/']// 全局路由中间件(前置路由守卫)
router.beforeEach((to, from, next)=>{if(whileList.includes(to.path) || localStorage.getItem('token')){next()}else{next('/')}
})createApp(App).use(router).mount('#app')
step2:在src下建一个views文件夹,在里面建Login.vue, index.vue两个组件
目的:必须登陆用户才能访问index.vue组件,不过是根据前置路由守卫来进行过滤的。
Index.vue
嘎嘎我进来了{{route.query.name}}{{route.query.password}}
Login.vue
用户名:
密码:
step3: 路由的配置
router/index.ts
import { createRouter, createWebHistory, RouteRecordRaw, createWebHashHistory } from 'vue-router'
const router = createRouter({history:createWebHistory(),routes: [{path: '/',component: ()=>import('../views/Login.vue')},{path: '/index',component: ()=>import('../views/Index.vue')}]
})export default router
2.10 全局后置守卫
使用场景,可以用来做登录进度条。
router.afterEach(to, from) => {
Vnode.component?.exposed?.endLoading()
}
可以注册全局后置钩子,和前置守卫不同的是,这些钩子不会接受next函数也不会改变导航本身。
在进入路由之前开启进度条,之后呢给他清掉。
2.11 路由元信息
通过路由记录的meta属性可以定义路由的元信息,使用路由元信息可以在路由中附加自定义的数据,如:
- 权限校验标识
- 路由组件的过渡名称
- 路由组件持久化缓存(keep-alive)的相关配置
- 标题名称
可在以导航守卫或者是路由对象中访问路由的元信息数据,进入路由设置title之类的
2.12 滚动行为
使用前端路由,当切换到新路由时,想要页面滚到顶部,或者保持原先的滚动位置,就像重新加载页面那样,vue-route可以自定义路由切换时页面如何滚动
当创建一个Router实例,你可以提供一个scrollBehavior方法
const router = createRouter({history: createWebHistory(),scrollBehavior: (to, from, savePosition) => {console.log(to, '======>', savePosition)return new Promise((r)=>{setTimeout(() => {r({top: 10000})}, 2000)})}
})
router/index.ts
import { createRouter, createWebHistory, RouteRecordRaw, createWebHashHistory } from 'vue-router'const router = createRouter({history:createWebHistory(),scrollBehavior: (to, from, savePosition) => {console.log(savePosition)if(savePosition){  //如果savePosition有值,返回这个值return savePosition}else{return {top: 0}}},routes: [{path: '/',component: ()=>import('../views/Login.vue')},{path: '/index',component: ()=>import('../views/Index.vue')}]
})export default router
2.13 动态路由
不同的用户进去系统看到的菜单是不一样的
上一篇:求一些关于孤独的句子,求古体的
下一篇:java乱码问题一次性解决