

react学习随笔
创始人
2024-01-31 23:00:38
创建react脚手架项目
方法一:在安装好nodejs的情况下
npm install -g create-react-app 全局安装react脚手架
create-react-app 项目名 创建一个新的react项目
方法二:直接安装
npx create-react-app 项目名
npx create-react-app 项目名 --template typescript
注意:创建好的项目配置文件webpack相关是隐藏的,需要运行npm run eject解包展示出来。但是是不可逆的,所以可以换以下方式!
# 解包前必须做git提交,到commit就行了,否则无法解包(这是为了方便随时做版本回滚)
$ git add .
$ git commit -m '解包前'
$ npm run eject# 会发现多了个config配置文件夹。
# 项目默认配置了sass ,但是想要使用less需要找到sassModuleRegex重新配置一下
{test: /\.less$/,use: getStyleLoaders({//暂不配置},'less-loader'),
},
hooks(函数式组件才用)
useState 便于修改变量
useEffect 模拟三个生命周期:mounted(componentDidMount)updated(componentDidUpate)beforeDestory(componentWillUnmount)
useRef 用于获取节点
createContext 方便多级组件传参
生命周期
旧版生命周期(react17之前)
初始阶段    设置 props and state(static设置属性和constructor设置状态)
挂载阶段    componentWillMount render componentDidMount
修改阶段    修改 props and states ==> props: componentsWillReceiveProps -- shouldComponentUpdate -- componentWillUpdate -- render -- componentDidUpatestates: shouldComponentUpdate -- componentWillUpdate -- render -- componentDidUpate
销毁阶段    componentWillUnmount
新版生命周期(react17及之后) --will的的都没有了
创建阶段
修改阶段
销毁阶段
dom diff算法
没有索引key:一一对比。老的节点与新的节点比。依次对比。
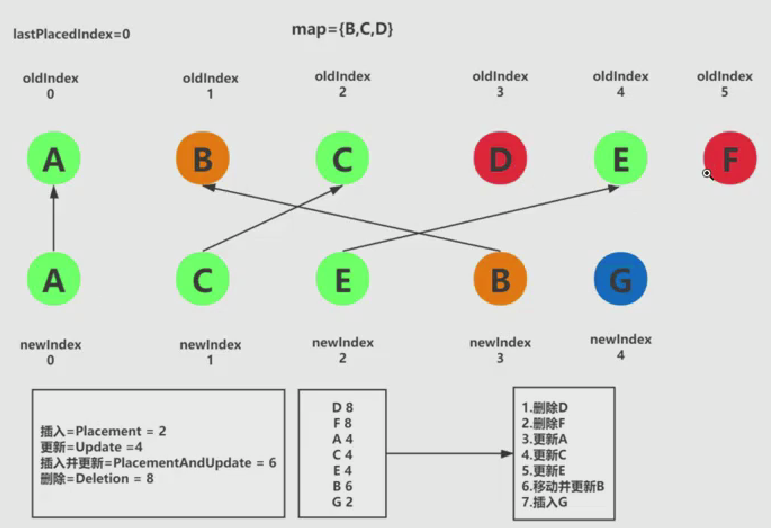
有索引key优化 :先比较索引key,再比较元素类型(元素类型相同的都可以复用),再比较函数内容,再比较下标,新下标<=老下标则不需要更新。新下标>老下标则需要移动和更新。其他索引key不同的,直接进行新增和删除。例子如下:
class AAA extends React.Component {constructor(props) {super(props) //相当于this.props=props重写父类构造函数this.state ={visible:true}; //设置默认状态}handleClick=()=>{this.setState({visible:!this.state.visible})}render() {//4的时候没有子组件,componentWillUnmount卸载子组件return ( {this.state.visible?- A
- B
- C
- D
- E
- F
: - A
- C
- E
- B
- G
})}
}
观察控制台元素发现,点击按钮,元素改变。有些元素不重新渲染有些元素重新渲染
原理:先比较key是否相同,相同比较type元素类型。再比较内容,内容相同,比较下标(0到n)。如果新下标<=老下标,那么是绿色的,不用更新。如果新下标>老下标,那么是黄色的,需要移动和更新。如果新的没有此元素或者老的多余了,进行新增和删除
context上下文
小项目可以用context,大项目还是用redux
相关内容
热门资讯
应用未安装解决办法 平板应用未...
---IT小技术,每天Get一个小技能!一、前言描述苹果IPad2居然不能安装怎么办?与此IPad不...
脚上的穴位图 脚面经络图对应的...
人体穴位作用图解大全更清晰直观的标注了各个人体穴位的作用,包括头部穴位图、胸部穴位图、背部穴位图、胳...
长白山自助游攻略 吉林长白山游...
昨天介绍了西坡的景点详细请看链接:一个人的旅行,据说能看到长白山天池全凭运气,您的运气如何?今日介绍...
世界上最漂亮的人 世界上最漂亮...
此前在某网上,选出了全球265万颜值姣好的女性。从这些数量庞大的女性群体中,人们投票选出了心目中最美...
埃菲尔铁塔在哪 中国仿建埃菲尔...
2019年4月26日,广西南宁市,街头惊现一座巨型山寨版埃菲尔铁塔,高约20米,白色塔身,造型逼真,...
每逢佳节倍思亲的意思 每逢佳节...
朴素,是诗歌语言众多风格之一。所谓“朴素”,即通过简洁、准确的语言传达作者真挚、美好的情感。如李白的...
苗族的传统节日 贵州苗族节日有...
【岜沙苗族芦笙节】岜沙,苗语叫“分送”,距从江县城7.5公里,是世界上最崇拜树木并以树为神的枪手部落...
北京的名胜古迹 北京最著名的景...
北京从元代开始,逐渐走上帝国首都的道路,先是成为大辽朝五大首都之一的南京城,随着金灭辽,金代从海陵王...
应用未安装解决办法 平板应用未...
---IT小技术,每天Get一个小技能!一、前言描述苹果IPad2居然不能安装怎么办?与此IPad不...
脚上的穴位图 脚面经络图对应的...
人体穴位作用图解大全更清晰直观的标注了各个人体穴位的作用,包括头部穴位图、胸部穴位图、背部穴位图、胳...
世界上最漂亮的人 世界上最漂亮...
此前在某网上,选出了全球265万颜值姣好的女性。从这些数量庞大的女性群体中,人们投票选出了心目中最美...
猫咪吃了塑料袋怎么办 猫咪误食...
你知道吗?塑料袋放久了会长猫哦!要说猫咪对塑料袋的喜爱程度完完全全可以媲美纸箱家里只要一有塑料袋的响...
北京的名胜古迹 北京最著名的景...
北京从元代开始,逐渐走上帝国首都的道路,先是成为大辽朝五大首都之一的南京城,随着金灭辽,金代从海陵王...
苗族的传统节日 贵州苗族节日有...
【岜沙苗族芦笙节】岜沙,苗语叫“分送”,距从江县城7.5公里,是世界上最崇拜树木并以树为神的枪手部落...