

Android最全的setContentView源码分析
前言
我们在开发过程中,在布局文件里添加TextView,代码运行起来就可以看到对应文字显示出来,那系统是如何把我们的TextView加载并显示出来的呢?
源码分析(这里版本对应30)
第一阶段
我们直接从Activity.setContentView()【为什么不是AppCompatActivity呢?其实最终继承Activity,只不过进行了高版本的适配】源码开始分析:
Activity.setContentView()
public void setContentView(@LayoutRes int layoutResID) {getWindow().setContentView(layoutResID);initWindowDecorActionBar();}
getWindow()对应Window类,它是一个抽象类,我们知道它的唯一实现类是PhoneWindow:
PhoneWindow.setContentView()
public void setContentView(int layoutResID) {if (mContentParent == null) {installDecor();} else if (!hasFeature(FEATURE_CONTENT_TRANSITIONS)) {mContentParent.removeAllViews();}if (hasFeature(FEATURE_CONTENT_TRANSITIONS)) {final Scene newScene = Scene.getSceneForLayout(mContentParent, layoutResID,getContext());transitionTo(newScene);} else {mLayoutInflater.inflate(layoutResID, mContentParent);}mContentParent.requestApplyInsets();final Callback cb = getCallback();if (cb != null && !isDestroyed()) {cb.onContentChanged();}mContentParentExplicitlySet = true;}
mContentParent是一个ViewGroup,一开始默认为null,我们先看下installDecor()方法都做了什么?
private void installDecor() {mForceDecorInstall = false;if (mDecor == null) {mDecor = generateDecor(-1);...} else {mDecor.setWindow(this);}if (mContentParent == null) {mContentParent = generateLayout(mDecor);}...}
installDecor()方法代码比较多,我们看源码最忌讳一行行弄清楚,我们只关心我们需要关心的代码,这里重点方法为generateDecor(-1)和generateLayout(mDecor),我们继续跟进下:
protected DecorView generateDecor(int featureId) {Context context;if (mUseDecorContext) {Context applicationContext = getContext().getApplicationContext();if (applicationContext == null) {context = getContext();} else {context = new DecorContext(applicationContext, this);if (mTheme != -1) {context.setTheme(mTheme);}}} else {context = getContext();}return new DecorView(context, featureId, this, getAttributes());}
可以看到generateDecor()方法如其名,最终就是创建了一个DecorView对象;我们再看下generateLayout(mDecor)方法;
protected ViewGroup generateLayout(DecorView decor) {....// Inflate the window decor.int layoutResource;//下面会根据features不同的值给layoutResource赋值不同的布局文件,features就是对应不同的窗口样式int features = getLocalFeatures();if ((features & ((1 << FEATURE_LEFT_ICON) | (1 << FEATURE_RIGHT_ICON))) != 0) {...} ...} else if ((features & (1 << FEATURE_ACTION_MODE_OVERLAY)) != 0) {layoutResource = R.layout.screen_simple_overlay_action_mode;} else {//默认加载R.layout.screen_simple布局layoutResource = R.layout.screen_simple;}mDecor.startChanging();//在这里将layoutResource添加到DecorView上mDecor.onResourcesLoaded(mLayoutInflater, layoutResource);contentParent对应布局文件中ID_ANDROID_CONTENT的ViewViewGroup contentParent = (ViewGroup)findViewById(ID_ANDROID_CONTENT);if (contentParent == null) {throw new RuntimeException("Window couldn't find content container view");}...return contentParent;}在generateLayout方法中,会根据不同的features(窗口样式,比如带不带标题栏等等)加载不同的布局文件,默认采用R.layout.screen_simple布局文件,我们看下这个布局文件代码:
获取到需要加载的布局文件后,紧跟着调用mDecor.onResourcesLoaded(mLayoutInflater, layoutResource)方法:
void onResourcesLoaded(LayoutInflater inflater, int layoutResource) {...mDecorCaptionView = createDecorCaptionView(inflater);final View root = inflater.inflate(layoutResource, null);if (mDecorCaptionView != null) {if (mDecorCaptionView.getParent() == null) {addView(mDecorCaptionView,new ViewGroup.LayoutParams(MATCH_PARENT, MATCH_PARENT));}mDecorCaptionView.addView(root,new ViewGroup.MarginLayoutParams(MATCH_PARENT, MATCH_PARENT));} else {// Put it below the color views.addView(root, 0, new ViewGroup.LayoutParams(MATCH_PARENT, MATCH_PARENT));}mContentRoot = (ViewGroup) root;initializeElevation();}
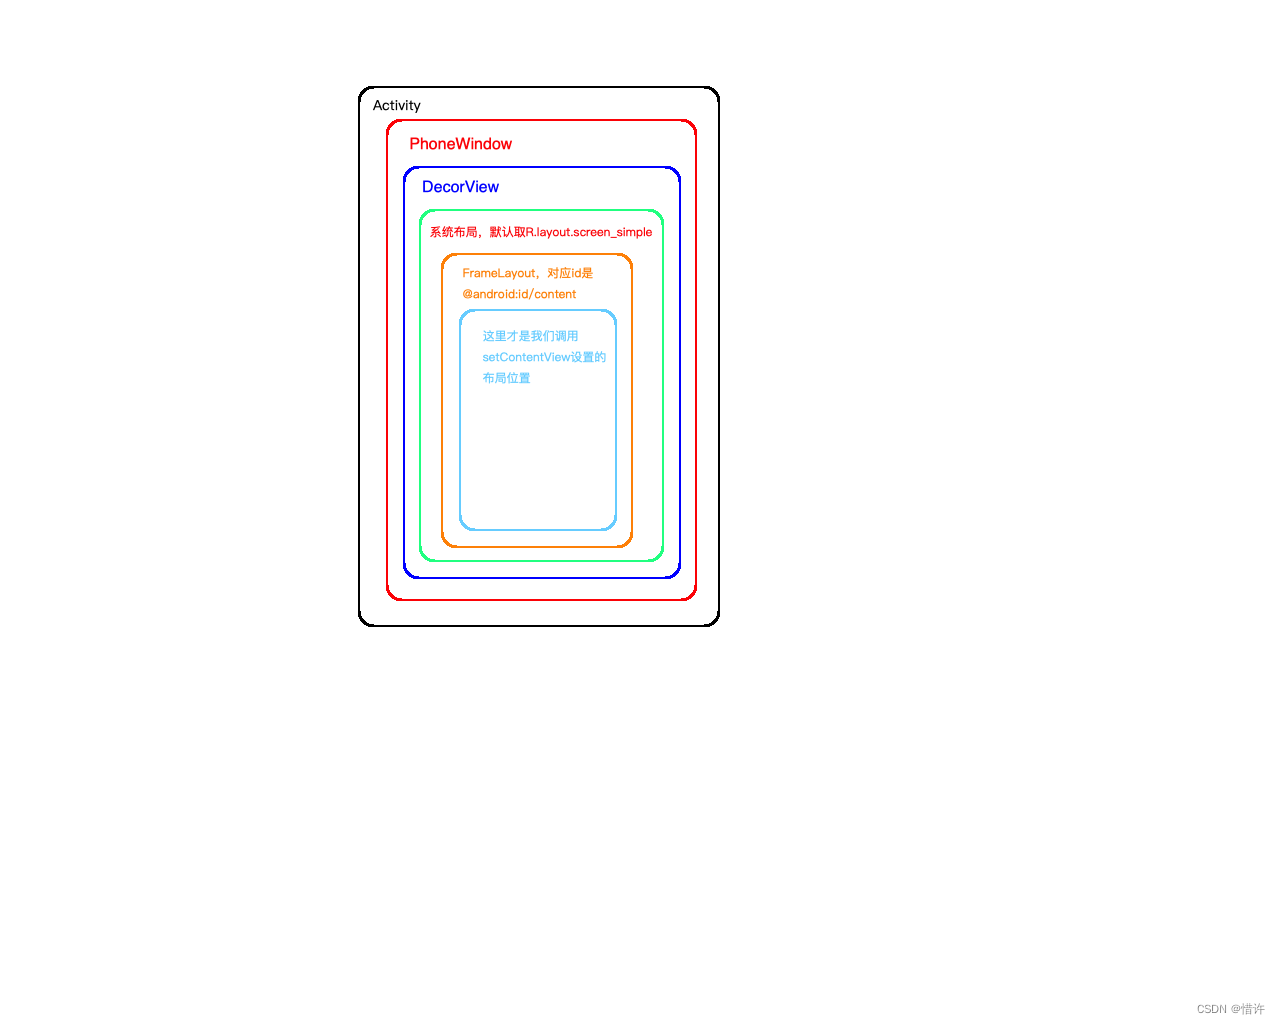
可以看到onResourcesLoaded方法就是将layoutResource布局添加到DecorView的根布局位置。添加完成后,最终generateLayout方法返回的就是ID对应ID_ANDROID_CONTENT的FrameLayout!!
到这里我们先简单画一下当前界面的显示内容:
第二阶段
分析完了installDecor(),接下来,我们就来分析mLayoutInflater.inflate(layoutResID, mContentParent)
在分析之前,我们先简单了解下mLayoutInflater,在PhoneWindow初始化时,会完成mLayoutInflater的初始化工作:
public PhoneWindow(Context context) {super(context);mLayoutInflater = LayoutInflater.from(context);...
public static LayoutInflater from(Context context) {LayoutInflater LayoutInflater =(LayoutInflater) context.getSystemService(Context.LAYOUT_INFLATER_SERVICE);if (LayoutInflater == null) {throw new AssertionError("LayoutInflater not found.");}return LayoutInflater;}
Context是一个抽象类,它对应的实现类为ContextImpl:
public Object getSystemService(String name) {....return SystemServiceRegistry.getSystemService(this, name);}
public static Object getSystemService(ContextImpl ctx, String name) {if (name == null) {return null;}final ServiceFetcher fetcher = SYSTEM_SERVICE_FETCHERS.get(name);...final Object ret = fetcher.getService(ctx);...return ret;}
SYSTEM_SERVICE_FETCHERS是一个Map集合,那什么时候把LayoutInflater放进集合的呢?答案在SystemServiceRegistry类的静态代码块中:
....
static{registerService(Context.LAYOUT_INFLATER_SERVICE, LayoutInflater.class,new CachedServiceFetcher() {@Overridepublic LayoutInflater createService(ContextImpl ctx) {return new PhoneLayoutInflater(ctx.getOuterContext());}});}
...### registerService方法private static void registerService(@NonNull String serviceName,@NonNull Class serviceClass, @NonNull ServiceFetcher serviceFetcher) {SYSTEM_SERVICE_NAMES.put(serviceClass, serviceName);SYSTEM_SERVICE_FETCHERS.put(serviceName, serviceFetcher);SYSTEM_SERVICE_CLASS_NAMES.put(serviceName, serviceClass.getSimpleName());} 从这里我们可以看出mLayoutInflater是一个单例,整个APP启动只会创建一个实例。
我们继续分析mLayoutInflater.inflate(layoutResID, mContentParent),会调用到LayoutInflater.inflate方法
public View inflate(@LayoutRes int resource, @Nullable ViewGroup root, boolean attachToRoot) {final Resources res = getContext().getResources();...View view = tryInflatePrecompiled(resource, res, root, attachToRoot);if (view != null) {return view;}XmlResourceParser parser = res.getLayout(resource);try {return inflate(parser, root, attachToRoot);} finally {parser.close();}}
其中tryInflatePrecompiled是Android 10(Android Q)中新增的方法,用来根据布局文件的xml预编译生成dex,然后通过反射来生成对应的View,从而减少XmlPullParser解析Xml的时间。它是一个编译优化选项。
我们重点看下inflate(parser, root, attachToRoot)方法:
public View inflate(XmlPullParser parser, @Nullable ViewGroup root, boolean attachToRoot) {synchronized (mConstructorArgs) {...if (TAG_MERGE.equals(name)) {//有merge标签的解析rInflate(parser, root, inflaterContext, attrs, false);} else {//普通布局解析final View temp = createViewFromTag(root, name, inflaterContext, attrs);// 解析Children,最终调用rInflate方法,一层层解析rInflateChildren(parser, temp, attrs, true);//添加创建的temp到root中,root即对应上面的FrameLayout,这里就完成了整个界面的解析if (root != null && attachToRoot) {root.addView(temp, params);}if (root == null || !attachToRoot) {result = temp;}}return result;}}
我们重点看下createViewFromTag(root, name, inflaterContext, attrs)
View createViewFromTag(View parent, String name, Context context, AttributeSet attrs,boolean ignoreThemeAttr) {if (name.equals("view")) {name = attrs.getAttributeValue(null, "class");}...try {//先去创建ViewView view = tryCreateView(parent, name, context, attrs);if (view == null) {//创建不成功,则直接通过反射去创建View,并做缓存final Object lastContext = mConstructorArgs[0];mConstructorArgs[0] = context;try {if (-1 == name.indexOf('.')) {view = onCreateView(context, parent, name, attrs);} else {view = createView(context, name, null, attrs);}} finally {mConstructorArgs[0] = lastContext;}}return view;} catch (InflateException e) {throw e;.....}}
我们先看下tryCreateView(parent, name, context, attrs)方法:
public final View tryCreateView(@Nullable View parent, @NonNull String name,@NonNull Context context,@NonNull AttributeSet attrs) {....View view;if (mFactory2 != null) {view = mFactory2.onCreateView(parent, name, context, attrs);} else if (mFactory != null) {view = mFactory.onCreateView(name, context, attrs);} else {view = null;}if (view == null && mPrivateFactory != null) {view = mPrivateFactory.onCreateView(parent, name, context, attrs);}return view;}
我们看到创建View又交给了mFactory2处理【二者都是LayoutInflater类内部定义的接口。Factory2继承自Factory接口,Factory2比Factory多增加了一个onCreateView(View parent, String name, Context context, AttributeSet attrs),该方法多了一个parent,用来存放构建出的View。】
然后会交给AppCompatDelegateImpl.createView来处理:
public View createView(View parent, final String name, @NonNull Context context,@NonNull AttributeSet attrs) {....return mAppCompatViewInflater.createView(parent, name, context, attrs, inheritContext,IS_PRE_LOLLIPOP, true, VectorEnabledTintResources.shouldBeUsed() );}
mAppCompatViewInflater.createView方法如下:
final View createView(View parent, final String name, @NonNull Context context,@NonNull AttributeSet attrs, boolean inheritContext,boolean readAndroidTheme, boolean readAppTheme, boolean wrapContext) {final Context originalContext = context;View view = null;switch (name) {case "TextView":view = createTextView(context, attrs);verifyNotNull(view, name);break;case "ImageView":view = createImageView(context, attrs);verifyNotNull(view, name);break;case "Button":view = createButton(context, attrs);verifyNotNull(view, name);break;....//匹配其他Viewdefault: view = createView(context, name, attrs);}//没有匹配成功if (view == null && originalContext != context) {view = createViewFromTag(context, name, attrs);}if (view != null) {checkOnClickListener(view, attrs);backportAccessibilityAttributes(context, view, attrs);}return view;}
我们就看下TextView是如何创建的:
protected AppCompatTextView createTextView(Context context, AttributeSet attrs) {return new AppCompatTextView(context, attrs);}
就是直接new了一个AppCompatTextView返回,对于没有匹配成功的View(如自定义的View),会调用createViewFromTag方法进行创建:
private View createViewFromTag(Context context, String name, AttributeSet attrs) {if (name.equals("view")) {name = attrs.getAttributeValue(null, "class");}try {mConstructorArgs[0] = context;mConstructorArgs[1] = attrs;//表示name里不包含.如LinearLayout/RetiveLayout等,就是拼上sClassPrefixList前缀,如android.widget.LinearLayoutif (-1 == name.indexOf('.')) {for (int i = 0; i < sClassPrefixList.length; i++) {final View view = createViewByPrefix(context, name, sClassPrefixList[i]);if (view != null) {return view;}}return null;} else {return createViewByPrefix(context, name, null);}} catch (Exception e) {...}}
我们看下createViewByPrefix方法:
private View createViewByPrefix(Context context, String name, String prefix)throws ClassNotFoundException, InflateException {//先从缓存map中获取,减少反射带来的开销Constructor constructor = sConstructorMap.get(name);try {//缓存中没有则通过反射根据类的全名去创建Viewif (constructor == null) {Class clazz = Class.forName(prefix != null ? (prefix + name) : name,false,context.getClassLoader()).asSubclass(View.class);constructor = clazz.getConstructor(sConstructorSignature);//存放到缓存集合中sConstructorMap.put(name, constructor);}constructor.setAccessible(true);//这里是调用两参的构造方法return constructor.newInstance(mConstructorArgs);} catch (Exception e) {return null;}}
小结
布局解析主要以下几个步骤:
-
先会调用
tryInflatePrecompiled进行解析添加到FrameLayout中【它会根据布局文件的xml预编译生成的dex文件,然后通过反射来生成对应的View,从而减少XmlPullParser解析Xml的时间。它是一个编译优化】,如果添加完成直接返回。 -
否则调用
inflate(parser, root, attachToRoot)方法进行解析加载,会调用createViewFromTag方法进行根View创建,先调用tryCreateView()方法,最终会调用到AppCompatViewInflater.createView方法,对于TextView、ImageView、Button这类View,直接调用两参的构造方法完成创建,对于LinearLayout或自定义View则通过反射进行创建,并进行了缓存处理。 -
如果上述
tryCreateView()方法创建的根View返回为null,则会直接调用createView方法使用反射进行创建,同样进行了缓存处理。 -
根布局创建完成会调用
rInflateChildren进行子View的创建,一层层创建添加到根布局View中; -
最后将根布局View添加到
FrameLayout中,完成整个界面View的解析。
总结
通过对setContentView的源码分析,了解了View是如何添加到当前界面上的,对于插件换肤方案有很大的帮助!
结语
如果以上文章对您有一点点帮助,希望您不要吝啬的点个赞加个关注,您每一次小小的举动都是我坚持写作的不懈动力!ღ( ´・ᴗ・` )
上一篇:博客系统前端页面
下一篇:数据存储策略——lsm-tree