

win10系统下使用openvino部署yolov5模型
创始人
2024-02-09 10:43:29
文章目录
- 前言
- 一、环境
- 1、硬件
- 2、软件
- 二、YOLO模型
- 三、新建Qt项目
- 1、pro文件
- 2、main.cpp
- 四、效果
- 五、后记
前言
上一篇介绍过使用onnxruntime实现模型推理部署,但在我的机器上视频效果仍不理想,本篇介绍使用openvino完成模型推理部署。
openvino是Intel开发的深度学习模型推理加速引擎,支持python和C++,使用起来比较方便。
一、环境
1、硬件
Intel® Core i5-7400 CPU @ 3.00GHZ
Intel® HD Graphics 630 内存4G 核显
内存 8G
win10 64位系统
2、软件
opencv4.6.0
yolov5 6.2版本
qt5.6.2
openvino_2022.1.0.643 runtime版本(关于安装自行谷歌。。。)
二、YOLO模型
我使用的是onnx模型,如果没有训练过自己的模型,可以使用官方的yolov5s.pt模型,将其转化为yolov5s.onnx模型,转化方法如下:
python export.py
在yolov5-master目录下,可以看到yolov5s.onnx模型已生成。
三、新建Qt项目
1、pro文件
在pro文件中,添加opencv相关配置,内容如下:
#-------------------------------------------------
#
# Project created by QtCreator 2022-10-31T09:37:31
#
#-------------------------------------------------QT       += core guigreaterThan(QT_MAJOR_VERSION, 4): QT += widgetsTARGET = yolov5-openvino-cpp
TEMPLATE = appCONFIG += C++11#CONFIG(debug, debug|release){
#    DESTDIR = ../out
#}
#else {
#    DESTDIR = ../out
#}SOURCES += main.cpp\mainwindow.cppHEADERS  += mainwindow.hFORMS    += mainwindow.uiINCLUDEPATH += C:/opencv4.6.0/build/includeC:/opencv4.6.0/build/include/opencv2
LIBS += -LC:/opencv4.6.0/build/x64/vc14/lib/ -lopencv_world460INCLUDEPATH += C:/onnxruntime-win-x64-1.11.1/include
LIBS += -LC:/onnxruntime-win-x64-1.11.1/lib/ -lonnxruntimeINCLUDEPATH += 'C:/Program Files (x86)/Intel/openvino_2022.1.0.643/runtime/include''C:/Program Files (x86)/Intel/openvino_2022.1.0.643/runtime/include/ie''C:/Program Files (x86)/Intel/openvino_2022.1.0.643/runtime/include/ngraph''C:/Program Files (x86)/Intel/openvino_2022.1.0.643/runtime/include/openvino'LIBS += -L'C:/Program Files (x86)/Intel/openvino_2022.1.0.643/runtime/lib/intel64/Release/' -lopenvino
LIBS += -L'C:/Program Files (x86)/Intel/openvino_2022.1.0.643/runtime/lib/intel64/Release/' -lopenvino_c
LIBS += -L'C:/Program Files (x86)/Intel/openvino_2022.1.0.643/runtime/lib/intel64/Release/' -lopenvino_ir_frontend
LIBS += -L'C:/Program Files (x86)/Intel/openvino_2022.1.0.643/runtime/lib/intel64/Release/' -lopenvino_onnx_frontend
LIBS += -L'C:/Program Files (x86)/Intel/openvino_2022.1.0.643/runtime/lib/intel64/Release/' -lopenvino_paddle_frontend
LIBS += -L'C:/Program Files (x86)/Intel/openvino_2022.1.0.643/runtime/lib/intel64/Release/' -lopenvino_tensorflow_fe
2、main.cpp
#include "mainwindow.h"
#include
#include
#include
#include
#include
#include
#include using namespace std;
using namespace ov;
using namespace cv;//数据集的标签 官方模型yolov5s.onnx为80种
vector class_names = {"person", "bicycle", "car", "motorbike", "aeroplane", "bus", "train", "truck", "boat", "traffic light","fire hydrant","stop sign", "parking meter", "bench", "bird", "cat", "dog", "horse", "sheep", "cow", "elephant", "bear", "zebra", "giraffe","backpack", "umbrella","handbag", "tie", "suitcase", "frisbee", "skis", "snowboard", "sports ball", "kite", "baseball bat", "baseball glove","skateboard", "surfboard","tennis racket", "bottle", "wine glass", "cup", "fork", "knife", "spoon", "bowl", "banana", "apple", "sandwich", "orange","broccoli", "carrot","hot dog", "pizza", "donut", "cake", "chair", "sofa", "pottedplant", "bed", "diningtable", "toilet", "tvmonitor", "laptop", "mouse","remote","keyboard", "cell phone", "microwave", "oven", "toaster", "sink", "refrigerator", "book", "clock", "vase", "scissors", "teddy bear", "hair drier", "toothbrush"};//模型文件路径
string ir_filename = "G:/yolov5s.onnx";/*@brief 对网络的输入为图片数据的节点进行赋值,实现图片数据输入网络@param input_tensor 输入节点的tensor@param inpt_image 输入图片数据
*/
void fill_tensor_data_image(ov::Tensor& input_tensor, const cv::Mat& input_image)
{// 获取输入节点要求的输入图片数据的大小ov::Shape tensor_shape = input_tensor.get_shape();const size_t width = tensor_shape[3]; // 要求输入图片数据的宽度const size_t height = tensor_shape[2]; // 要求输入图片数据的高度const size_t channels = tensor_shape[1]; // 要求输入图片数据的维度// 读取节点数据内存指针float* input_tensor_data = input_tensor.data();// 将图片数据填充到网络中// 原有图片数据为 H、W、C 格式,输入要求的为 C、H、W 格式for (size_t c = 0; c < channels; c++){for (size_t h = 0; h < height; h++){for (size_t w = 0; w < width; w++){input_tensor_data[c * width * height + h * width + w] = input_image.at>(h, w)[c];}}}
}int main(int argc, char *argv[])
{ov::Core ie;ov::CompiledModel compiled_model = ie.compile_model(ir_filename, "AUTO");//AUTO  GPU CPUov::InferRequest infer_request = compiled_model.create_infer_request();// 预处理输入数据 - 格式化操作cv::VideoCapture cap("G:/1.mp4");////VideoCapture cap;if (!cap.isOpened()){std::cerr << "Error opening video file\n";return -1;}// 获取输入节点tensorTensor input_image_tensor = infer_request.get_tensor("images");int input_h = input_image_tensor.get_shape()[2]; //获得"images"节点的Heightint input_w = input_image_tensor.get_shape()[3]; //获得"images"节点的Width//int input_c = input_image_tensor.get_shape()[1]; //获得"images"节点的channelcout << "input_h:" << input_h << "; input_w:" << input_w << endl;cout << "input_image_tensor's element type:" << input_image_tensor.get_element_type() << endl;cout << "input_image_tensor's shape:" << input_image_tensor.get_shape() << endl;// 获取输出节点tensorTensor output_tensor = infer_request.get_tensor("output");int out_rows = output_tensor.get_shape()[1]; //获得"output"节点的out_rowsint out_cols = output_tensor.get_shape()[2]; //获得"output"节点的Widthcout << "out_cols:" << out_cols << "; out_rows:" << out_rows << endl;//Mat frame;//连续采集处理循环while (true){cap.read(frame);if (frame.empty()){std::cout << "End of stream\n";break;}//imshow("frame", frame);int64 start = cv::getTickCount();// 图像预处理 视频分辨率int w = frame.cols;int h = frame.rows;//qDebug()<<"w ="< boxes;vector classIds;vector confidences;for (int i = 0; i < det_output.rows; i++){float confidence = det_output.at(i, 4);//qDebug()<<"confidence ="<continue;}//官方模型为85cv::Mat classes_scores = det_output.row(i).colRange(5, 85);cv::Point classIdPoint;double score;cv::minMaxLoc(classes_scores, 0, &score, 0, &classIdPoint);// 置信度 0~1之间//qDebug()<<"score ="< 0.8)//0.65{float cx = det_output.at(i, 0);float cy = det_output.at(i, 1);float ow = det_output.at(i, 2);float oh = det_output.at(i, 3);int x = static_cast((cx - 0.5 * ow) * x_factor);int y = static_cast((cy - 0.5 * oh) * y_factor);int width = static_cast(ow * x_factor);int height = static_cast(oh * y_factor);//qDebug()<<"cx ="< indexes;cv::dnn::NMSBoxes(boxes, confidences, 0.25, 0.45, indexes);for (size_t i = 0; i < indexes.size(); i++){int index = indexes[i];int idx = classIds[index];float iscore = confidences[index];//cv::rectangle(frame, boxes[index], cv::Scalar(0, 0, 255), 2, 8);cv::rectangle(frame, cv::Point(boxes[index].tl().x, boxes[index].tl().y - 20),cv::Point(boxes[index].br().x, boxes[index].tl().y), cv::Scalar(0, 255, 255), -1);//String nameText = class_names[idx];nameText.append(to_string(iscore));cv::putText(frame, nameText/*class_names[idx]*/, cv::Point(boxes[index].tl().x, boxes[index].tl().y - 10), cv::FONT_HERSHEY_SIMPLEX, .5, cv::Scalar(0, 0, 0));//目标中心点Point2f point(boxes[index].x + boxes[index].width/2,boxes[index].y + boxes[index].height/2);circle(frame, point, 3, Scalar(0, 255, 0), -1);//String posText = "x:";posText.append(to_string(boxes[index].x + + boxes[index].width/2));posText.append(",");posText.append("y:");posText.append(to_string(boxes[index].y + + boxes[index].height/2));//qDebug()<(cv::getTickFrequency());//cout << "Infer time(ms): " << t * 1000 << "ms; Detections: " << indexes.size() << endl;putText(frame, cv::format("FPS: %.2f", 1.0 / t), cv::Point(20, 40), cv::FONT_HERSHEY_PLAIN, 2.0, cv::Scalar(255, 0, 0), 2, 8);cv::namedWindow("YOLOv5-6.2 + OpenVINO 2022.1 C++ Demo",0);cv::imshow("YOLOv5-6.2 + OpenVINO 2022.1 C++ Demo", frame);char c = cv::waitKey(1);if (c == 27){// ESCbreak;}}cv::waitKey(0);cv::destroyAllWindows();return 0;
}
四、效果
以本地视频文件1.mp4为例,效果如下:
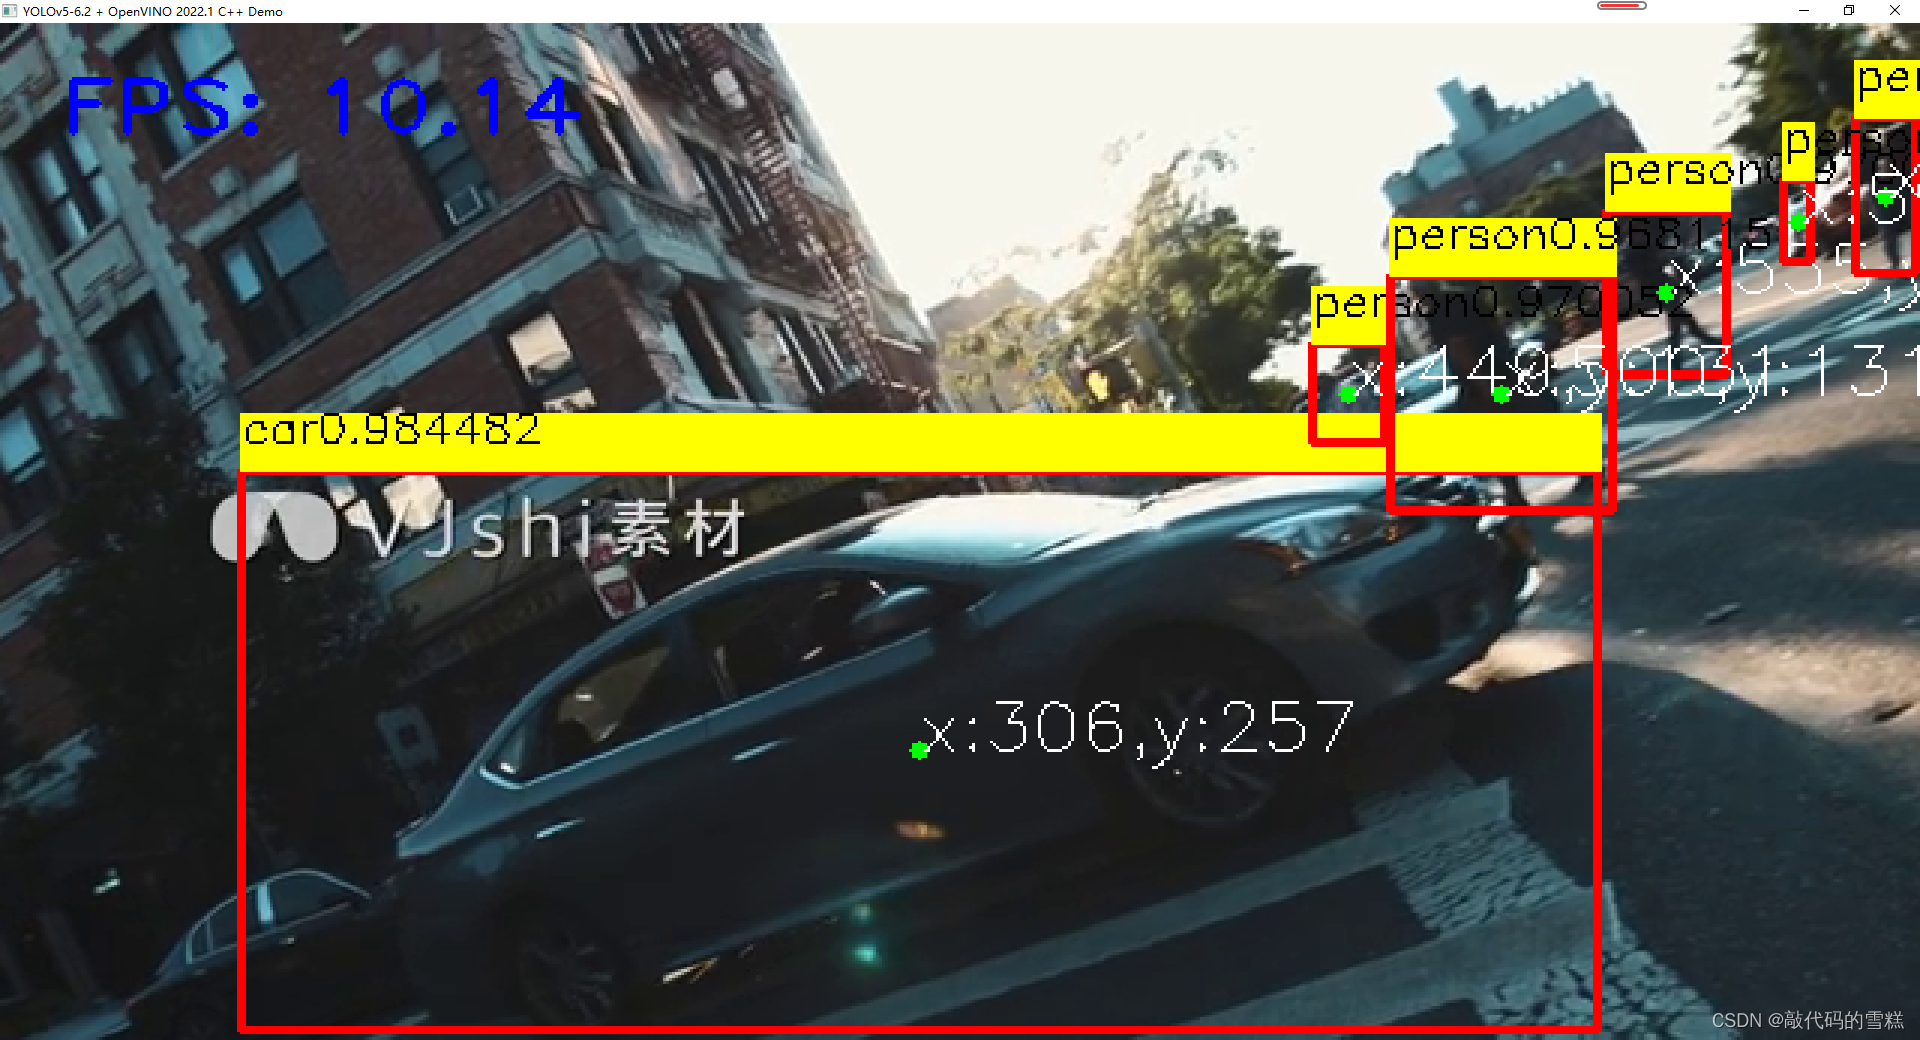
可以看到FPS获得较大提升,视频流明显比之前效果要好。
五、后记
以上代码是基于qt5.6.2 编译的64位程序,32位编译不通过,貌似需要自己编译openvino 32bit版本。我尝试编译过openvino 32bit,但部分库编译失败,该qt demo运行失败。如果有博主编译成功该版本openvino 32bit,辛苦告知一下,万分感谢!!!
上一篇:人间二月天打一字是什么
下一篇:带跌眼的成语有哪些
相关内容
热门资讯
埃菲尔铁塔在哪 中国仿建埃菲尔...
2019年4月26日,广西南宁市,街头惊现一座巨型山寨版埃菲尔铁塔,高约20米,白色塔身,造型逼真,...
苗族的传统节日 贵州苗族节日有...
【岜沙苗族芦笙节】岜沙,苗语叫“分送”,距从江县城7.5公里,是世界上最崇拜树木并以树为神的枪手部落...
北京的名胜古迹 北京最著名的景...
北京从元代开始,逐渐走上帝国首都的道路,先是成为大辽朝五大首都之一的南京城,随着金灭辽,金代从海陵王...
长白山自助游攻略 吉林长白山游...
昨天介绍了西坡的景点详细请看链接:一个人的旅行,据说能看到长白山天池全凭运气,您的运气如何?今日介绍...
应用未安装解决办法 平板应用未...
---IT小技术,每天Get一个小技能!一、前言描述苹果IPad2居然不能安装怎么办?与此IPad不...
脚上的穴位图 脚面经络图对应的...
人体穴位作用图解大全更清晰直观的标注了各个人体穴位的作用,包括头部穴位图、胸部穴位图、背部穴位图、胳...
demo什么意思 demo版本...
618快到了,各位的小金库大概也在准备开闸放水了吧。没有小金库的,也该向老婆撒娇卖萌服个软了,一切只...
猫咪吃了塑料袋怎么办 猫咪误食...
你知道吗?塑料袋放久了会长猫哦!要说猫咪对塑料袋的喜爱程度完完全全可以媲美纸箱家里只要一有塑料袋的响...
世界上最漂亮的人 世界上最漂亮...
此前在某网上,选出了全球265万颜值姣好的女性。从这些数量庞大的女性群体中,人们投票选出了心目中最美...
埃菲尔铁塔在哪 中国仿建埃菲尔...
2019年4月26日,广西南宁市,街头惊现一座巨型山寨版埃菲尔铁塔,高约20米,白色塔身,造型逼真,...
苗族的传统节日 贵州苗族节日有...
【岜沙苗族芦笙节】岜沙,苗语叫“分送”,距从江县城7.5公里,是世界上最崇拜树木并以树为神的枪手部落...
北京的名胜古迹 北京最著名的景...
北京从元代开始,逐渐走上帝国首都的道路,先是成为大辽朝五大首都之一的南京城,随着金灭辽,金代从海陵王...
脚上的穴位图 脚面经络图对应的...
人体穴位作用图解大全更清晰直观的标注了各个人体穴位的作用,包括头部穴位图、胸部穴位图、背部穴位图、胳...