

biaffine model:Named Entity Recognition as Dependency Parsing
论文名称:Named Entity Recognition as Dependency Parsing
论文地址:https://www.aclweb.org/anthology/2020.acl-main.577/
前提说明
本文主要参考了以下资料
- nlp_paper_study_information_extraction/code_pytorch.md at main · km1994/nlp_paper_study_information_extraction (github.com)
- suolyer/PyTorch_BERT_Biaffine_NER: 论文复现《Named Entity Recognition as Dependency Parsing》 (github.com)
借助于第二个资料里的仓库,也是很顺利的跑出了该模型
摘要
- 动机:NER研究关注于flat NER,而忽略了nested NER
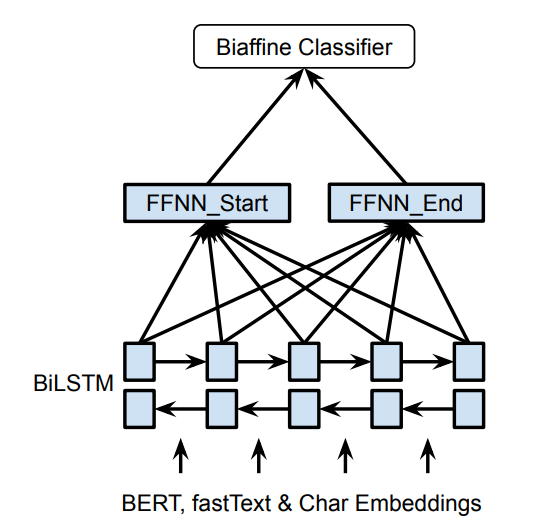
- 方法:在本文中,使用基于图的依存关系解析中的思想,以通过biaffine model为模型提供全局的输入视图。biaffine model 对句子中的开始标记和结束标记进行评分,使用该标记来探索所有跨度,以便该模型能够准确地预测命名实体
- 工作介绍:在这项工作中,我们将NER重新确定为开始和结束索引的任务,并为这些定义的范围分配类别,我们的系统在多层Bi-LSTM之上使用biaffine模型,将分数分配给句子中所有可能的跨度。此后,我们不用构建依赖关系树,而是根据侯选树的分数对它们进行排序,然后返回符合 Flat 或 Nested NER约束排名最高的树span
- 实验结果:
- 我们根据三个嵌套的NER基准(ACE 2004,ACE 2005,GENIA)和五个扁平的NER语料库(CONLL 2002(荷兰语,西班牙语),CONLL 2003(英语,德语)和ONTONOTES)对系统进行了评估。结果表明,我们的系统在所有三个嵌套的NER语料库和所有五个平坦的NER语料库上均取得了SoTA结果,与以前的SoTA相比,实际收益高达2.2%的绝对百分比。
一、数据处理模块
1. 1原始数据格式
{"text": "当希望工程救助的百万儿童成长起来,科教兴国蔚然成风时,今天有收藏价值的书你没买,明日就叫你悔不当初!", "entity_list": []
}
{"text": "藏书本来就是所有传统收藏门类中的第一大户,只是我们结束温饱的时间太短而已。", "entity_list": []
}
{"text": "因有关日寇在京掠夺文物详情,藏界较为重视,也是我们收藏北京史料中的要件之一。", "entity_list": [{"type": "ns", "argument": "北京"}]
}
...
1.2数据预处理模块
1.2 .1数据加载load_data(file_path)
def load_data(file_path):with open(file_path, 'r', encoding='utf8') as f:lines = f.readlines()sentences = []arguments = []for line in lines:data = json.loads(line)text,entity_list = data['text'],data['entity_list']args_dict={}if entity_list != []:for entity in entity_list:entity_type,entity_argument = entity['type'],entity['argument']if entity_type not in args_dict.keys():args_dict[entity_type] = [entity_argument]else:args_dict[entity_type].append(entity_argument)sentences.append(text)arguments.append(args_dict)return sentences, arguments
-
获取原始数据
-
返回entity_list不为 [] 的数据
-
返回sentences、arguments,格式如下
print(f"sentences[0:2]:{sentences[0:2]}")
print(f"arguments[0:2]:{arguments[0:2]}")sentences[0:2]:['因有关日寇在京掠夺文物详情,藏界较为重视,也是我们收藏北京史料中的要件之一。', '我们藏有一册1945年6月油印的《北京文物保存保管状态之调查报告》,调查范围涉及故宫、历博、古研所、北大清华图书馆、北图、日伪资料库等二十几家,言及文物二十万件以上,洋洋三万余言,是珍贵的北京史料。']arguments[0:2]:[{'ns': ['北京']}, {'ns': ['北京', '故宫', '历博', '北大清华图书馆', '北图', '北京'], 'nt': ['古研所']}]
1.2.2 数据编码encoder(sentence,argument)
# step 1:获取 Bert tokenizer
tokenizer=tools.get_tokenizer()
# step 2: 获取 label 到 id 间  的 映射表;
label2id,id2label,num_labels = tools.load_schema()def encoder(sentence, argument):from utils.arguments_parse import args# step 3:利用 tokenizer 对 sentence 进行 编码encode_dict = tokenizer.encode_plus(sentence,max_length=args.max_length,pad_to_max_length=True)encode_sent = encode_dict['input_ids']token_type_ids = encode_dict['token_type_ids']attention_mask = encode_dict['attention_mask']# step 4:span_mask 生成zero = [0 for i in range(args.max_length)]span_mask=[ attention_mask for i in range(sum(attention_mask))]span_mask.extend([ zero for i in range(sum(attention_mask),args.max_length)])# step 5:span_label 生成span_label = [0 for i in range(args.max_length)]span_label = [span_label for i in range(args.max_length)]span_label = np.array(span_label)for entity_type,args in argument.items():for arg in args:encode_arg = tokenizer.encode(arg)start_idx = tools.search(encode_arg[1:-1], encode_sent)end_idx = start_idx + len(encode_arg[1:-1]) - 1span_label[start_idx, end_idx] = label2id[entity_type]+1 # 在span_label这个矩阵中,1代表nr,2代表ns,3代表ntreturn encode_sent, token_type_ids, attention_mask, span_label, span_mask
-
获取Bert tokenizer、获取label到id间的映射表
-
encode_plus后的编码信息
- input_ids:单词在词典中的编码
- token_type_ids:区分两个句子的编码
- attention_mask:指定对哪些词进行self-Attention操作
encode_dict: {'input_ids': [101, 1728, 3300, 1068, 3189, 2167, 1762, 776, 2966, 1932, 3152, 4289, 6422, 2658, 8024, 5966, 4518, 6772, 711, 7028, 6228, 8024, 738, 3221, 2769, 812, 3119, 5966, 1266, 776, 1380, 3160, 704, 4638, 6206, 816, 722, 671, 511, 102, 0, 0, 0, 0, 0, 0, 0, 0, 0, 0, 0, 0, 0, 0, 0, 0, 0, 0, 0, 0, 0, 0, 0, 0, 0, 0, 0, 0, 0, 0, 0, 0, 0, 0, 0, 0, 0, 0, 0, 0, 0, 0, 0, 0, 0, 0, 0, 0, 0, 0, 0, 0, 0, 0, 0, 0, 0, 0, 0, 0, 0, 0, 0, 0, 0, 0, 0, 0, 0, 0, 0, 0, 0, 0, 0, 0, 0, 0, 0, 0, 0, 0, 0, 0, 0, 0, 0, 0],'token_type_ids': [0, 0, 0, 0, 0, 0, 0, 0, 0, 0, 0, 0, 0, 0, 0, 0, 0, 0, 0, 0, 0, 0, 0, 0, 0, 0, 0, 0, 0, 0, 0, 0, 0, 0, 0, 0, 0, 0, 0, 0, 0, 0, 0, 0, 0, 0, 0, 0, 0, 0, 0, 0, 0, 0, 0, 0, 0, 0, 0, 0, 0, 0, 0, 0, 0, 0, 0, 0, 0, 0, 0, 0, 0, 0, 0, 0, 0, 0, 0, 0, 0, 0, 0, 0, 0, 0, 0, 0, 0, 0, 0, 0, 0, 0, 0, 0, 0, 0, 0, 0, 0, 0, 0, 0, 0, 0, 0, 0, 0, 0, 0, 0, 0, 0, 0, 0, 0, 0, 0, 0, 0, 0, 0, 0, 0, 0, 0, 0], 'attention_mask': [1, 1, 1, 1, 1, 1, 1, 1, 1, 1, 1, 1, 1, 1, 1, 1, 1, 1, 1, 1, 1, 1, 1, 1, 1, 1, 1, 1, 1, 1, 1, 1, 1, 1, 1, 1, 1, 1, 1, 1, 0, 0, 0, 0, 0, 0, 0, 0, 0, 0, 0, 0, 0, 0, 0, 0, 0, 0, 0, 0, 0, 0, 0, 0, 0, 0, 0, 0, 0, 0, 0, 0, 0, 0, 0, 0, 0, 0, 0, 0, 0, 0, 0, 0, 0, 0, 0, 0, 0, 0, 0, 0, 0, 0, 0, 0, 0, 0, 0, 0, 0, 0, 0, 0, 0, 0, 0, 0, 0, 0, 0, 0, 0, 0, 0, 0, 0, 0, 0, 0, 0, 0, 0, 0, 0, 0, 0, 0] } -
span_mask:形状为[max_len,max_len]。这个行、列都是这个句子表示,掩码机制扩展到二维上
-
span_label:形状为[max_len,max_len]。用于定位实体span在句子中的位置[开始位置,结束位置],span在矩阵中行代表开始,列代表结束,里面的值就是该span所对应的类型
>>>
import numpy as np
span_label = [0 for i in range(10)]
span_label = [span_label for i in range(10)]
span_label = np.array(span_label)
start = [1, 3, 7]
end  = [ 2,9, 9]
label2id = [1,2,4]
for i in range(len(label2id)):span_label[start[i], end[i]] = label2id[i]  >>>
array( [[0, 0, 0, 0, 0, 0, 0, 0, 0, 0],[0, 0, 1, 0, 0, 0, 0, 0, 0, 0],[0, 0, 0, 0, 0, 0, 0, 0, 0, 0],[0, 0, 0, 0, 0, 0, 0, 0, 0, 2],[0, 0, 0, 0, 0, 0, 0, 0, 0, 0],[0, 0, 0, 0, 0, 0, 0, 0, 0, 0],[0, 0, 0, 0, 0, 0, 0, 0, 0, 0],[0, 0, 0, 0, 0, 0, 0, 0, 0, 4],[0, 0, 0, 0, 0, 0, 0, 0, 0, 0],[0, 0, 0, 0, 0, 0, 0, 0, 0, 0]])
> 注:行号 为 start,列号 为 end,值 为 label2id
1.2.3 数据预处理主函数 data_pre(file_path)
- 加载数据,对数据进行编码,转化为训练数据格式
def data_pre(file_path):sentences, arguments = load_data(file_path)data = []for i in tqdm(range(len(sentences))): ##一条条句子读取encode_sent, token_type_ids, attention_mask, span_label, span_mask = encoder(sentences[i], arguments[i])tmp = {}tmp['input_ids'] = encode_senttmp['input_seg'] = token_type_idstmp['input_mask'] = attention_masktmp['span_label'] = span_labeltmp['span_mask'] = span_maskdata.append(tmp)return data
1.3 数据转为MyDataset对象
将数据转化为 torch.tensor 类型
class MyDataset(Dataset):def __init__(self, data):self.data = datadef __len__(self):return len(self.data)def __getitem__(self, index):item = self.data[index]one_data = {"input_ids": torch.tensor(item['input_ids']).long(),"input_seg": torch.tensor(item['input_seg']).long(),"input_mask": torch.tensor(item['input_mask']).float(),"span_label": torch.tensor(item['span_label']).long(),"span_mask": torch.tensor(item['span_mask']).long()}return one_data
1.4 构建数据迭代器
def yield_data(file_path):tmp = MyDataset(data_pre(file_path))return DataLoader(tmp, batch_size=args.batch_size, shuffle=True)
二、模型构建 模块
模型主要由 embedding layer、BiLSTM、biaffine model四部分组成
embedding layers
- BERT: 遵循 (Kantor and Globerson, 2019) 的方法来获取目标令牌的上下文相关嵌入,每侧有64个周围令牌;
- character-based word embeddings:使用 CNN 编码 characters of the tokens
# 获取 Bert tokenizer
tokenizer=tools.get_tokenizer()class myModel(nn.Module):def __init__(self, pre_train_dir: str, dropout_rate: float):super().__init__()self.roberta_encoder = BertModel.from_pretrained(pre_train_dir)self.roberta_encoder.resize_token_embeddings(len(tokenizer))...def forward(self, input_ids, input_mask, input_seg, is_training=False):bert_output = self.roberta_encoder(input_ids=input_ids, attention_mask=input_mask, token_type_ids=input_seg) encoder_rep = bert_output[0]# {batch_size,max_seq_len,hidden_size=768}...
BiLSTM
拼接 char emb 和 word emb,并输入到 BiLSTM,以获得 word 表示;
class myModel(nn.Module):def __init__(self, pre_train_dir: str, dropout_rate: float):super().__init__()...self.lstm=torch.nn.LSTM(input_size=768,hidden_size=768, \num_layers=1,batch_first=True, \dropout=0.5,bidirectional=True)...def forward(self, input_ids, input_mask, input_seg, is_training=False):...encoder_rep,_ = self.lstm(encoder_rep)# encoder_rep : {batch_size,max_seq_len,hidden_size * 2}...
FFNN
从BiLSTM获得单词表示形式后,我们应用两个单独的FFNN为 span 的开始/结束创建不同的表示形式(hs / he)。对 span 的开始/结束使用不同的表示,可使系统学会单独识别 span 的开始/结束。与直接使用LSTM输出的模型相比,这提高了准确性,因为实体开始和结束的上下文不同
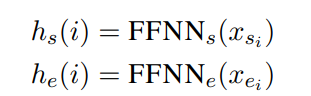
class myModel(nn.Module):def __init__(self, pre_train_dir: str, dropout_rate: float):...self.start_layer = torch.nn.Sequential(torch.nn.Linear(in_features=2*768, out_features=128),torch.nn.ReLU())self.end_layer = torch.nn.Sequential(torch.nn.Linear(in_features=2*768, out_features=128),torch.nn.ReLU())...def forward(self, input_ids, input_mask, input_seg, is_training=False):...start_logits = self.start_layer(encoder_rep) # {batch_size,max_seq_len,out_features}end_logits = self.end_layer(encoder_rep) # {batch_size,max_seq_len,out_features}...
biaffine model
句子上使用biaffine模型来创建 l×l×c 评分张量(rm),其中l是句子的长度,c 是 NER 类别的数量 +1(对于非实体)

- si和ei是 span i 的开始和结束索引
- Um 是 d×c×d 张量
- Wm是2d×c矩阵
- bm是偏差
# NER类别数量 + 1(对于非实体)
num_label = num_labels+1class biaffine(nn.Module):def __init__(self, in_size, out_size, bias_x=True, bias_y=True):super().__init__()self.bias_x = bias_xself.bias_y = bias_yself.out_size = out_sizeself.U = torch.nn.Parameter(torch.Tensor(in_size + int(bias_x),out_size,in_size + int(bias_y))) def forward(self, x, y):# {batch_size,max_seq_len,out_features}if self.bias_x:x = torch.cat((x, torch.ones_like(x[..., :1])), dim=-1)# {batch_size,max_seq_len,out_features + 1}if self.bias_y:y = torch.cat((y, torch.ones_like(y[..., :1])), dim=-1)bilinar_mapping = torch.einsum('bxi,ioj,byj->bxyo', x, self.U, y)# {bacth_size,max_seq_len,out_features,num_label}return bilinar_mapping
class myModel(nn.Module):def __init__(self, pre_train_dir: str, dropout_rate: float):...self.biaffne_layer = biaffine(128,num_label)...def forward(self, input_ids, input_mask, input_seg, is_training=False):...span_logits = self.biaffne_layer(start_logits,end_logits)# {bacth_size,max_seq_len,out_features,num_label}span_logits = span_logits.contiguous()...
冲突解决
张量 r_m 提供在 s_i≤e_i 的约束下(实体的起点在其终点之前)可以构成命名实体的所有可能 span 的分数。我们为每个跨度分配一个NER类别

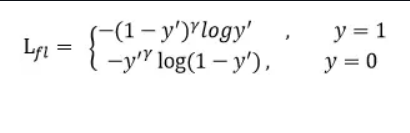
然后,我们按照其类别得分 (r_m(i_{y’})) 降序对所有其他“非实体”类别的 span 进行排序,并应用以下后处理约束:对于嵌套的NER,只要选择了一个实体就不会与排名较高的实体发生冲突。对于 实体 i与其他实体 j ,如果 s_i 因为该任务属于 多类别分类问题: 核心思想:对于模型学习到的所有实体的 start 和 end 位置,构造首尾实体匹配任务,即判断某个 start 位置是否与某个end位置匹配为一个实体,是则预测为1,否则预测为0,相当于转化为一个二分类问题,正样本就是真实实体的匹配,负样本是非实体的位置匹配 参考论文:[1910.11476] A Unified MRC Framework for Named Entity Recognition (arxiv.org) Focal loss是在交叉熵损失函数基础上进行的修改,首先回顾二分类交叉上损失 y’是经过激活函数的输出,所以在0-1之间。可见普通的交叉熵对于正样本而言,输出概率越大损失越小。对于负样本而言,输出概率越小则损失越小。此时的损失函数在大量简单样本的迭代过程中比较缓慢且可能无法优化至最优。那么Focal loss是怎么改进的呢? 首先在原有的基础上加了一个因子,其中gamma>0使得减少易分类样本的损失。使得更关注于困难的、错分的样本。 例如gamma为2,对于正类样本而言,预测结果为0.95肯定是简单样本,所以(1-0.95)的gamma次方就会很小,这时损失函数值就变得更小。而预测概率为0.3的样本其损失相对很大。对于负类样本而言同样,预测0.1的结果应当远比预测0.7的样本损失值要小得多。对于预测概率为0.5时,损失只减少了0.25倍,所以更加关注于这种难以区分的样本。这样减少了简单样本的影响,大量预测概率很小的样本叠加起来后的效应才可能比较有效。 此外,加入平衡因子alpha,用来平衡正负样本本身的比例不均: 只添加alpha虽然可以平衡正负样本的重要性,但是无法解决简单与困难样本的问题。 lambda调节简单样本权重降低的速率,当lambda为0时即为交叉熵损失函数,当lambda增加时,调整因子的影响也在增加。实验发现lambda为2是最优 参考论文:https://arxiv.org/pdf/1708.02002.pdf nlp_paper_study_information_extraction/code_pytorch.md at main · km1994/nlp_paper_study_information_extraction (github.com) 实体识别之Biaffine双仿射注意力机制 - 知乎 (zhihu.com) 1 | 原来这也叫Dependency Parsing - 知乎 (zhihu.com) Biaffine for NER:Named Entity Recognition as Dependency Parsing - 知乎 (zhihu.com)eg:
在 句子 : In the Bank of China 中, 实体 the Bank 的 边界与 实体 Bank of China 冲突,
注:对于 flat NER,我们应用了一个更多的约束,其中包含或在排名在它之前的实体之内的任何实体都将不会被选择。我们命名实体识别器的学习目标是为每个有效范围分配正确的类别(包括非实体)。
损失函数
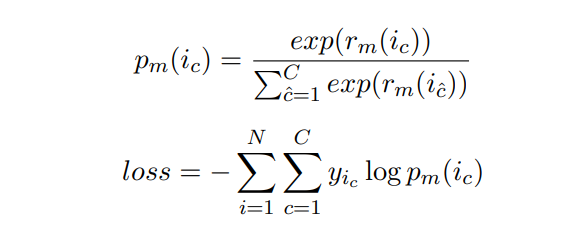
class myModel(nn.Module):def __init__(self, pre_train_dir: str, dropout_rate: float):...def forward(self, input_ids, input_mask, input_seg, is_training=False):...span_prob = torch.nn.functional.softmax(span_logits, dim=-1)# {bacth_size,max_seq_len,out_features,num_label}if is_training:return span_logitselse:return span_prob
三、学习率衰减模块
class WarmUp_LinearDecay:def __init__(self, optimizer: optim.AdamW, init_rate, warm_up_epoch, decay_epoch, min_lr_rate=1e-8):self.optimizer = optimizerself.init_rate = init_rateself.epoch_step = train_data_length / args.batch_sizeself.warm_up_steps = self.epoch_step * warm_up_epochself.decay_steps = self.epoch_step * decay_epochself.min_lr_rate = min_lr_rateself.optimizer_step = 0self.all_steps = args.epoch*(train_data_length/args.batch_size)def step(self):self.optimizer_step += 1if self.optimizer_step <= self.warm_up_steps:rate = (self.optimizer_step / self.warm_up_steps) * self.init_rateelif self.warm_up_steps < self.optimizer_step <= self.decay_steps:rate = self.init_rateelse:rate = (1.0 - ((self.optimizer_step - self.decay_steps) / (self.all_steps-self.decay_steps))) * self.init_rateif rate < self.min_lr_rate:rate = self.min_lr_ratefor p in self.optimizer.param_groups:p["lr"] = rateself.optimizer.step()
四 、 损失函数定义
1.span_loss 损失函数定义
import torch
from torch import nn
from utils.arguments_parse import args
from data_preprocessing import tools
label2id,id2label,num_labels=tools.load_schema()
num_label = num_labels+1class Span_loss(nn.Module):def __init__(self):super().__init__()self.loss_func = torch.nn.CrossEntropyLoss(reduction="none")def forward(self,span_logits,span_label,seq_mask):'''span_logits : {batch_size,max_seq_len,out_features,num_label}span_label : {batch_size,max_seq_len,out_features=128}span_mask : {batch_size,max_seq_len,max_seq_len=128}'''span_label = span_label.view(size=(-1,))# {batch_size * max_seq_len * out_features}span_logits = span_logits.view(size=(-1, num_label)) # {batch_size * max_seq_len * out_features,num_labels}span_loss = self.loss_func(input=span_logits, target=span_label) # {batch_size * max_seq_len * out_features}span_mask = seq_mask.view(size=(-1,)) # {batch_size * max_seq_len * out_features}span_loss *=span_maskavg_se_loss = torch.sum(span_loss) / seq_mask.size()[0]# avg_se_loss = torch.sum(sum_loss) / bszreturn avg_se_loss
focal_loss损失函数定义

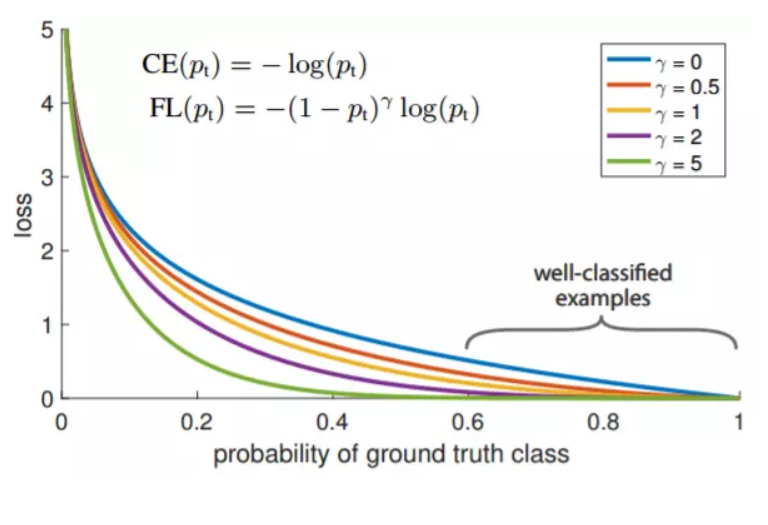
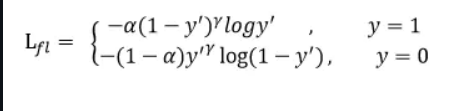
import torch
import torch.nn as nn
import torch.nn.functional as F
class FocalLoss(nn.Module):'''Multi-class Focal loss implementation'''def __init__(self, gamma=2, weight=None, ignore_index=-100):super(FocalLoss, self).__init__()self.gamma = gammaself.weight = weightself.ignore_index = ignore_indexdef forward(self, input, target):"""input: [N, C]target: [N, ]"""logpt = F.log_softmax(input, dim=1)pt = torch.exp(logpt)logpt = (1 - pt) ** self.gamma * logptloss = F.nll_loss(logpt, target, self.weight, ignore_index=self.ignore_index)return loss
五、模型训练
def train():# setp1:获取训练所需数据train_data = data_prepro.yield_data(args.train_path)test_data = data_prepro.yield_data(args.test_path)# step2 : 模型定义model = myModel(pre_train_dir=args.pretrained_model_path, dropout_rate=0.5).to(device)# model.load_state_dict(torch.load(args.checkpoints))# step3 : 优化函数定义param_optimizer = list(model.named_parameters())no_decay = ['bias', 'gamma', 'beta']optimizer_grouped_parameters = [{'params': [p for n, p in param_optimizer if not any(nd in n for nd in no_decay)],'weight_decay_rate': 0.01},{'params': [p for n, p in param_optimizer if any(nd in n for nd in no_decay)],'weight_decay_rate': 0.0}]optimizer = optim.AdamW(params=optimizer_grouped_parameters, lr=args.learning_rate)schedule = WarmUp_LinearDecay(optimizer = optimizer, init_rate = args.learning_rate,warm_up_epoch = args.warm_up_epoch,decay_epoch = args.decay_epoch)# step4 : 损失函数函数定义span_loss_func = span_loss.Span_loss().to(device)span_acc = metrics.metrics_span().to(device)# step5 : 训练step = 0best = 0for epoch in range(args.epoch):for item in train_data:step += 1# 模型输入input_ids, input_mask, input_seg = item["input_ids"], item["input_mask"], item["input_seg"] # {batch_size,max_seq_len}span_label,span_mask = item['span_label'],item["span_mask"] # {batch_size,max_seq_len,max_seq_len}optimizer.zero_grad()# 模型训练span_logits = model( input_ids=input_ids.to(device), input_mask=input_mask.to(device),input_seg=input_seg.to(device),is_training=True) # span_logits:{batch_size,max_seq_len,out_features,num_label}# span损失span_loss_v = span_loss_func(span_logits,span_label.to(device),span_mask.to(device))loss = span_loss_vloss = loss.float().mean().type_as(loss)# 反向传播loss.backward()torch.nn.utils.clip_grad_norm_(model.parameters(), max_norm=args.clip_norm)schedule.step()# optimizer.step()# 打印此时模型的效果if step%100 == 0:span_logits = torch.nn.functional.softmax(span_logits, dim=-1)recall,precise,span_f1=span_acc(span_logits,span_label.to(device))logger.info('epoch %d, step %d, loss %.4f, recall %.4f, precise %.4f, span_f1 %.4f'% (epoch,step,loss,recall,precise,span_f1))# 测试with torch.no_grad():count=0span_f1=0recall=0precise=0for item in test_data:count+=1input_ids, input_mask, input_seg = item["input_ids"], item["input_mask"], item["input_seg"]span_label,span_mask = item['span_label'],item["span_mask"]optimizer.zero_grad()span_logits = model( input_ids=input_ids.to(device), input_mask=input_mask.to(device),input_seg=input_seg.to(device),is_training=False) tmp_recall,tmp_precise,tmp_span_f1=span_acc(span_logits,span_label.to(device))span_f1+=tmp_span_f1recall+=tmp_recallprecise+=tmp_precisespan_f1 = span_f1/countrecall=recall/countprecise=precise/countlogger.info('-----eval----')logger.info('epoch %d, step %d, loss %.4f, recall %.4f, precise %.4f, span_f1 %.4f'% (epoch,step,loss,recall,precise,span_f1))logger.info('-----eval----')if best < span_f1:best=span_f1torch.save(model.state_dict(), f=args.checkpoints)logger.info('-----save the best model----')
参考
上一篇:落实的近义词是什么
下一篇:成语达人四个脚步带营是什么成语