
Spring Security(十八)--OAuth2:实现授权服务器(上)--环境准备以及骨架代码搭建
一、前言
本节大家如果一直从一开始看过来的话,就会巧妙发现我们将之前的实践代码全部连接起来,本节将会使用到之前的短信/验证码登录相关的逻辑代码,如果大家没有看的感兴趣可以回到https://editor.csdn.net/md/?articleId=127617691先将这部分逻辑代码看一看,尝试自己完成。然后本节仍然以实践为主,大家要完全吸收前几节关于OAuth2内容再来学习本节会更好点,然后当时再讲解搭建单点应用程序时,我们讲到过ClientRegistrationRepository这个类,讲到可以通过数据库去管理客户端,但是当时我们没有做相关展示,本次将会通过mysql结合mybatis完成对客户端的管理操作。
我们知道,授权服务器是在OAuth2架构中发挥作用的组件之一。授权服务器的职责是对用户进行身份验证,并向客户端提供令牌。客户端可以使用此令牌访问由资源服务器代表用户暴露的资源其中还介绍了,OAuth2框架定义了获取令牌的多个流程,我们称这些流程为授权。可以根据面临的场景选择一种不同的授权。所选择的授权的不同,授权服务器的行为也会有所不同。本章将介绍如何使用Spring Security为最常见的OAuth2授权类型配置授权服务器。
- 授权码授权类型
- 密码授权类型
- 客户端凭据授权类型
并且还会讲解如何配置授权服务器以颁发刷新令牌。客户端要使用刷新令牌获得新的访问令牌。如果访问令牌过期,则客户端必须获得一个新的访问令牌。
二、编写我们自己的授权服务器实现
没有授权服务器就没有OAuth2流程。如之前所说,OAuth2的主要处理就是获取访问令牌。授权服务器是OAuth2架构的组件,它可以颁发访问令牌。所以我们首先需要知道如何实现它。
我们接着之前的项目基础上进行改造,首先在父项目的pom上加入spring-cloud-dependencies的组件依赖:
org.springframework.cloud spring-cloud-dependencies Hoxton.SR1 pom import 当然我们引入cloud组件主要是为了用spring-cloud-starter-oauth2这个依赖,所以我们接下来在子项目的Pom加入该依赖:
org.springframework.cloud spring-cloud-starter-oauth2 接下来可以定义一个配置类,这里将其称为AuthServerConfig.除了经典的@Configuration注解外,还需要使用@EnableAuthorizationServer对这个类进行注解。通过这种方式,就可以指示Spring Boot启用特定于OAuth2授权服务器的配置。可以通过配置AuthorizationServerConfigurerAdapter类和重写将在本章中讨论的特定方法来自定义这个配置:
package com.mbw.security.config;import org.springframework.context.annotation.Configuration;
import org.springframework.security.oauth2.config.annotation.web.configuration.AuthorizationServerConfigurerAdapter;
import org.springframework.security.oauth2.config.annotation.web.configuration.EnableAuthorizationServer;@Configuration
@EnableAuthorizationServer
public class AuthServerConfig extends AuthorizationServerConfigurerAdapter {
}
三、定义用户管理
本节将讨论用户管理。授权服务器是OAuth2框架中处理用户身份验证的组件。因此,它自然需要管理用户。幸运的是,这里的用户管理实现和之前讲解的UserDetails一家子是相同的,我们将继续使用它们来管理凭据。为了管理密码,我们要继续使用PasswordEncoder。

上图再次描述了Spring Security中执行身份验证过程的主要组件。你应该注意到,与之前描述的身份验证架构不同的是,图中不再有SecurityContext。之所以发生此更改,是因为身份验证的结果没有存储在SecurityContext中。取而代之的是,其中使用了来自TokenStore的令牌来管理身份验证。这个我们后面说资源服务器会细说。
那关于用户管理的配置不需要我多说,大家直接把当时短信认证登录写的用户的配置完全搬过来即可,顺便可以把之前写的短信认证,验证码登录相关的逻辑代码全部照搬过来,将前文写的ProjectConfig进行相关修改:
package com.mbw.security.config;import com.mbw.security.filter.CaptchaCodeFilter;
import com.mbw.security.handler.CommonLoginFailureHandler;
import com.mbw.security.handler.CommonLoginSuccessHandler;
import com.mbw.security.handler.MyLogoutSuccessHandler;
import com.mbw.security.service.UserDetailsServiceImpl;
import org.springframework.beans.factory.annotation.Autowired;
import org.springframework.context.annotation.Bean;
import org.springframework.context.annotation.Configuration;
import org.springframework.security.authentication.AuthenticationManager;
import org.springframework.security.config.annotation.authentication.builders.AuthenticationManagerBuilder;
import org.springframework.security.config.annotation.web.builders.HttpSecurity;
import org.springframework.security.config.annotation.web.builders.WebSecurity;
import org.springframework.security.config.annotation.web.configuration.EnableWebSecurity;
import org.springframework.security.config.annotation.web.configuration.WebSecurityConfigurerAdapter;
import org.springframework.security.config.http.SessionCreationPolicy;
import org.springframework.security.crypto.bcrypt.BCryptPasswordEncoder;
import org.springframework.security.crypto.password.PasswordEncoder;
import org.springframework.security.web.authentication.UsernamePasswordAuthenticationFilter;
import org.springframework.web.cors.CorsConfiguration;
import org.springframework.web.cors.CorsConfigurationSource;
import org.springframework.web.cors.UrlBasedCorsConfigurationSource;import javax.annotation.Resource;@Configuration
@EnableWebSecurity
public class ProjectConfig extends WebSecurityConfigurerAdapter {@Autowiredprivate UserDetailsServiceImpl commonUserDetailServiceImpl;@Autowiredprivate CommonLoginSuccessHandler successHandler;@Autowiredprivate CommonLoginFailureHandler failureHandler;@Autowiredprivate MyLogoutSuccessHandler logoutSuccessHandler;@Autowiredprivate CaptchaCodeFilter captchaCodeFilter;@Resourceprivate SmsCodeSecurityConfig smsCodeSecurityConfig;@Overrideprotected void configure(HttpSecurity http) throws Exception {http.cors().and()
//				.addFilterBefore(captchaCodeFilter, UsernamePasswordAuthenticationFilter.class).logout().logoutSuccessHandler(logoutSuccessHandler).and().rememberMe()//默认都为remember-me.rememberMeParameter("remeber-me")//cookieName一般设置复杂一些,迷惑别人(不容易看出).rememberMeCookieName("remeber-me")//过期时间.tokenValiditySeconds(24 * 60 * 60 * 2).and().csrf().disable().formLogin().loginPage("/toLogin") //用户没有权限就跳转到这个页面.loginProcessingUrl("/login")//登录跳转页面,表单中的action.usernameParameter("uname").passwordParameter("upassword")//传递的属性.successHandler(successHandler).failureHandler(failureHandler).and().apply(smsCodeSecurityConfig).and().httpBasic().and().authorizeRequests().antMatchers("/home","/toLogin","/login", "/user/create", "/kaptcha", "/smsCode", "/smslogin").permitAll().mvcMatchers("/test/a/*").permitAll().anyRequest().authenticated().and().sessionManagement().sessionCreationPolicy(SessionCreationPolicy.IF_REQUIRED).sessionFixation().migrateSession().maximumSessions(1).maxSessionsPreventsLogin(false).expiredSessionStrategy(new CustomExpiredSessionStrategy());}@Overrideprotected void configure(AuthenticationManagerBuilder auth) throws Exception {auth.userDetailsService(commonUserDetailServiceImpl).passwordEncoder(passwordEncoder());}@Overridepublic void configure(WebSecurity web) {//将项目中的静态资源路径开放出来//为什么要抽出来?上面的规则都需要通过过滤器校验,这个不需要web.ignoring().antMatchers("/css/**", "/fonts/**", "/js/**", "/templates/**", "/static/**");}@Beanpublic PasswordEncoder passwordEncoder() {return new BCryptPasswordEncoder();}//跨域配置@BeanCorsConfigurationSource corsConfigurationSource() {CorsConfiguration configuration = new CorsConfiguration();configuration.addAllowedOrigin("*");configuration.addAllowedMethod("*");configuration.addAllowedHeader("*");configuration.applyPermitDefaultValues();configuration.setAllowCredentials(true);UrlBasedCorsConfigurationSource source = new UrlBasedCorsConfigurationSource();source.registerCorsConfiguration("/**", configuration);return source;}
}
那么现在已经有了用户,接下来只需将用户管理关联到授权服务器配置即可。为此,需要在Spring上下文中将AuthenticationManager暴露一个bean,然后在AuthServerConfig类中使用它。所以我们紧接着上面的ProjectConfig配置我们的AuthenticationManager。
@Bean@Overridepublic AuthenticationManager authenticationManagerBean() throws Exception {return super.authenticationManagerBean();}接下来更改AuthServerConfig类,以便向授权服务器去注册AuthenticationManager.
package com.mbw.security.config;import com.mbw.security.service.UserDetailsServiceImpl;
import org.springframework.beans.factory.annotation.Autowired;
import org.springframework.context.annotation.Configuration;
import org.springframework.security.authentication.AuthenticationManager;
import org.springframework.security.oauth2.config.annotation.web.configuration.AuthorizationServerConfigurerAdapter;
import org.springframework.security.oauth2.config.annotation.web.configuration.EnableAuthorizationServer;
import org.springframework.security.oauth2.config.annotation.web.configurers.AuthorizationServerEndpointsConfigurer;@Configuration
@EnableAuthorizationServer
public class AuthServerConfig extends AuthorizationServerConfigurerAdapter {@Autowiredprivate AuthenticationManager authenticationManager;@Autowiredprivate UserDetailsServiceImpl userDetailsService;@Overridepublic void configure(AuthorizationServerEndpointsConfigurer endpoints) throws Exception {endpoints.authenticationManager(authenticationManager).userDetailsService(userDetailsService);}
}有了这些配置,就有了可以在身份验证服务器上进行身份验证的用户。但OAuth2架构意味着用户向客户端授予权利。客户端则以用户名义使用资源。所以接下来讲解如何配置客户端。
四、向授权服务器注册客户端
本节将介绍如何让授权服务器知晓客户端**。要调用授权服务器,在OAuth2架构中充当客户端的应用程序需要自己的凭据**。授权服务器还要管理这些凭据,并且只允许来自已知客户端的请求。
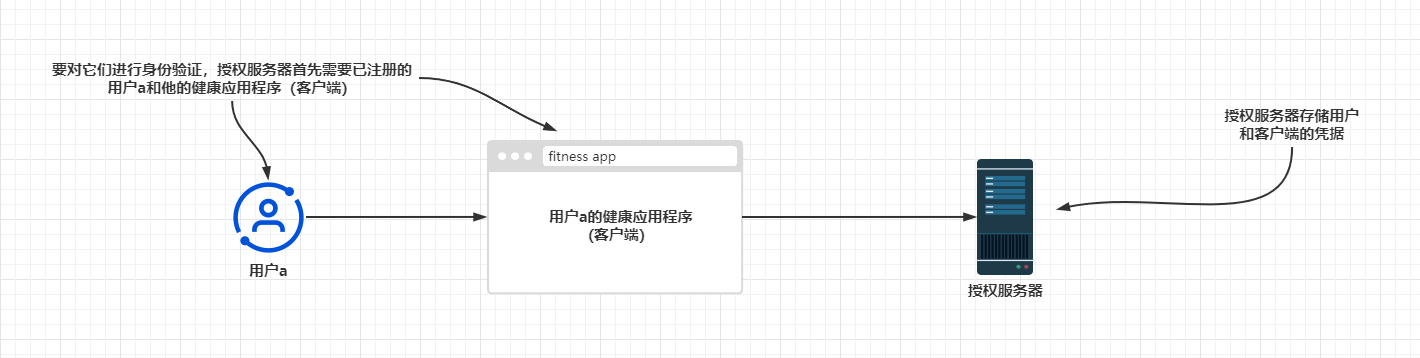
还记得之前开发过的客户端应用程序吗?就那个GiteeClient,其中使用Gitee作为身份验证服务器。Gitee需要知悉该客户端应用程序,所以我们做的第一件事就是在Gitee上注册这个应用程序。然后,我们会接收到客户端ID和客户端密钥:客户端凭据。接着我们配置了这些凭据,该客户端应用程序使用它们通过授权服务器(Gitee)进行身份验证。同样的情况也适用于本示例。授权服务器需要知悉其客户端,因为它要接收来自客户端的请求。这里的处理过程你应该很熟悉。为授权服务器定义客户端的契约是ClientDetails.定义对象以便根据其ID检索ClientDetails的契约是ClientDetailsService。
这些名称听着熟悉吗?没错,这些接口的工作方式类似于UserDetails和UserDetailsService接口,只不过一个是用户,一个是客户端。你会发现,他俩很多都是类似的。例如InMemoryClientDetailsService是ClientDetailsService接口的实现,该接口管理内存中的ClientDetails.它的工作方式类似于用于UserDetails的InMemoryUserDetailsManager类。同样,JdbcClientDetailsService也类似于JdbcUserDetailsManager。
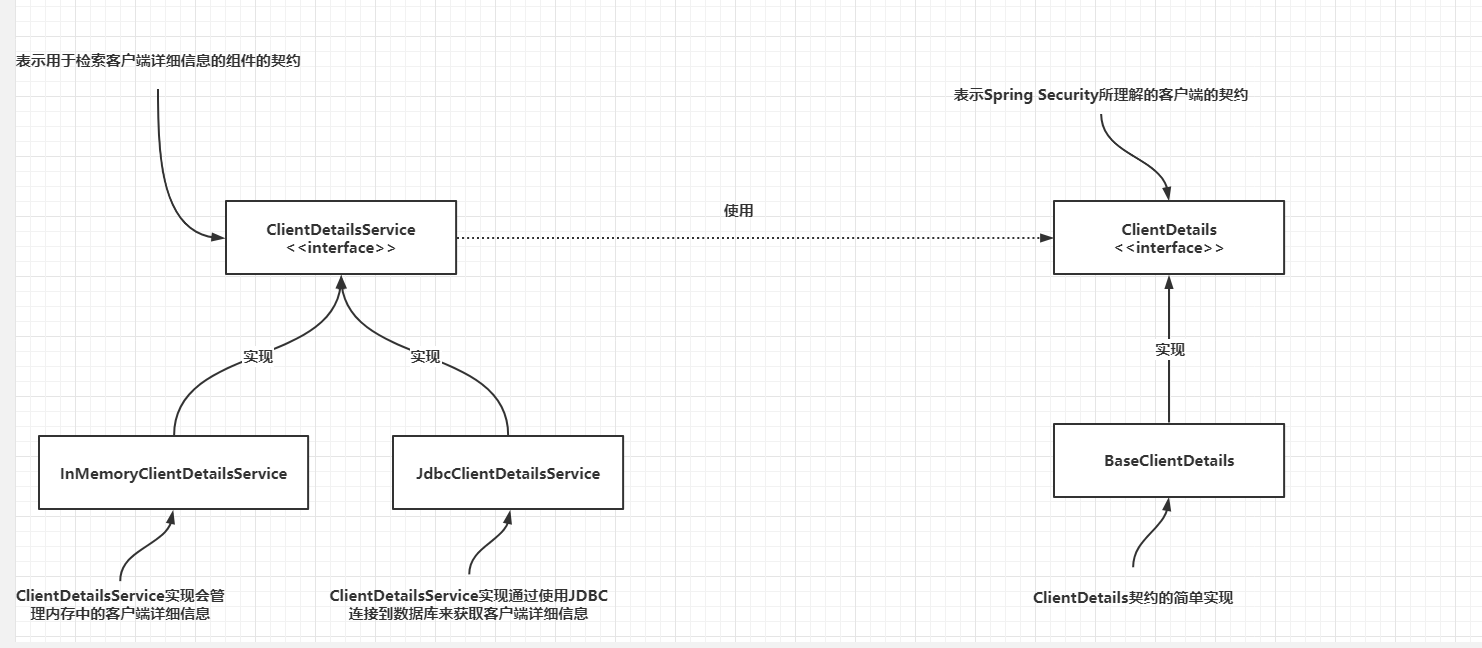
可以把这些相似之处总结为很容易记住的以下几点:
- ClientDetails之于客户端就像UserDetails之于用户一样。
- ClientDetailsService之于客户端就像UserDetailsService之于用户一样。
- InMemoryClientDetailsService之于客户端就像InMemoryUserDetailsManager之于用户一样
- JdbcClientDetailsService之于客户端就像JdbcUserDetailsManager之于用户一样
理解这一层关系后,我们就可以使用之前类似于配置UserDetails的方法同样用于ClientDetails上
首先我们需要一张存储客户端信息的表,表的结构和数据如下:
/*Navicat Premium Data TransferSource Server         : local_mysqlSource Server Type    : MySQLSource Server Version : 50727Source Host           : localhost:3306Source Schema         : spring_securityTarget Server Type    : MySQLTarget Server Version : 50727File Encoding         : 65001Date: 28/11/2022 12:00:29
*/SET NAMES utf8mb4;
SET FOREIGN_KEY_CHECKS = 0;-- ----------------------------
-- Table structure for oauth_client_details
-- ----------------------------
DROP TABLE IF EXISTS `oauth_client_details`;
CREATE TABLE `oauth_client_details`  (`id` bigint(20) NOT NULL COMMENT 'id',`clientId` varchar(128) CHARACTER SET utf8 COLLATE utf8_general_ci NOT NULL COMMENT '客户端ID',`resourceIds` varchar(256) CHARACTER SET utf8 COLLATE utf8_general_ci NULL DEFAULT NULL COMMENT '资源ID集合,多个资源时用英文逗号分隔',`clientSecret` varchar(256) CHARACTER SET utf8 COLLATE utf8_general_ci NULL DEFAULT NULL COMMENT '客户端密匙',`scope` varchar(256) CHARACTER SET utf8 COLLATE utf8_general_ci NULL DEFAULT NULL COMMENT '客户端申请的权限范围',`authorizedGrantTypes` varchar(256) CHARACTER SET utf8 COLLATE utf8_general_ci NULL DEFAULT NULL COMMENT '客户端支持的grant_type',`webServerRedirectUri` varchar(256) CHARACTER SET utf8 COLLATE utf8_general_ci NULL DEFAULT NULL COMMENT '重定向URI',`authorities` varchar(256) CHARACTER SET utf8 COLLATE utf8_general_ci NULL DEFAULT NULL COMMENT '客户端所拥有的SpringSecurity的权限值,多个用英文逗号分隔',`accessTokenValidity` int(11) NULL DEFAULT NULL COMMENT '访问令牌有效时间值(单位秒)',`refreshTokenValidity` int(11) NULL DEFAULT NULL COMMENT '更新令牌有效时间值(单位秒)',`additionalInformation` varchar(500) CHARACTER SET utf8 COLLATE utf8_general_ci NULL DEFAULT NULL COMMENT '预留字段',`autoApprove` tinyint(1) NULL DEFAULT NULL COMMENT '用户是否自动Approval操作',PRIMARY KEY (`id`) USING BTREE,UNIQUE INDEX `UNIQUE_CLIENT_ID`(`clientId`) USING BTREE
) ENGINE = InnoDB CHARACTER SET = utf8 COLLATE = utf8_general_ci COMMENT = '客户端信息' ROW_FORMAT = Dynamic;-- ----------------------------
-- Records of oauth_client_details
-- ----------------------------
INSERT INTO `oauth_client_details` VALUES (1596077605292945410, 'f7n6ockwdb9zmayr', NULL, '$2a$10$b87rn4FF4TeR7r6VB45rC.kTv5M36Qs2U62WheA4mnEB5MmA3mVAW', 'user_info', 'password,authorization_code,refresh_token', 'http://localhost:9090/yidou', 'add,delete', 86400, 432000, NULL, 0);SET FOREIGN_KEY_CHECKS = 1;然后同样的我们需要建立一个客户端的实体类,同样的,这个实体类和真正用于OAuth的客户端是分离开来的,类似于我们之前的User类和JwtUserDto类的关系:
OAuth2Client.java
package com.mbw.pojo;import com.baomidou.mybatisplus.annotation.IdType;
import com.baomidou.mybatisplus.annotation.TableField;
import com.baomidou.mybatisplus.annotation.TableId;
import com.baomidou.mybatisplus.annotation.TableName;
import lombok.AllArgsConstructor;
import lombok.Data;
import lombok.NoArgsConstructor;import java.io.Serializable;@Data
@AllArgsConstructor
@NoArgsConstructor
@TableName("oauth_client_details")
public class OAuth2Client implements Serializable {@TableId(type = IdType.ASSIGN_ID, value = "id")private Long id;@TableField("clientId")private String clientId;@TableField(value = "resourceIds")private String resourceIds;@TableField(value = "authorities")private String authorities;@TableField("clientSecret")private String clientSecret;@TableField(value = "scope")private String scope;@TableField(value = "authorizedGrantTypes")private String authorizedGrantTypes;@TableField("webServerRedirectUri")private String webServerRedirectUri;@TableField("accessTokenValidity")private Integer accessTokenValidity;@TableField("refreshTokenValidity")private Integer refreshTokenValidity;@TableField("additionalInformation")private String additionalInformation;@TableField("autoApprove")private Boolean autoApprove;
}
同样的dao-service-controller我们也需要建立,并且提供2个方法,通过clientId查找client(这个也是ClientDetailsService需要重写的方法的原理),然后还有注册client的方法
OAuth2ClientMapper.java
package com.mbw.mapper;import com.baomidou.mybatisplus.core.mapper.BaseMapper;
import com.mbw.pojo.OAuth2Client;
import org.apache.ibatis.annotations.Mapper;@Mapper
public interface OAuth2ClientMapper extends BaseMapper {OAuth2Client queryByClientId(String clientId);OAuth2Client queryClientUnique(String clientId);
}
OAuth2ClientMapper.xml
OAuth2ClientService.java
这里主要是需要解析一下clientSecret,我在这里当时出现过Bad Crendential相关的异常。
由于OAuth2解析客户端秘钥也会通过我们配置的passwordEncoder去解密,而我们在projectConfig已经对PasswordEncoder配置为BCryptPasswordEncoder,那么如果在注册客户端不通过passwordEncoder对clientSecret进行加密,在解析的时候就会出现解析错误。所以这里我们需要注入passwordEncoder.
package com.mbw.service;import cn.hutool.core.util.ObjectUtil;
import cn.hutool.core.util.RandomUtil;
import com.baomidou.mybatisplus.extension.service.impl.ServiceImpl;
import com.mbw.mapper.OAuth2ClientMapper;
import com.mbw.pojo.OAuth2Client;
import org.springframework.beans.factory.annotation.Autowired;
import org.springframework.context.annotation.Lazy;
import org.springframework.security.crypto.password.PasswordEncoder;
import org.springframework.stereotype.Service;@Service
public class OAuth2ClientService extends ServiceImpl {@Autowiredprivate OAuth2ClientMapper oAuth2ClientMapper;@Autowired@Lazyprivate PasswordEncoder passwordEncoder;public OAuth2Client queryClientByClientId(String clientId){return oAuth2ClientMapper.queryByClientId(clientId);}public String getClientIdUnique(OAuth2Client oAuth2Client){Long id = ObjectUtil.isEmpty(oAuth2Client.getId()) ? -1: oAuth2Client.getId();String clientId = RandomUtil.randomString(16);OAuth2Client oAuthClient = oAuth2ClientMapper.queryClientUnique(clientId);if(ObjectUtil.isNotEmpty(oAuthClient) && !oAuthClient.getId().equals(id)){//说明有重复,重新生成一次return getClientIdUnique(oAuth2Client);}else {return clientId;}}public OAuth2Client createOAuth2Client(OAuth2Client oAuth2Client){String clientId = getClientIdUnique(oAuth2Client);String clientSecret = RandomUtil.randomString(16);String clientSecretEncoded = passwordEncoder.encode(clientSecret);oAuth2Client.setClientId(clientId);//对clientSecret进行加密oAuth2Client.setClientSecret(clientSecretEncoded);oAuth2ClientMapper.insert(oAuth2Client);oAuth2Client.setClientSecret(clientSecret);return oAuth2Client;}
}
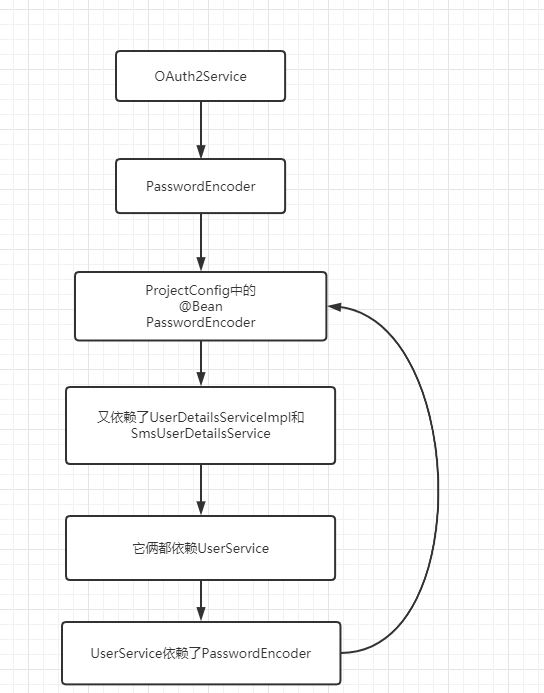
但是对于加入@Lazy的原因,如果直接注入passwordEncoder,看似没什么问题,但启动后会报循环依赖的问题。原因是我们的ProjectConfig在引用两个类,SmsUserDetailsServiceImpl和UserDetailsServiceImpl分别代表短信认证和用户认证的两个Service,而这两个Service都依赖了UserService,UserService又依赖了PasswordEncoder,具体关系如下图:
但是我这里有一个疑问,那就是为什么我们在没写OAuth2相关业务时,其实也存在这样一个循环依赖关系,为什么在当时不会报错,而加入OAuth2Service相关逻辑,就报了相关的错误呢,如果有知道的小伙伴可以在评论群帮我解决这个疑惑,非常感谢。
接着上面代码,我们接着写OAuth2ClientController类
package com.mbw.controller;import com.mbw.common.utils.Res;
import com.mbw.pojo.OAuth2Client;
import com.mbw.service.OAuth2ClientService;
import org.springframework.beans.factory.annotation.Autowired;
import org.springframework.web.bind.annotation.PostMapping;
import org.springframework.web.bind.annotation.RequestBody;
import org.springframework.web.bind.annotation.RequestMapping;
import org.springframework.web.bind.annotation.RestController;@RestController
@RequestMapping("/oauth2/client")
public class OAuth2ClientController {@Autowiredprivate OAuth2ClientService oAuth2ClientService;@PostMapping("query/clientId")public Res queryOauthClientByClientId(String clientId){OAuth2Client oAuth2Client = oAuth2ClientService.queryClientByClientId(clientId);return Res.success(oAuth2Client);}@PostMapping("create")public Res createOAuthClient(@RequestBody OAuth2Client oAuth2Client){OAuth2Client oAuth2ClientCreated = oAuth2ClientService.createOAuth2Client(oAuth2Client);return Res.success(oAuth2ClientCreated);}
}
然后别忘了在projectConfig中对创建客户端这个接口进行放行:
.mvcMatchers("/oauth2/client/create").permitAll()
然后对于client这个单体我们完成了,现在我们要把它和OAuth2相关的逻辑类实现
类似于我们之前实现UserDetails和UserDetailsService一样
首先我们在dto包中加入OAuth2ClientDto并实现ClientDetails
OAuth2ClientDto.java
package com.mbw.security.dto;import cn.hutool.core.text.CharSequenceUtil;
import com.mbw.pojo.OAuth2Client;
import lombok.Data;
import lombok.ToString;
import org.springframework.security.core.GrantedAuthority;
import org.springframework.security.core.authority.SimpleGrantedAuthority;
import org.springframework.security.oauth2.provider.ClientDetails;import java.util.ArrayList;
import java.util.Arrays;
import java.util.Collection;
import java.util.Collections;
import java.util.HashMap;
import java.util.HashSet;
import java.util.List;
import java.util.Map;
import java.util.Set;@Data
@ToString
public class OAuth2ClientDto implements ClientDetails {private OAuth2Client oAuth2Client;@Overridepublic String getClientId() {return oAuth2Client.getClientId();}@Overridepublic Set getResourceIds() {String resourceIds = oAuth2Client.getResourceIds();if(CharSequenceUtil.isNotBlank(resourceIds)){String[] resourceCollection = resourceIds.split(",");return new HashSet<>(Arrays.asList(resourceCollection));}return Collections.emptySet();}@Overridepublic boolean isSecretRequired() {return true;}@Overridepublic String getClientSecret() {return oAuth2Client.getClientSecret();}@Overridepublic boolean isScoped() {return true;}@Overridepublic Set getScope() {String scopes = oAuth2Client.getScope();if(CharSequenceUtil.isNotBlank(scopes)){String[] scopeCollection = scopes.split(",");return new HashSet<>(Arrays.asList(scopeCollection));}return Collections.emptySet();}@Overridepublic Set getAuthorizedGrantTypes() {String authorizedGrantTypes = oAuth2Client.getAuthorizedGrantTypes();if(CharSequenceUtil.isNotBlank(authorizedGrantTypes)){String[] grantTypes = authorizedGrantTypes.split(",");return new HashSet<>(Arrays.asList(grantTypes));}return Collections.emptySet();}@Overridepublic Set getRegisteredRedirectUri() {String webServerRedirectUri = oAuth2Client.getWebServerRedirectUri();if(CharSequenceUtil.isNotBlank(webServerRedirectUri)){HashSet redirectUris = new HashSet<>();redirectUris.add(webServerRedirectUri);return redirectUris;}return Collections.emptySet();}@Overridepublic Collection getAuthorities() {String authorities = oAuth2Client.getAuthorities();List grantedAuthorityList = new ArrayList<>();if(CharSequenceUtil.isNotBlank(authorities)){String[] grantAuthorities = authorities.split(",");for (String grantAuthority : grantAuthorities) {SimpleGrantedAuthority simpleGrantedAuthority = new SimpleGrantedAuthority(grantAuthority);grantedAuthorityList.add(simpleGrantedAuthority);}return grantedAuthorityList;}return Collections.emptyList();}@Overridepublic Integer getAccessTokenValiditySeconds() {return oAuth2Client.getAccessTokenValidity();}@Overridepublic Integer getRefreshTokenValiditySeconds() {return oAuth2Client.getRefreshTokenValidity();}@Overridepublic boolean isAutoApprove(String s) {return oAuth2Client.getAutoApprove();}@Overridepublic Map getAdditionalInformation() {String additionalInformation = oAuth2Client.getAdditionalInformation();if(CharSequenceUtil.isNotBlank(additionalInformation)){HashMap information = new HashMap<>();information.put("额外信息",additionalInformation);return information;}return Collections.emptyMap();}public OAuth2ClientDto(OAuth2Client oAuth2Client) {this.oAuth2Client = oAuth2Client;}
}
然后实现ClientDetailsServiceImpl,让它实现ClientDetailsService类。重写loadClientByClientId(String clientId)方法:
package com.mbw.security.service;import com.mbw.mapper.OAuth2ClientMapper;
import com.mbw.pojo.OAuth2Client;
import com.mbw.security.dto.OAuth2ClientDto;
import org.springframework.beans.factory.annotation.Autowired;
import org.springframework.security.oauth2.provider.ClientDetails;
import org.springframework.security.oauth2.provider.ClientDetailsService;
import org.springframework.security.oauth2.provider.ClientRegistrationException;
import org.springframework.stereotype.Service;@Service
public class ClientDetailsServiceImpl implements ClientDetailsService {@Autowiredprivate OAuth2ClientMapper oAuth2ClientMapper;@Overridepublic ClientDetails loadClientByClientId(String clientId) throws ClientRegistrationException {OAuth2Client oAuth2Client = oAuth2ClientMapper.queryByClientId(clientId);return new OAuth2ClientDto(oAuth2Client);}
}
对比一下我们实现UserDetails和UserDetailsService,是不是基本一致呢。
写完后,我们就需要在授权服务器配置类当中去配置客户端了,完整配置类代码如下:
AuthServerConfig.java
package com.mbw.security.config;import com.mbw.security.service.ClientDetailsServiceImpl;
import com.mbw.security.service.UserDetailsServiceImpl;
import org.springframework.beans.factory.annotation.Autowired;
import org.springframework.context.annotation.Configuration;
import org.springframework.security.authentication.AuthenticationManager;
import org.springframework.security.oauth2.config.annotation.configurers.ClientDetailsServiceConfigurer;
import org.springframework.security.oauth2.config.annotation.web.configuration.AuthorizationServerConfigurerAdapter;
import org.springframework.security.oauth2.config.annotation.web.configuration.EnableAuthorizationServer;
import org.springframework.security.oauth2.config.annotation.web.configurers.AuthorizationServerEndpointsConfigurer;
import org.springframework.security.oauth2.config.annotation.web.configurers.AuthorizationServerSecurityConfigurer;@Configuration
@EnableAuthorizationServer
public class AuthServerConfig extends AuthorizationServerConfigurerAdapter {@Autowiredprivate AuthenticationManager authenticationManager;@Autowiredprivate ClientDetailsServiceImpl clientDetailsServiceImpl;@Autowiredprivate UserDetailsServiceImpl userDetailsServiceImpl;@Overridepublic void configure(AuthorizationServerEndpointsConfigurer endpoints) throws Exception {endpoints.authenticationManager(authenticationManager).userDetailsService(userDetailsServiceImpl);}@Overridepublic void configure(ClientDetailsServiceConfigurer clients) throws Exception {clients.withClientDetails(clientDetailsServiceImpl);}/*** 解决访问/oauth/check_token 403的问题** @param security* @throws Exception*/@Overridepublic void configure(AuthorizationServerSecurityConfigurer security) throws Exception {// 允许表单认证security.tokenKeyAccess("permitAll()").checkTokenAccess("permitAll()").allowFormAuthenticationForClients();}}
完成后我们可以来到postman
试试创建一个客户端:

发现创建成功,但是大家最好拿笔记本记录下这个未加密的clientSecret,因为db存储的加密后的secret。到时候我们需要该密钥去请求token。
到此,我们就完成了环境和相关骨架的搭建,下一章我们将在代码基础上完成三种授权类型的测试。
大家如果是一路跟过笔者写的文章过来的,可以发现OAuth2并不是独立的,相反,它将我们之前的学习内容通过这一章又紧密连接了起来,所以大家对于之前的内容不能忘记,必须加以巩固。
如果大家需要代码的话,可以在评论区回复我,我看到时候需不需要把代码放gitee上供大家自由克隆下来学习使用。
上一篇:带弓和马的成语有哪些
下一篇:雾霾的心情怎么说