

【5w字】SpringBoot源码分析
Spring Boot源码分析
文章目录
- Spring Boot源码分析
- 启动类分析
- @SpringBootConfiguration
- @EnableAutoConfiguration
- @ComponentScan
- SpringBoot启动流程
- 1. 准备SpringApplication
- 获取当前 web 应用类型
- 设置初始化器
- 设置监听器
- 推导主应用程序类
- 2. Spring Boot的运行
- 创建计时器并启动
- 设置headless属性值
- 获取运行监听器
- 运行监听器方法
- 准备运行时环境
- 创建IOC容器
- 准备IOC容器
- 启动IOC容器
- 完成启动
- 3. 延伸与拓展
- SpringBoot中的事件推送原型(观察者模式)
- SpringBoot如何加载yml配置文件
- SpringBoot自动配置原理
- @EnableAutoConfiguration
- @AutoConfigurationPackage
- AutoConfigurationPackages.Registrar
- AutoConfigurationImportSelector
- DeferredImportSelector
- AutoConfigurationGroup
- 获取装配类:getAutoConfigurationEntry()
- 获取候选配置类:getCandidateConfigurations()
- loadFactoryNames()
- loadSpringFactories()
- 总结与拓展
- 总结
- @ConditionalOnXXX
- 自动装配类装配的顺序
- 问题与思考
- Spring是如何处理@Import注解的?
- @Import注解
- @Import注解处理
- SPI 和 类加载器
- Java SPI
- Java SPI应用实例
- Java SPI 原理
- 类加载器
- 基本概念
- 双亲委派机制
- SpringBoot的SPI机制
- Java SPI的缺点
- Spring SPI机制
- Java SPI 与 Spring SPI 的区别
SpringBoot版本-2.X
启动类分析
@SpringBootApplication 标注在某个类上说明这个类是 SpringBoot 的主配置类, SpringBoot 就应该运行这个类的main方法来启动 SpringBoot 应用;
@SpringBootApplication
public class StudyProjectApplication {public static void main(String[] args) {SpringApplication.run(StudyProjectApplication.class, args);}}
当我们点进去后发现:这是一个集成注解,为什么它能集成这么多的注解的功能呢?是在于它上面的 @Inherited 注解, @Inherited 表示自动继承注解类型。
@Target(ElementType.TYPE)
@Retention(RetentionPolicy.RUNTIME)
@Documented
@Inherited
@SpringBootConfiguration
@EnableAutoConfiguration
@ComponentScan(excludeFilters = { @Filter(type = FilterType.CUSTOM, classes = TypeExcludeFilter.class),@Filter(type = FilterType.CUSTOM, classes = AutoConfigurationExcludeFilter.class) })
public @interface SpringBootApplication {/*** 自动装配要排除的类,功能来自于 @EnableAutoConfiguration*/@AliasFor(annotation = EnableAutoConfiguration.class)Class[] exclude() default {};/***  自动装配要排除的类名,功能来自于 @EnableAutoConfiguration*/@AliasFor(annotation = EnableAutoConfiguration.class)String[] excludeName() default {};/*** 配置扫描的包,功能来自于 @ComponentScan*/@AliasFor(annotation = ComponentScan.class, attribute = "basePackages")String[] scanBasePackages() default {};/*** 配置扫描的class,该class所在的包都会被扫描,功能来自于 @ComponentScan*/@AliasFor(annotation = ComponentScan.class, attribute = "basePackageClasses")Class[] scanBasePackageClasses() default {};/*** 是否启用 @Bean 方法代理,功能来自于 @Configuration*/@AliasFor(annotation = Configuration.class)boolean proxyBeanMethods() default true;}
@SpringBootApplication 是一个组合注解,包含了 @SpringBootConfiguration、@EnableAutoConfiguration、@ComponentScan 三个注解的功能;@SpringBootApplication 中也提供了一些配置属性,而这些属性来自于以上三个注解。
@SpringBootConfiguration
我们点进注解发现:它是 springboot 的配置类,标注在某个类上,表示这是一个 springboot的配置类。
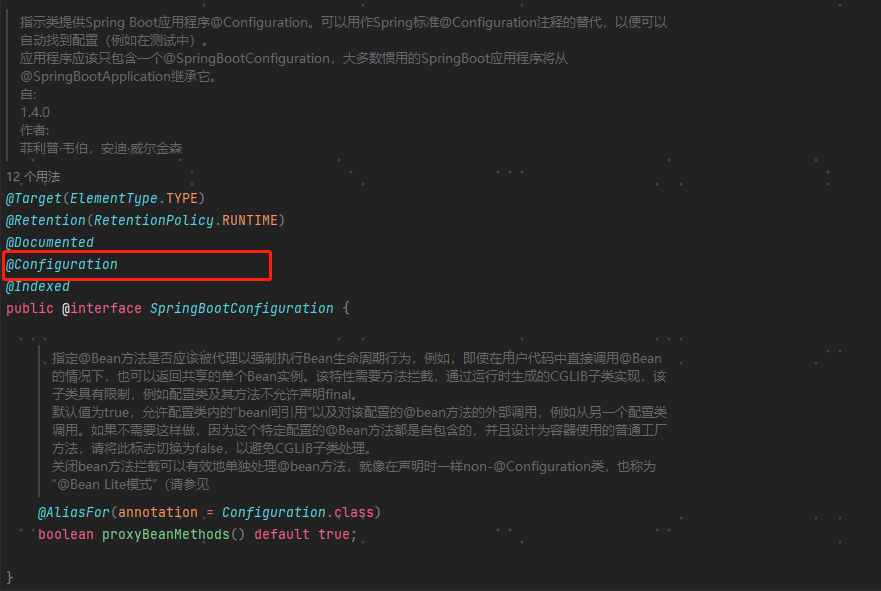
这个注解比较简单,上面标记了 @Configuration,然后是一个属性 proxyBeanMethods(),它来自于 @Configuration。因此,@SpringBootConfiguration 并没有做什么,仅仅只是将 @Configuration 使用了 @Configuration 的功能。
@EnableAutoConfiguration
@EnableAutoConfiguration主要 用来开启自动装配功能,在第二章SpringBoot自动装配原理中详细说明。
@Target(ElementType.TYPE)
@Retention(RetentionPolicy.RUNTIME)
@Documented
@Inherited
// 将被 @SpringBootApplication 标记的类所在的包,包装成 BasePackages,然后注册到 spring 容器中;
@AutoConfigurationPackage
// 将当前项目支持的自动配置类添加到 spring 容器中;
@Import(AutoConfigurationImportSelector.class)
public @interface EnableAutoConfiguration {String ENABLED_OVERRIDE_PROPERTY = "spring.boot.enableautoconfiguration";/*** 可自行定义排除自动装配的类*/Class[] exclude() default {};/*** 可自行定义排除自动装配的类名*/String[] excludeName() default {};}
从代码中可以看到,
- 该注解组合了
@AutoConfigurationPackage注解的功能,该注解用来指定自动装配的包; - 该注解通过
@Import注解引入了一个类AutoConfigurationImportSelector,这个类是自动装配的关键; - 该注解提供了两个配置,用来排除指定的自动装配类,可以根据类来排除 (
Class对象),也可以根据类名 (包名.类名) 排除。
@ComponentScan
这个注解想必大家已经很熟悉了,它指定了包扫描路径,如果不指定,就扫描所在类的包。
@ComponentScan(excludeFilters = { @Filter(type = FilterType.CUSTOM, classes = TypeExcludeFilter.class),@Filter(type = FilterType.CUSTOM, classes = AutoConfigurationExcludeFilter.class) })
TypeExcludeFilter: 这个类表示在进行包扫描时,可以排除一些类。
AutoConfigurationExcludeFilter:用来排除自动配置类,也就是说,spring 在进行包扫描时,不会扫描自动配置类。核心源码如下:
public class AutoConfigurationExcludeFilter implements TypeFilter, BeanClassLoaderAware {private ClassLoader beanClassLoader;private volatile List autoConfigurations;@Overridepublic void setBeanClassLoader(ClassLoader beanClassLoader) {this.beanClassLoader = beanClassLoader;}@Overridepublic boolean match(MetadataReader metadataReader, MetadataReaderFactory metadataReaderFactory) throws IOException {// isConfiguration(...):当前类是否被 @Configuration 标记// isAutoConfiguration(...):当前类是否为自动配置类return isConfiguration(metadataReader) && isAutoConfiguration(metadataReader);}private boolean isConfiguration(MetadataReader metadataReader) {return metadataReader.getAnnotationMetadata().isAnnotated(Configuration.class.getName());}private boolean isAutoConfiguration(MetadataReader metadataReader) {// 获取所有的自动配置类,然后判断当前类是否存在于其中return getAutoConfigurations().contains(metadataReader.getClassMetadata().getClassName());}protected List getAutoConfigurations() {if (this.autoConfigurations == null) {this.autoConfigurations = SpringFactoriesLoader.loadFactoryNames(EnableAutoConfiguration.class, this.beanClassLoader);}return this.autoConfigurations;}}
我们主要看 match(...) 方法,它的匹配的类为:
- 被
@Configuration标记; - 是自动配置类。(从
isAutoConfiguration(...)可以看到,在判断是否为自动配置类上,springboot 先使用SpringFactoriesLoader加载所有配置类,然后再判断传入的类是否为其中之一。)
满足以上两个条件,spring 就不会对其进行扫描处理。
SpringBoot启动流程
@SpringBootApplication
public class StudyProjectApplication {public static void main(String[] args) {SpringApplication.run(StudyProjectApplication.class, args);}}
我们进入这个run方法:
public class SpringApplication {...// primarySource 就是我们传入的 StudyProjectApplication.class,// args 就是 main() 方法的参数public static ConfigurableApplicationContext run(Class primarySource, String... args) {// 将 primarySource 包装成数组,继续调用 run(...) 方法return run(new Class[] { primarySource }, args);}// primarySources 就是我们传入的 StudyProjectApplication.class 包装成的数组,// args 就是 main() 方法的参数public static ConfigurableApplicationContext run(Class[] primarySources, String[] args) {// 核心代码return new SpringApplication(primarySources).run(args);}...
}
分析关键代码: return new SpringApplication(primarySources).run(args);
这块代码需要拆开来看,可以拆成以下两部分:
- 构造方法:
SpringApplication#SpringApplication(Class...) - 实例方法:
SpringApplication#run(String...)
看来,这两个方法就是 springboot 的启动所有流程了,接下来我们就来分析这两个方法。
1. 准备SpringApplication
创建SpringApplication对象
 /*** 这里就最终调用的构造方法了* resourceLoader 为 null* primarySources 为 StudyProjectApplication.class*/
public SpringApplication(ResourceLoader resourceLoader, Class... primarySources) {// 1. 将传入的resourceLoader设置到成员变量,这里的值为nullthis.resourceLoader = resourceLoader;Assert.notNull(primarySources, "PrimarySources must not be null");// 2. 将传入的primarySources设置到成员变量,这里的值为 StudyProjectApplication.classthis.primarySources = new LinkedHashSet<>(Arrays.asList(primarySources));// 3. 当前的 web 应用类型,REACTIVE,NONE,SERVLETthis.webApplicationType = WebApplicationType.deduceFromClasspath();// 4. 设置初始化器,getSpringFactoriesInstances:从 META-INF/spring.factories 中获取配置setInitializers((Collection) getSpringFactoriesInstances(ApplicationContextInitializer.class));// 5. 设置监听器,getSpringFactoriesInstances:从 META-INF/spring.factories 中获取配置setListeners((Collection) getSpringFactoriesInstances(ApplicationListener.class));// 6. 返回包含main()方法的classthis.mainApplicationClass = deduceMainApplicationClass();}
获取当前 web 应用类型
this.webApplicationType = WebApplicationType.deduceFromClasspath();
WebApplicationType.deduceFromClasspath() 方法是用来推断当前项目是什么类型的,代码如下:
public enum WebApplicationType {// 不是 web 应用NONE,// servlet 类型的 web 应用SERVLET,// reactive 类型的 web 应用REACTIVE;...private static final String[] SERVLET_INDICATOR_CLASSES = { "javax.servlet.Servlet","org.springframework.web.context.ConfigurableWebApplicationContext" };private static final String WEBMVC_INDICATOR_CLASS = "org.springframework.web.servlet.DispatcherServlet";private static final String WEBFLUX_INDICATOR_CLASS = "org.springframework.web.reactive.DispatcherHandler";private static final String JERSEY_INDICATOR_CLASS = "org.glassfish.jersey.servlet.ServletContainer";static WebApplicationType deduceFromClasspath() {// classpath 中仅存在 WEBFLUX 相关类if (ClassUtils.isPresent(WEBFLUX_INDICATOR_CLASS, null) && !ClassUtils.isPresent(WEBMVC_INDICATOR_CLASS, null)&& !ClassUtils.isPresent(JERSEY_INDICATOR_CLASS, null)) {return WebApplicationType.REACTIVE;}// classpath 不存在 SERVLET 相关类for (String className : SERVLET_INDICATOR_CLASSES) {if (!ClassUtils.isPresent(className, null)) {return WebApplicationType.NONE;}}// 默认 web 类型为 SERVLET// 也就是说,同时存在 WEBFLUX 与 SERVLET 相关类,最终返回的是 SERVLETreturn WebApplicationType.SERVLET;}...
}
可以看到,springboot 定义了三种项目类型:NONE(不是 web 应用)、SERVLET(servlet 类型的 web 应用)、REACTIVE(reactive 类型的 web 应用),WebApplicationType.deduceFromClasspath() 的执行流程如下:
- 如果
classpath中仅存在WEBFLUX相关类,则表明当前项目是reactive类型的 web 应用,返回; - 如果
classpath中不存在SERVLET相关类,则表明当前项目不是 web 应用,返回; - 如果以上条件都不满足,则表明当前项目是
servlet类型的 web 应用。
由于 demo 引用了 spring-boot-starter-web 相关依赖,因此当前项目是 servlet 类型的 web 应用。
设置初始化器
setInitializers((Collection) getSpringFactoriesInstances(ApplicationContextInitializer.class));
这行代码分为两部分:
- 获取
ApplicationContextInitializer:getSpringFactoriesInstances(ApplicationContextInitializer.class) - 设置初始化器:
setInitializers(...)
public class SpringApplication {...// type 为 ApplicationContextInitializer.classprivate  Collection getSpringFactoriesInstances(Class type) {return getSpringFactoriesInstances(type, new Class[] {});}/*** type 为 ApplicationContextInitializer.class* parameterTypes 为 ew Class[] {}* args 为 null*/private  Collection getSpringFactoriesInstances(Class type, Class[] parameterTypes, Object... args) {ClassLoader classLoader = getClassLoader();// 从 META-INF/spring.factories 加载内容Set names = new LinkedHashSet<>(SpringFactoriesLoader.loadFactoryNames(type, classLoader));// 实例化,使用的反射操作List instances = createSpringFactoriesInstances(type, parameterTypes, classLoader, args, names);// 排序,比较的是 @Order 注解,或实现的 Orderd 接口AnnotationAwareOrderComparator.sort(instances);return instances;}...
}
先从 META-INF/spring.factories 获取内容,然后使用反射进行实例化,进行排序后再返回。那么最终会有多少个 ApplicationContextInitializer 加载进来呢?
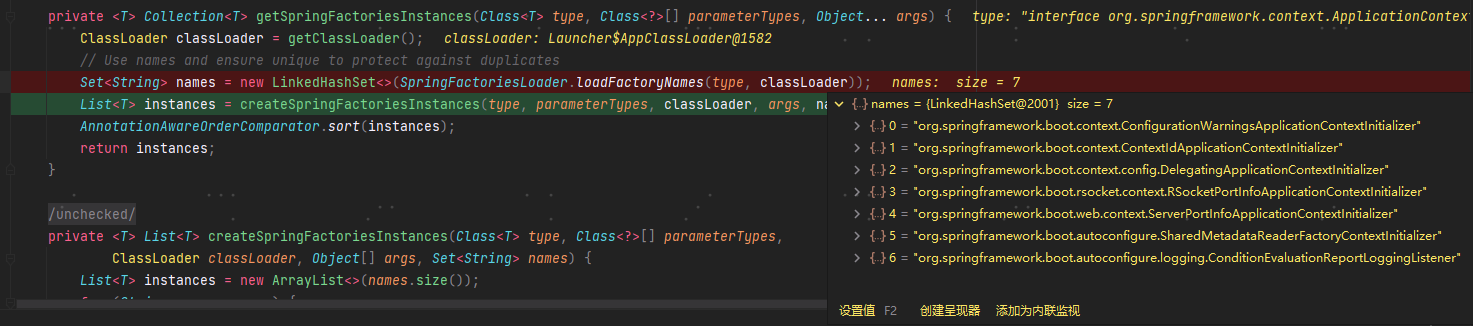
通过调试,发现一共有 7 个:对这 7 个 ApplicationContextInitializer,说明如下:
ConfigurationWarningsApplicationContextInitializer:报告 IOC 容器的一些常见的错误配置ContextIdApplicationContextInitializer:设置 Spring 应用上下文的 IDDelegatingApplicationContextInitializer:加载application.properties中context.initializer.classes配置的类RSocketPortInfoApplicationContextInitializer:将RSocketServer实际使用的监听端口写入到Environment环境属性中ServerPortInfoApplicationContextInitializer:将内置 servlet 容器实际使用的监听端口写入到Environment环境属性中SharedMetadataReaderFactoryContextInitializer:创建一个SpringBoot和ConfigurationClassPostProcessor共用的CachingMetadataReaderFactory对象ConditionEvaluationReportLoggingListener:将ConditionEvaluationReport写入日志
获取到 ApplicationContextInitializer,我们再来看看 setInitializers(...) 方法:
public class SpringApplication {...public void setInitializers(Collection> initializers) {this.initializers = new ArrayList<>(initializers);}...
}
这是一个标准的 setter 方法,所做的就只是设置成员变量。
注意: 这里会把项目中所有的spring.factories中的key都存到内存里,以便后面快速找到对应的key
设置监听器
setListeners((Collection) getSpringFactoriesInstances(ApplicationListener.class));
从形式上看,同 Initializer 一样,也是先从 META-INF/spring.factories 中加载 ApplicationListener,然后添加到成员变量中,这里我们直接看能获取到哪些 listener:
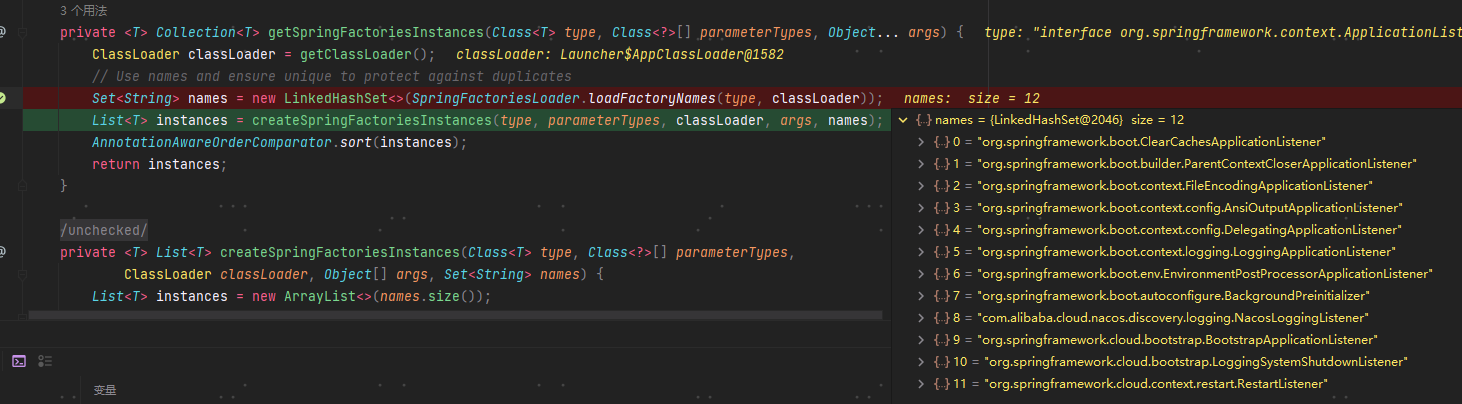
这些Listener的作用是:
ClearCachesApplicationListener:应用上下文加载完成后对缓存做清除工作ParentContextCloserApplicationListener:监听双亲应用上下文的关闭事件并往自己的子应用上下文中传播CloudFoundryVcapEnvironmentPostProcessor:对CloudFoundry提供支持FileEncodingApplicationListener:检测系统文件编码与应用环境编码是否一致,如果系统文件编码和应用环境的编码不同则终止应用启动AnsiOutputApplicationListener:根据spring.output.ansi.enabled参数配置AnsiOutputConfigFileApplicationListener:从常见的那些约定的位置读取配置文件DelegatingApplicationListener:监听到事件后转发给application.properties中配置的context.listener.classes的监听器ClasspathLoggingApplicationListener:对环境就绪事件ApplicationEnvironmentPreparedEvent和应用失败事件ApplicationFailedEvent做出响应LoggingApplicationListener:配置LoggingSystem,使用logging.config环境变量指定的配置或者缺省配置LiquibaseServiceLocatorApplicationListener:使用一个可以和SpringBoot可执行 jar 包配合工作的版本替换LiquibaseServiceLocatorBackgroundPreinitializer:使用一个后台线程尽早触发一些耗时的初始化任务
再来看看 SpringApplication#setListeners:
public void setListeners(Collection> listeners) {this.listeners = new ArrayList<>(listeners);
}
推导主应用程序类
this.mainApplicationClass = deduceMainApplicationClass();
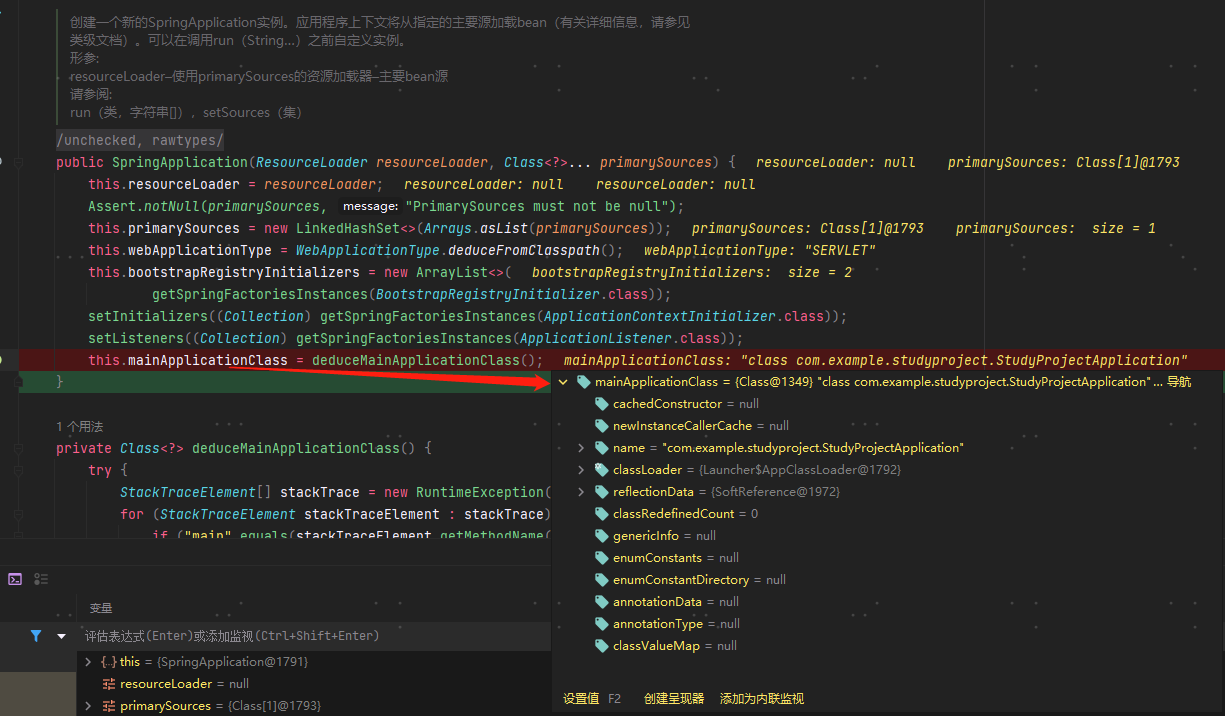
所谓主类,就是包含 main(String[]),也就是当前 spring 应用的启动类,SpringApplication#deduceMainApplicationClass 代码如下:
private Class deduceMainApplicationClass() {try {// 获取调用栈StackTraceElement[] stackTrace = new RuntimeException().getStackTrace();// 遍历调用栈,找 到main方法for (StackTraceElement stackTraceElement : stackTrace) {if ("main".equals(stackTraceElement.getMethodName())) {return Class.forName(stackTraceElement.getClassName());}}}catch (ClassNotFoundException ex) {// Swallow and continue}return null;
}
这里主要是通过 new RuntimeException().getStackTrace() 获取调用栈,然后遍历,得到包含 main 方法的类,得到的调用栈如下:
可以看到,main() 就包含在调用栈中了。
2. Spring Boot的运行
创建好了SpringApplication实例后,我们继续分析: 实例方法:SpringApplication#run(String...)
run方法的内容如下:
public ConfigurableApplicationContext run(String... args) {//1.创建 StopWatch 对象,并启动。StopWatch 主要用于简单统计 run 启动过程的时长。StopWatch stopWatch = new StopWatch();stopWatch.start();//准备空的ApplicationContext,以及一组异常报告器ConfigurableApplicationContext context = null;Collection exceptionReporters = new ArrayList<>();//2. 配置 headless 属性,java.awt.headless,java.awt.headless模式是系统的一种配置模式,在系统可能缺少显示设备、键盘或鼠标这些外设的情况下可以使用该模式configureHeadlessProperty();// 3. 获取监听器,也是从 META-INF/spring.factories 中获取SpringApplicationRunListeners listeners = getRunListeners(args);// starting():首次启动run方法时立即调用。可用于非常早期的初始化(准备运行时环境之前)。// 4. 发布事件listeners.starting();try {// 封装传入的参数,args是启动Spring应用的命令行参数,该参数可以在Spring应用中被访问。如:--server.port=9000ApplicationArguments applicationArguments = new DefaultApplicationArguments(args);// 5. 处理环境参数// 创建并配置当前SpringBoot应用将要使用的EnvironmentConfigurableEnvironment environment = prepareEnvironment(listeners, applicationArguments);// 6. 如果有配置 spring.beaninfo.ignore,则将该配置设置进系统参数configureIgnoreBeanInfo(environment);// 7.准备Banner打印器 - 就是启动Spring Boot的时候打印在console上的ASCII艺术字体Banner printedBanner = printBanner(environment);// 8. 创建applicationContextcontext = createApplicationContext();//启动错误报告的自定义回调接口//这一步的逻辑和实例化初始化器和监听器的一样,都是通过调用 getSpringFactoriesInstances 方法来获取配置的异常类名称并实例化所有的异常处理类。exceptionReporters = getSpringFactoriesInstances(SpringBootExceptionReporter.class,new Class[] { ConfigurableApplicationContext.class }, context);// 9. 准备上下文,设置了一系列的属性值//这一步主要是在容器刷新之前的准备动作。包含一个非常关键的操作:将启动类注入容器,为后续开启自动化配置奠定基础。prepareContext(context, environment, listeners, applicationArguments,printedBanner);// 10. 调用 AbstractApplicationContext.refresh,启动spring容器refreshContext(context);// 11. 刷新后的处理//扩展接口,设计模式中的模板方法,默认为空实现。// 如果有自定义需求,可以重写该方法。比如打印一些启动结束log,或者一些其它后置处理afterRefresh(context, applicationArguments);// 停止 StopWatch 统计时长stopWatch.stop();// 打印 Spring Boot 启动的时长日志。if (this.logStartupInfo) {new StartupInfoLogger(this.mainApplicationClass).logStarted(getApplicationLog(), stopWatch);}// 12. 发布事件listeners.started(context);//13. 调用 runner,实现了 ApplicationRunner或CommandLineRunner 的接口//用于调用项目中自定义的执行器XxxRunner类,使得在项目启动完成后立即执行一些特定程序//Runner 运行器用于在服务启动时进行一些业务初始化操作,这些操作只在服务启动后执行一次。//Spring Boot提供了ApplicationRunner和CommandLineRunner两种服务接口callRunners(context, applicationArguments);} catch (Throwable ex) {// 如果发生异常,则进行处理,并抛出 IllegalStateException 异常handleRunFailure(context, ex, exceptionReporters, listeners);throw new IllegalStateException(ex);}//14. 发布应用上下文就绪事件//表示在前面一切初始化启动都没有问题的情况下,使用运行监听器SpringApplicationRunListener持续运行配置好的应用上下文ApplicationContext,// 这样整个Spring Boot项目就正式启动完成了。try {listeners.running(context);} catch (Throwable ex) {// 如果发生异常,则进行处理,并抛出 IllegalStateException 异常handleRunFailure(context, ex, exceptionReporters, null);throw new IllegalStateException(ex);}//返回容器return context;
}
下面进行详细分析:
创建计时器并启动
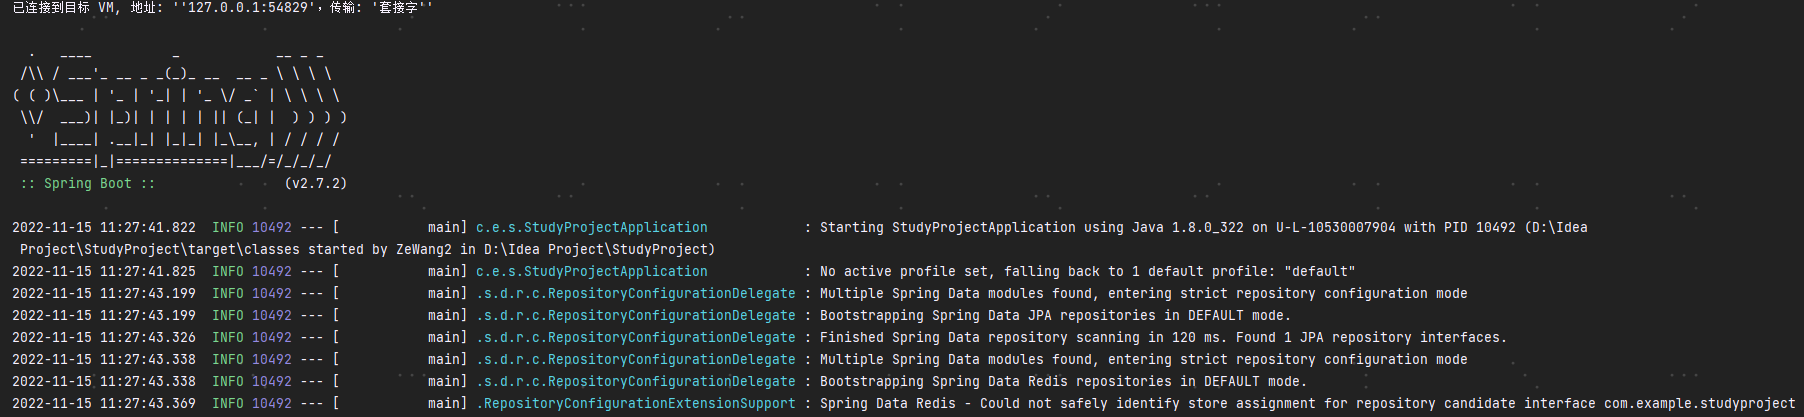
一开始,springboot 就创建了 stopWatch 实例,然后调用 StopWatch#start() 启动计时功能,关于这个类没啥好说的,它就是个计时器,这里是用来计算 springboot 启动耗时,以下日志中的时间就是由这个计时器得到的:
设置headless属性值
SpringApplication#configureHeadlessProperty 方法的相关代码如下:
public class SpringApplication {private static final String SYSTEM_PROPERTY_JAVA_AWT_HEADLESS = "java.awt.headless";...private boolean headless = true;public void setHeadless(boolean headless) {this.headless = headless;}...private void configureHeadlessProperty() {// 将 java.awt.headless 的值配置到系统变量System.setProperty(SYSTEM_PROPERTY_JAVA_AWT_HEADLESS,System.getProperty(SYSTEM_PROPERTY_JAVA_AWT_HEADLESS, Boolean.toString(this.headless)));}...
}
这个方法仅仅是将 java.awt.headless 的值设置到了系统变量,设置成 true,表示启动 java.awt.headless 模式。那么它是个啥模式呢?简单来说,该模式就是系统缺少了显示设备、键盘或鼠标等情况的模式,服务器一般都是在这种情况下工作的。
获取运行监听器
SpringApplicationRunListener 依然是从 META-INF/spring.factories 中获取,那 SpringApplicationRunListener 是个啥呢?我们来看代码:
public interface SpringApplicationRunListener {/*** 首次启动run方法时立即调用。可用于非常早期的初始化。*/default void starting() {}/*** 准备好环境(Environment构建完成),但在创建ApplicationContext之前调用。*/default void environmentPrepared(ConfigurableEnvironment environment) {}/*** 在创建和构建ApplicationContext之后,但在加载之前调用。*/default void contextPrepared(ConfigurableApplicationContext context) {}/*** ApplicationContext已加载但在刷新之前调用。*/default void contextLoaded(ConfigurableApplicationContext context) {}/*** ApplicationContext已刷新,应用程序已启动,* 但尚未调用CommandLineRunners和ApplicationRunners。*/default void started(ConfigurableApplicationContext context) {}/*** 在运行方法彻底完成之前立即调用,* 刷新ApplicationContext并调用所有CommandLineRunners和ApplicationRunner。*/default void running(ConfigurableApplicationContext context) {}/*** 在运行应用程序时失败时调用。*/default void failed(ConfigurableApplicationContext context, Throwable exception) {}
}
SpringApplicationRunListener 是一个接口,定义了一系列的方法来监听 springboot 的启动过程,方法的说明已经在文档中有详细定义,如果我们需要在 springboot 的启动中的某个过程做一些事情,就可以实现 SpringApplicationRunListener 然后重写对应的方法。
通过调试,发现 springboot 获得的运行监听器如下:SpringApplication运行方法的侦听器。

运行监听器方法
回到 SpringApplication#run(java.lang.String...),获取到运行监听器后,会立即调用 starting() 方法来发布启动事件:
// 获取监听器
SpringApplicationRunListeners listeners = getRunListeners(args);
// starting():首次启动run方法时立即调用。可用于非常早期的初始化(准备运行时环境之前)。
listeners.starting();
进入 SpringApplicationRunListeners#starting 方法:
void starting() {for (SpringApplicationRunListener listener : this.listeners) {listener.starting();}
}
可以看到,所谓的发布事件,就是遍历所有的监听器,逐一调用其 starting() 罢了,this.listeners 就是上面获取到的所有的运行监听器。不仅如此,SpringApplicationRunListener 的其他方法如 environmentPrepared(...)、contextPrepared(...) 等都是这样的调用套路,后面看到了就不重复分析了。
准备运行时环境
接下我们来看看环境参数的处理,代码如下:
// 封装传入的参数
ApplicationArguments applicationArguments = new DefaultApplicationArguments(args);
// 处理环境参数
ConfigurableEnvironment environment = prepareEnvironment(listeners, applicationArguments);
进入 SpringApplication#prepareEnvironment:
private ConfigurableEnvironment prepareEnvironment(SpringApplicationRunListeners listeners,ApplicationArguments applicationArguments) {// 获取环境,如果不存在则创建ConfigurableEnvironment environment = getOrCreateEnvironment();// 配置运行时环境configureEnvironment(environment, applicationArguments.getSourceArgs());ConfigurationPropertySources.attach(environment);//  SpringApplicationRunListener 的 environmentPrepared 方法// (Environment构建完成,但在创建ApplicationContext之前)//  配置文件加载监听器(ConfigFileApplicationListener)listeners.environmentPrepared(environment);// 环境与应用绑定bindToSpringApplication(environment);if (!this.isCustomEnvironment) {environment = new EnvironmentConverter(getClassLoader()).convertEnvironmentIfNecessary(environment, deduceEnvironmentClass());}ConfigurationPropertySources.attach(environment);return environment;
}
-
获取或创建环境:
这个方法是根据应用类型来创建对应的
Environment实例,当前应用类型是SERVLET。private ConfigurableEnvironment getOrCreateEnvironment() {if (this.environment != null) {return this.environment;}switch (this.webApplicationType) {case SERVLET:return new StandardServletEnvironment();case REACTIVE:return new StandardReactiveWebEnvironment();default:return new StandardEnvironment();} }StandardServletEnvironment()中包含了如下内容:- 系统属性,我们平时调用
System.getenv()得到的参数; - 系统环境,我们平时调用
System.getProperties()得到的参数; servlet的servletContext与servletConfig.
- 系统属性,我们平时调用
-
配置环境
我们继续分析,接着看看配置环境的流程,也就是
SpringApplication#configureEnvironment方法:protected void configureEnvironment(ConfigurableEnvironment environment, String[] args) {if (this.addConversionService) {// 添加转换器,处理参数类型转换,如 String转Number,Integer转Enum等ConversionService conversionService = ApplicationConversionService.getSharedInstance();environment.setConversionService((ConfigurableConversionService) conversionService);}// 将启动参数添加到 environment 中configurePropertySources(environment, args);// 处理 ActiveProfiles 值configureProfiles(environment, args); }
springboot 的启动参数有啥好解析的呢?在启动 spring 项目时,我们可以这样指定参数:
java -jar xxx.jar --a1=aaa --b1=bbb
然后我们就能通过 @Value("${a1}") 获取到,关键就是在这里,可以看到,springboot 会把传入的 --a1=aaa、--b1=bbb 解析成 a1/aaa、b1/bbb 键值对的形式,保存到 Environment,后续要用到时,就可很方便地从 Environment 中获取了。
environment还有一个很重要的功能——加载配置文件,在下面章节中详细说明。
创建IOC容器
创建 ioc 容器的代码如下:
ConfigurableApplicationContext context = null;
....
// 创建applicationContext
context = createApplicationContext();
我们进入 SpringApplication#createApplicationContext 方法:
/** 默认的 ApplicationContext */
public static final String DEFAULT_CONTEXT_CLASS = "org.springframework.context."+ "annotation.AnnotationConfigApplicationContext";/** servlet 应用的的 ApplicationContext */
public static final String DEFAULT_SERVLET_WEB_CONTEXT_CLASS = "org.springframework.boot."+ "web.servlet.context.AnnotationConfigServletWebServerApplicationContext";/** Reactive 应用的 ApplicationContext */
public static final String DEFAULT_REACTIVE_WEB_CONTEXT_CLASS = "org.springframework."+ "boot.web.reactive.context.AnnotationConfigReactiveWebServerApplicationContext";protected ConfigurableApplicationContext createApplicationContext() {Class contextClass = this.applicationContextClass;if (contextClass == null) {try {// 根据应用类型来创建不同的容器switch (this.webApplicationType) {case SERVLET:// 使用的是 AnnotationConfigServletWebServerApplicationContextcontextClass = Class.forName(DEFAULT_SERVLET_WEB_CONTEXT_CLASS);break;case REACTIVE:contextClass = Class.forName(DEFAULT_REACTIVE_WEB_CONTEXT_CLASS);break;default:// 默认使用的是 AnnotationConfigApplicationContextcontextClass = Class.forName(DEFAULT_CONTEXT_CLASS);}}catch (ClassNotFoundException ex) {throw new IllegalStateException(...);}}// 使用反射进行实例化return (ConfigurableApplicationContext) BeanUtils.instantiateClass(contextClass);
}
这个方法主要就是根据应用类型来创建不同 ApplicationContext,使用反射的方法进行实例化,各应用类型对应的 ApplicationContext 如下:
servlet应用:AnnotationConfigServletWebServerApplicationContextreactive应用:AnnotationConfigReactiveWebServerApplicationContext- 以上都不是:
AnnotationConfigApplicationContext
当前应用的类型是 servlet,因此创建的 ApplicationContext 是 AnnotationConfigReactiveWebServerApplicationContext,来看看它的构造方法:
我们进入 SpringApplication#createApplicationContext 方法:
/** 默认的 ApplicationContext */
public static final String DEFAULT_CONTEXT_CLASS = "org.springframework.context."+ "annotation.AnnotationConfigApplicationContext";/** servlet 应用的的 ApplicationContext */
public static final String DEFAULT_SERVLET_WEB_CONTEXT_CLASS = "org.springframework.boot."+ "web.servlet.context.AnnotationConfigServletWebServerApplicationContext";/** Reactive 应用的 ApplicationContext */
public static final String DEFAULT_REACTIVE_WEB_CONTEXT_CLASS = "org.springframework."+ "boot.web.reactive.context.AnnotationConfigReactiveWebServerApplicationContext";protected ConfigurableApplicationContext createApplicationContext() {Class contextClass = this.applicationContextClass;if (contextClass == null) {try {// 根据应用类型来创建不同的容器switch (this.webApplicationType) {case SERVLET:// 使用的是 AnnotationConfigServletWebServerApplicationContextcontextClass = Class.forName(DEFAULT_SERVLET_WEB_CONTEXT_CLASS);break;case REACTIVE:contextClass = Class.forName(DEFAULT_REACTIVE_WEB_CONTEXT_CLASS);break;default:// 默认使用的是 AnnotationConfigApplicationContextcontextClass = Class.forName(DEFAULT_CONTEXT_CLASS);}}catch (ClassNotFoundException ex) {throw new IllegalStateException(...);}}// 使用反射进行实例化return (ConfigurableApplicationContext) BeanUtils.instantiateClass(contextClass);
}
这个方法主要就是根据应用类型来创建不同 ApplicationContext,使用反射的方法进行实例化,各应用类型对应的 ApplicationContext 如下:
servlet应用:AnnotationConfigServletWebServerApplicationContextreactive应用:AnnotationConfigReactiveWebServerApplicationContext- 以上都不是:
AnnotationConfigApplicationContext
当前应用的类型是 servlet,因此创建的 ApplicationContext 是 AnnotationConfigReactiveWebServerApplicationContext,来看看它的构造方法:
public class AnnotationConfigServletWebServerApplicationContext extends ServletWebServerApplicationContext implements AnnotationConfigRegistry {// 用来处理 BeanDefinition 的注册private final AnnotatedBeanDefinitionReader reader;// 用来处理包的扫描private final ClassPathBeanDefinitionScanner scanner;...public AnnotationConfigServletWebServerApplicationContext() {this.reader = new AnnotatedBeanDefinitionReader(this);this.scanner = new ClassPathBeanDefinitionScanner(this);}...
}
AnnotationConfigServletWebServerApplicationContext 的构造方法还是比较简单的,只是设置了两个属性,就不多说了。不过,我们也要把目光放远一点,看看其父类的构造方法,最终在 GenericApplicationContext 的构造方法中找到这么一句:
public GenericApplicationContext() {this.beanFactory = new DefaultListableBeanFactory();
}
这行代码创建了 DefaultListableBeanFactory 并将其赋值给了 beanFactory,这表明我们在 ApplicationContext 使用的 beanFactory 就是 DefaultListableBeanFactory。
准备IOC容器
创建完 ioc 容器后,接着就是对容器进行一些准备操作,代码如下:
prepareContext(bootstrapContext, context, environment, listeners, applicationArguments, printedBanner);
public class SpringApplication {...private void prepareContext(ConfigurableApplicationContext context, ConfigurableEnvironment environment, SpringApplicationRunListeners listeners, ApplicationArguments applicationArguments, Banner printedBanner) {// 将创建好的应用环境设置到IOC容器中context.setEnvironment(environment);// 设置容器的一些参数postProcessApplicationContext(context);// 应用Initializer进行初始化操作applyInitializers(context);// 监听器:SpringApplicationRunListeners的contextPrepared方法// (在创建和准备ApplicationContext之后,但在加载之前)listeners.contextPrepared(context);// 打印个日志if (this.logStartupInfo) {logStartupInfo(context.getParent() == null);logStartupProfileInfo(context);}// 获取beanFactoryConfigurableListableBeanFactory beanFactory = context.getBeanFactory();// 将运行参数作为bean注册到beanFactory中beanFactory.registerSingleton("springApplicationArguments", applicationArguments);// 将 banner 作为bean注册到beanFactory中if (printedBanner != null) {beanFactory.registerSingleton("springBootBanner", printedBanner);}if (beanFactory instanceof DefaultListableBeanFactory) {// 是否允许bean的信息被覆盖((DefaultListableBeanFactory) beanFactory).setAllowBeanDefinitionOverriding(this.allowBeanDefinitionOverriding);}// 处理懒加载if (this.lazyInitialization) {context.addBeanFactoryPostProcessor(new LazyInitializationBeanFactoryPostProcessor());}// 获取所有资源Set启动IOC容器
接下来我们来看看 SpringApplication#refreshContext 方法:
private void refreshContext(ConfigurableApplicationContext context) {// 启动spring容器refresh(context);if (this.registerShutdownHook) {try {// 注册 ShutdownHookcontext.registerShutdownHook();}catch (AccessControlException ex) {// Not allowed in some environments.}}
}
这个方法操作就两个:
refresh(context):启动 spring 容器,也不是调用AbstractApplicationContext#refresh方法;context.registerShutdownHook():注册ShutdownHook,可以在 jvm 进程关闭时处理一些特定的操作。
进入 SpringApplication#refresh:
protected void refresh(ApplicationContext applicationContext) {Assert.isInstanceOf(AbstractApplicationContext.class, applicationContext);// spring 容器的启动操作了((AbstractApplicationContext) applicationContext).refresh();
}
这个方法很简单,先判断 applicationContext 的类型是否为 AbstractApplicationContext,然后再调用 AbstractApplicationContext#refresh()。
关于 AbstractApplicationContext#refresh(),那可是大名鼎鼎啊,该方法涵盖了 spring 容器的启动流程。
**refreshContext(context)**的核心代码如下:
@Overridepublic void refresh() throws BeansException, IllegalStateException {synchronized (this.startupShutdownMonitor) {StartupStep contextRefresh = this.applicationStartup.start("spring.context.refresh");// 准备此上下文以进行刷新。将 servletContext 与 servletConfig 设置到了 Environment 中。prepareRefresh();// 告诉子类刷新内部 Bean 工厂。ConfigurableListableBeanFactory beanFactory = obtainFreshBeanFactory();// 准备 Bean 工厂以在此上下文中使用。prepareBeanFactory(beanFactory);try {// 允许在上下文子类中对 Bean 工厂进行后处理。这个 BeanPostProcessor 是用来处理 ServletContextAware 与 ServletConfigAware 两个 Aware 接口的postProcessBeanFactory(beanFactory);StartupStep beanPostProcess = this.applicationStartup.start("spring.context.beans.post-process");// 执行 BeanFactoryPostProcessors。在这个方法中,有个重的 BeanFactoryPostProcessor 会被执行:ConfigurationClassPostProcessor,springboot 的自动装配的启用注解 @EnableAutoConfiguration 会在这里处理,自动装配类的加载、条件注解也是在 ConfigurationClassPostProcessor 中。invokeBeanFactoryPostProcessors(beanFactory);// 注册 BeanPostProcessorregisterBeanPostProcessors(beanFactory);beanPostProcess.end();// 初始化此上下文的消息源,用于国际化操作。initMessageSource();// 为此上下文初始化事件多播程序。initApplicationEventMulticaster();// 在特定上下文子类中初始化其他特殊 bean。web 服务器是在这个方法中创建的,如tomcat/jetty等onRefresh();// 注册事件监听器registerListeners();// 初始化单例 beanfinishBeanFactoryInitialization(beanFactory);// 完成启动操作finishRefresh();}catch (BeansException ex) {if (logger.isWarnEnabled()) {logger.warn("Exception encountered during context initialization - " +"cancelling refresh attempt: " + ex);}// 销毁已创建的单例以避免悬而未决的资源。destroyBeans();// 重置“活动”标志。cancelRefresh(ex);// 将异常传播给调用方。throw ex;}finally {// 重置 Spring 核心中的常见内省缓存,因为我们可能不再需要单例 Bean 的元数据了......resetCommonCaches();contextRefresh.end();}}}
完成启动
刷新后的处理
afterRefresh(context, applicationArguments);
刷新后的处理方法为 SpringApplication#afterRefresh,内容如下:
protected void afterRefresh(ConfigurableApplicationContext context, ApplicationArguments args) {
}
可以看到,这是一个空方法,springboot 提供的扩展。
Runner回调
处理运行器的方法是 SpringApplication#callRunners,代码如下:
private void callRunners(ApplicationContext context, ApplicationArguments args) {List这两个方法表示,springboot 为我们提供了两个接口:ApplicationRunner 与 CommandLineRunner,我们可以实现它来完成一些操作,应用示例如下:
/*** ApplicationRunner 示例*/
@Component
public class MyApplicationRunner implements ApplicationRunner {@Overridepublic void run(ApplicationArguments args) throws Exception {System.out.println("MyApplicationRunner: hello world");}
}/*** CommandLineRunner 示例*/
@Component
public class MyCommandLineRunner implements CommandLineRunner {@Overridepublic void run(String... args) throws Exception {System.out.println("MyCommandLineRunner: hello world!");}
}

3. 延伸与拓展
SpringBoot中的事件推送原型(观察者模式)
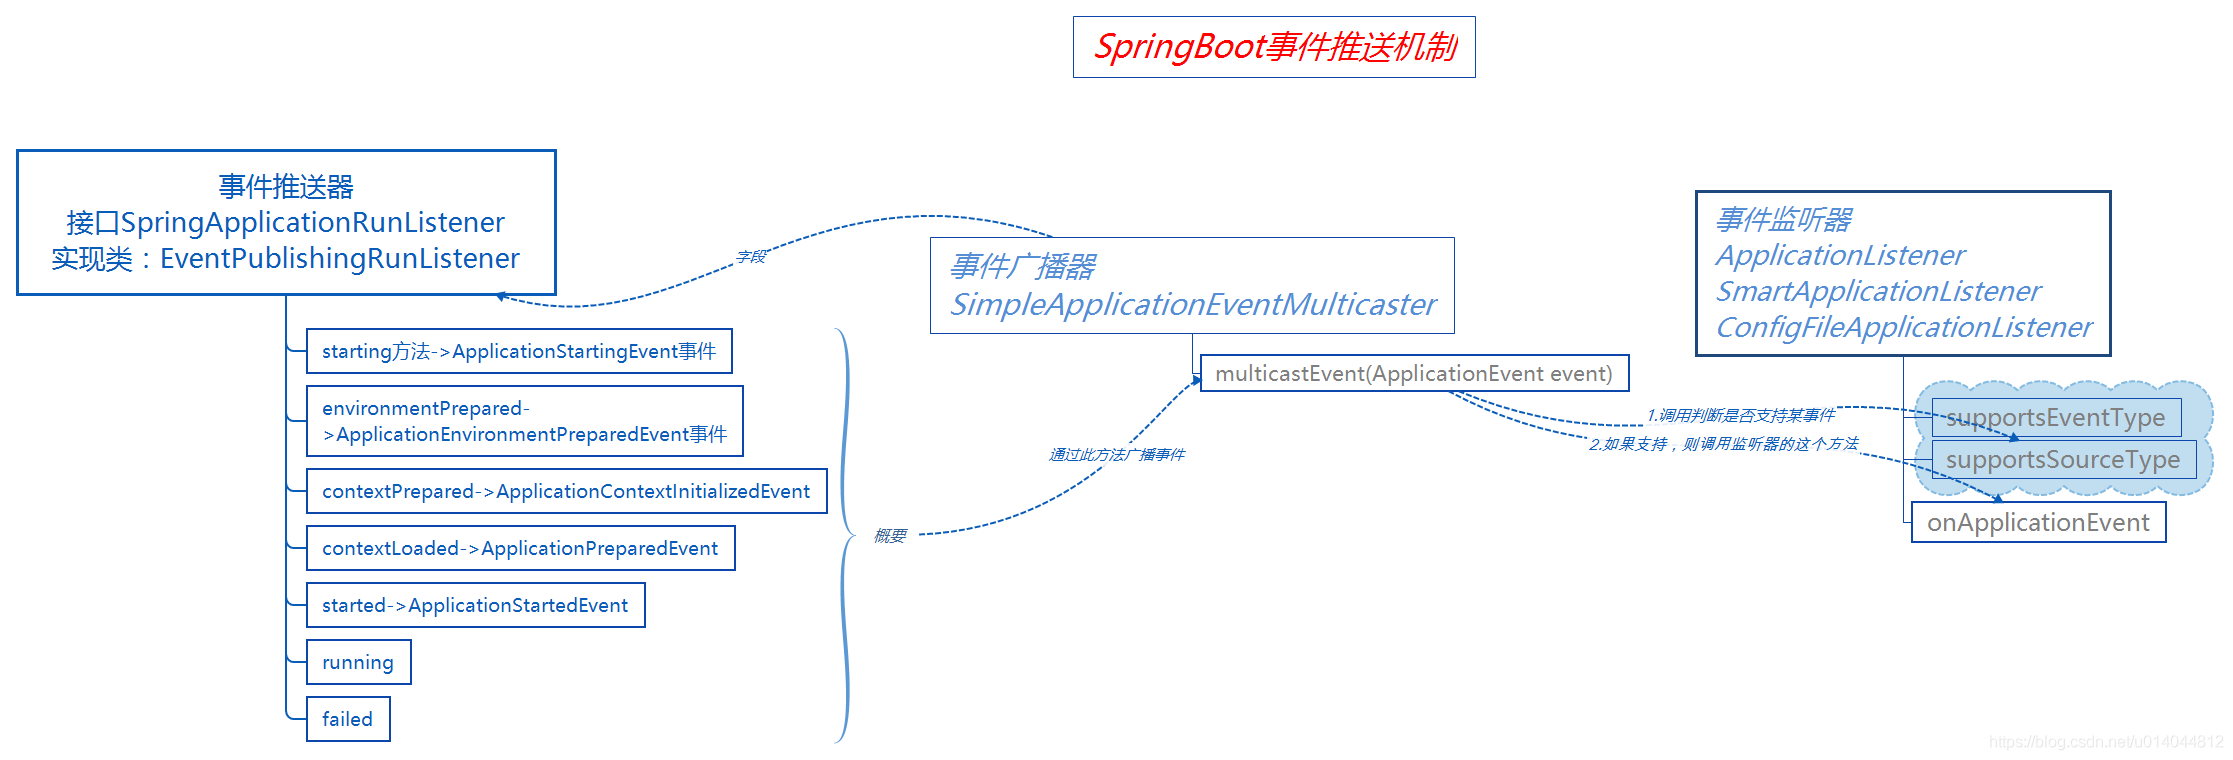
SpringBoot启动过程中分多个阶段或者说是多个步骤,每完成一步就会产生一个事件,并调用对应事件的监听器,这是一种标准的观察者模式,这在启动的过程中有很好的扩展性,下面我们来看看SpringBoot的事件推送原理:
SpringBoot如何加载yml配置文件
先说结论:在启动的准备运行时环境这一步,会加载配置文件。
在SpringBoot2.4.0以前,是通过ConfigFileApplicationListener来加载配置文件的。
在SpringBoot2.4.0以后,配置文件的加载机制进行了重构
SpringBoot自动配置原理
再了解Spring Boot自动配置原理之前可以先去下面问题与思考章节,看一下SPI机制。
@EnableAutoConfiguration
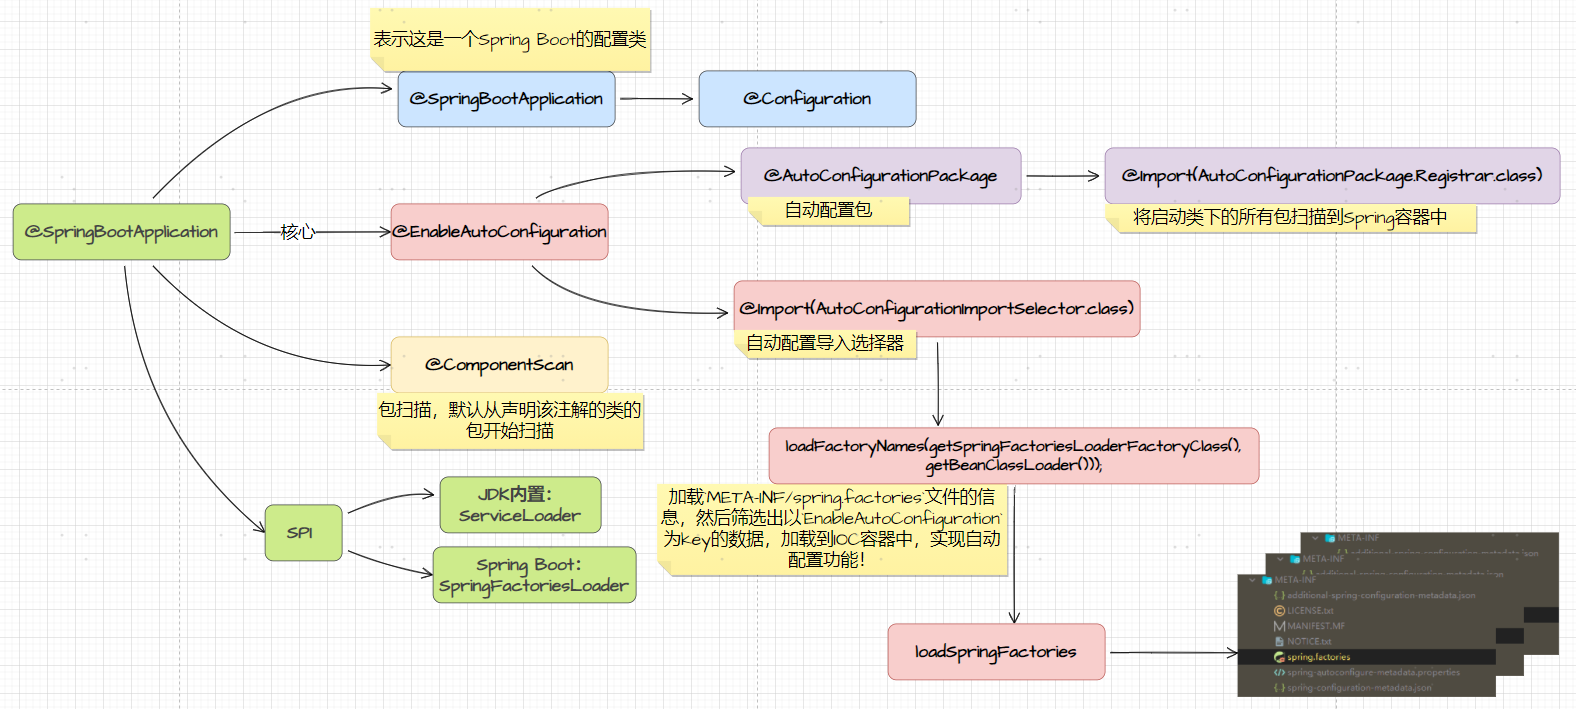
先说结论:
内部实际上就去加载
META-INF/spring.factories文件的信息,然后筛选出以EnableAutoConfiguration为key的数据,加载到IOC容器中,实现自动配置功能!
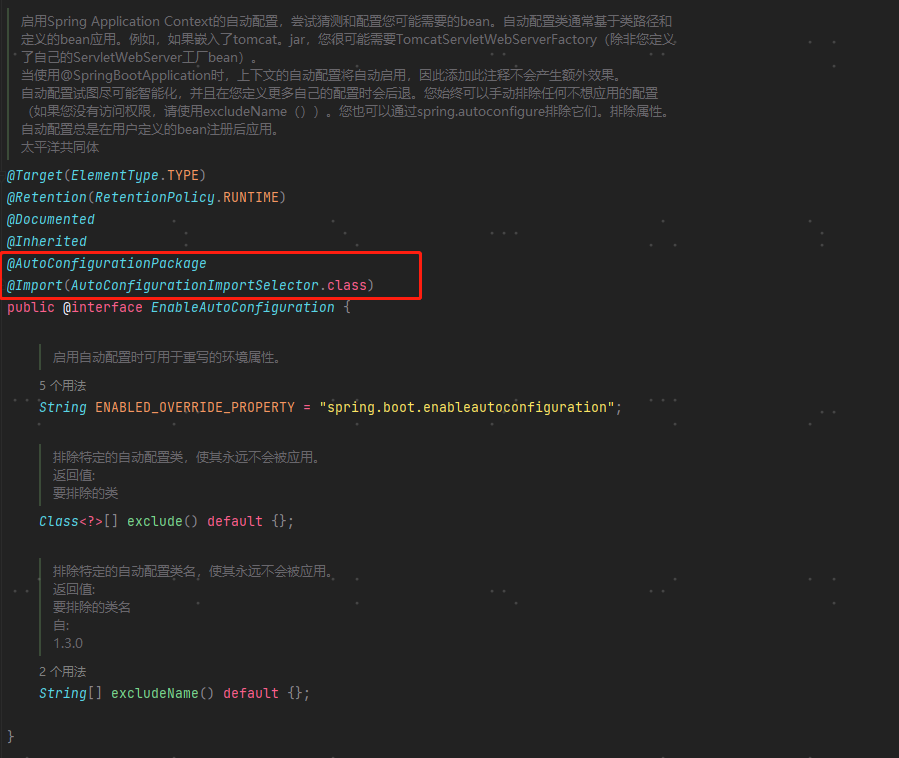
自动导入配置,是SpringBoot的关键。点进源码后发现:这个注解集成了@AutoConfigurationPackage和Import两个注解。
@AutoConfigurationPackage
@AutoConfigurationPackage 指定了自动装配的包,代码如下:
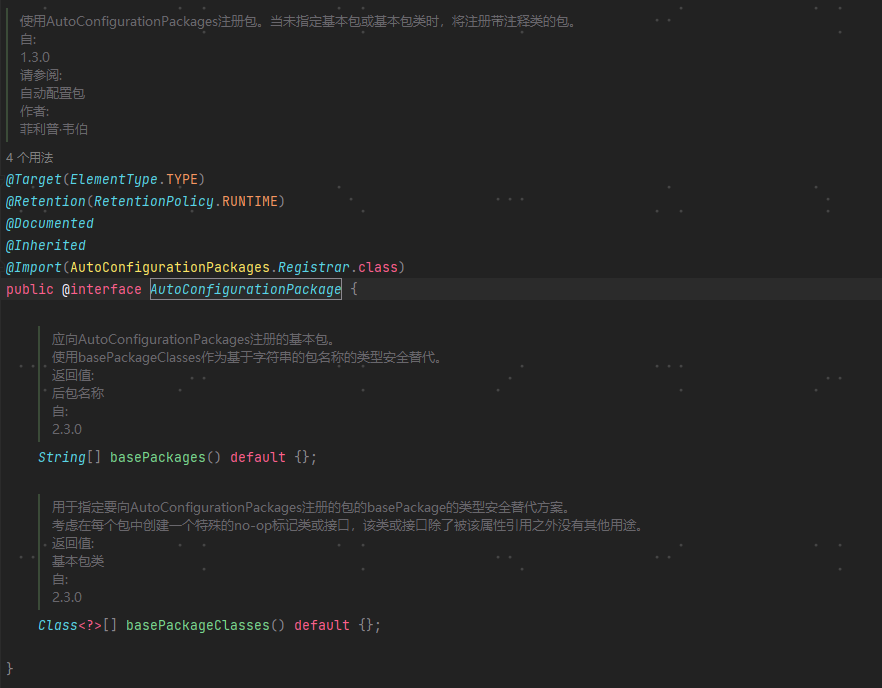
这个注解的内容非常简单,仅使用 @Import 注解引入了 AutoConfigurationPackages.Registrar,下面看一下Registrar的内容:
AutoConfigurationPackages.Registrar
将被 @SpringBootApplication 标记的类所在的包,包装成 BasePackages,然后注册到 spring 容器中;
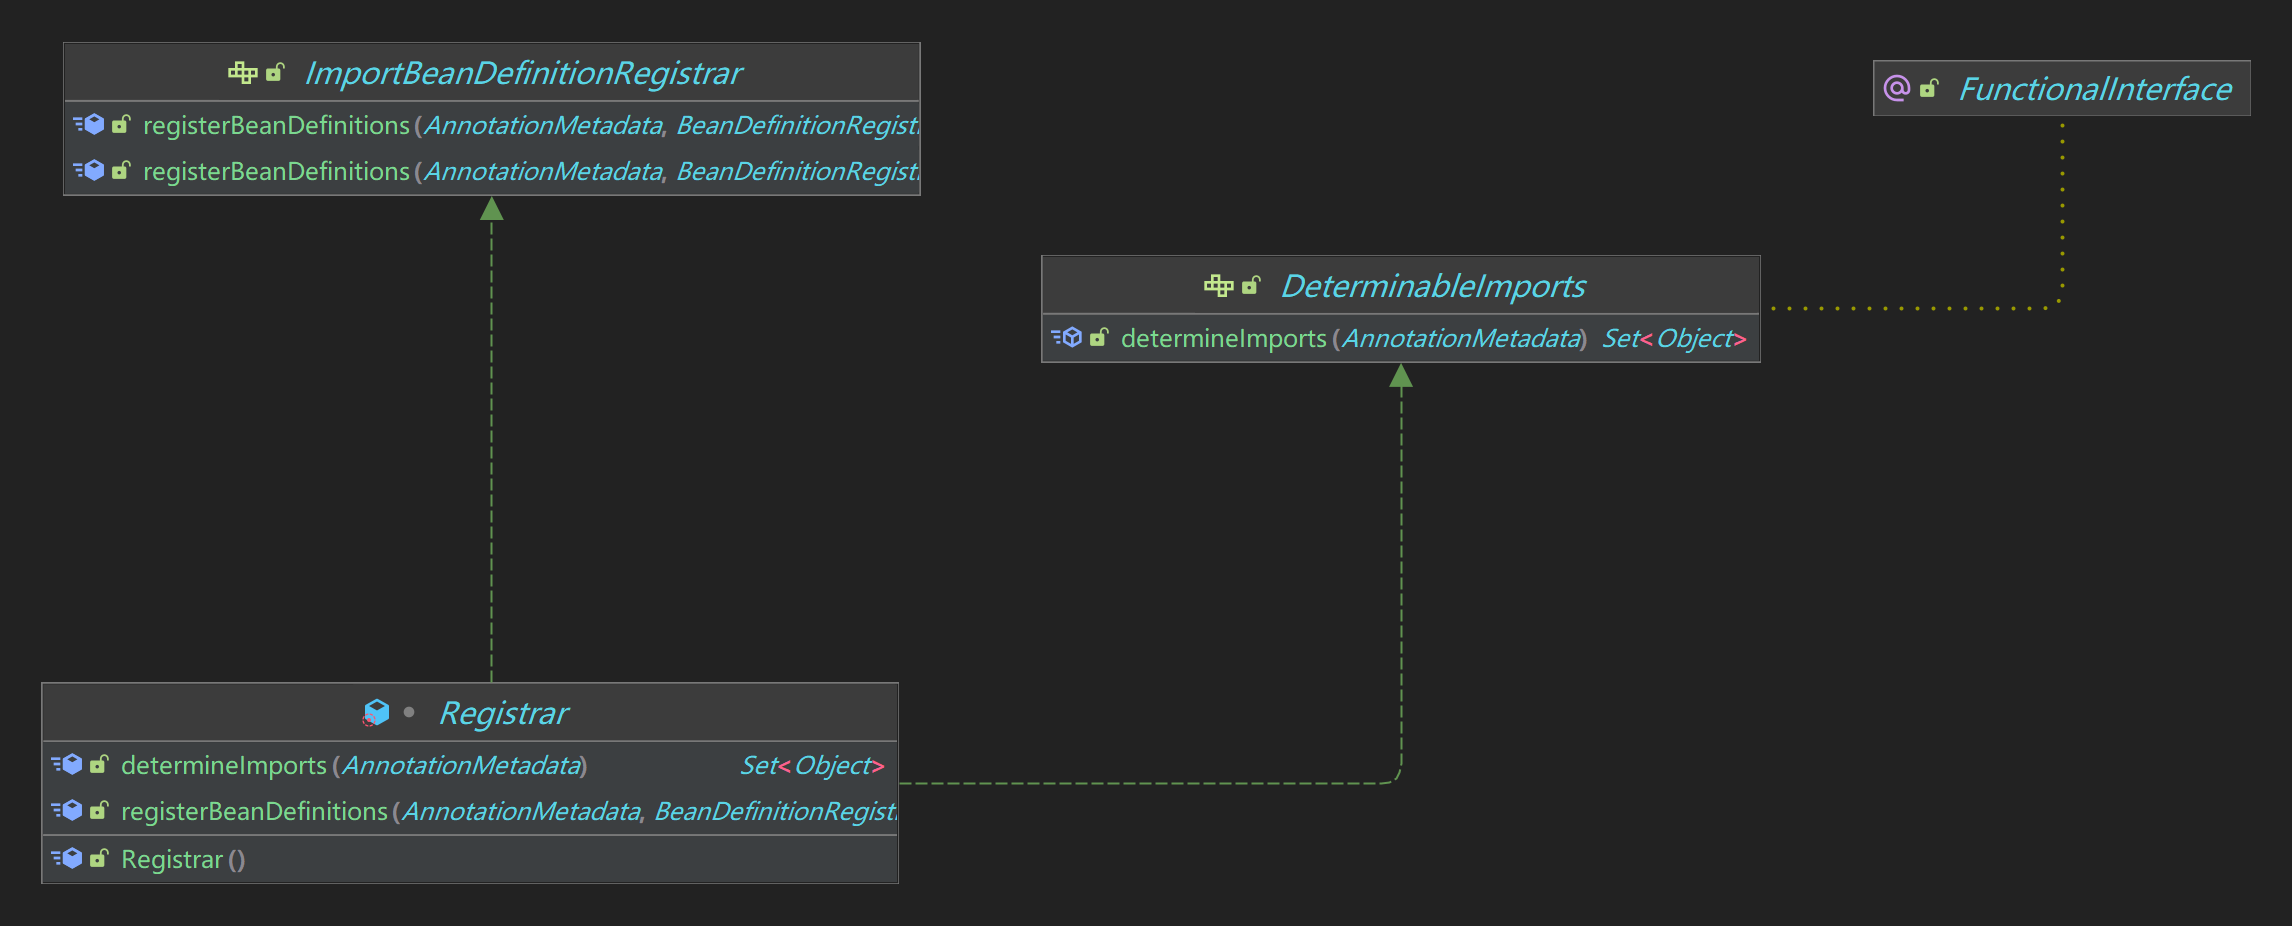
public abstract class AutoConfigurationPackages {private static final String BEAN = AutoConfigurationPackages.class.getName();static class Registrar implements ImportBeanDefinitionRegistrar, DeterminableImports {/*** 根据 ImportBeanDefinitionRegistrar 的处理,spring将调用 registerBeanDefinitions() 注册内容*/@Overridepublic void registerBeanDefinitions(AnnotationMetadata metadata, BeanDefinitionRegistry registry) {//new PackageImports(metadata).getPackageNames()`就是当前启动类所在的包。register(registry, new PackageImport(metadata).getPackageName());}@Overridepublic Set代码有点长,但逻辑并不复杂,流程如下:
AutoConfigurationPackages.Registrar实现了ImportBeanDefinitionRegistrar,registerBeanDefinitions(...)方法向 spring 中注册了BasePackages,注册逻辑在AutoConfigurationPackages#register方法中;AutoConfigurationPackages#register方法的注册逻辑为,先判断是否已注册了BasePackages,如果注册了,就将当前类所在的包添加到BasePackages的构造方法参数值中,否则就创建BeanDefinition,设置构造方法的参数值,然后注册到 spring 中;
自动配置重点
AutoConfigurationImportSelector
AutoConfigurationImportSelector 开启自动配置类的导包的选择器(导入哪些组件的选择器),DeferedImportSelector处理自动配置。如果需要@EnableAutoConfiguration的自定义变量,也可以对该类进行子类化。
DeferredImportSelector

AutoConfigurationImportSelector 实现了 DeferredImportSelector,关于 DeferredImportSelector 的分析,可以参考 ConfigurationClassPostProcessor 之处理 @Import 注解,这里我们直接给出结论:
DeferredImportSelector 是 ImportSelector 的子接口,其内部有一个接口 Group,该接口定义了两个方法:
public interface DeferredImportSelector extends ImportSelector {...interface Group {/*** 处理导入操作*/void process(AnnotationMetadata metadata, DeferredImportSelector selector);/*** 返回导入类*/Iterable selectImports()}
}
- 在处理
DeferredImportSelector的导入类时,DeferredImportSelector.Group#process方法会先调用,然后再调用DeferredImportSelector.Group#selectImports返回导入类; DeferredImportSelector可以指定导入类的分组,在处理时,可以按分组处理导入类;DeferredImportSelector在处理导入类时,先将导入类按分组放入一个map中,在处理完其他配置类(spring 的配置类为@Component、@ComponentScan、@Import、@Configuration、@Bean标记的类)后再来处理分组中的导入类,也就是说,DeferredImportSelector导入的类,会在其他类注册到beanFactory中后,再进行注册(注册前还需判断能否注册到beanFactory,若能才注册)。
AutoConfigurationGroup
// 实现了 DeferredImportSelector
public class AutoConfigurationImportSelector implements DeferredImportSelector, BeanClassLoaderAware,ResourceLoaderAware, BeanFactoryAware, EnvironmentAware, Ordered {.../*** 这里实现了 DeferredImportSelector.Group*/private static class AutoConfigurationGroup implements DeferredImportSelector.Group, BeanClassLoaderAware, BeanFactoryAware, ResourceLoaderAware {/*** 保存导入的类*/private final List autoConfigurationEntries = new ArrayList<>();/*** 处理导入类*/@Overridepublic void process(AnnotationMetadata annotationMetadata, DeferredImportSelector deferredImportSelector) {Assert.state(deferredImportSelector instanceof AutoConfigurationImportSelector,() -> String.format("Only %s implementations are supported, got %s",AutoConfigurationImportSelector.class.getSimpleName(),deferredImportSelector.getClass().getName()));// 1. 调用 AutoConfigurationImportSelector#getAutoConfigurationEntry(...) 方法,// 在这个方法里会加载自动装配类AutoConfigurationEntry autoConfigurationEntry = ((AutoConfigurationImportSelector) deferredImportSelector).getAutoConfigurationEntry(getAutoConfigurationMetadata(), annotationMetadata);// 2. 将获取到的 autoConfigurationEntry 保存起来this.autoConfigurationEntries.add(autoConfigurationEntry);for (String importClassName : autoConfigurationEntry.getConfigurations()) {this.entries.putIfAbsent(importClassName, annotationMetadata);}}/*** 返回导入类*/@Overridepublic Iterable selectImports() {if (this.autoConfigurationEntries.isEmpty()) {return Collections.emptyList();}// 3. 得到过滤类Set allExclusions = this.autoConfigurationEntries.stream().map(AutoConfigurationEntry::getExclusions).flatMap(Collection::stream).collect(Collectors.toSet());// 4. 将 autoConfigurationEntries 转换为 LinkedHashSetSet processedConfigurations = this.autoConfigurationEntries.stream().map(AutoConfigurationEntry::getConfigurations).flatMap(Collection::stream).collect(Collectors.toCollection(LinkedHashSet::new));// 5. 去除需要过滤的类processedConfigurations.removeAll(allExclusions);// 6. 进行排序,这个顺序决定了自动装配类注册到 beanFactory 中的顺序return sortAutoConfigurations(processedConfigurations, getAutoConfigurationMetadata()).stream().map((importClassName) -> new Entry(this.entries.get(importClassName), importClassName)).collect(Collectors.toList());}...}}
这里我们将 DeferredImportSelector.Group#process 与 DeferredImportSelector.Group#selectImports 两个方法结合起来看,处理步骤总结如下:
- 调用
AutoConfigurationImportSelector#getAutoConfigurationEntry(...)方法加载自动装配类; - 将得到的自动装配类保存到
autoConfigurationEntries中; - 得到过滤类,这些过滤类就是由
@EnableAutoConfiguration的exclude或excludeName指定的; - 将
autoConfigurationEntries转换为LinkedHashSet,结果为processedConfigurations; - 去除
processedConfigurations需要过滤的类; - 将第 5 步得到的类排序后,返回。
springboot 的自动导入类不是在
AutoConfigurationImportSelector#selectImports方法中处理的,而是在AutoConfigurationImportSelector.AutoConfigurationGroup#selectImports方法中处理的。
获取装配类:getAutoConfigurationEntry()
核心代码:
public class AutoConfigurationImportSelector implements DeferredImportSelector, BeanClassLoaderAware,ResourceLoaderAware, BeanFactoryAware, EnvironmentAware, Ordered {.....//根据导入的@Configuration类的AnnotationMetadata返回AutoConfigurationImportSelector.AutoConfigurationEntryprotected AutoConfigurationEntry getAutoConfigurationEntry(AnnotationMetadata annotationMetadata) {if (!isEnabled(annotationMetadata)) {return EMPTY_ENTRY;}//获取注解中属性的值,@EnableAutoConfiguration中的两个属性AnnotationAttributes attributes = getAttributes(annotationMetadata);// 所有需要导入的组件全类名,下面有断点图List configurations = getCandidateConfigurations(annotationMetadata, attributes);//删除重复项configurations = removeDuplicates(configurations);// 排除依赖Set exclusions = getExclusions(annotationMetadata, attributes);//检查checkExcludedClasses(configurations, exclusions);//删除需要排除的依赖configurations.removeAll(exclusions);configurations = getConfigurationClassFilter().filter(configurations);// 触发 AutoConfigurationImportEvent 事件fireAutoConfigurationImportEvents(configurations, exclusions);// 最终返回结果return new AutoConfigurationEntry(configurations, exclusions);}
}
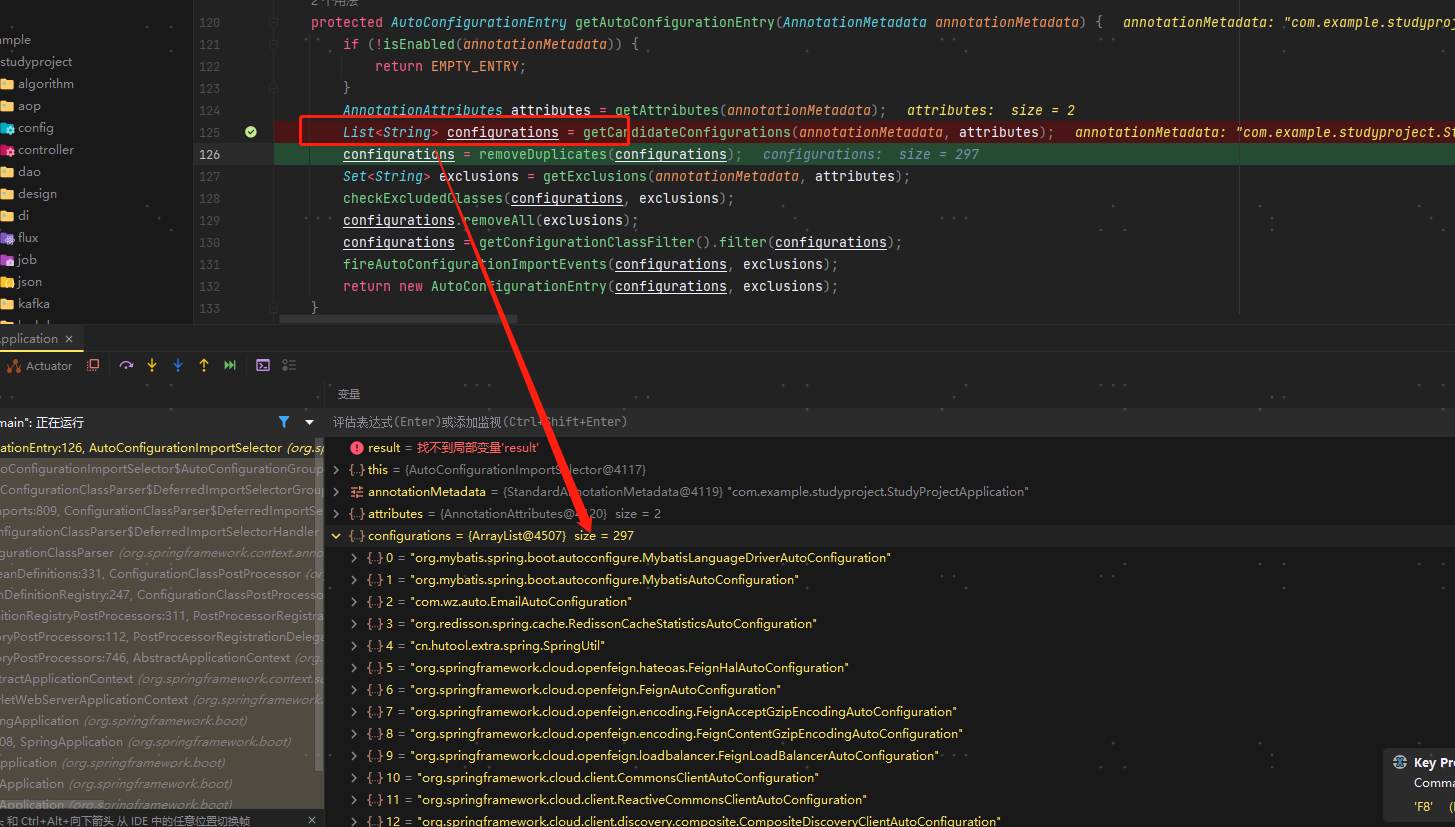
这里的意思是将所有需要导入的组件以全类名的方式返回,并添加到容器中,最终会给容器中导入非常多的自动配置类(xxxAutoConfiguration),给容器中导入这个场景需要的所有组件,并配置好这些组件。有了自动配置,就不需要我们自己手写了。
注意最后一行代码:
//  最终返回的值
return new AutoConfigurationEntry(configurations, exclusions);
这里把 configurations 与 exclusions 都传入了 AutoConfigurationEntry 的构造方法,我们来看看 AutoConfigurationEntry:
protected static class AutoConfigurationEntry {// 自动装配类private final List configurations;// 需要排除的自动装配类private final Set exclusions;/*** 构造方法,对再者进行赋值*/AutoConfigurationEntry(Collection configurations, Collection exclusions) {this.configurations = new ArrayList<>(configurations);this.exclusions = new HashSet<>(exclusions);}...
}
由些可见,最终返回的 AutoConfigurationEntry 包含两大内容:
configurations:自动装配类,已经去除了需要排除的类exclusions:通过@EnableAutoConfiguration指定的需要排除的类
整个自动装配类的获取就是这样了,下面我们来看看加载候选的自动装配类的流程。
获取候选配置类:getCandidateConfigurations()
核心代码:
protected List getCandidateConfigurations(AnnotationMetadata metadata, AnnotationAttributes attributes) {List configurations = new ArrayList<>(SpringFactoriesLoader.loadFactoryNames(getSpringFactoriesLoaderFactoryClass(), getBeanClassLoader()));ImportCandidates.load(AutoConfiguration.class, getBeanClassLoader()).forEach(configurations::add);Assert.notEmpty(configurations,"No auto configuration classes found in META-INF/spring.factories nor in META-INF/spring/org.springframework.boot.autoconfigure.AutoConfiguration.imports. If you "  + "are using a custom packaging, make sure that file is correct.");return configurations;
}
这里有个loadFactoryNames 方法:
SpringFactoriesLoader.loadFactoryNames(getSpringFactoriesLoaderFactoryClass(), getBeanClassLoader()));
两个参数:
-
getBeanClassLoader() 是类加载器
-
getSpringFactoriesLoaderFactoryClass()
protected Class getSpringFactoriesLoaderFactoryClass() {return EnableAutoConfiguration.class;
}
我们发现这里传入的是最外层的EnableAutoConfiguration.class,作为加载的key。
注意:在spring.factories中还有其它属性可以作为key,但是自动配置的key只是EnableAutoConfiguration
getCandidateConfigurations()中还有一个断言,大致意思是:在 META-INF/spring.factories 中没有找到自动配置类。如果您使用自定义包装,请确保该文件是正确的。
loadFactoryNames()
再探究一下 loadFactoryNames() 方法带着它去做了什么处理:
/**
* 使用给定的类加载器从“META-INF/spring.factory”加载给定类型的工厂实现的完全限定类名。
* @param factoryType 需要被加载的工厂类的class
* @param classLoader 用于加载资源的类加载器;可以为 null 以使用默认值
*/
public static List loadFactoryNames(Class factoryType, @Nullable ClassLoader classLoader) {ClassLoader classLoaderToUse = classLoader;if (classLoaderToUse == null) {classLoaderToUse = SpringFactoriesLoader.class.getClassLoader();}String factoryTypeName = factoryType.getName();//Map.getOrDefault(A,B): A为Key,从Map中获取Value,若Value为Null,则返回B 当作返回值return loadSpringFactories(classLoaderToUse).getOrDefault(factoryTypeName, Collections.emptyList());
}
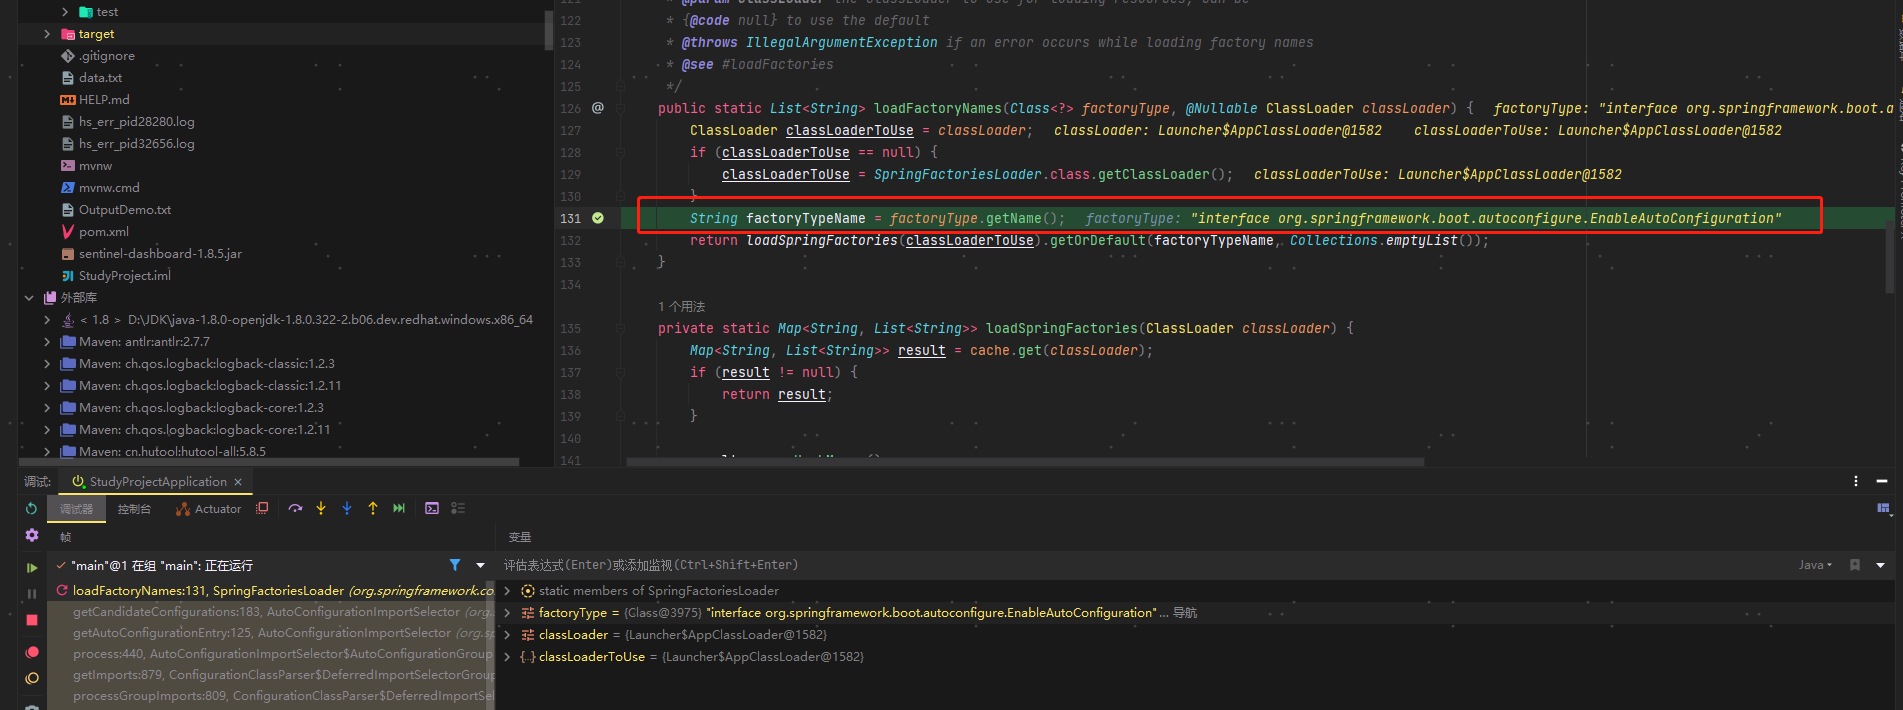
打断点后也可以发现这里是EnableAutoConfiguration
拓展:Spring.factories中,key除了EnableAutoConfiguration还有许多其它的key,例如ApplicationListener用于监听Spring事件。属性源加载器、运行监听器、应用上下文初始器以及应用监听器… 在Spring启动过程中,也会从META-INF/spring.factories获取很多其它key的全类名。
再来看看是如何从META-INF/spring.factory加载的:
loadSpringFactories()
/**
* 该方法是最核心部分:
* 1.从项目中找到所有META-INF/spring.factories
* 2.解析所有spring.factories文件,生成 Map<一个接口类--->对应所有具体实现类集合>,即Map>
*/
private static Map> loadSpringFactories(ClassLoader classLoader) {// Map>> cache:// 该缓存存储的是:一个类加载器对应 加载spring.factories的结果集Map> result = cache.get(classLoader);// 有则说明已经加载过了,直接返回if (result != null) {return result;}result = new HashMap<>();try {//从FACTORIES_RESOURCE_LOCATION = "META-INF/spring.factories"路径加载资源//Enumeration:可以认为是旧版的迭代器,目前被Iterator取代// 加载spring.factories资源并封装为URL对象Enumeration urls = classLoader.getResources(FACTORIES_RESOURCE_LOCATION);while (urls.hasMoreElements()) {URL url = urls.nextElement();// UrlResource 类是spring 对URL资源一种封装而已UrlResource resource = new UrlResource(url);// 解析properties文件,因为spring.factories 本身就是以key-->value来书写的Properties properties = PropertiesLoaderUtils.loadProperties(resource);for (Map.Entry entry : properties.entrySet()) {// key:接口全限定名字String factoryTypeName = ((String) entry.getKey()).trim();// 因为value:是可以写多个,并且要求之间 用,\ 来隔开。可以看下图的示例// commaDelimitedListToStringArray方法就是把value的值,解析并封装为数组String[] factoryImplementationNames =StringUtils.commaDelimitedListToStringArray((String) entry.getValue());for (String factoryImplementationName : factoryImplementationNames) {//computeIfAbsent(key,function)作用://若key 找不到则执行function方法得到value,并put(key,value),若key 找的到则直接返回get(key)的值result.computeIfAbsent(factoryTypeName, key -> new ArrayList<>()).add(factoryImplementationName.trim());}}}// 将所有列表替换为包含唯一元素的不可修改列表result.replaceAll((factoryType, implementations) -> implementations.stream().distinct().collect(Collectors.collectingAndThen(Collectors.toList(), Collections::unmodifiableList)));// 放入缓存,防止多次执行上述操作,提高性能cache.put(classLoader, result);}catch (IOException ex) {throw new IllegalArgumentException("Unable to load factories from location [" +FACTORIES_RESOURCE_LOCATION + "]", ex);}return result;}
到这里,基本也就明了了,Spring是从"META-INF/spring.factories"获取到 所需组件的全类名的,这个文件一般格式为:
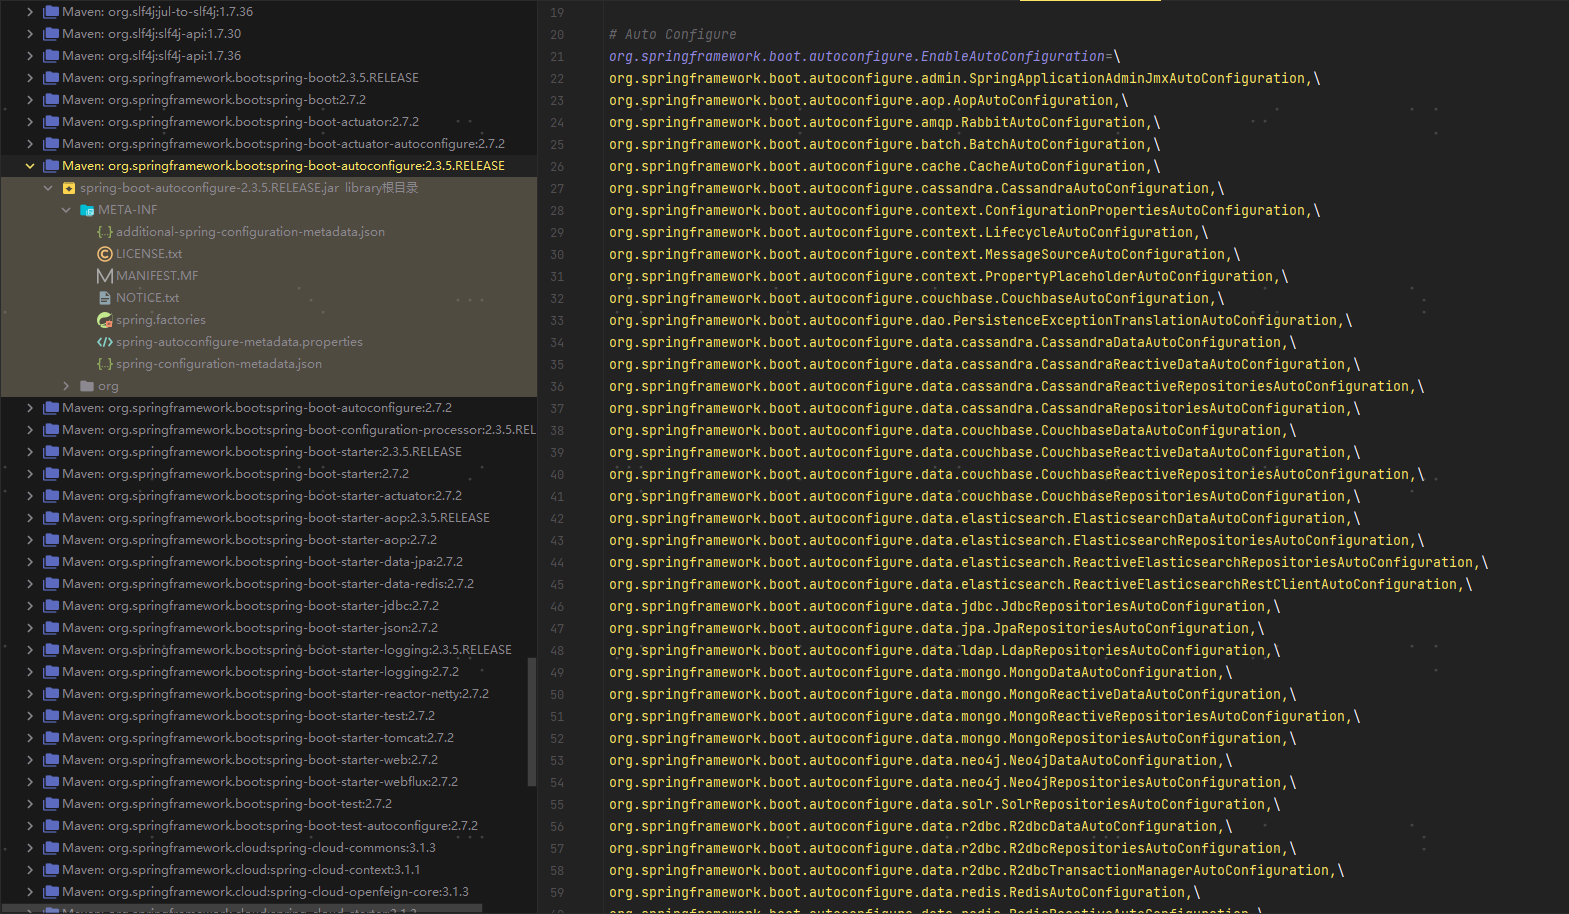
自动配置会取key为EnableAutoConfiguration的所有value,一个项目中还会有很多其它的spring.factories,依旧要加载里面key为EnableAutoConfiguration的value。
拓展:如何获项目中所有的spring.factories
classLoader.getResources(FACTORIES_RESOURCE_LOCATION)springboot获取resource目录路径classpath
总结与拓展
总结
启动类中有一个 @SpringBootApplication 注解,包含了 @SpringBootConfiguration、 @EnableAutoConfiguration
@EnableAutoConfiguration代表开启自动装配,注解会去spring-boot-autoconfigure工程下寻找META-INF/spring.factories文件,此文件中列举了所有能够自动装配类的清单,然后自动读取里面的自动装配配置类清单。- 因为有
@ConditionalOn条件注解,满足一定条件配置才会生效,否则不生效。 如:@ConditionalOnClass(某类.class)工程中必须包含一些相关的类时,配置才会生效。 - 所以说当我们的依赖中引入了一些对应的类之后,满足了自动装配的条件后,自动装配才会被触发。
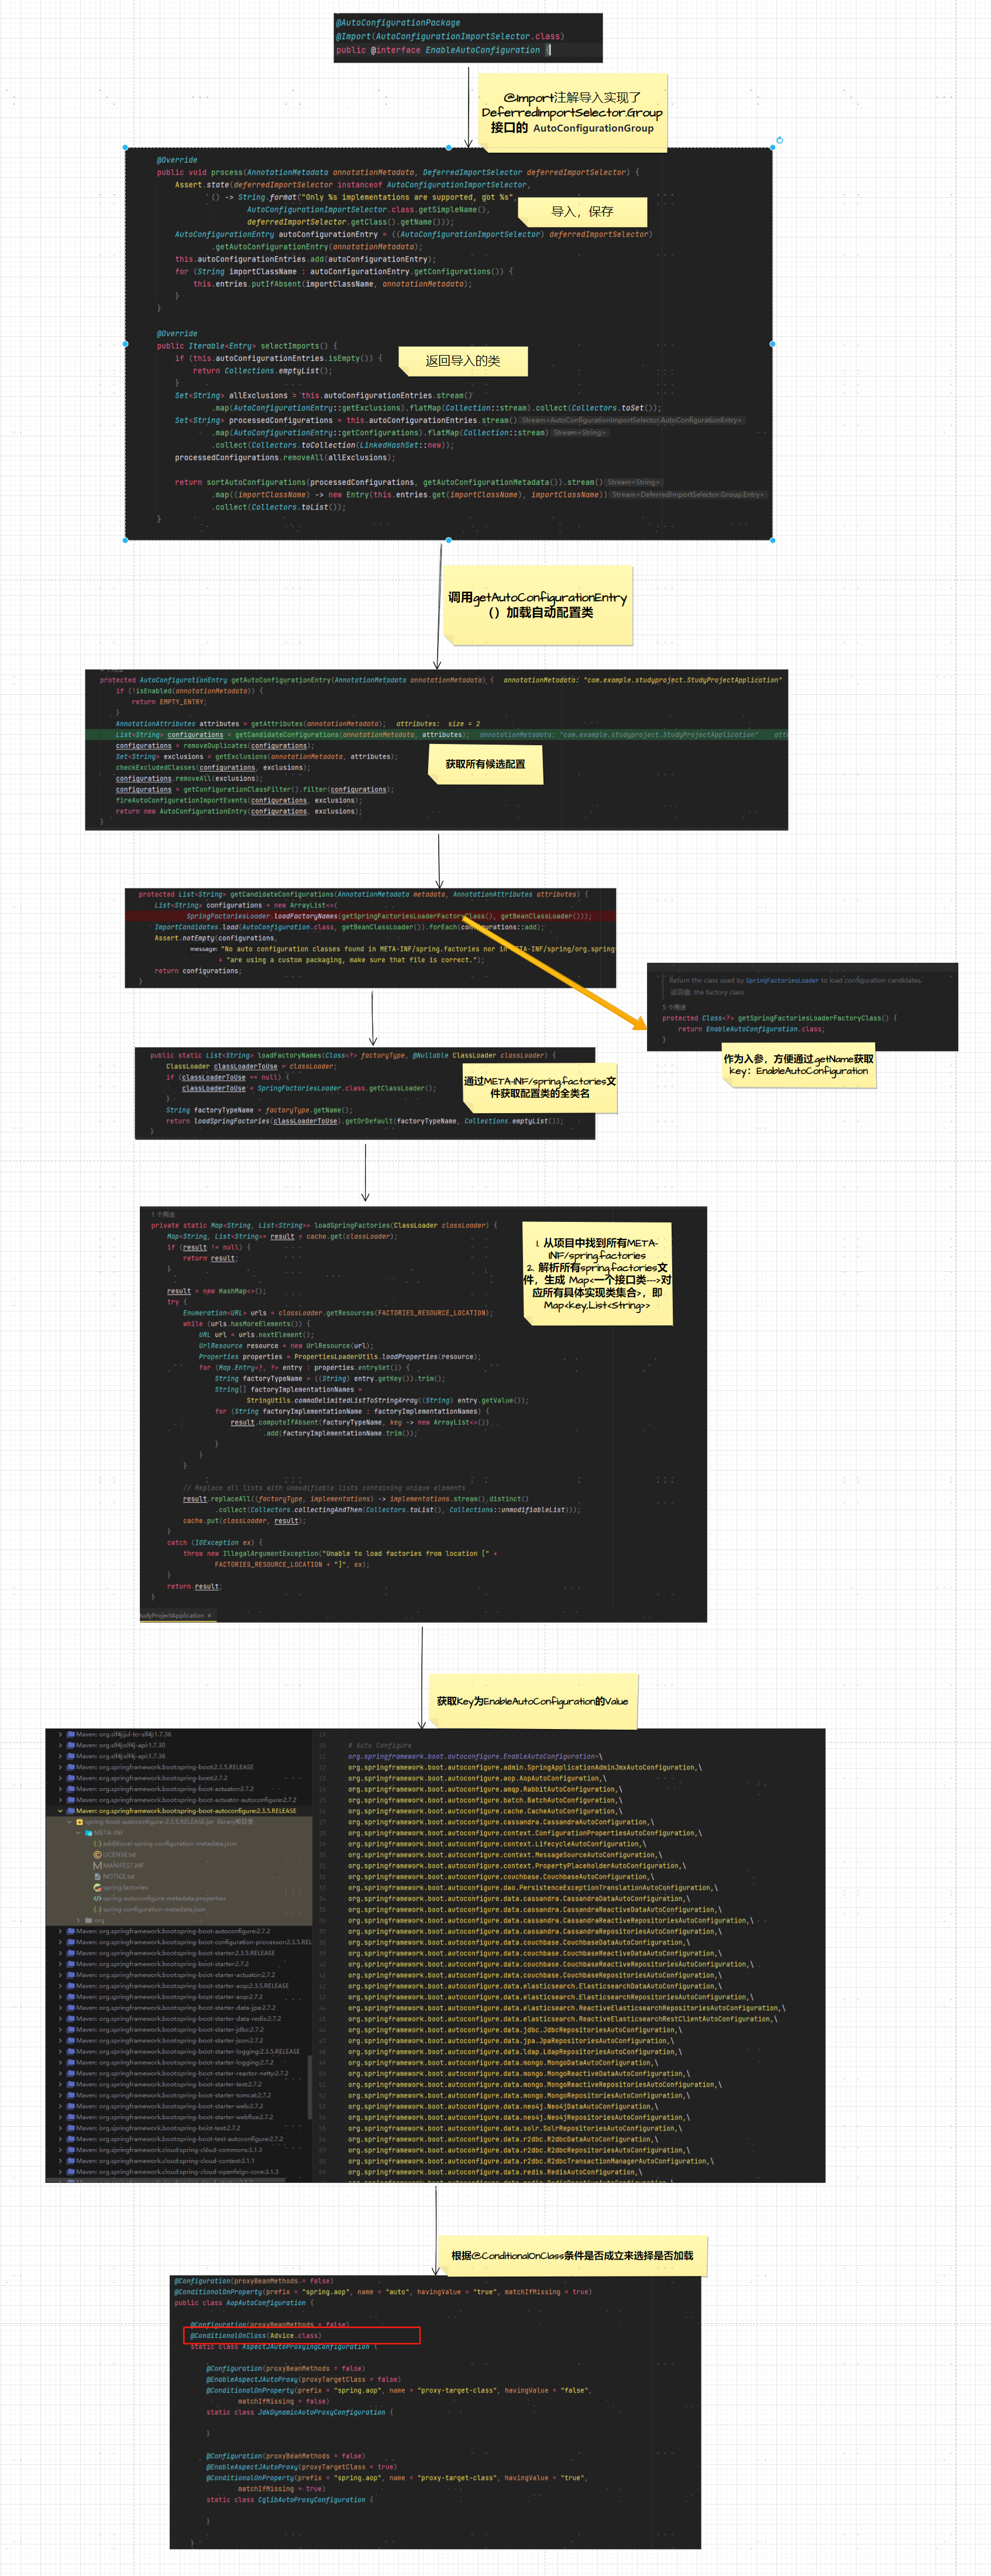
@ConditionalOnXXX
在上面的自动配置原理中可以知道,
spring.factories中有那么多的配置,每次启动并不是全部加载,而是根据@ConditionalOnXXX来判断。我们随便点开一个类,都有这个@ConditionalOnXXX注解,@Conditional其实是spring底层注解,意思就是根据不同的条件,来进行自己不同的条件判断,如果满足指定的条件,那么整个配置类里边的配置才会生效。
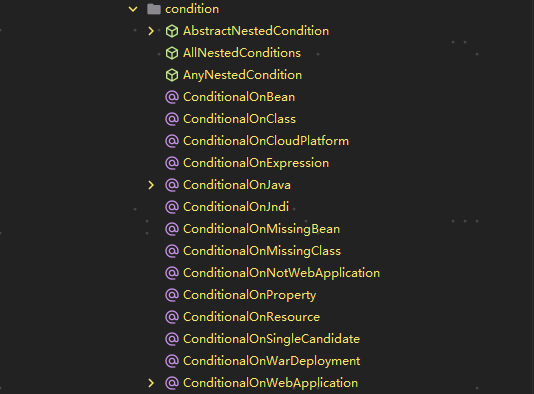
点开任意一个注解,发现这些注解上都有相同的元注解:
@Target({ ElementType.TYPE, ElementType.METHOD })
@Retention(RetentionPolicy.RUNTIME)
@Documented
@Conditional(OnClassCondition.class)
重点在于@Conditional注解中的参数。点进对应的类中,我们可以看到一些自定义的实现。从上面的注解也基本上都能看出判断的逻辑。
下面说几个常用的条件:
-
@ConditionalOnProperty 检查是否在环境中定义了属性。
@Configuration
@ConditionalOnProperty(prefix = "email", name = "enabled", havingValue = "true")
@ConditionalOnClass({EmailProperties.class})
@EnableConfigurationProperties({EmailProperties.class})
public class EmailAutoConfiguration {private final EmailProperties emailProperties;public EmailAutoConfiguration(EmailProperties emailProperties) {this.emailProperties = emailProperties;}@Beanpublic EmailFactoryBean emailFactoryBean() {return new EmailFactoryBean(emailProperties);}
}
只有 application.properties 或 application.yml 文件中 email.enable 为 true 才会加载 EmailAutoConfiguration这个 Bean。
还有个属性:matchIfMissing默认为false, 如果设置为true 没有匹配上也会加载。
-
@ConditionalOnBean 和 ConditionalOnMissingBean
有时候我们需要某个 Bean 已经存在应用上下文时才会加载,那么我们会用到
@ConditionalOnBean注解:@ConditionOnBean(OtherBean.class)与之相反,有时候我们需要某个 Bean 不存在于应用上下文时才会加载,那么我们会用到
@ConditionalOnMissingBean注解 -
@ConditionalOnClass 和 @ConditionalOnMissingClass
某个 CLASS 位于类路径上,才会实例化一个 Bean
-
复杂的组合校验@ConditionalOnExpression
当表达式为 true 的时候,才会实例化一个 Bean
| 注解类型 | 注解类型 | 功能说明 |
|---|---|---|
| class 条件注解 | @ConditionalOnClass/@ConditionalOnMissingClass | 当指定的类存在 / 缺失时初始化该 bean |
| bean 条件注解 | @ConditionalOnBean/@ConditionalOnMissingBean | 当指定的 bean 存在 / 缺失时初始化该 bean |
| 属性条件注解 | @ConditionalOnProperty | 当指定的属性存在初始化该 bean |
| Resource 条件注解 | @ConditionalOnResource | 当指定的资源存在初始化该 bean |
| Web 应用条件注解 | @ConditionalOnWebApplication / @ConditionalOnNotWebApplication | 当前应用为 / 不为 web 应用时初始化该 bean |
| spring 表达式条件注解 | @ConditionalOnExpression | 当表达式结果为 true 时初始化该 bean |
自动装配类装配的顺序
- 对自动装配类排序:
AutoConfigurationImportSelector.AutoConfigurationGroup#sortAutoConfigurations - 指定自动装配类的装配顺序:使用
@AutoConfigureBefore/@AutoConfigureAfter或@AutoConfigureOrder - 排序方式有三种,依次是:
- 按 className 排序,由
String提供排序规则 - 根据
@AutoConfigureOrder指定的值进行排序,由Integer提供排序规则 - 根据
@AutoConfigureBefore/@AutoConfigureAfter进行排序 需要注意的是,以上三种排序方式先后进行,以最后排序完的结果为最终顺序
- 按 className 排序,由
- 关于
@ConditionalOnBean/@ConditionalOnMissingBean避坑指南:- 两个
bean都是自动装配类:避坑方式是,使用@AutoConfigureBefore/@AutoConfigureAfter或@AutoConfigureOrder指定条件顺序,保证条件注解中的bean先装配即可; - 一个是普通
spring bean,一个是自动装配类:条件注解中的bean必须为普通的spring bean; - 其他情况不可控,不建议使用。
- 两个
问题与思考
Spring是如何处理@Import注解的?
@Import注解
@Import 为 spring 的注解,导入一个配置文件,在 springboot 中为给容器导入一个组件,而导入的组件由 参数类 执行逻辑来决定的。
@Target(ElementType.TYPE)
@Retention(RetentionPolicy.RUNTIME)
@Documented
public @interface Import {/*** {@link Configuration @Configuration}, {@link ImportSelector},* {@link ImportBeanDefinitionRegistrar}, or regular component classes to import.*/Class[] value();
}
@Import 里有一个方法:value(),支持的类型是 Class,从上面的文档来看,可以支持类型有 4 种:
- 被
@Configuration注解标记的类 - 实现了
ImportSelector的类 - 实现了
ImportBeanDefinitionRegistrar的类 - 普通类
例如:@Import可以创建对象和多配置bean的整合:
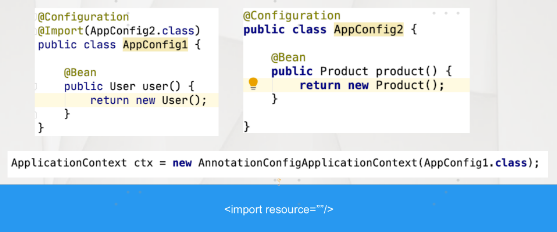
@Import注解处理
spring探秘之ConfigurationClassPostProcessor(三):处理@Import注解
SPI 和 类加载器
Java SPI
SPI 全称 Service Provider Interface,是 Java 提供的,旨在由第三方实现或扩展的 API,它是一种用于动态加载服务的机制。Java 中 SPI 机制主要思想是将装配的控制权移到程序之外,在模块化设计中这个机制尤其重要,其核心思想就是 解耦。
Java SPI 有四个要素:
- **SPI 接口:**为服务提供者实现类约定的的接口或抽象类。
- **SPI 实现类:**实际提供服务的实现类。
- **SPI 配置:**Java SPI 机制约定的配置文件,提供查找服务实现类的逻辑。配置文件必须置于 META-INF/services 目录中,并且,文件名应与服务提供者接口的完全限定名保持一致。文件中的每一行都有一个实现服务类的详细信息,同样是服务提供者类的完全限定名称。
- **ServiceLoader:**Java SPI 的核心类,用于加载 SPI 实现类。ServiceLoader 中有各种实用方法来获取特定实现、迭代它们或重新加载服务。
Java SPI应用实例
1️⃣ SPI接口定义
package com.wz.spi;public interface DataStorage{String selectbyKey(String key);
}
2️⃣ SPI实现类
package com.wz.spi;public class MysqlStorage implements DataStorage{@Overridepublic String selectbyKey(String key) {return "【Mysql】搜索" + key + ",结果:Hello SPI Mysql";}
}
package com.wz.spi;public class RedisStorage implements DataStorage{@Overridepublic String selectbyKey(String key) {return "【Redis】搜索" + key + ",结果:Hello SPI Redis";}
}
3️⃣ SPI 配置
如果想通过 Java SPI 机制来发现服务,就需要在 SPI 配置中约定好发现服务的逻辑。配置文件必须置于 META-INF/services 目录中,并且,文件名应与服务提供者接口的完全限定名保持一致。文件中的每一行都有一个实现服务类的详细信息,同样是服务提供者类的完全限定名称。
文件名:com.wz.spi.DataStoragecom.wz.spi.MysqlStorage
com.wz.spi.RedisStorage
4️⃣ ServiceLoader
通过ServiceLoader来加载服务:
public class SpiDemo {public static void main(String[] args) {ServiceLoader serviceLoader = ServiceLoader.load(DataStorage.class);System.out.println("============ Java SPI 测试============");serviceLoader.forEach(loader -> System.out.println(loader.search("wz")));}
}============ Java SPI 测试============
【Mysql】搜索wz,结果:Hello SPI Mysql
【Redis】搜索wz,结果:Hello SPI Redis
Java SPI 原理
Java SPI 机制依赖于 ServiceLoader 类去解析、加载服务。因此,掌握了 ServiceLoader 的工作流程,就掌握了 SPI 的原理。
ServiceLoader 的成员变量:
public final class ServiceLoader implements Iterable {// SPI 配置文件目录private static final String PREFIX = "META-INF/services/";// 将要被加载的 SPI 服务private final Class service;// 用于加载 SPI 服务的类加载器private final ClassLoader loader;// ServiceLoader 创建时的访问控制上下文private final AccessControlContext acc;// SPI 服务缓存,按实例化的顺序排列private LinkedHashMap providers = new LinkedHashMap<>();// 懒查询迭代器private LazyIterator lookupIterator;// ...
}
ServiceLoader 的工作流程:
(1)ServiceLoader.load 静态方法
应用程序加载 Java SPI 服务,都是先调用 ServiceLoader.load 静态方法。
ServiceLoader.load 静态方法的作用是:
① 指定类加载 ClassLoader 和访问控制上下文;
② 然后,重新加载 SPI 服务
- 清空缓存中所有已实例化的 SPI 服务
- 根据 ClassLoader 和 SPI 类型,创建懒加载迭代器
这里,摘录 ServiceLoader.load 相关源码,如下:
// service 传入的是期望加载的 SPI 接口类型
// loader 是用于加载 SPI 服务的类加载器
public static  ServiceLoader load(Class service, ClassLoader loader) {return new ServiceLoader<>(service, loader);
}public void reload() {// 清空缓存中所有已实例化的 SPI 服务providers.clear();// 根据 ClassLoader 和 SPI 类型,创建懒加载迭代器lookupIterator = new LazyIterator(service, loader);
}// 私有构造方法
// 重新加载 SPI 服务
private ServiceLoader(Class svc, ClassLoader cl) {service = Objects.requireNonNull(svc, "Service interface cannot be null");// 指定类加载 ClassLoader 和访问控制上下文loader = (cl == null) ? ClassLoader.getSystemClassLoader() : cl;acc = (System.getSecurityManager() != null) ? AccessController.getContext() : null;// 然后,重新加载 SPI 服务reload();
}
(2)应用程序通过 ServiceLoader 的 iterator 方法遍历 SPI 实例
ServiceLoader 的类定义,明确了 ServiceLoader 类实现了 Iterable 接口,所以,它是可以迭代遍历的。实际上,ServiceLoader 类维护了一个缓存 providers( LinkedHashMap 对象),缓存 providers 中保存了已经被成功加载的 SPI 实例,这个 Map 的 key 是 SPI 接口实现类的全限定名,value 是该实现类的一个实例对象。
当应用程序调用 ServiceLoader 的 iterator 方法时,ServiceLoader 会先判断缓存 providers 中是否有数据:如果有,则直接返回缓存 providers 的迭代器;如果没有,则返回懒加载迭代器的迭代器。
public Iterator iterator() {return new Iterator() {// 缓存 SPI providersIterator> knownProviders = providers.entrySet().iterator();// lookupIterator 是 LazyIterator 实例,用于懒加载 SPI 实例public boolean hasNext() {if (knownProviders.hasNext())return true;return lookupIterator.hasNext();}public S next() {if (knownProviders.hasNext())return knownProviders.next().getValue();return lookupIterator.next();}public void remove() {throw new UnsupportedOperationException();}};
}
(3)懒加载迭代器的工作流程
上面的源码中提到了,lookupIterator 是 LazyIterator 实例,而 LazyIterator 用于懒加载 SPI 实例。那么, LazyIterator 是如何工作的呢?
这里,摘取 LazyIterator 关键代码
private boolean hasNextService() {if (nextName != null) {return true;}if (configs == null) {try {// 1.拼接 META-INF/services/ + SPI 接口全限定名// 2.通过类加载器,尝试加载资源文件// 3.解析资源文件中的内容String fullName = PREFIX + service.getName();if (loader == null)configs = ClassLoader.getSystemResources(fullName);elseconfigs = loader.getResources(fullName);} catch (IOException x) {fail(service, "Error locating configuration files", x);}}while ((pending == null) || !pending.hasNext()) {if (!configs.hasMoreElements()) {return false;}pending = parse(service, configs.nextElement());}nextName = pending.next();return true;
}private S nextService() {if (!hasNextService())throw new NoSuchElementException();String cn = nextName;nextName = null;Class c = null;try {c = Class.forName(cn, false, loader);} catch (ClassNotFoundException x) {fail(service,"Provider " + cn + " not found");}if (!service.isAssignableFrom(c)) {fail(service,"Provider " + cn  + " not a s");}try {S p = service.cast(c.newInstance());providers.put(cn, p);return p;} catch (Throwable x) {fail(service,"Provider " + cn + " could not be instantiated",x);}throw new Error();          // This cannot happen
}
hasNextService 方法:
- 拼接 META-INF/services/ + SPI 接口全限定名
- 通过类加载器,尝试加载资源文件
- 解析资源文件中的内容,获取 SPI 接口的实现类的全限定名 nextName
nextService 方法:
- hasNextService () 方法解析出了 SPI 实现类的的全限定名 nextName,通过反射,获取 SPI 实现类的类定义 Class。
- 然后,尝试通过 Class 的 newInstance 方法实例化一个 SPI 服务对象。如果成功,则将这个对象加入到缓存 providers 中并返回该对象。
什么是类加载机制
当编译器将 Java 源码编译为字节码之后,虚拟机便可以将字节码读取进内存,从而进行解析、运行等整个过程。我们将这个过程称为 Java 虚拟机的「类加载机制」。
类加载机制中,通过类加载器(classloader)来完成类加载的过程。
类加载器
基本概念
通过一个类全限定名称来获取其二进制文件(.class)流的工具,被称为类加载器(classloader)。
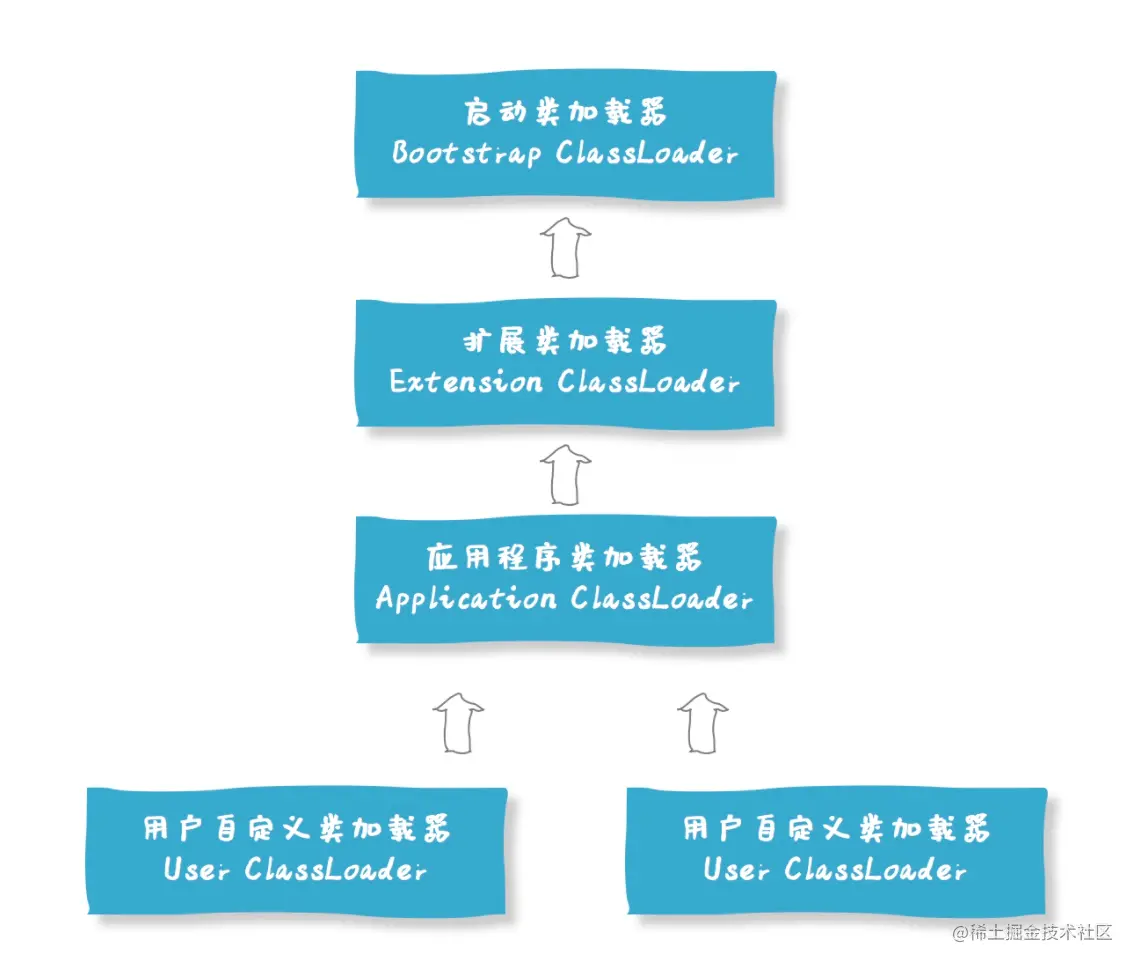
如上图所示,Java 支持 4 种 classloader
- 启动类加载器(
Bootstrap ClassLoader)- 用于加载 Java 的核心类
- 它不是一个 Java 类,是由底层的 C++ 实现。因此,启动类加载器不属于 Java 类库,无法被 Java 程序直接引用。
Bootstrap ClassLoader的parent属性为null
- 标准扩展类加载器(
Extention ClassLoader)- 由
sun.misc.Launcher$ExtClassLoader实现 - 负责加载
JAVA_HOME下libext目录下的或者被java.ext.dirs系统变量所指定的路径中的所有类库
- 由
- 应用类加载器(
Application ClassLoader)- 由
sun.misc.Launcher$AppClassLoader实现 - 负责在 JVM 启动时加载用户类路径上的指定类库
- 由
- 用户自定义类加载器(
User ClassLoader)- 当上述 3 种类加载器不能满足开发需求时,用户可以自定义加载器
- 自定义类加载器时,需要继承
java.lang.ClassLoader类。如果不想打破双亲委派模型,那么只需要重写findClass方法即可;如果想打破双亲委派模型,则需要重写loadClass方法
前 3 种 classloader 均继承了抽象类 ClassLoader,其源码如下,该抽象类拥有一个 parent 属性,用于指定其父类的加载器。
类加载机制的特点
「类加载机制」中,通过**类加载器(classloader)**来完成类加载的过程。Java 中的类加载机制,有如下 3 个特点
- 双亲委派
- JVM 中,类加载器默认使用双亲委派原则
- 负责依赖
- 如果一个加载器在加载某个类的时候,发现这个类依赖于另外几个类或接口,也会去尝试加载这些依赖项。
- 缓存加载
- 为了提升加载效率,消除重复加载,一旦某个类被一个类加载器加载,那么它会缓存这个加载结果,不会重复加载。
双亲委派机制
JVM 中,类加载器默认使用双亲委派原则。
双亲委派机制是一种任务委派模式,是 Java 中通过加载工具(classloader)加载类文件的一种具体方式。 具体表现为
- 如果一个类加载器收到了类加载请求,它并不会自己先加载,而是把这个请求委托给父类的加载器去执行。
- 如果父类加载器还存在其父类加载器,则进一步向上委托,依次递归,请求最终将到达顶层的引导类加载器
BootstrapClassLoader。 - 如果父类加载器可以完成类加载任务,就成功返回;倘若父类加载器无法完成加载任务,子加载器才会尝试自己去加载。
- 父类加载器一层一层往下分配任务,如果子类加载器能加载,则加载此类;如果将加载任务分配至系统类加载器(
AppClassLoader)也无法加载此类,则抛出异常。
双亲委派的优点
使得 Java 类伴随着它的类加载器,天然具备一种带有优先级的层次关系,从而使得类加载得到统一,不会出现重复加载的问题:
- 系统类防止内存中出现多份同样的字节码
- 保证 Java 程序安全稳定运行
双亲委派的缺点
子类加载器可以使用父类加载器已经加载的类,而父类加载器无法使用子类加载器已经加载的。—— 这就导致了双亲委派模型并不能解决所有的类加载器问题。Java SPI 就面临着这样的问题:
- SPI 的接口是 Java 核心库的一部分,是由 BootstrapClassLoader 加载的;
- 而 SPI 实现的 Java 类一般是由 AppClassLoader 来加载的。BootstrapClassLoader 是无法找到 SPI 的实现类的,因为它只加载 Java 的核心库。它也不能代理给 AppClassLoader,因为它是最顶层的类加载器。这也解释了本节开始的问题 —— 为什么加载 SPI 服务时,需要指定类加载器 ClassLoader 呢?因为如果不指定 ClassLoader,则无法获取 SPI 服务。
如果不做任何的设置,Java 应用的线程的上下文类加载器默认就是 AppClassLoader。在核心类库使用 SPI 接口时,传递的类加载器使用线程上下文类加载器,就可以成功的加载到 SPI 实现的类。线程上下文类加载器在很多 SPI 的实现中都会用到。
通常可以通过 Thread.currentThread ().getClassLoader () 和 Thread.currentThread ().getContextClassLoader () 获取线程上下文类加载器。
SpringBoot的SPI机制
Java SPI的缺点
Java SPI 存在一些不足:
- 不能按需加载,需要遍历所有的实现,并实例化,然后在循环中才能找到我们需要的实现。如果不想用某些实现类,或者某些类实例化很耗时,它也被载入并实例化了,这就造成了浪费。
- 获取某个实现类的方式不够灵活,只能通过 Iterator 形式获取,不能根据某个参数来获取对应的实现类。
- 多个并发多线程使用 ServiceLoader 类的实例是不安全的。
Spring SPI机制
在 Spring Boot 中好多配置和实现都有默认的实现,我们如果想要修改某些配置,我们只需要在配置文件中写上对应的配置,项目应用的便是我们定义的配置内容。这正是通过 SPI 机制实现的。
- 我们将想要注入 IoC 容器的类的全类限定名写到
META-INF/spring.factories文件中 - Spring Boot 程序启动时,使用
SpringFactoriesLoader进行加载,扫描每个 jar 包class-path目录下的META-INF/spring.factories配置文件,然后解析properties文件,找到指定名称的配置
SpringFactoriesLoader.loadFactoryNames 方法核心源码:
// spring.factories 文件的格式为:key=value1,value2,value3
// 遍历所有 META-INF/spring.factories 文件
// 解析文件,获得 key=factoryClass 的类名称
public static List loadFactoryNames(Class factoryType, @Nullable ClassLoader classLoader) {ClassLoader classLoaderToUse = classLoader;if (classLoaderToUse == null) {classLoaderToUse = SpringFactoriesLoader.class.getClassLoader();}String factoryTypeName = factoryType.getName();return loadSpringFactories(classLoaderToUse).getOrDefault(factoryTypeName, Collections.emptyList());
}private static Map> loadSpringFactories(@Nullable ClassLoader classLoader) {// 尝试获取缓存,如果缓存中有数据,直接返回MultiValueMap result = cache.get(classLoader);if (result != null) {return result;}try {// 获取资源文件路径Enumeration urls = (classLoader != null ?classLoader.getResources(FACTORIES_RESOURCE_LOCATION) :ClassLoader.getSystemResources(FACTORIES_RESOURCE_LOCATION));result = new LinkedMultiValueMap<>();// 遍历所有路径while (urls.hasMoreElements()) {URL url = urls.nextElement();UrlResource resource = new UrlResource(url);// 解析文件,得到对应的一组 PropertiesProperties properties = PropertiesLoaderUtils.loadProperties(resource);// 遍历解析出的 properties,组装数据for (Map.Entry entry : properties.entrySet()) {String factoryTypeName = ((String) entry.getKey()).trim();for (String factoryImplementationName : StringUtils.commaDelimitedListToStringArray((String) entry.getValue())) {result.add(factoryTypeName, factoryImplementationName.trim());}}}cache.put(classLoader, result);return result;}catch (IOException ex) {throw new IllegalArgumentException("Unable to load factories from location [" +FACTORIES_RESOURCE_LOCATION + "]", ex);}
}
Java SPI 与 Spring SPI 的区别
- JDK 使用的加载工具类是
ServiceLoader,而 Spring 使用的是SpringFactoriesLoader。 - JDK 目录命名方式是
META-INF/services/提供方接口全类名,而 Spring 使用的是META-INF/spring-factories。
上一篇:此时已春暖花开 所有却不能皆所愿
下一篇:生活励志的句子