

Netty02——Netty 入门
目录
- 1.概述
- 1.1.Netty 是什么?
- 1.2.Netty 的作者
- 1.3.Netty 的地位
- 1.4 Netty 的优势
- 2. Hello World
- 2.1 目标
- 2.2 服务器端
- 2.3 客户端
- 2.4 流程梳理
- 2.5.提示
- 3. 组件
- 3.1 EventLoop
- 3.1.1.概述
- 3.1.2.案例演示
- 3.2 Channel
- 3.2.1.ChannelFuture
- 3.2.2.CloseFuture
- 3.2.3.异步提升的是什么?
- 3.3 Future & Promise
- 3.3.1.概述
- 3.3.2.JDK Future:同步处理任务
- 3.3.3.Netty Future:同步/异步处理任务
- 3.3.4.Netty Promise
- 3.4 Handler & Pipeline
- 3.4.1.概述
- 3.4.2.案例演示
- 3.4.3.EmbeddedChannel
- 3.5 ByteBuf
- 3.5.1.创建
- 3.5.2.直接内存 vs 堆内存
- 3.5.3.池化 vs 非池化
- 3.5.4.组成
- 3.5.5.写入
- 3.5.6.扩容
- 3.5.7.读取
- 3.5.8.retain & release
- 3.5.9.slice
- 3.5.10.duplicate & copy
- 3.5.11.CompositeByteBuf
- 3.5.12.Unpooled
- 3.5.13.ByteBuf 优势
- 4. 双向通信
- 4.1 练习
- 4.2.读和写的误解
本文笔记整理来自尚硅谷视频https://www.bilibili.com/video/BV1py4y1E7oA/?p=53,相关资料可在视频评论区进行获取。
1.概述
1.1.Netty 是什么?
Netty is an asynchronous event-driven network application framework for rapid development of maintainable high performance
protocol servers & clients.
Netty 是一个异步的、基于事件驱动的网络应用框架,用于快速开发可维护、高性能的网络服务器和客户端。
1.2.Netty 的作者
他还是另一个著名网络应用框架 Mina 的重要贡献者。
1.3.Netty 的地位
Netty 在 Java 网络应用框架中的地位就好比:Spring 框架在 JavaEE 开发中的地位。以下的框架都使用了 Netty,因为它们有网络通信需求!
- Cassandra - nosql 数据库
- Spark - 大数据分布式计算框架
- Hadoop - 大数据分布式存储框架
- RocketMQ - ali 开源的消息队列
- ElasticSearch - 搜索引擎
- gRPC - rpc 框架
- Dubbo - rpc 框架
- Spring 5.x - flux api 完全抛弃了 tomcat ,使用 netty 作为服务器端
- Zookeeper - 分布式协调框架
1.4 Netty 的优势
- Netty vs NIO,工作量大,bug 多。
- 需要自己构建协议;
- 解决 TCP 传输问题,如粘包、半包;
- epoll 空轮询导致 CPU 100%;
- 对 API 进行增强,使之更易用,如 FastThreadLocal => ThreadLocal,ByteBuf => ByteBuffer;
- Netty vs 其它网络应用框架。
- Mina 由 apache 维护,将来 3.x 版本可能会有较大重构,破坏 API 向下兼容性,Netty 的开发迭代更迅速,API 更简洁、文档更优秀
- 久经考验,16年,Netty 版本
- 2.x 2004
- 3.x 2008
- 4.x 2013
- 5.x 已废弃(没有明显的性能提升,维护成本高)
2. Hello World
2.1 目标
(1)开发一个简单的服务器端和客户端
- 客户端向服务器端发送 hello, world;
- 服务器仅接收,不返回;
(2)加入依赖(承接Netty01——NIO 基础这篇文章中的项目,之前已经加入过)
io.netty netty-all 4.1.39.Final
2.2 服务器端
package cn.itcast.netty.c1;import io.netty.bootstrap.ServerBootstrap;
import io.netty.channel.ChannelHandlerContext;
import io.netty.channel.ChannelInitializer;
import io.netty.channel.SimpleChannelInboundHandler;
import io.netty.channel.nio.NioEventLoopGroup;
import io.netty.channel.socket.nio.NioServerSocketChannel;
import io.netty.channel.socket.nio.NioSocketChannel;
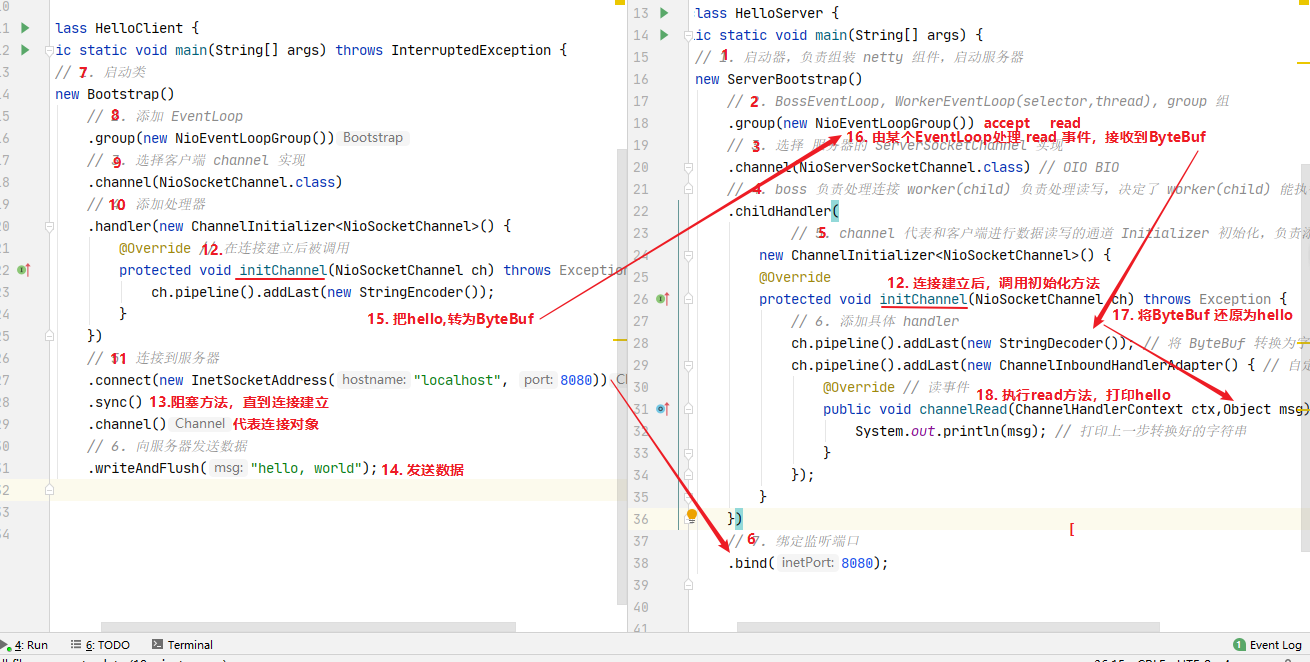
import io.netty.handler.codec.string.StringDecoder;public class HelloServer {public static void main(String[] args) {// 1.启动器,负责组装 netty 组件,启动服务器new ServerBootstrap()// 2.BossEventLoop, WorkerEventLoop(selector, thread), group 组.group(new NioEventLoopGroup())// 3.选择服务器的 ServerSocketChannel 实现.channel(NioServerSocketChannel.class)// 4.boss 负责处理连接 worker(child) 负责处理读写,决定了 worker(child) 能执行哪些操作(handler).childHandler(// 5.channel 代表和客户端进行数据读写的通道 Initializer 初始化,负责添加别的 handlernew ChannelInitializer() {protected void initChannel(NioSocketChannel ch) {// 6.添加具体的 handlerch.pipeline().addLast(new StringDecoder());    // 将 ByteBuf 转换为字符串ch.pipeline().addLast(new SimpleChannelInboundHandler() {   // 自定义 handler//读事件@Overrideprotected void channelRead0(ChannelHandlerContext ctx, String msg) {//打印上一步转换好的字符串System.out.println(msg);}});}})// 7.绑定监听端口.bind(8080);}
}
2.3 客户端
package cn.itcast.netty.c1;import io.netty.bootstrap.Bootstrap;
import io.netty.channel.Channel;
import io.netty.channel.ChannelInitializer;
import io.netty.channel.nio.NioEventLoopGroup;
import io.netty.channel.socket.nio.NioSocketChannel;
import io.netty.handler.codec.string.StringEncoder;import java.util.Date;public class HelloClient {public static void main(String[] args) throws InterruptedException {// 1.启动类new Bootstrap()// 2添加 EventLoop.group(new NioEventLoopGroup())// 3.选择客户端channel实现.channel(NioSocketChannel.class)// 4.添加处理器.handler(new ChannelInitializer() {//在连接建立后被调用@Overrideprotected void initChannel(Channel ch) {ch.pipeline().addLast(new StringEncoder());}})// 5.连接到服务器.connect("localhost", 8080).sync().channel()// 6.向服务器发送数据.writeAndFlush("hello world!");}
}
服务器端的结果如下:
hello world!
2.4 流程梳理
2.5.提示
一开始需要树立正确的观念:
- 把 channel 理解为数据的通道;
- 把 msg 理解为流动的数据,最开始输入是 ByteBuf,但经过 pipeline 的加工,会变成其它类型对象,最后输出又变成 ByteBuf;
- 把 handler 理解为数据的处理工序:
- 工序有多道,合在一起就是 pipeline,pipeline 负责发布事件(读、读取完成…)传播给每个 handler, handler 对自己感兴趣的事件进行处理(重写了相应事件处理方法)
- handler 分 Inbound 和 Outbound 两类
- 把 eventLoop 理解为处理数据的工人:
- 工人可以管理多个 channel 的 IO 操作,并且一旦工人负责了某个 channel,就要负责到底(绑定);
- 工人既可以执行 IO 操作,也可以进行任务处理,每位工人有任务队列,队列里可以堆放多个 channel 的待处理任务,任务分为普通任务、定时任务;
- 工人按照 pipeline 顺序,依次按照 handler 的规划(代码)处理数据,可以为每道工序指定不同的工人;
3. 组件
3.1 EventLoop
3.1.1.概述
(1)EventLoop(事件循环对象) 本质是一个单线程执行器(同时维护了一个 Selector),里面有 run 方法处理 Channel 上源源不断的 IO 事件。它的继承关系比较复杂:
- 一条线是继承自 j.u.c.ScheduledExecutorService,因此包含了线程池中所有的方法;
- 另一条线是继承自 netty 自己的 OrderedEventExecutor;
- 提供了 boolean inEventLoop(Thread thread) 方法判断一个线程是否属于此 EventLoop;
- 提供了 parent 方法来看看自己属于哪个 EventLoopGroup;
(2)EventLoopGroup(事件循环组)是一组 EventLoop,Channel 一般会调用 EventLoopGroup 的 register 方法来绑定其中一个 EventLoop,后续这个 Channel 上的 IO 事件都由此 EventLoop 来处理(保证了 io 事件处理时的线程安全)
- 继承自 netty 自己的 EventExecutorGroup:
- 实现了 Iterable 接口提供遍历 EventLoop 的能力;
- 另有 next 方法获取集合中下一个 EventLoop;
3.1.2.案例演示
(1)处理普通任务、定时任务:
package cn.itcast.netty.c3;import io.netty.channel.DefaultEventLoopGroup;
import io.netty.channel.EventLoopGroup;
import io.netty.channel.nio.NioEventLoopGroup;
import io.netty.util.NettyRuntime;
import lombok.extern.slf4j.Slf4j;import java.util.concurrent.TimeUnit;@Slf4j
public class TestEventLoop {public static void main(String[] args) {// 1.创建事件循环组,线程数为 2EventLoopGroup group = new NioEventLoopGroup(2); //可处理 IO 事件、普通任务、定时任务//EventLoopGroup group = new DefaultEventLoopGroup(); //可处理普通任务,定时任务// 2.获取下一个事件循环对象System.out.println(group.next());System.out.println(group.next());System.out.println(group.next());System.out.println(group.next());// 3.执行普通任务group.next().execute(() -> {try {Thread.sleep(1000);} catch (InterruptedException e) {e.printStackTrace();}log.debug("ok");});// 4.执行定时任务,初始延时时间为 0,间隔时间为 1group.next().scheduleAtFixedRate(() -> {log.debug("ok");}, 0, 1, TimeUnit.SECONDS);log.debug("main");}
}
输出如下:
io.netty.channel.nio.NioEventLoop@5700d6b1
io.netty.channel.nio.NioEventLoop@6fd02e5
io.netty.channel.nio.NioEventLoop@5700d6b1
io.netty.channel.nio.NioEventLoop@6fd02e5
16:58:26 [DEBUG] [nioEventLoopGroup-2-2] c.i.n.c.TestEventLoop - ok
16:58:26 [DEBUG] [main] c.i.n.c.TestEventLoop - main
16:58:27 [DEBUG] [nioEventLoopGroup-2-1] c.i.n.c.TestEventLoop - ok
16:58:27 [DEBUG] [nioEventLoopGroup-2-2] c.i.n.c.TestEventLoop - ok
16:58:28 [DEBUG] [nioEventLoopGroup-2-2] c.i.n.c.TestEventLoop - ok
...
上述代码中遍历 group 也可以使用 for 循环:
EventLoopGroup group = new NioEventLoopGroup(2)
for (EventExecutor eventLoop : group) {System.out.println(eventLoop);
}
输出如下:
io.netty.channel.nio.NioEventLoop@5700d6b1
io.netty.channel.nio.NioEventLoop@6fd02e5
(2)处理 IO 任务:
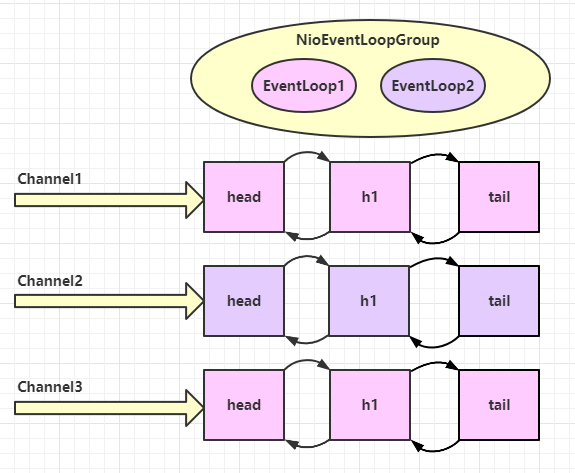
服务器端两个 nio worker 工人
new ServerBootstrap().group(new NioEventLoopGroup(1), new NioEventLoopGroup(2)).channel(NioServerSocketChannel.class).childHandler(new ChannelInitializer() {@Overrideprotected void initChannel(NioSocketChannel ch) {ch.pipeline().addLast(new ChannelInboundHandlerAdapter() {@Overridepublic void channelRead(ChannelHandlerContext ctx, Object msg) {ByteBuf byteBuf = msg instanceof ByteBuf ? ((ByteBuf) msg) : null;if (byteBuf != null) {byte[] buf = new byte[16];ByteBuf len = byteBuf.readBytes(buf, 0, byteBuf.readableBytes());log.debug(new String(buf));}}});}}).bind(8080).sync();
客户端,启动三次,分别修改发送字符串为 zhangsan(第一次),lisi(第二次),wangwu(第三次)
public static void main(String[] args) throws InterruptedException {Channel channel = new Bootstrap().group(new NioEventLoopGroup(1)).handler(new ChannelInitializer() {@Overrideprotected void initChannel(NioSocketChannel ch) throws Exception {System.out.println("init...");ch.pipeline().addLast(new LoggingHandler(LogLevel.DEBUG));}}).channel(NioSocketChannel.class).connect("localhost", 8080).sync().channel();channel.writeAndFlush(ByteBufAllocator.DEFAULT.buffer().writeBytes("wangwu".getBytes()));Thread.sleep(2000);channel.writeAndFlush(ByteBufAllocator.DEFAULT.buffer().writeBytes("wangwu".getBytes()));
最后输出:
22:03:34 [DEBUG] [nioEventLoopGroup-3-1] c.i.o.EventLoopTest - zhangsan
22:03:36 [DEBUG] [nioEventLoopGroup-3-1] c.i.o.EventLoopTest - zhangsan
22:05:36 [DEBUG] [nioEventLoopGroup-3-2] c.i.o.EventLoopTest - lisi
22:05:38 [DEBUG] [nioEventLoopGroup-3-2] c.i.o.EventLoopTest - lisi
22:06:09 [DEBUG] [nioEventLoopGroup-3-1] c.i.o.EventLoopTest - wangwu
22:06:11 [DEBUG] [nioEventLoopGroup-3-1] c.i.o.EventLoopTest - wangwu
可以看到两个工人轮流处理 channel,但工人与 channel 之间进行了绑定
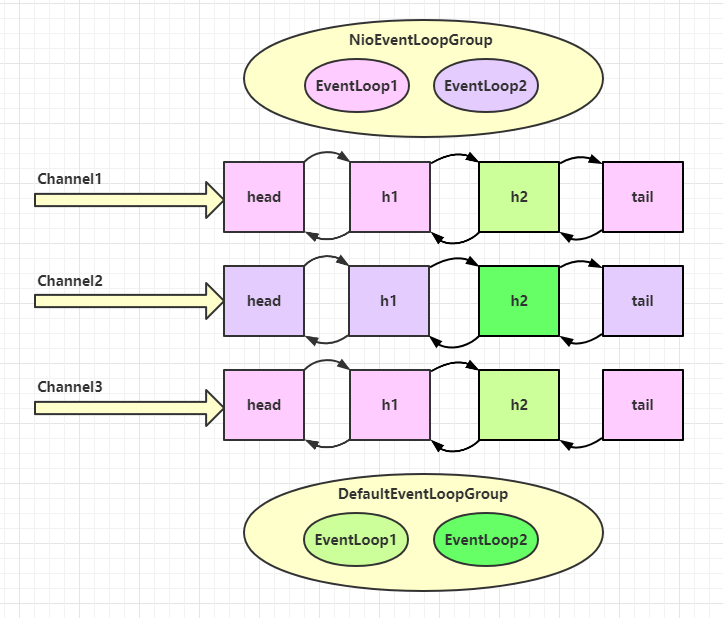
再增加两个非 nio 工人
DefaultEventLoopGroup normalWorkers = new DefaultEventLoopGroup(2);
new ServerBootstrap().group(new NioEventLoopGroup(1), new NioEventLoopGroup(2)).channel(NioServerSocketChannel.class).childHandler(new ChannelInitializer() {@Overrideprotected void initChannel(NioSocketChannel ch)  {ch.pipeline().addLast(new LoggingHandler(LogLevel.DEBUG));ch.pipeline().addLast(normalWorkers,"myhandler",new ChannelInboundHandlerAdapter() {@Overridepublic void channelRead(ChannelHandlerContext ctx, Object msg) {ByteBuf byteBuf = msg instanceof ByteBuf ? ((ByteBuf) msg) : null;if (byteBuf != null) {byte[] buf = new byte[16];ByteBuf len = byteBuf.readBytes(buf, 0, byteBuf.readableBytes());log.debug(new String(buf));}}});}}).bind(8080).sync();
客户端代码不变,启动三次,分别修改发送字符串为 zhangsan(第一次),lisi(第二次),wangwu(第三次),输出如下:
22:19:48 [DEBUG] [nioEventLoopGroup-4-1] i.n.h.l.LoggingHandler - [id: 0x251562d5, L:/127.0.0.1:8080 - R:/127.0.0.1:52588] REGISTERED
22:19:48 [DEBUG] [nioEventLoopGroup-4-1] i.n.h.l.LoggingHandler - [id: 0x251562d5, L:/127.0.0.1:8080 - R:/127.0.0.1:52588] ACTIVE
22:19:48 [DEBUG] [nioEventLoopGroup-4-1] i.n.h.l.LoggingHandler - [id: 0x251562d5, L:/127.0.0.1:8080 - R:/127.0.0.1:52588] READ: 8B+-------------------------------------------------+|  0  1  2  3  4  5  6  7  8  9  a  b  c  d  e  f |
+--------+-------------------------------------------------+----------------+
|00000000| 7a 68 61 6e 67 73 61 6e                         |zhangsan        |
+--------+-------------------------------------------------+----------------+
22:19:48 [DEBUG] [nioEventLoopGroup-4-1] i.n.h.l.LoggingHandler - [id: 0x251562d5, L:/127.0.0.1:8080 - R:/127.0.0.1:52588] READ COMPLETE
22:19:48 [DEBUG] [defaultEventLoopGroup-2-1] c.i.o.EventLoopTest - zhangsan
22:19:50 [DEBUG] [nioEventLoopGroup-4-1] i.n.h.l.LoggingHandler - [id: 0x251562d5, L:/127.0.0.1:8080 - R:/127.0.0.1:52588] READ: 8B+-------------------------------------------------+|  0  1  2  3  4  5  6  7  8  9  a  b  c  d  e  f |
+--------+-------------------------------------------------+----------------+
|00000000| 7a 68 61 6e 67 73 61 6e                         |zhangsan        |
+--------+-------------------------------------------------+----------------+
22:19:50 [DEBUG] [nioEventLoopGroup-4-1] i.n.h.l.LoggingHandler - [id: 0x251562d5, L:/127.0.0.1:8080 - R:/127.0.0.1:52588] READ COMPLETE
22:19:50 [DEBUG] [defaultEventLoopGroup-2-1] c.i.o.EventLoopTest - zhangsan
22:20:24 [DEBUG] [nioEventLoopGroup-4-2] i.n.h.l.LoggingHandler - [id: 0x94b2a840, L:/127.0.0.1:8080 - R:/127.0.0.1:52612] REGISTERED
22:20:24 [DEBUG] [nioEventLoopGroup-4-2] i.n.h.l.LoggingHandler - [id: 0x94b2a840, L:/127.0.0.1:8080 - R:/127.0.0.1:52612] ACTIVE
22:20:25 [DEBUG] [nioEventLoopGroup-4-2] i.n.h.l.LoggingHandler - [id: 0x94b2a840, L:/127.0.0.1:8080 - R:/127.0.0.1:52612] READ: 4B+-------------------------------------------------+|  0  1  2  3  4  5  6  7  8  9  a  b  c  d  e  f |
+--------+-------------------------------------------------+----------------+
|00000000| 6c 69 73 69                                     |lisi            |
+--------+-------------------------------------------------+----------------+
22:20:25 [DEBUG] [nioEventLoopGroup-4-2] i.n.h.l.LoggingHandler - [id: 0x94b2a840, L:/127.0.0.1:8080 - R:/127.0.0.1:52612] READ COMPLETE
22:20:25 [DEBUG] [defaultEventLoopGroup-2-2] c.i.o.EventLoopTest - lisi
22:20:27 [DEBUG] [nioEventLoopGroup-4-2] i.n.h.l.LoggingHandler - [id: 0x94b2a840, L:/127.0.0.1:8080 - R:/127.0.0.1:52612] READ: 4B+-------------------------------------------------+|  0  1  2  3  4  5  6  7  8  9  a  b  c  d  e  f |
+--------+-------------------------------------------------+----------------+
|00000000| 6c 69 73 69                                     |lisi            |
+--------+-------------------------------------------------+----------------+
22:20:27 [DEBUG] [nioEventLoopGroup-4-2] i.n.h.l.LoggingHandler - [id: 0x94b2a840, L:/127.0.0.1:8080 - R:/127.0.0.1:52612] READ COMPLETE
22:20:27 [DEBUG] [defaultEventLoopGroup-2-2] c.i.o.EventLoopTest - lisi
22:20:38 [DEBUG] [nioEventLoopGroup-4-1] i.n.h.l.LoggingHandler - [id: 0x79a26af9, L:/127.0.0.1:8080 - R:/127.0.0.1:52625] REGISTERED
22:20:38 [DEBUG] [nioEventLoopGroup-4-1] i.n.h.l.LoggingHandler - [id: 0x79a26af9, L:/127.0.0.1:8080 - R:/127.0.0.1:52625] ACTIVE
22:20:38 [DEBUG] [nioEventLoopGroup-4-1] i.n.h.l.LoggingHandler - [id: 0x79a26af9, L:/127.0.0.1:8080 - R:/127.0.0.1:52625] READ: 6B+-------------------------------------------------+|  0  1  2  3  4  5  6  7  8  9  a  b  c  d  e  f |
+--------+-------------------------------------------------+----------------+
|00000000| 77 61 6e 67 77 75                               |wangwu          |
+--------+-------------------------------------------------+----------------+
22:20:38 [DEBUG] [nioEventLoopGroup-4-1] i.n.h.l.LoggingHandler - [id: 0x79a26af9, L:/127.0.0.1:8080 - R:/127.0.0.1:52625] READ COMPLETE
22:20:38 [DEBUG] [defaultEventLoopGroup-2-1] c.i.o.EventLoopTest - wangwu
22:20:40 [DEBUG] [nioEventLoopGroup-4-1] i.n.h.l.LoggingHandler - [id: 0x79a26af9, L:/127.0.0.1:8080 - R:/127.0.0.1:52625] READ: 6B+-------------------------------------------------+|  0  1  2  3  4  5  6  7  8  9  a  b  c  d  e  f |
+--------+-------------------------------------------------+----------------+
|00000000| 77 61 6e 67 77 75                               |wangwu          |
+--------+-------------------------------------------------+----------------+
22:20:40 [DEBUG] [nioEventLoopGroup-4-1] i.n.h.l.LoggingHandler - [id: 0x79a26af9, L:/127.0.0.1:8080 - R:/127.0.0.1:52625] READ COMPLETE
22:20:40 [DEBUG] [defaultEventLoopGroup-2-1] c.i.o.EventLoopTest - wangwu
可以看到,nio 工人和 非 nio 工人也分别绑定了 channel(LoggingHandler 由 nio 工人执行,而我们自己的 handler 由非 nio 工人执行)
(3)handler 执行中如何换人?
关键代码 io.netty.channel.AbstractChannelHandlerContext#invokeChannelRead()。
static void invokeChannelRead(final AbstractChannelHandlerContext next, Object msg) {final Object m = next.pipeline.touch(ObjectUtil.checkNotNull(msg, "msg"), next);// 下一个 handler 的事件循环是否与当前的事件循环是同一个线程EventExecutor executor = next.executor();// 是,直接调用if (executor.inEventLoop()) {	//判断当前handler中的线程,是否和eventLoop是同—个线程next.invokeChannelRead(m);} // 不是,将要执行的代码作为任务提交给下一个事件循环处理(换人)else {executor.execute(new Runnable() {@Overridepublic void run() {next.invokeChannelRead(m);}});}
}
- 如果两个 handler 绑定的是同一个线程,那么就直接调用;
- 否则,把要调用的代码封装为一个任务对象,由下一个 handler 的线程来调用;
3.2 Channel
channel 的主要作用如下:
- close() 可以用来关闭 channel;
- closeFuture() 用来处理 channel 的关闭;
- sync 方法作用是同步等待 channel 关闭;
- 而 addListener 方法是异步等待 channel 关闭;
- pipeline() 方法添加处理器;
- write() 方法将数据写入;
- writeAndFlush() 方法将数据写入并刷出;
3.2.1.ChannelFuture
(1)这时刚才的客户端代码:
new Bootstrap().group(new NioEventLoopGroup()).channel(NioSocketChannel.class).handler(new ChannelInitializer() {@Overrideprotected void initChannel(Channel ch) {ch.pipeline().addLast(new StringEncoder());}}).connect("localhost", 8080).sync().channel().writeAndFlush("hello world!");
现在把它拆开来看:
ChannelFuture channelFuture = new Bootstrap().group(new NioEventLoopGroup()).channel(NioSocketChannel.class).handler(new ChannelInitializer() {@Overrideprotected void initChannel(Channel ch) {ch.pipeline().addLast(new StringEncoder());}}).connect("localhost", 8080); // 1channelFuture.sync().channel().writeAndFlush(new Date() + ": hello world!");
- 1 处返回的是 ChannelFuture 对象,它的作用是利用 channel() 方法来获取 Channel 对象;
注意:connect 方法是异步的,意味着不等连接建立,方法执行就返回了。因此 channelFuture 对象中不能【立刻】获得到正确的 Channel 对象。实验如下:
ChannelFuture channelFuture = new Bootstrap().group(new NioEventLoopGroup()).channel(NioSocketChannel.class).handler(new ChannelInitializer() {@Overrideprotected void initChannel(Channel ch) {ch.pipeline().addLast(new StringEncoder());}}).connect("localhost", 8080);System.out.println(channelFuture.channel()); // 1
channelFuture.sync(); // 2 阻塞住当前线程,直到 nio 线程连接建立完毕
System.out.println(channelFuture.channel()); // 3
- 执行到 1 时,连接未建立,打印
[id: 0x2e1884dd]; - 执行到 2 时,sync 方法是同步等待连接建立完成;
- 执行到 3 时,连接肯定建立了,打印
[id: 0x2e1884dd, L:/127.0.0.1:57191 - R:/127.0.0.1:8080];
(2)除了用 sync 方法可以让异步操作同步以外,还可以使用回调的方式:
ChannelFuture channelFuture = new Bootstrap().group(new NioEventLoopGroup()).channel(NioSocketChannel.class).handler(new ChannelInitializer() {//在 nio 线程连接建立好之后,会调用 operationComplete@Overrideprotected void initChannel(Channel ch) {ch.pipeline().addLast(new StringEncoder());}}).connect("localhost", 8080);
System.out.println(channelFuture.channel()); // 1
channelFuture.addListener((ChannelFutureListener) future -> {System.out.println(future.channel()); // 2
});
- 执行到 1 时,连接未建立,打印
[id: 0x749124ba]; - ChannelFutureListener 会在连接建立时被调用(其中 operationComplete 方法),因此执行到 2 时,连接肯定建立了,打印
[id: 0x749124ba, L:/127.0.0.1:57351 - R:/127.0.0.1:8080];
3.2.2.CloseFuture
服务器端代码
package cn.itcast.netty.c3;import io.netty.bootstrap.ServerBootstrap;
import io.netty.buffer.ByteBuf;
import io.netty.channel.*;
import io.netty.channel.nio.NioEventLoopGroup;
import io.netty.channel.socket.nio.NioServerSocketChannel;
import io.netty.channel.socket.nio.NioSocketChannel;
import lombok.extern.slf4j.Slf4j;import java.nio.charset.Charset;@Slf4j
public class CloseFutureServer {public static void main(String[] args) {// 细分2:创建一个独立的 EventLoopGroupEventLoopGroup group = new DefaultEventLoopGroup();new ServerBootstrap()// boss 和 worker// 细分1:boss 只负责 ServerSocketChannel 上 accept 事件     worker 只负责 socketChannel 上的读写.group(new NioEventLoopGroup(), new NioEventLoopGroup(2)).channel(NioServerSocketChannel.class).childHandler(new ChannelInitializer() {@Overrideprotected void initChannel(NioSocketChannel ch) throws Exception {ch.pipeline().addLast("handler1", new ChannelInboundHandlerAdapter() {@Override                                         // ByteBufpublic void channelRead(ChannelHandlerContext ctx, Object msg) throws Exception {ByteBuf buf = (ByteBuf) msg;log.debug(buf.toString(Charset.defaultCharset()));ctx.fireChannelRead(msg);   //让消息传递给下一个 handler}});}}).bind(8080);}
}
客户端代码
package cn.itcast.netty.c3;import io.netty.bootstrap.Bootstrap;
import io.netty.channel.Channel;
import io.netty.channel.ChannelFuture;
import io.netty.channel.ChannelFutureListener;
import io.netty.channel.ChannelInitializer;
import io.netty.channel.nio.NioEventLoopGroup;
import io.netty.channel.socket.nio.NioSocketChannel;
import io.netty.handler.codec.string.StringEncoder;
import io.netty.handler.logging.LogLevel;
import io.netty.handler.logging.LoggingHandler;
import lombok.extern.slf4j.Slf4j;import java.net.InetSocketAddress;
import java.util.Scanner;@Slf4j
public class CloseFutureClient {public static void main(String[] args) throws InterruptedException {NioEventLoopGroup group = new NioEventLoopGroup();ChannelFuture channelFuture = new Bootstrap().group(group).channel(NioSocketChannel.class).handler(new ChannelInitializer() {@Override // 在连接建立后被调用protected void initChannel(NioSocketChannel ch) throws Exception {ch.pipeline().addLast(new LoggingHandler(LogLevel.DEBUG));ch.pipeline().addLast(new StringEncoder());}}).connect(new InetSocketAddress("localhost", 8080));System.out.println(channelFuture.getClass());//同步等待获取 channel 对象Channel channel = channelFuture.sync().channel();log.debug("{}", channel);new Thread(()->{Scanner scanner = new Scanner(System.in);while (true) {String line = scanner.nextLine();if ("q".equals(line)) {channel.close(); // close 异步操作 1s 之后
//                    log.debug("处理关闭之后的操作"); // 不能在这里善后break;}channel.writeAndFlush(line);}}, "input").start();// 获取 CloseFuture 对象,1) 同步处理关闭, 2) 异步处理关闭ChannelFuture closeFuture = channel.closeFuture();System.out.println(closeFuture.getClass());//1) 同步处理关闭
//        log.debug("waiting close...");
//        closeFuture.sync();
//        log.debug("处理关闭之后的操作");//2) 异步处理关闭closeFuture.addListener((ChannelFutureListener) future -> {log.debug("处理关闭之后的操作");group.shutdownGracefully();});}
}
结果如下所示:

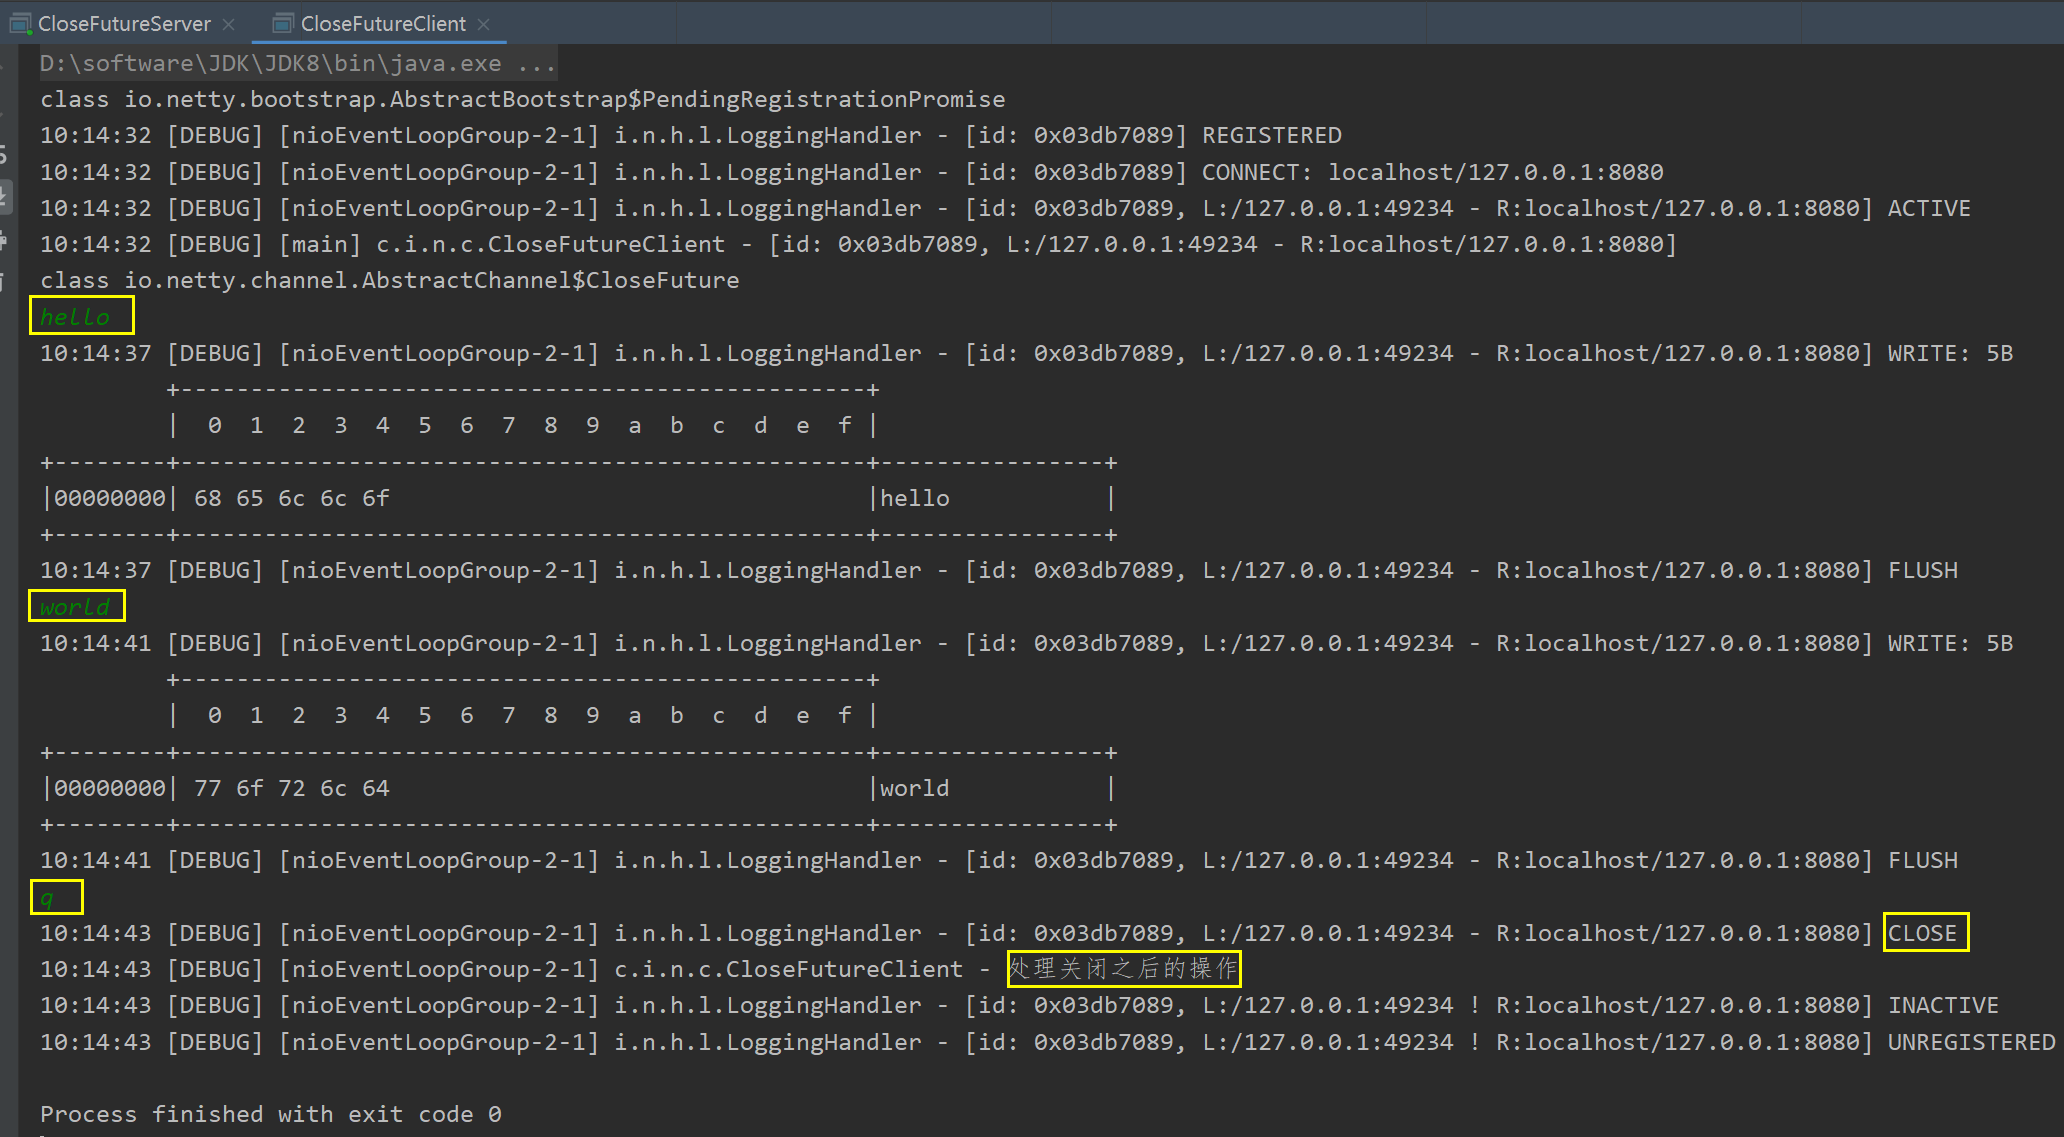
优雅关闭:
shutdownGracefully()方法。该方法会首先切换EventLoopGroup到关闭状态从而拒绝新的任务的加入,然后在任务队列的任务都处理完成后,停止线程的运行。从而确保整体应用是在正常有序的状态下退出的。
3.2.3.异步提升的是什么?
(1)有些同学看到这里会有疑问:为什么不在一个线程中去执行建立连接、去执行关闭 channel,那样不是也可以吗?非要用这么复杂的异步方式:比如一个线程发起建立连接,另一个线程去真正建立连接。还有同学会笼统地回答:因为 netty 异步方式用了多线程、多线程就效率高。其实这些认识都比较片面,多线程和异步所提升的效率并不是所认为的。
(2)思考下面的场景,4 个医生给人看病,每个病人花费 20 分钟,而且医生看病的过程中是以病人为单位的,一个病人看完了,才能看下一个病人。假设病人源源不断地来,可以计算一下 4 个医生一天工作 8 小时,处理的病人总数是:4 * 8 * 3 = 96。
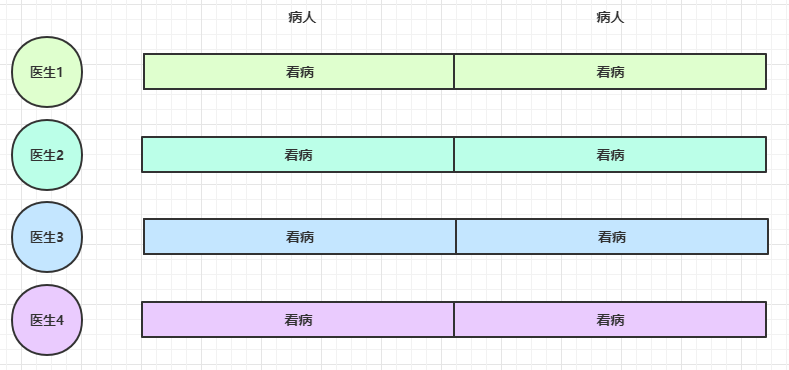
经研究发现,看病可以细分为四个步骤,经拆分后每个步骤需要 5 分钟,如下:
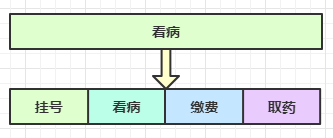
因此可以做如下优化,只有一开始,医生 2、3、4 分别要等待 5、10、15 分钟才能执行工作,但只要后续病人源源不断地来,他们就能够满负荷工作,并且处理病人的能力提高到了 4 * 8 * 12 效率几乎是原来的四倍!
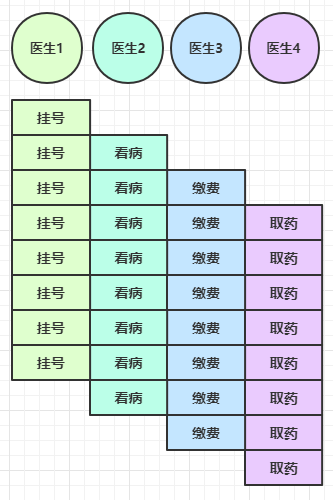
(3)要点:
- 单线程没法异步提高效率,必须配合多线程、多核 cpu 才能发挥异步的优势;
- 异步并没有缩短响应时间,反而有所增加;
- 合理进行任务拆分,也是利用异步的关键;
3.3 Future & Promise
3.3.1.概述
在异步处理时,经常用到 Future、Promise 这两个接口。首先要说明 netty 中的 Future 与 jdk 中的 Future 同名,但是是两个接口,netty 的 Future 继承自 jdk 的 Future,而 Promise 又对 netty Future 进行了扩展。
- jdk Future 只能同步等待任务结束(或成功、或失败)才能得到结果;
- netty Future 可以同步等待任务结束得到结果,也可以异步方式得到结果,但都是要等任务结束;
- netty Promise 不仅有 netty Future 的功能,而且脱离了任务独立存在,只作为两个线程间传递结果的容器;
| 功能/名称 | jdk Future | netty Future | Promise |
|---|---|---|---|
| cancel | 取消任务 | - | - |
| isCanceled | 任务是否取消 | - | - |
| isDone | 任务是否完成,不能区分成功失败 | - | - |
| get | 获取任务结果,阻塞等待 | - | - |
| getNow | - | 获取任务结果,非阻塞,还未产生结果时返回 null | - |
| await | - | 等待任务结束,如果任务失败,不会抛异常,而是通过 isSuccess 判断 | - |
| sync | - | 等待任务结束,如果任务失败,抛出异常 | - |
| isSuccess | - | 判断任务是否成功 | - |
| cause | - | 获取失败信息,非阻塞,如果没有失败,返回null | - |
| addLinstener | - | 添加回调,异步接收结果 | - |
| setSuccess | - | - | 设置成功结果 |
| setFailure | - | - | 设置失败结果 |
3.3.2.JDK Future:同步处理任务
package cn.itcast.netty.c3;import lombok.extern.slf4j.Slf4j;import java.util.concurrent.*;@Slf4j
public class TestJdkFuture {public static void main(String[] args) throws ExecutionException, InterruptedException {// 1. 线程池ExecutorService service = Executors.newFixedThreadPool(2);// 2. 提交任务Future future = service.submit(new Callable() {@Overridepublic Integer call() throws Exception {log.debug("执行计算...");Thread.sleep(1000);return 50;}});// 3. 主线程通过 future 来获取结果log.debug("等待结果...");// future.get() 用于获取任务的结果log.debug("结果是 {}", future.get());service.shutdown();}
}
输出如下:

3.3.3.Netty Future:同步/异步处理任务
package cn.itcast.netty.c3;import io.netty.channel.EventLoop;
import io.netty.channel.nio.NioEventLoopGroup;
import io.netty.util.concurrent.Future;
import io.netty.util.concurrent.GenericFutureListener;
import lombok.extern.slf4j.Slf4j;import java.util.concurrent.Callable;
import java.util.concurrent.ExecutionException;@Slf4j
public class TestNettyFuture {public static void main(String[] args) throws ExecutionException, InterruptedException {NioEventLoopGroup group = new NioEventLoopGroup();EventLoop eventLoop = group.next();// netty futureFuture future = eventLoop.submit(new Callable() {@Overridepublic Integer call() throws Exception {log.debug("执行计算...");Thread.sleep(1000);return 70;}});//1.同步方式
//        log.debug("等待结果");
//        log.debug("结果是 {}", future.get());//2.异步方式future.addListener(new GenericFutureListener>(){@Overridepublic void operationComplete(Future future) throws Exception {log.debug("接收结果:{}", future.getNow());}});}
}
输出如下:

3.3.4.Netty Promise
(1)同步处理任务失败 - sync & get
package cn.itcast.netty.c3;import io.netty.channel.EventLoop;
import io.netty.channel.EventLoopGroup;
import io.netty.channel.nio.NioEventLoopGroup;
import io.netty.util.concurrent.DefaultPromise;
import lombok.extern.slf4j.Slf4j;import java.util.concurrent.ExecutionException;@Slf4j
public class TestNettyPromise {public static void main(String[] args) throws ExecutionException, InterruptedException {// 1.准备 EventLoop 对象EventLoop eventLoop = new NioEventLoopGroup().next();// 2.可以主动创建 promise,结果容器DefaultPromise promise = new DefaultPromise<>(eventLoop);new Thread(() -> {// 3.任意一个线程执行计算,计算完毕后向 promise 中填充结果log.debug("开始计算...");try {int i = 1 / 0;Thread.sleep(1000);promise.setSuccess(80);} catch (Exception e) {e.printStackTrace();promise.setFailure(e);}}).start();// 4.接收结果的线程log.debug("等待结果...");log.debug("结果是: {}", promise.get());}
}
输出如下:
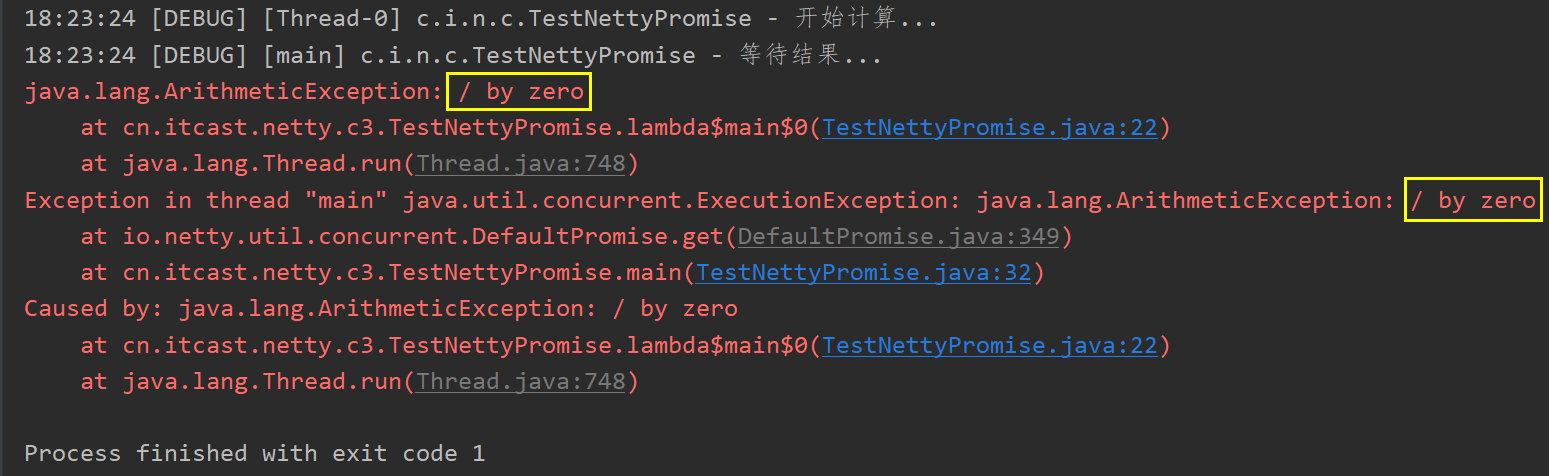
(2)同步处理任务失败 - await
DefaultEventLoop eventExecutors = new DefaultEventLoop();
DefaultPromise promise = new DefaultPromise<>(eventExecutors);eventExecutors.execute(() -> {try {Thread.sleep(1000);} catch (InterruptedException e) {e.printStackTrace();}RuntimeException e = new RuntimeException("error...");log.debug("set failure, {}", e.toString());promise.setFailure(e);
});log.debug("start...");
log.debug("{}", promise.getNow());
promise.await(); // 与 sync 和 get 区别在于,不会抛异常
log.debug("result {}", (promise.isSuccess() ? promise.getNow() : promise.cause()).toString());
输出如下:
12:18:53 [DEBUG] [main] c.i.o.DefaultPromiseTest2 - start...
12:18:53 [DEBUG] [main] c.i.o.DefaultPromiseTest2 - null
12:18:54 [DEBUG] [defaultEventLoop-1-1] c.i.o.DefaultPromiseTest2 - set failure, java.lang.RuntimeException: error...
12:18:54 [DEBUG] [main] c.i.o.DefaultPromiseTest2 - result java.lang.RuntimeException: error...
(3)异步处理任务失败
DefaultEventLoop eventExecutors = new DefaultEventLoop();
DefaultPromise promise = new DefaultPromise<>(eventExecutors);promise.addListener(future -> {log.debug("result {}", (promise.isSuccess() ? promise.getNow() : promise.cause()).toString());
});eventExecutors.execute(() -> {try {Thread.sleep(1000);} catch (InterruptedException e) {e.printStackTrace();}RuntimeException e = new RuntimeException("error...");log.debug("set failure, {}", e.toString());promise.setFailure(e);
});log.debug("start...");
输出如下:
12:04:57 [DEBUG] [main] c.i.o.DefaultPromiseTest2 - start...
12:04:58 [DEBUG] [defaultEventLoop-1-1] c.i.o.DefaultPromiseTest2 - set failure, java.lang.RuntimeException: error...
12:04:58 [DEBUG] [defaultEventLoop-1-1] c.i.o.DefaultPromiseTest2 - result java.lang.RuntimeException: error...
(4)await 死锁检查
DefaultEventLoop eventExecutors = new DefaultEventLoop();
DefaultPromise promise = new DefaultPromise<>(eventExecutors);eventExecutors.submit(()->{System.out.println("1");try {promise.await();// 注意不能仅捕获 InterruptedException 异常// 否则 死锁检查抛出的 BlockingOperationException 会继续向上传播// 而提交的任务会被包装为 PromiseTask,它的 run 方法中会 catch 所有异常然后设置为 Promise 的失败结果而不会抛出} catch (Exception e) { e.printStackTrace();}System.out.println("2");
});
eventExecutors.submit(()->{System.out.println("3");try {promise.await();} catch (Exception e) {e.printStackTrace();}System.out.println("4");
});
输出如下:
1
2
3
4
io.netty.util.concurrent.BlockingOperationException: DefaultPromise@47499c2a(incomplete)at io.netty.util.concurrent.DefaultPromise.checkDeadLock(DefaultPromise.java:384)at io.netty.util.concurrent.DefaultPromise.await(DefaultPromise.java:212)at com.itcast.oio.DefaultPromiseTest.lambda$main$0(DefaultPromiseTest.java:27)at io.netty.util.concurrent.PromiseTask$RunnableAdapter.call(PromiseTask.java:38)at io.netty.util.concurrent.PromiseTask.run(PromiseTask.java:73)at io.netty.channel.DefaultEventLoop.run(DefaultEventLoop.java:54)at io.netty.util.concurrent.SingleThreadEventExecutor$5.run(SingleThreadEventExecutor.java:918)at io.netty.util.internal.ThreadExecutorMap$2.run(ThreadExecutorMap.java:74)at io.netty.util.concurrent.FastThreadLocalRunnable.run(FastThreadLocalRunnable.java:30)at java.lang.Thread.run(Thread.java:745)
io.netty.util.concurrent.BlockingOperationException: DefaultPromise@47499c2a(incomplete)at io.netty.util.concurrent.DefaultPromise.checkDeadLock(DefaultPromise.java:384)at io.netty.util.concurrent.DefaultPromise.await(DefaultPromise.java:212)at com.itcast.oio.DefaultPromiseTest.lambda$main$1(DefaultPromiseTest.java:36)at io.netty.util.concurrent.PromiseTask$RunnableAdapter.call(PromiseTask.java:38)at io.netty.util.concurrent.PromiseTask.run(PromiseTask.java:73)at io.netty.channel.DefaultEventLoop.run(DefaultEventLoop.java:54)at io.netty.util.concurrent.SingleThreadEventExecutor$5.run(SingleThreadEventExecutor.java:918)at io.netty.util.internal.ThreadExecutorMap$2.run(ThreadExecutorMap.java:74)at io.netty.util.concurrent.FastThreadLocalRunnable.run(FastThreadLocalRunnable.java:30)at java.lang.Thread.run(Thread.java:745)
3.4 Handler & Pipeline
3.4.1.概述
ChannelHandler 用来处理 Channel 上的各种事件,分为入站、出站两种。所有 ChannelHandler 被连成一串,就是 Pipeline:
- 入站处理器通常是 ChannelInboundHandlerAdapter 的子类,主要用来读取客户端数据,写回结果;
- 出站处理器通常是 ChannelOutboundHandlerAdapter 的子类,主要对写回结果进行加工;
打个比喻,每个 Channel 是一个产品的加工车间,Pipeline 是车间中的流水线,ChannelHandler 就是流水线上的各道工序,而后面要讲的 ByteBuf 是原材料,经过很多工序的加工:先经过一道道入站工序,再经过一道道出站工序最终变成产品。
3.4.2.案例演示
(1)服务端代码
package cn.itcast.netty.c3;import io.netty.bootstrap.ServerBootstrap;
import io.netty.buffer.ByteBuf;
import io.netty.channel.*;
import io.netty.channel.nio.NioEventLoopGroup;
import io.netty.channel.socket.nio.NioServerSocketChannel;
import io.netty.channel.socket.nio.NioSocketChannel;
import lombok.AllArgsConstructor;
import lombok.Data;
import lombok.extern.slf4j.Slf4j;import java.nio.charset.Charset;@Slf4j
public class TestPipeline {public static void main(String[] args) {new ServerBootstrap().group(new NioEventLoopGroup()).channel(NioServerSocketChannel.class).childHandler(new ChannelInitializer() {protected void initChannel(NioSocketChannel ch) {ch.pipeline().addLast(new ChannelInboundHandlerAdapter(){@Overridepublic void channelRead(ChannelHandlerContext ctx, Object msg) {System.out.println(1);ctx.fireChannelRead(msg); // 1}});ch.pipeline().addLast(new ChannelInboundHandlerAdapter(){@Overridepublic void channelRead(ChannelHandlerContext ctx, Object msg) {System.out.println(2);ctx.fireChannelRead(msg); // 2}});ch.pipeline().addLast(new ChannelInboundHandlerAdapter(){@Overridepublic void channelRead(ChannelHandlerContext ctx, Object msg) {System.out.println(3);ctx.channel().write(msg); // 3}});ch.pipeline().addLast(new ChannelOutboundHandlerAdapter(){@Overridepublic void write(ChannelHandlerContext ctx, Object msg, ChannelPromise promise) {System.out.println(4);ctx.write(msg, promise); // 4}});ch.pipeline().addLast(new ChannelOutboundHandlerAdapter(){@Overridepublic void write(ChannelHandlerContext ctx, Object msg, ChannelPromise promise) {System.out.println(5);ctx.write(msg, promise); // 5}});ch.pipeline().addLast(new ChannelOutboundHandlerAdapter(){@Overridepublic void write(ChannelHandlerContext ctx, Object msg, ChannelPromise promise) {System.out.println(6);ctx.write(msg, promise); // 6}});}}).bind(8080);}
}
(2)客户端代码
package cn.itcast.netty.c3;import io.netty.bootstrap.Bootstrap;
import io.netty.channel.Channel;
import io.netty.channel.ChannelFutureListener;
import io.netty.channel.ChannelInitializer;
import io.netty.channel.nio.NioEventLoopGroup;
import io.netty.channel.socket.nio.NioSocketChannel;
import io.netty.handler.codec.string.StringEncoder;public class TestPipelineClient {public static void main(String[] args) {new Bootstrap().group(new NioEventLoopGroup()).channel(NioSocketChannel.class).handler(new ChannelInitializer() {@Overrideprotected void initChannel(Channel ch) {ch.pipeline().addLast(new StringEncoder());}}).connect("localhost", 8080).addListener((ChannelFutureListener) future -> {future.channel().writeAndFlush("张三");});}
}
服务器端打印结果如下:
1
2
3
6
5
4
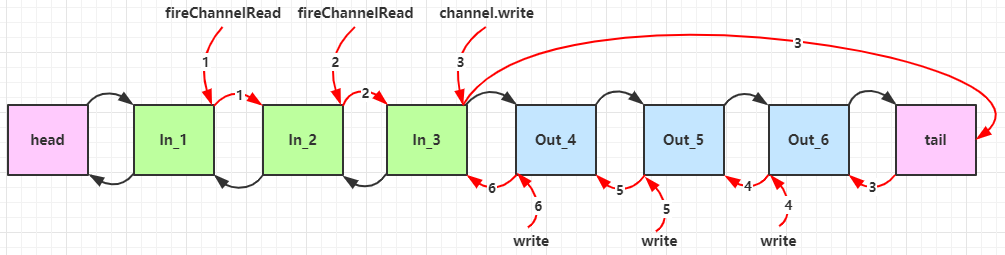
可以看到,ChannelInboundHandlerAdapter 是按照 addLast 的顺序执行的,而 ChannelOutboundHandlerAdapter 是按照 addLast 的逆序执行的。ChannelPipeline 的实现是一个 ChannelHandlerContext(包装了 ChannelHandler) 组成的双向链表:

- 入站处理器中,ctx.fireChannelRead(msg) 是 调用下一个入站处理器
- 如果注释掉 1 处代码,则仅会打印 1;
- 如果注释掉 2 处代码,则仅会打印 1 2;
- 3 处的 ctx.channel().write(msg) 会 从尾部开始触发 后续出站处理器的执行
- 如果注释掉 3 处代码,则仅会打印 1 2 3;
- 类似的,出站处理器中,ctx.write(msg, promise) 的调用也会 触发上一个出站处理器
- 如果注释掉 6 处代码,则仅会打印 1 2 3 6;
- ctx.channel().write(msg) 与 ctx.write(msg)
- 都是触发出站处理器的执行;
- ctx.channel().write(msg) 从尾部开始查找出站处理器;
- ctx.write(msg) 是从当前节点找上一个出站处理器;
- 3 处的 ctx.channel().write(msg) 如果改为 ctx.write(msg) 仅会打印 1 2 3,因为节点3 之前没有其它出站处理器了;
- 6 处的 ctx.write(msg, promise) 如果改为 ctx.channel().write(msg) 会打印 1 2 3 6 6 6… 因为 ctx.channel().write() 是从尾部开始查找,结果又是节点 6 自己;
(3)服务端 pipeline 触发的原始流程如下,图中数字代表了处理步骤的先后次序。
(4)进一步处理
@Slf4j
public class TestPipeline {public static void main(String[] args) {new ServerBootstrap().group(new NioEventLoopGroup()).channel(NioServerSocketChannel.class).childHandler(new ChannelInitializer() {@Overrideprotected void initChannel(NioSocketChannel ch) throws Exception {// 1.通过 channel 拿到 pipelineChannelPipeline pipeline = ch.pipeline();// 2.添加处理器 head <->  h1 <-> h2 <-> h4 <-> h3 <-> h5 <-> h6 <-> tail (双向链表)pipeline.addLast("h1", new ChannelInboundHandlerAdapter(){@Overridepublic void channelRead(ChannelHandlerContext ctx, Object msg) throws Exception {log.debug("1");ByteBuf buf = (ByteBuf) msg;String name = buf.toString(Charset.defaultCharset());super.channelRead(ctx, name);}});pipeline.addLast("h2", new ChannelInboundHandlerAdapter(){@Overridepublic void channelRead(ChannelHandlerContext ctx, Object name) throws Exception {log.debug("2");Student student = new Student(name.toString());// 将数据传递给下个 handler,如果不调用,调用链会断开或者调用 ctx.fireChannelRead(student);super.channelRead(ctx, student);}});pipeline.addLast("h3", new ChannelInboundHandlerAdapter(){@Overridepublic void channelRead(ChannelHandlerContext ctx, Object msg) throws Exception {log.debug("3,结果:{},class:{}", msg, msg.getClass());//触发出站ctx.writeAndFlush(ctx.alloc().buffer().writeBytes("server...".getBytes()));}});pipeline.addLast("h4", new ChannelOutboundHandlerAdapter(){@Overridepublic void write(ChannelHandlerContext ctx, Object msg, ChannelPromise promise) throws Exception {log.debug("4");super.write(ctx, msg, promise);}});pipeline.addLast("h5", new ChannelOutboundHandlerAdapter(){@Overridepublic void write(ChannelHandlerContext ctx, Object msg, ChannelPromise promise) throws Exception {log.debug("5");super.write(ctx, msg, promise);}});pipeline.addLast("h6", new ChannelOutboundHandlerAdapter(){@Overridepublic void write(ChannelHandlerContext ctx, Object msg, ChannelPromise promise) throws Exception {log.debug("6");super.write(ctx, msg, promise);}});}}).bind(8080);}@Data@AllArgsConstructorstatic class Student {private String name;}
}
结果如下:

3.4.3.EmbeddedChannel
Netty 使用 EmbeddedChannel 来进行单元测试。
package cn.itcast.netty.c3;import io.netty.buffer.ByteBufAllocator;
import io.netty.channel.ChannelHandlerContext;
import io.netty.channel.ChannelInboundHandlerAdapter;
import io.netty.channel.ChannelOutboundHandlerAdapter;
import io.netty.channel.ChannelPromise;
import io.netty.channel.embedded.EmbeddedChannel;
import lombok.extern.slf4j.Slf4j;@Slf4j
public class TestEmbeddedChannel {public static void main(String[] args) {ChannelInboundHandlerAdapter h1 = new ChannelInboundHandlerAdapter() {@Overridepublic void channelRead(ChannelHandlerContext ctx, Object msg) throws Exception {log.debug("1");super.channelRead(ctx, msg);}};ChannelInboundHandlerAdapter h2 = new ChannelInboundHandlerAdapter() {@Overridepublic void channelRead(ChannelHandlerContext ctx, Object msg) throws Exception {log.debug("2");super.channelRead(ctx, msg);}};ChannelOutboundHandlerAdapter h3 = new ChannelOutboundHandlerAdapter() {@Overridepublic void write(ChannelHandlerContext ctx, Object msg, ChannelPromise promise) throws Exception {log.debug("3");super.write(ctx, msg, promise);}};ChannelOutboundHandlerAdapter h4 = new ChannelOutboundHandlerAdapter() {@Overridepublic void write(ChannelHandlerContext ctx, Object msg, ChannelPromise promise) throws Exception {log.debug("4");super.write(ctx, msg, promise);}};EmbeddedChannel channel = new EmbeddedChannel(h1, h2, h3, h4);// 模拟入站操作channel.writeInbound(ByteBufAllocator.DEFAULT.buffer().writeBytes("hello".getBytes()));System.out.println();// 模拟出站操作channel.writeOutbound(ByteBufAllocator.DEFAULT.buffer().writeBytes("world".getBytes()));}
}
结果如下:
10:20:01 [DEBUG] [main] c.i.n.c.TestEmbeddedChannel - 1
10:20:01 [DEBUG] [main] c.i.n.c.TestEmbeddedChannel - 210:20:01 [DEBUG] [main] c.i.n.c.TestEmbeddedChannel - 4
10:20:01 [DEBUG] [main] c.i.n.c.TestEmbeddedChannel - 3Process finished with exit code 0
3.5 ByteBuf
ByteBuf 是对字节数据的封装。
3.5.1.创建
package cn.itcast.netty.c4;import io.netty.buffer.ByteBuf;
import io.netty.buffer.ByteBufAllocator;import static io.netty.buffer.ByteBufUtil.appendPrettyHexDump;
import static io.netty.util.internal.StringUtil.NEWLINE;public class TestByteBuf {public static void main(String[] args) {//创建 ByteBuf,初始容量默认为 256,也可在创建时指定,但如果容量不够会动态扩容ByteBuf buf = ByteBufAllocator.DEFAULT.buffer(10);log(buf);StringBuilder builder = new StringBuilder();for (int i = 0; i < 300; i++) {builder.append("a");}buf.writeBytes(builder.toString().getBytes());log(buf);}private static void log(ByteBuf buffer) {int length = buffer.readableBytes();int rows = length / 16 + (length % 15 == 0 ? 0 : 1) + 4;StringBuilder buf = new StringBuilder(rows * 80 * 2).append("read index:").append(buffer.readerIndex()).append(" write index:").append(buffer.writerIndex()).append(" capacity:").append(buffer.capacity()).append(NEWLINE);appendPrettyHexDump(buf, buffer);System.out.println(buf.toString());}
}
上面代码创建了一个默认的 ByteBuf(池化基于直接内存的 ByteBuf),初始容量是 10,输出如下:
read index:0 write index:0 capacity:10read index:0 write index:300 capacity:512+-------------------------------------------------+|  0  1  2  3  4  5  6  7  8  9  a  b  c  d  e  f |
+--------+-------------------------------------------------+----------------+
|00000000| 61 61 61 61 61 61 61 61 61 61 61 61 61 61 61 61 |aaaaaaaaaaaaaaaa|
|00000010| 61 61 61 61 61 61 61 61 61 61 61 61 61 61 61 61 |aaaaaaaaaaaaaaaa|
|00000020| 61 61 61 61 61 61 61 61 61 61 61 61 61 61 61 61 |aaaaaaaaaaaaaaaa|
|00000030| 61 61 61 61 61 61 61 61 61 61 61 61 61 61 61 61 |aaaaaaaaaaaaaaaa|
|00000040| 61 61 61 61 61 61 61 61 61 61 61 61 61 61 61 61 |aaaaaaaaaaaaaaaa|
|00000050| 61 61 61 61 61 61 61 61 61 61 61 61 61 61 61 61 |aaaaaaaaaaaaaaaa|
|00000060| 61 61 61 61 61 61 61 61 61 61 61 61 61 61 61 61 |aaaaaaaaaaaaaaaa|
|00000070| 61 61 61 61 61 61 61 61 61 61 61 61 61 61 61 61 |aaaaaaaaaaaaaaaa|
|00000080| 61 61 61 61 61 61 61 61 61 61 61 61 61 61 61 61 |aaaaaaaaaaaaaaaa|
|00000090| 61 61 61 61 61 61 61 61 61 61 61 61 61 61 61 61 |aaaaaaaaaaaaaaaa|
|000000a0| 61 61 61 61 61 61 61 61 61 61 61 61 61 61 61 61 |aaaaaaaaaaaaaaaa|
|000000b0| 61 61 61 61 61 61 61 61 61 61 61 61 61 61 61 61 |aaaaaaaaaaaaaaaa|
|000000c0| 61 61 61 61 61 61 61 61 61 61 61 61 61 61 61 61 |aaaaaaaaaaaaaaaa|
|000000d0| 61 61 61 61 61 61 61 61 61 61 61 61 61 61 61 61 |aaaaaaaaaaaaaaaa|
|000000e0| 61 61 61 61 61 61 61 61 61 61 61 61 61 61 61 61 |aaaaaaaaaaaaaaaa|
|000000f0| 61 61 61 61 61 61 61 61 61 61 61 61 61 61 61 61 |aaaaaaaaaaaaaaaa|
|00000100| 61 61 61 61 61 61 61 61 61 61 61 61 61 61 61 61 |aaaaaaaaaaaaaaaa|
|00000110| 61 61 61 61 61 61 61 61 61 61 61 61 61 61 61 61 |aaaaaaaaaaaaaaaa|
|00000120| 61 61 61 61 61 61 61 61 61 61 61 61             |aaaaaaaaaaaa    |
+--------+-------------------------------------------------+----------------+Process finished with exit code 0
3.5.2.直接内存 vs 堆内存
(1)可以使用下面的代码来创建池化基于堆的 ByteBuf:
ByteBuf buffer = ByteBufAllocator.DEFAULT.heapBuffer(10);
(2)也可以使用下面的代码来创建池化基于直接内存的 ByteBuf:
ByteBuf buffer = ByteBufAllocator.DEFAULT.directBuffer(10);
- 直接内存创建和销毁的代价昂贵,但读写性能高(少一次内存复制),适合配合池化功能一起用;
- 直接内存对 GC 压力小,因为这部分内存不受 JVM 垃圾回收的管理,但也要注意及时主动释放;
3.5.3.池化 vs 非池化
(1)池化的最大意义在于可以重用 ByteBuf,优点有:
- 没有池化,则每次都得创建新的 ByteBuf 实例,这个操作对直接内存代价昂贵,就算是堆内存,也会增加 GC 压力
- 有了池化,则可以重用池中 ByteBuf 实例,并且采用了与 jemalloc 类似的内存分配算法提升分配效率
- 高并发时,池化功能更节约内存,减少内存溢出的可能
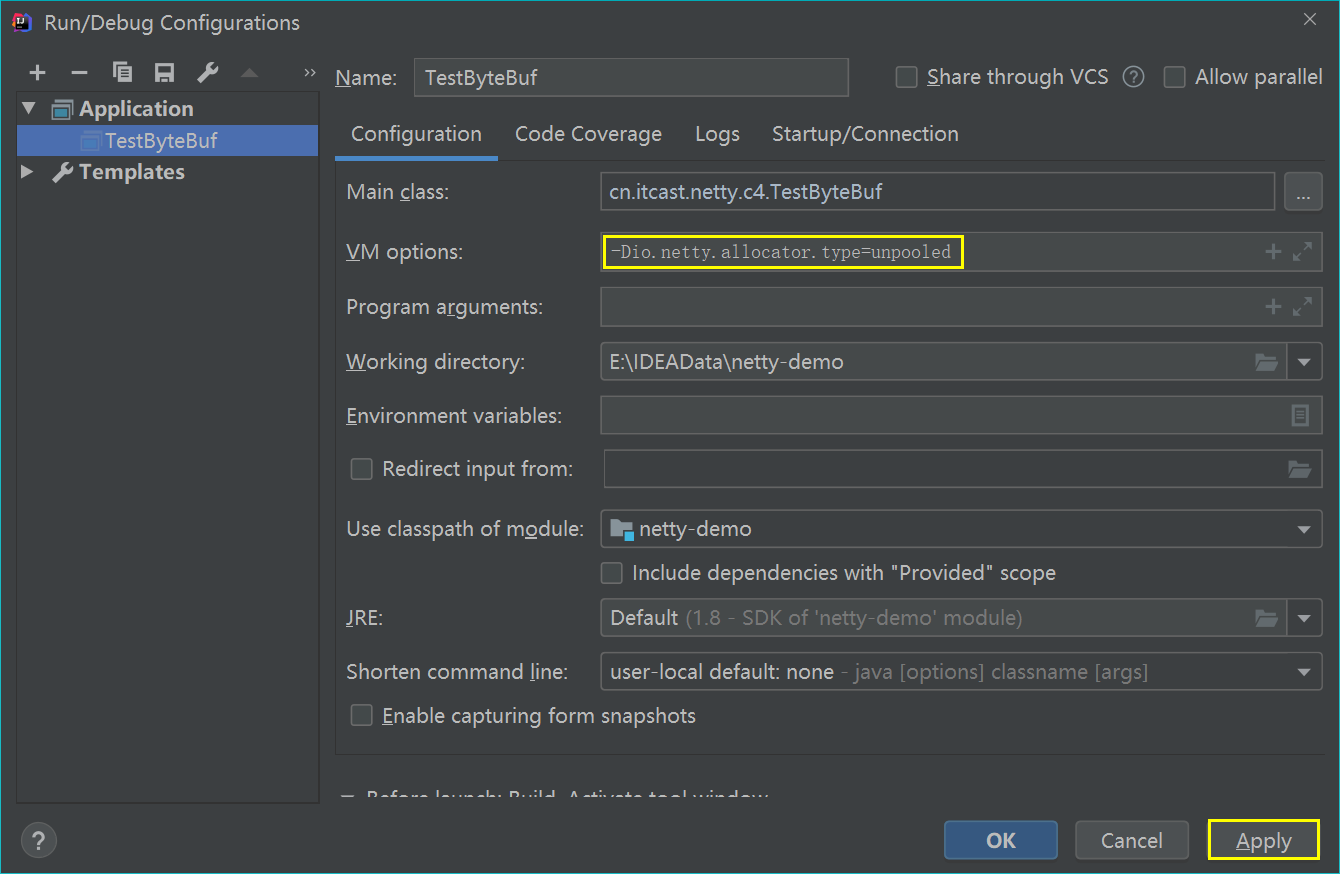
(2)池化功能是否开启,可以通过下面的系统环境变量来设置。
-Dio.netty.allocator.type={unpooled|pooled}
- 4.1 以后,非 Android 平台默认启用池化实现,Android 平台启用非池化实现;
- 4.1 之前,池化功能还不成熟,默认是非池化实现;
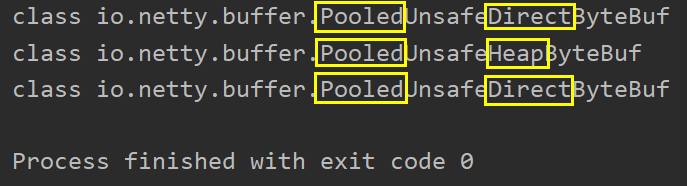
(3)查看 ByteBuf 类型:
public static void main(String[] args) {ByteBuf buf1 = ByteBufAllocator.DEFAULT.buffer(10);System.out.println(buf1.getClass());ByteBuf buf2 = ByteBufAllocator.DEFAULT.heapBuffer(10);System.out.println(buf2.getClass());ByteBuf buf3 = ByteBufAllocator.DEFAULT.directBuffer(10);System.out.println(buf3.getClass());
}
结果如下:
(4)在 IDEA 中设置非池化:
VM options: -Dio.netty.allocator.type=unpooled
3.5.4.组成
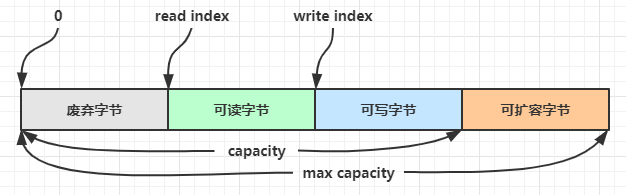
ByteBuf 由四部分组成,最开始读写指针都在 0 位置,读指针与写指针之间的部分是可读部分。
3.5.5.写入
方法列表,省略一些不重要的方法。
| 方法签名 | 含义 | 备注 |
|---|---|---|
| writeBoolean(boolean value) | 写入 boolean 值 | 用一字节 01|00 代表 true|false |
| writeByte(int value) | 写入 byte 值 | |
| writeShort(int value) | 写入 short 值 | |
| writeInt(int value) | 写入 int 值 | Big Endian,即 0x250,写入后 00 00 02 50 |
| writeIntLE(int value) | 写入 int 值 | Little Endian,即 0x250,写入后 50 02 00 00 |
| writeLong(long value) | 写入 long 值 | |
| writeChar(int value) | 写入 char 值 | |
| writeFloat(float value) | 写入 float 值 | |
| writeDouble(double value) | 写入 double 值 | |
| writeBytes(ByteBuf src) | 写入 netty 的 ByteBuf | |
| writeBytes(byte[] src) | 写入 byte[] | |
| writeBytes(ByteBuffer src) | 写入 nio 的 ByteBuffer | |
| int writeCharSequence(CharSequence sequence, Charset charset) | 写入字符串 |
注意
- 这些方法的未指明返回值的,其返回值都是 ByteBuf,意味着可以链式调用;
- 网络传输,默认习惯是 Big Endian;
先写入 4 个字节:
buffer.writeBytes(new byte[]{1, 2, 3, 4});
log(buffer);
结果如下:
read index:0 write index:4 capacity:10+-------------------------------------------------+|  0  1  2  3  4  5  6  7  8  9  a  b  c  d  e  f |
+--------+-------------------------------------------------+----------------+
|00000000| 01 02 03 04                                     |....            |
+--------+-------------------------------------------------+----------------+
再写入一个 int 整数,也是 4 个字节:
buffer.writeInt(5);
log(buffer);
结果如下:
read index:0 write index:8 capacity:10+-------------------------------------------------+|  0  1  2  3  4  5  6  7  8  9  a  b  c  d  e  f |
+--------+-------------------------------------------------+----------------+
|00000000| 01 02 03 04 00 00 00 05                         |........        |
+--------+-------------------------------------------------+----------------+
还有一类方法是 set 开头的一系列方法,也可以写入数据,但不会改变写指针位置。
3.5.6.扩容
再写入一个 int 整数时,容量不够了(初始容量是 10),这时会引发扩容。
buffer.writeInt(6);
log(buffer);
扩容规则是:
- 如何写入后数据大小未超过 512,则选择下一个 16 的整数倍,例如写入后大小为 12 ,则扩容后 capacity 是 16;
- 如果写入后数据大小超过 512,则选择下一个 2n,例如写入后大小为 513,则扩容后 capacity 是 210=1024(29 = 512 已经不够了);
- 扩容不能超过 max capacity(Integer.MAX_VALUE),否则会报错。
结果如下:
read index:0 write index:12 capacity:16+-------------------------------------------------+|  0  1  2  3  4  5  6  7  8  9  a  b  c  d  e  f |
+--------+-------------------------------------------------+----------------+
|00000000| 01 02 03 04 00 00 00 05 00 00 00 06             |............    |
+--------+-------------------------------------------------+----------------+
3.5.7.读取
例如读了 4 次,每次一个字节:
System.out.println(buffer.readByte());
System.out.println(buffer.readByte());
System.out.println(buffer.readByte());
System.out.println(buffer.readByte());
log(buffer);
读过的内容,就属于废弃部分了,再读只能读那些尚未读取的部分。
1
2
3
4
read index:4 write index:12 capacity:16+-------------------------------------------------+|  0  1  2  3  4  5  6  7  8  9  a  b  c  d  e  f |
+--------+-------------------------------------------------+----------------+
|00000000| 00 00 00 05 00 00 00 06                         |........        |
+--------+-------------------------------------------------+----------------+
如果需要重复读取 int 整数 5,怎么办?可以在 read 前先做个标记 mark。
buffer.markReaderIndex();
System.out.println(buffer.readInt());
log(buffer);
结果如下:
5
read index:8 write index:12 capacity:16+-------------------------------------------------+|  0  1  2  3  4  5  6  7  8  9  a  b  c  d  e  f |
+--------+-------------------------------------------------+----------------+
|00000000| 00 00 00 06                                     |....            |
+--------+-------------------------------------------------+----------------+
这时要重复读取的话,重置到标记位置 reset
buffer.resetReaderIndex();
log(buffer);
这时结果结果如下:
read index:4 write index:12 capacity:16+-------------------------------------------------+|  0  1  2  3  4  5  6  7  8  9  a  b  c  d  e  f |
+--------+-------------------------------------------------+----------------+
|00000000| 00 00 00 05 00 00 00 06                         |........        |
+--------+-------------------------------------------------+----------------+
还有种办法是采用 get 开头的一系列方法,这些方法不会改变 read index。
3.5.8.retain & release
(1)由于 Netty 中有堆外内存的 ByteBuf 实现,堆外内存最好是手动来释放,而不是等 GC 垃圾回收。
- UnpooledHeapByteBuf 使用的是 JVM 内存,只需等 GC 回收内存即可
- UnpooledDirectByteBuf 使用的就是直接内存了,需要特殊的方法来回收内存
- PooledByteBuf 和它的子类使用了池化机制,需要更复杂的规则来回收内存
回收内存的源码实现,请关注下面方法的不同实现
protected abstract void deallocate()
(2)Netty 这里采用了引用计数法来控制回收内存,每个 ByteBuf 都实现了 ReferenceCounted 接口。
- 每个 ByteBuf 对象的初始计数为 1
- 调用 release 方法计数减 1,如果计数为 0,ByteBuf 内存被回收
- 调用 retain 方法计数加 1,表示调用者没用完之前,其它 handler 即使调用了 release 也不会造成回收
- 当计数为 0 时,底层内存会被回收,这时即使 ByteBuf 对象还在,其各个方法均无法正常使用
谁来负责 release 呢?不是我们想象的(一般情况下)
ByteBuf buf = ...
try {...
} finally {buf.release();
}
请思考,因为 pipeline 的存在,一般需要将 ByteBuf 传递给下一个 ChannelHandler,如果在 finally 中 release 了,就失去了传递性(当然,如果在这个 ChannelHandler 内这个 ByteBuf 已完成了它的使命,那么便无须再传递)。
(3)基本规则是,谁是最后使用者,谁负责 release,详细分析如下:
- 起点,对于 NIO 实现来讲,在 io.netty.channel.nio.AbstractNioByteChannel.NioByteUnsafe#read 方法中首次创建 ByteBuf 放入 pipeline(line 163 pipeline.fireChannelRead(byteBuf))
- 入站 ByteBuf 处理原则
- 对原始 ByteBuf 不做处理,调用 ctx.fireChannelRead(msg) 向后传递,这时无须 release;
- 将原始 ByteBuf 转换为其它类型的 Java 对象,这时 ByteBuf 就没用了,必须 release;
- 如果不调用 ctx.fireChannelRead(msg) 向后传递,那么也必须 release;
- 注意各种异常,如果 ByteBuf 没有成功传递到下一个 ChannelHandler,必须 release;
- 假设消息一直向后传,那么 TailContext 会负责释放未处理消息(原始的 ByteBuf);
- 出站 ByteBuf 处理原则
- 出站消息最终都会转为 ByteBuf 输出,一直向前传,由 HeadContext flush 后 release;
- 异常处理原则
- 有时候不清楚 ByteBuf 被引用了多少次,但又必须彻底释放,可以循环调用 release 直到返回 true;
TailContext 释放未处理消息逻辑
// io.netty.channel.DefaultChannelPipeline#onUnhandledInboundMessage(java.lang.Object)
protected void onUnhandledInboundMessage(Object msg) {try {logger.debug("Discarded inbound message {} that reached at the tail of the pipeline. " +"Please check your pipeline configuration.", msg);} finally {ReferenceCountUtil.release(msg);}
}
具体代码
// io.netty.util.ReferenceCountUtil#release(java.lang.Object)
public static boolean release(Object msg) {if (msg instanceof ReferenceCounted) {return ((ReferenceCounted) msg).release();}return false;
}
3.5.9.slice
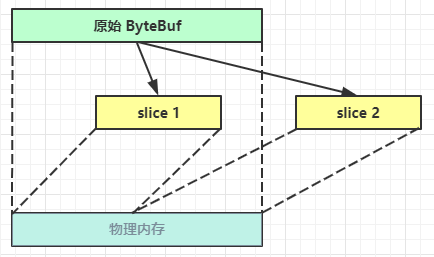
(1)slice() 是 Netty 对数据的【零拷贝】的体现之一,即对原始 ByteBuf 进行切片成多个 ByteBuf,切片后的 ByteBuf 并没有发生内存复制,还是使用原始 ByteBuf 的内存,切片后的 ByteBuf 维护独立的 read,write 指针。
(2)案例如下:
package cn.itcast.netty.c4;import io.netty.buffer.ByteBuf;
import io.netty.buffer.ByteBufAllocator;import static cn.itcast.netty.c4.TestByteBuf.log;public class TestSlice {public static void main(String[] args) {ByteBuf buf = ByteBufAllocator.DEFAULT.buffer(10);buf.writeBytes(new byte[]{'a', 'b', 'c', 'd', 'e', 'f', 'g', 'h', 'i', 'j'});log(buf);//对原来的 bytebuf 进行切片,在切片过程中并没有发生数据复制ByteBuf buf1 = buf.slice(0, 5);ByteBuf buf2 = buf.slice(5, 5);log(buf1);log(buf2);//修改新生成的 bytebufbuf1.setByte(0, 'z');buf2.setByte(0, 'z');log(buf);log(buf1);log(buf2);//不能向新生成的 bytebuf 中添加数据,否则会出现 IndexOutOfBoundsException//buf1.writeByte('x');/*释放原来的 bytebuf 内存会影响到之前生成的 bytebuf,如果想要其不受到影响,可以在释放原来的 bytebuf 之前让 buf1 调用 retain()*/System.out.println("释放原来的 bytebuf 内存...");buf1.retain();buf.release();//如果没有 buf1.retain(),那么会出现 IllegalReferenceCountExceptionlog(buf1);}
}
结果如下:
read index:0 write index:10 capacity:10+-------------------------------------------------+|  0  1  2  3  4  5  6  7  8  9  a  b  c  d  e  f |
+--------+-------------------------------------------------+----------------+
|00000000| 61 62 63 64 65 66 67 68 69 6a                   |abcdefghij      |
+--------+-------------------------------------------------+----------------+
read index:0 write index:5 capacity:5+-------------------------------------------------+|  0  1  2  3  4  5  6  7  8  9  a  b  c  d  e  f |
+--------+-------------------------------------------------+----------------+
|00000000| 61 62 63 64 65                                  |abcde           |
+--------+-------------------------------------------------+----------------+
read index:0 write index:5 capacity:5+-------------------------------------------------+|  0  1  2  3  4  5  6  7  8  9  a  b  c  d  e  f |
+--------+-------------------------------------------------+----------------+
|00000000| 66 67 68 69 6a                                  |fghij           |
+--------+-------------------------------------------------+----------------+
read index:0 write index:10 capacity:10+-------------------------------------------------+|  0  1  2  3  4  5  6  7  8  9  a  b  c  d  e  f |
+--------+-------------------------------------------------+----------------+
|00000000| 7a 62 63 64 65 7a 67 68 69 6a                   |zbcdezghij      |
+--------+-------------------------------------------------+----------------+
read index:0 write index:5 capacity:5+-------------------------------------------------+|  0  1  2  3  4  5  6  7  8  9  a  b  c  d  e  f |
+--------+-------------------------------------------------+----------------+
|00000000| 7a 62 63 64 65                                  |zbcde           |
+--------+-------------------------------------------------+----------------+
read index:0 write index:5 capacity:5+-------------------------------------------------+|  0  1  2  3  4  5  6  7  8  9  a  b  c  d  e  f |
+--------+-------------------------------------------------+----------------+
|00000000| 7a 67 68 69 6a                                  |zghij           |
+--------+-------------------------------------------------+----------------+
释放原来的 bytebuf 内存
read index:0 write index:5 capacity:5+-------------------------------------------------+|  0  1  2  3  4  5  6  7  8  9  a  b  c  d  e  f |
+--------+-------------------------------------------------+----------------+
|00000000| 7a 62 63 64 65                                  |zbcde           |
+--------+-------------------------------------------------+----------------+Process finished with exit code 0
3.5.10.duplicate & copy
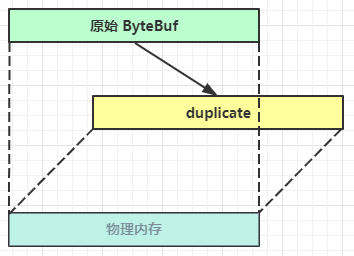
(1)duplicate 是【零拷贝】的体现之一,就好比截取了原始 ByteBuf 所有内容,并且没有 max capacity 的限制,也是与原始 ByteBuf 使用同一块底层内存,只是读写指针是独立的。
(2)copy 会将底层内存数据进行深拷贝,因此无论读写,都与原始 ByteBuf 无关。
3.5.11.CompositeByteBuf
(1)CompositeByteBuf 是【零拷贝】的体现之一,可以将多个 ByteBuf 合并为一个逻辑上的 ByteBuf,避免拷贝。
(2)案例演示如下:
package cn.itcast.netty.c4;import io.netty.buffer.ByteBuf;
import io.netty.buffer.ByteBufAllocator;
import io.netty.buffer.CompositeByteBuf;import static cn.itcast.netty.c4.TestByteBuf.log;public class TestCompositeByteBuf {public static void main(String[] args) {ByteBuf buf1 = ByteBufAllocator.DEFAULT.buffer();buf1.writeBytes(new byte[]{1, 2, 3, 4, 5});ByteBuf buf2 = ByteBufAllocator.DEFAULT.buffer();buf2.writeBytes(new byte[]{6, 7, 8, 9, 10});//将 buf1 和 buf2 合并为一个逻辑上的 ByteBuf//方法1:新生成一个 bytebuf,其中的数据来自于 buf1 和 buf2,但进行了数据的内存复制操作ByteBuf newBuf1 = ByteBufAllocator.DEFAULT.buffer();newBuf1.writeBytes(buf1).writeBytes(buf2);log(newBuf1);//方法2:使用 CompositeByteBufCompositeByteBuf newBuf2 = ByteBufAllocator.DEFAULT.compositeBuffer();//第一个参数表示是否自动调整读写指针位置newBuf2.addComponents(true, buf1, buf2);log((newBuf2));}
}
输出结果如下:
read index:0 write index:10 capacity:256+-------------------------------------------------+|  0  1  2  3  4  5  6  7  8  9  a  b  c  d  e  f |
+--------+-------------------------------------------------+----------------+
|00000000| 01 02 03 04 05 06 07 08 09 0a                   |..........      |
+--------+-------------------------------------------------+----------------+
read index:0 write index:0 capacity:0Process finished with exit code 0
(3)CompositeByteBuf 是一个组合的 ByteBuf,它内部维护了一个 Component 数组,每个 Component 管理一个 ByteBuf,记录了这个 ByteBuf 相对于整体偏移量等信息,代表着整体中某一段的数据。
- 优点:对外是一个虚拟视图,组合这些 ByteBuf 不会产生内存复制。
- 缺点:复杂了很多,多次操作会带来性能的损耗。
3.5.12.Unpooled
(1)Unpooled 是一个工具类,类如其名,提供了非池化的 ByteBuf 创建、组合、复制等操作。
(2)这里仅介绍其跟【零拷贝】相关的 wrappedBuffer 方法,可以用来包装 ByteBuf。
ByteBuf buf1 = ByteBufAllocator.DEFAULT.buffer(5);
buf1.writeBytes(new byte[]{1, 2, 3, 4, 5});
ByteBuf buf2 = ByteBufAllocator.DEFAULT.buffer(5);
buf2.writeBytes(new byte[]{6, 7, 8, 9, 10});// 当包装 ByteBuf 个数超过一个时, 底层使用了 CompositeByteBuf
ByteBuf buf3 = Unpooled.wrappedBuffer(buf1, buf2);
System.out.println(ByteBufUtil.prettyHexDump(buf3));
输出如下:
         +-------------------------------------------------+|  0  1  2  3  4  5  6  7  8  9  a  b  c  d  e  f |
+--------+-------------------------------------------------+----------------+
|00000000| 01 02 03 04 05 06 07 08 09 0a                   |..........      |
+--------+-------------------------------------------------+----------------+
也可以用来包装普通字节数组,底层也不会有拷贝操作:
ByteBuf buf4 = Unpooled.wrappedBuffer(new byte[]{1, 2, 3}, new byte[]{4, 5, 6});
System.out.println(buf4.getClass());
System.out.println(ByteBufUtil.prettyHexDump(buf4));
输出如下:
class io.netty.buffer.CompositeByteBuf+-------------------------------------------------+|  0  1  2  3  4  5  6  7  8  9  a  b  c  d  e  f |
+--------+-------------------------------------------------+----------------+
|00000000| 01 02 03 04 05 06                               |......          |
+--------+-------------------------------------------------+----------------+
3.5.13.ByteBuf 优势
- 池化 - 可以重用池中 ByteBuf 实例,更节约内存,减少内存溢出的可能;
- 读写指针分离,不需要像 ByteBuffer 一样切换读写模式;
- 可以自动扩容;
- 支持链式调用,使用更流畅;
- 很多地方体现零拷贝,例如 slice、duplicate、CompositeByteBuf;
4. 双向通信
4.1 练习
(1)实现一个 echo server。
(2)服务器端代码
package cn.itcast.netty.c4;import io.netty.bootstrap.ServerBootstrap;
import io.netty.buffer.ByteBuf;
import io.netty.channel.ChannelHandlerContext;
import io.netty.channel.ChannelInboundHandlerAdapter;
import io.netty.channel.ChannelInitializer;
import io.netty.channel.nio.NioEventLoopGroup;
import io.netty.channel.socket.nio.NioServerSocketChannel;
import io.netty.channel.socket.nio.NioSocketChannel;import java.nio.charset.Charset;public class TestEchoServer {public static void main(String[] args) {new ServerBootstrap().group(new NioEventLoopGroup()).channel(NioServerSocketChannel.class).childHandler(new ChannelInitializer() {@Overrideprotected void initChannel(NioSocketChannel ch) {ch.pipeline().addLast(new ChannelInboundHandlerAdapter(){@Overridepublic void channelRead(ChannelHandlerContext ctx, Object msg) {ByteBuf buffer = (ByteBuf) msg;System.out.println(buffer.toString(Charset.defaultCharset()));// 建议使用 ctx.alloc() 创建 ByteBufByteBuf response = ctx.alloc().buffer();response.writeBytes(buffer);ctx.writeAndFlush(response);// 思考:需要释放 buffer 吗// 思考:需要释放 response 吗}});}}).bind(8080);}
}
(3)客户端端代码
package cn.itcast.netty.c4;import io.netty.bootstrap.Bootstrap;
import io.netty.buffer.ByteBuf;
import io.netty.channel.Channel;
import io.netty.channel.ChannelHandlerContext;
import io.netty.channel.ChannelInboundHandlerAdapter;
import io.netty.channel.ChannelInitializer;
import io.netty.channel.nio.NioEventLoopGroup;
import io.netty.channel.socket.nio.NioSocketChannel;
import io.netty.handler.codec.string.StringEncoder;import java.nio.charset.Charset;
import java.util.Scanner;public class TestEchoClient {public static void main(String[] args) throws InterruptedException {NioEventLoopGroup group = new NioEventLoopGroup();Channel channel = new Bootstrap().group(group).channel(NioSocketChannel.class).handler(new ChannelInitializer() {@Overrideprotected void initChannel(NioSocketChannel ch) throws Exception {ch.pipeline().addLast(new StringEncoder());ch.pipeline().addLast(new ChannelInboundHandlerAdapter() {@Overridepublic void channelRead(ChannelHandlerContext ctx, Object msg) {ByteBuf buffer = (ByteBuf) msg;System.out.println(buffer.toString(Charset.defaultCharset()));// 思考:需要释放 buffer 吗}});}}).connect("127.0.0.1", 8080).sync().channel();channel.closeFuture().addListener(future -> {group.shutdownGracefully();});new Thread(() -> {Scanner scanner = new Scanner(System.in);while (true) {String line = scanner.nextLine();if ("q".equals(line)) {channel.close();break;}channel.writeAndFlush(line);}}).start();}
}
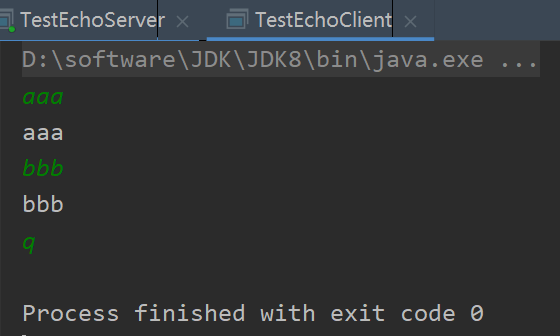
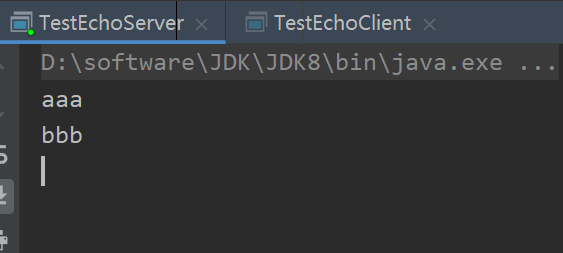
测试如下:
4.2.读和写的误解
大家可能有这样的误区,认为只有在 netty,nio 这样的多路复用 IO 模型时,读写才不会相互阻塞,才可以实现高效的双向通信,但实际上,Java Socket 是全双工的:在任意时刻,线路上存在A 到 B 和 B 到 A 的双向信号传输。即使是阻塞 IO,读和写是可以同时进行的,只要分别采用读线程和写线程即可,读不会阻塞写、写也不会阻塞读。
上一篇:zabbix监控Nginx