

ShareSDK for Unity
本文档使用Unity2019进行演示
下载unitypackage
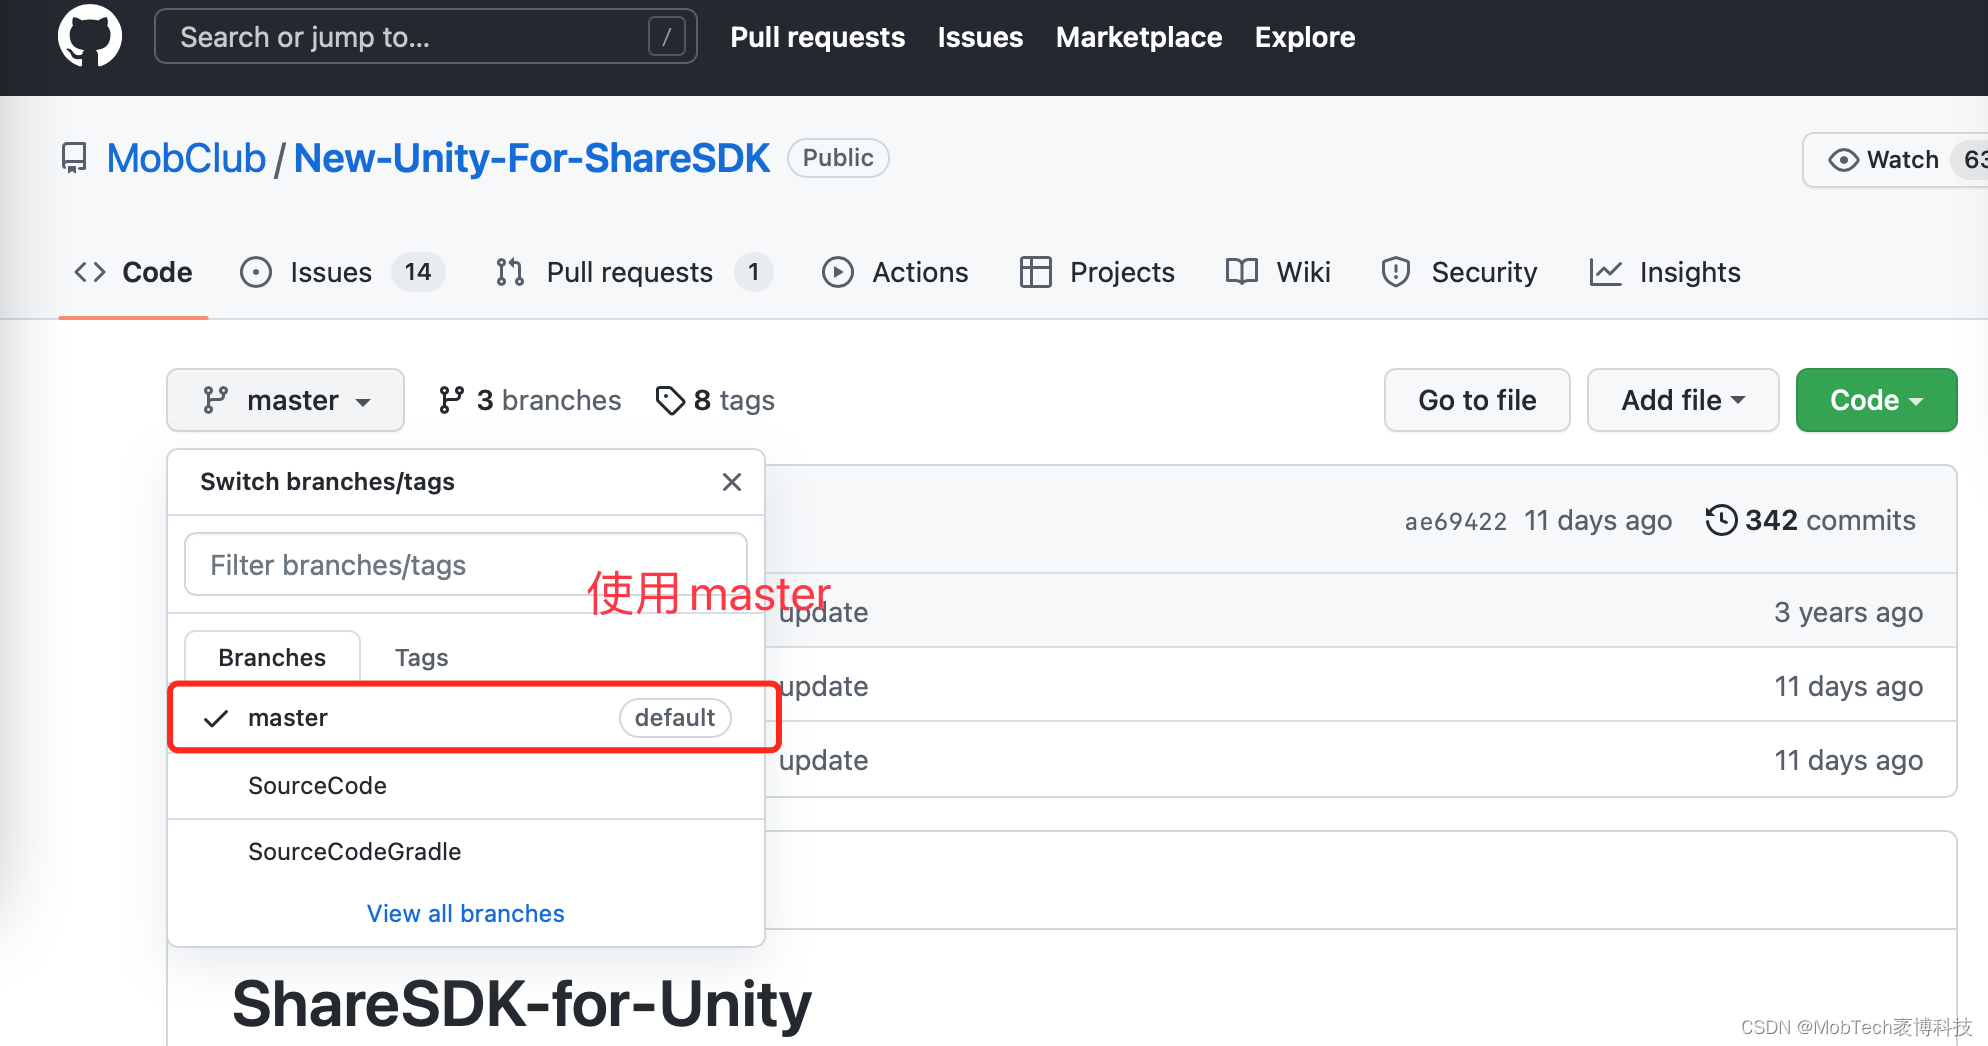
从Mob的github地址下载ShareSDK.unitypackage:Git地址,如下图所示
)![image.png]//download.sdk.mob.com/2022/06/22/15/165588252810937.61.png)
下载完成后得到一个.unitypackage结尾的文件,如下图:
导入unitypackage
双击导入到unity项目中并勾选,如下图:

Demo.cs是demo的示例页面,可通用
Android (只需要勾选SSDKU3D.jar)
demokey.keystore:demo的打包签名文件
SSDKU3D.jar:java桥接层文件
iOS (全部勾选)
MOBTool:自动打包工具
ShareSDK:SDK必要的文件
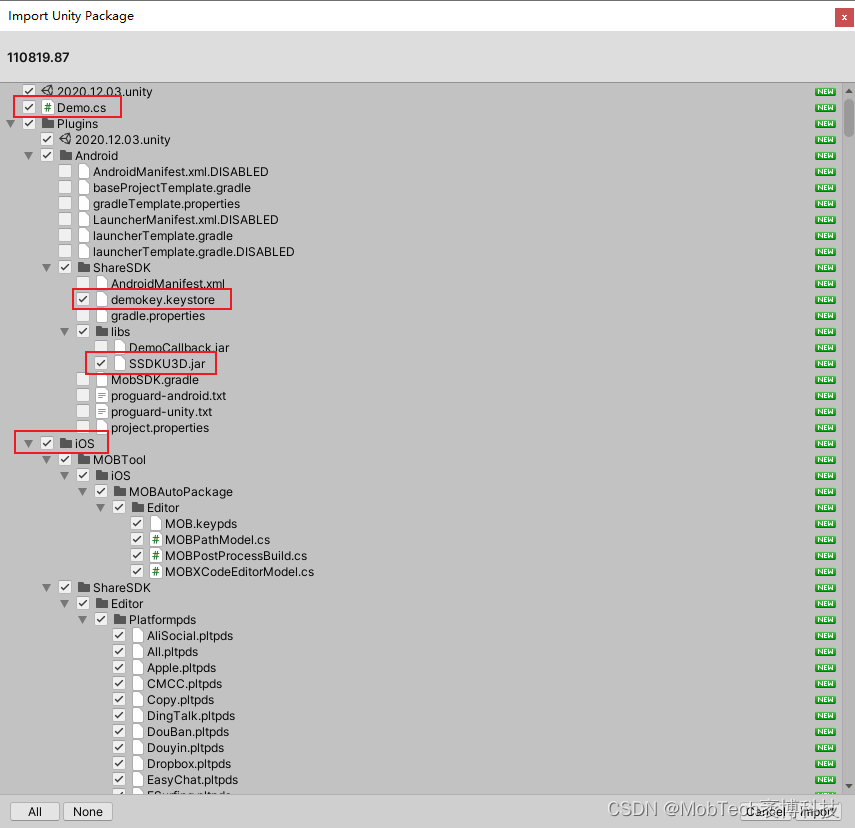
按图选好之后,点击import导入
挂载ShareSDK.cs脚本文件
在unity界面左侧选择要使用的场景(例如Main Camera),点击Add Component 按钮添加ShareSDK.cs(ShareSDK核心文件),或者直接拖进去。如果要测试效果,也可以添加Demo.cs(ShareSDK示例UI),如下图所示:
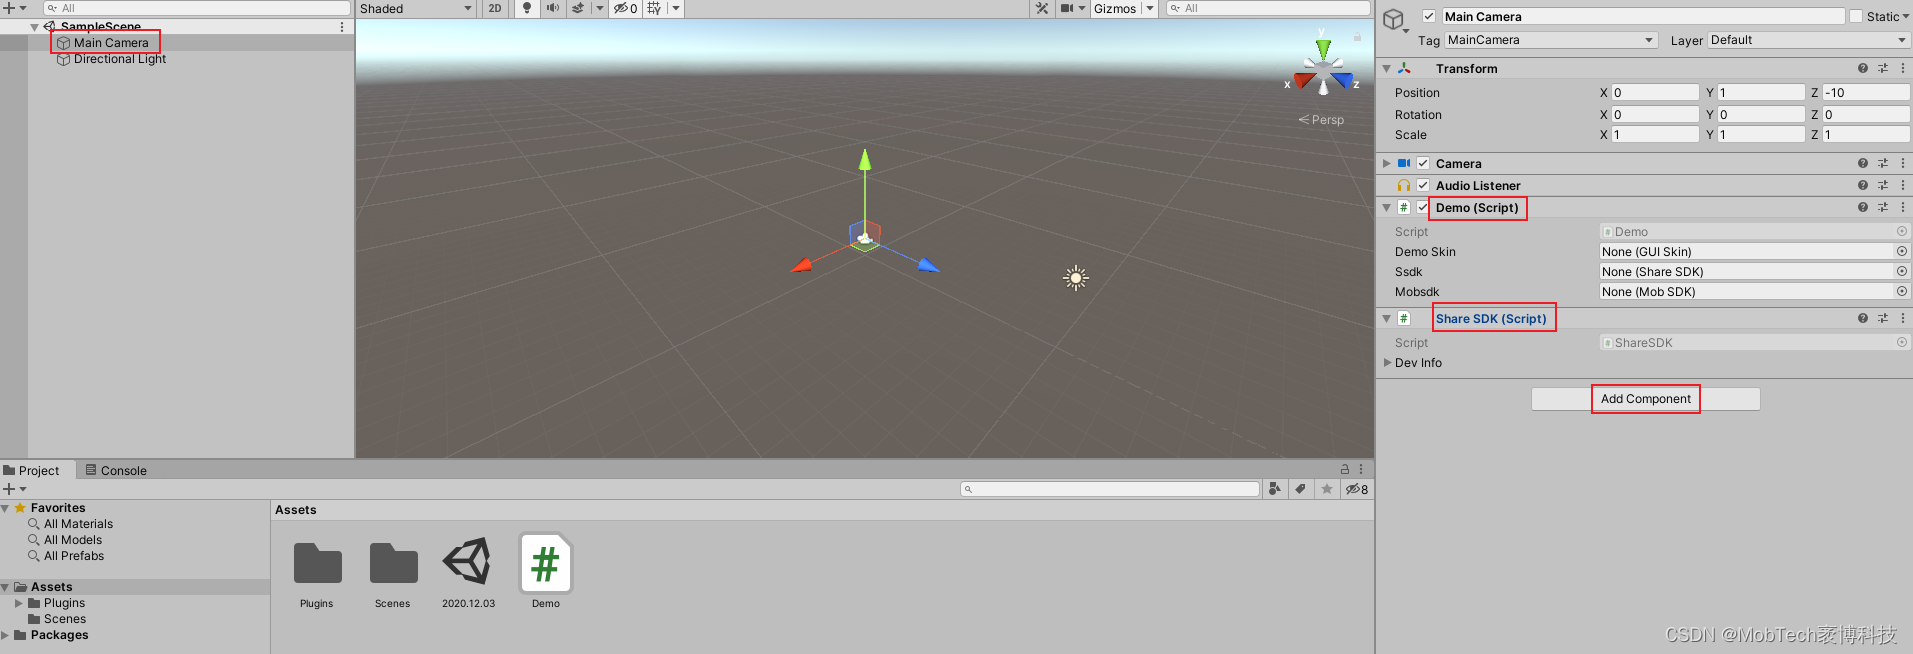
挂接后会发现提供了当前支持的平台和及其配置信息,需要注意的是当前的编译环境是Android还是iOS,其字段名称是不同的哦!
修改编译环境
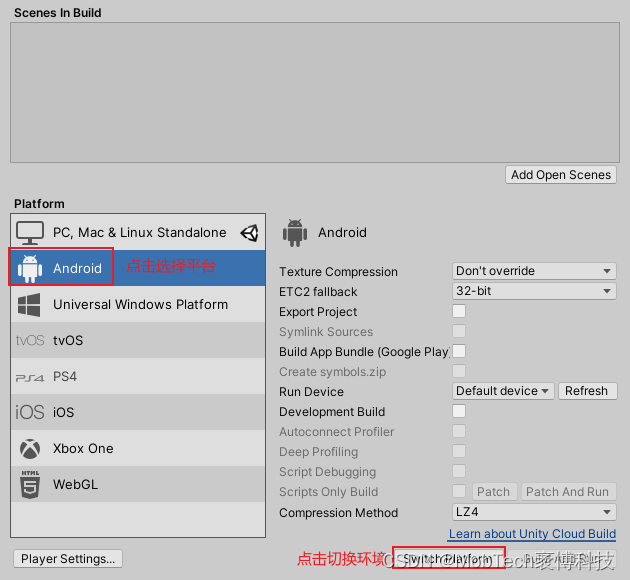
Platform设置,在unity中选择菜单栏-File-Build Settings,会打开Build Settings操作框,根据自己所编译的环境选择,如果是iOS的请选择iOS环境,如果是Android请选择Android环境,然后点击Switch Platform切换环境,如下图:
Android端集成编译配置
资源修改
1.把demokey.keystore和SSDKU3D.jar文件移动到上层目录下,也就从ShareSDK文件夹移动到Android文件夹;
2.删掉ShareSDK文件夹;
3.删掉Android目录下的baseProjectTemplate.gradle、launcherTemplate.gradle等文件;
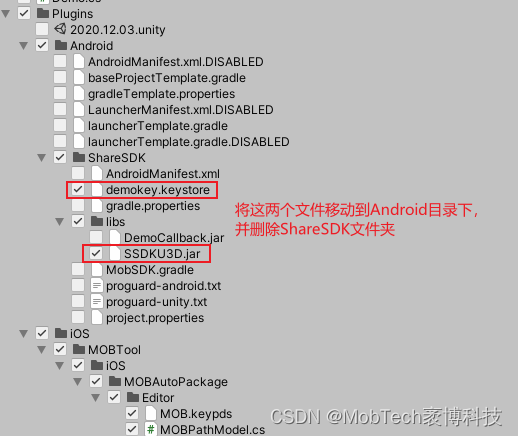
最终Android目录下文件内容为下图:
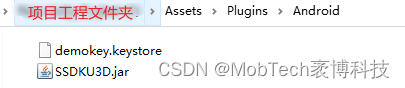
修改Unity设置
生成Gradle文件
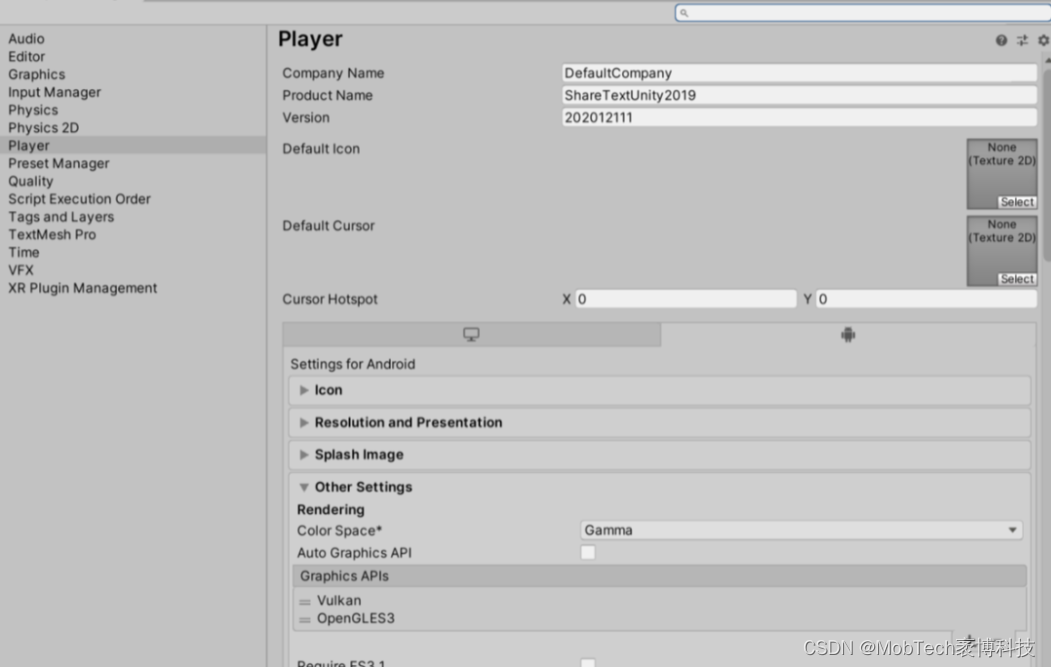
保持Build Settings操作框中左侧Platform列表中Android项的选中状态,点击Player Settings,会打开Project Settings操作框,如下图:
左侧切换到Player标签,然后在右侧选择Publishing Settings卡片,勾选Custom Launcher Gradle Template和Custom Base Gradle Template选项,如下图:
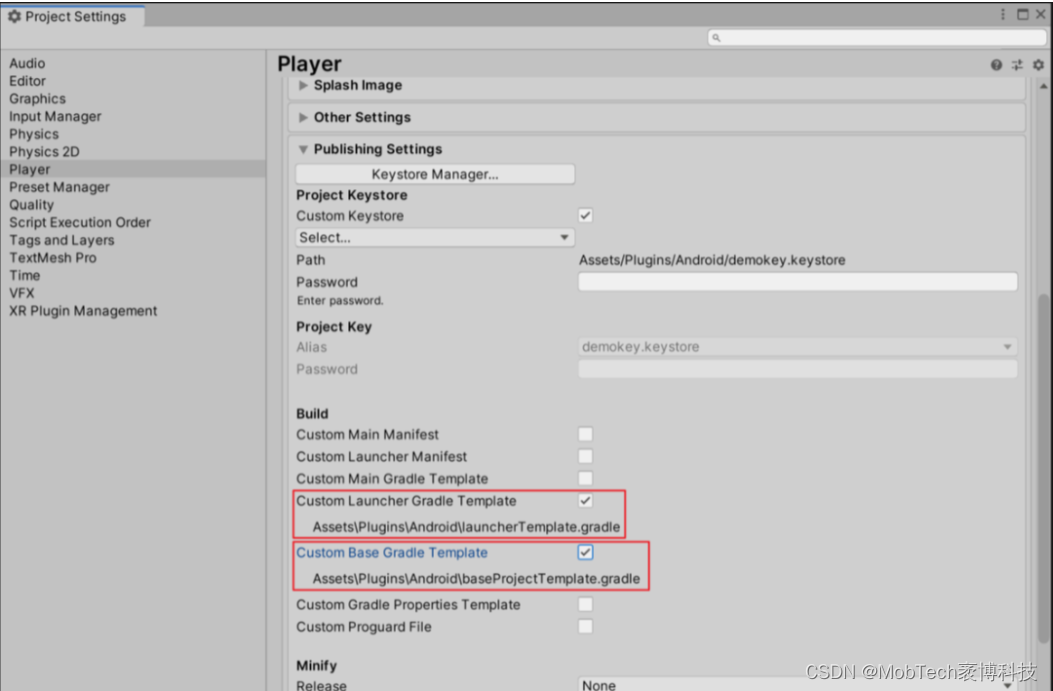
该操作会在"工程\Assets\Plugins\Android目录下"生成baseProjectTemplate.gradle、launcherTemplate.gradle文件。
修改gradle文件
修改baseProjectTemplate.gradle文件
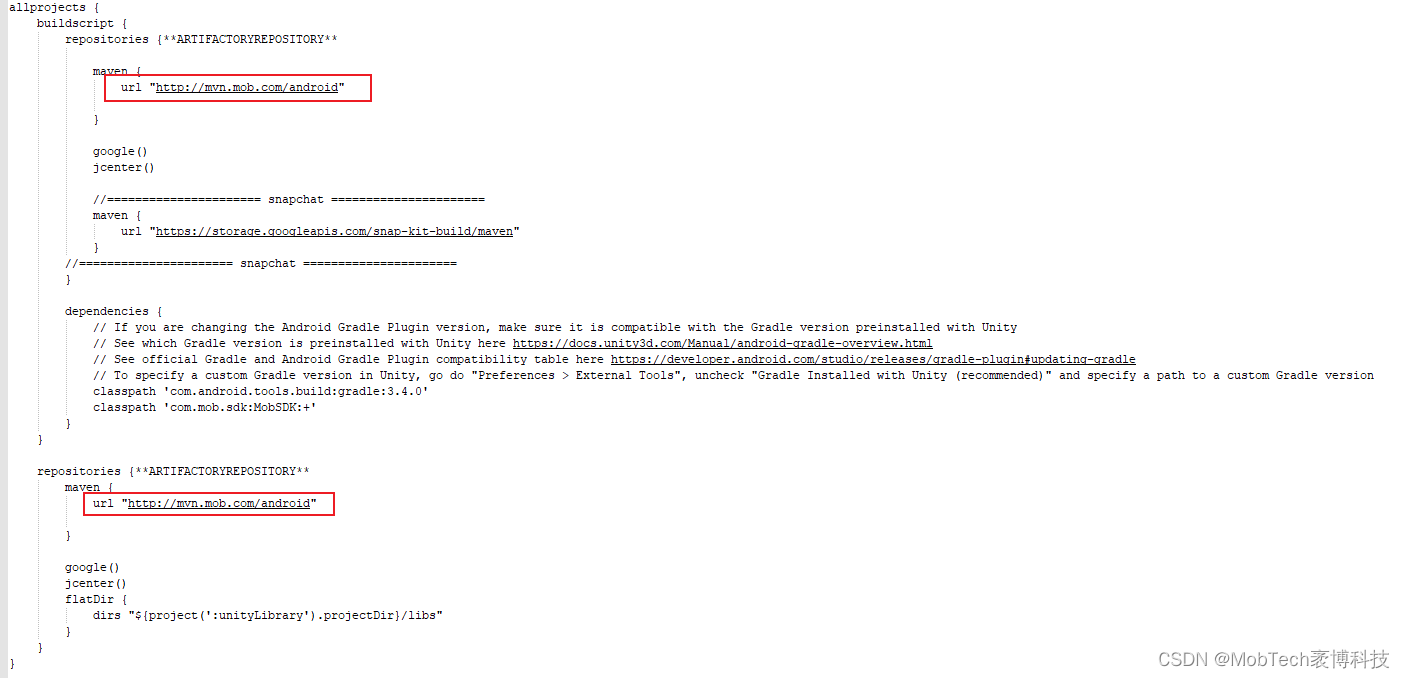
打开baseProjectTemplate.gradle文件后有两处需要操作:
1.在classpath 'com.android.tools.build:gradle'后添加mob的classpath
classpath "com.mob.sdk:MobSDK:2018.0319.1724"2.添加mob自己的maven仓库
maven { url "https://mvn.mob.com/android/"}最终baseProjectTemplate.gradle文件的参考结果为:
修改launcherTemplate.gradle文件
打开launcherTemplate.gradle,在文件的最下方加入以下代码:
apply plugin: 'com.mob.sdk'MobSDK {appKey "moba0b0c0d0"appSecret "5713f0d88511f9f4cf100cade0610a34"spEdition "fp"ShareSDK {devInfo {Wechat {appId "wx4868b35061f87885"appSecret "64020361b8ec4c99936c0e3999a9f249"withShareTicket truebypassApproval falseenable true}}}
}
这里的配置和Android原生配置无异,可参考Mob官方链接
配置签名文件
1.菜单打开Build Settings,左侧Platform列表选中Android,点击Player Settings,在打开的Project Settings操作框中,左侧选择Player标签,右侧选择Publishing Settings卡片;
2.勾选Project Keystore下的Custom Key store;
3.点击Project Keystore下的Select选择一个keystore文件;
4.填写Project Keystore下的Password;
5.如Project Keystore下的Password填写正确,则Project Key下的Alias下拉框亮起,选择自己的别名;
6.填写Project Key下的Password;
iOS端编译配置
默认所有平台都已经初始化,客户需要做的操作:
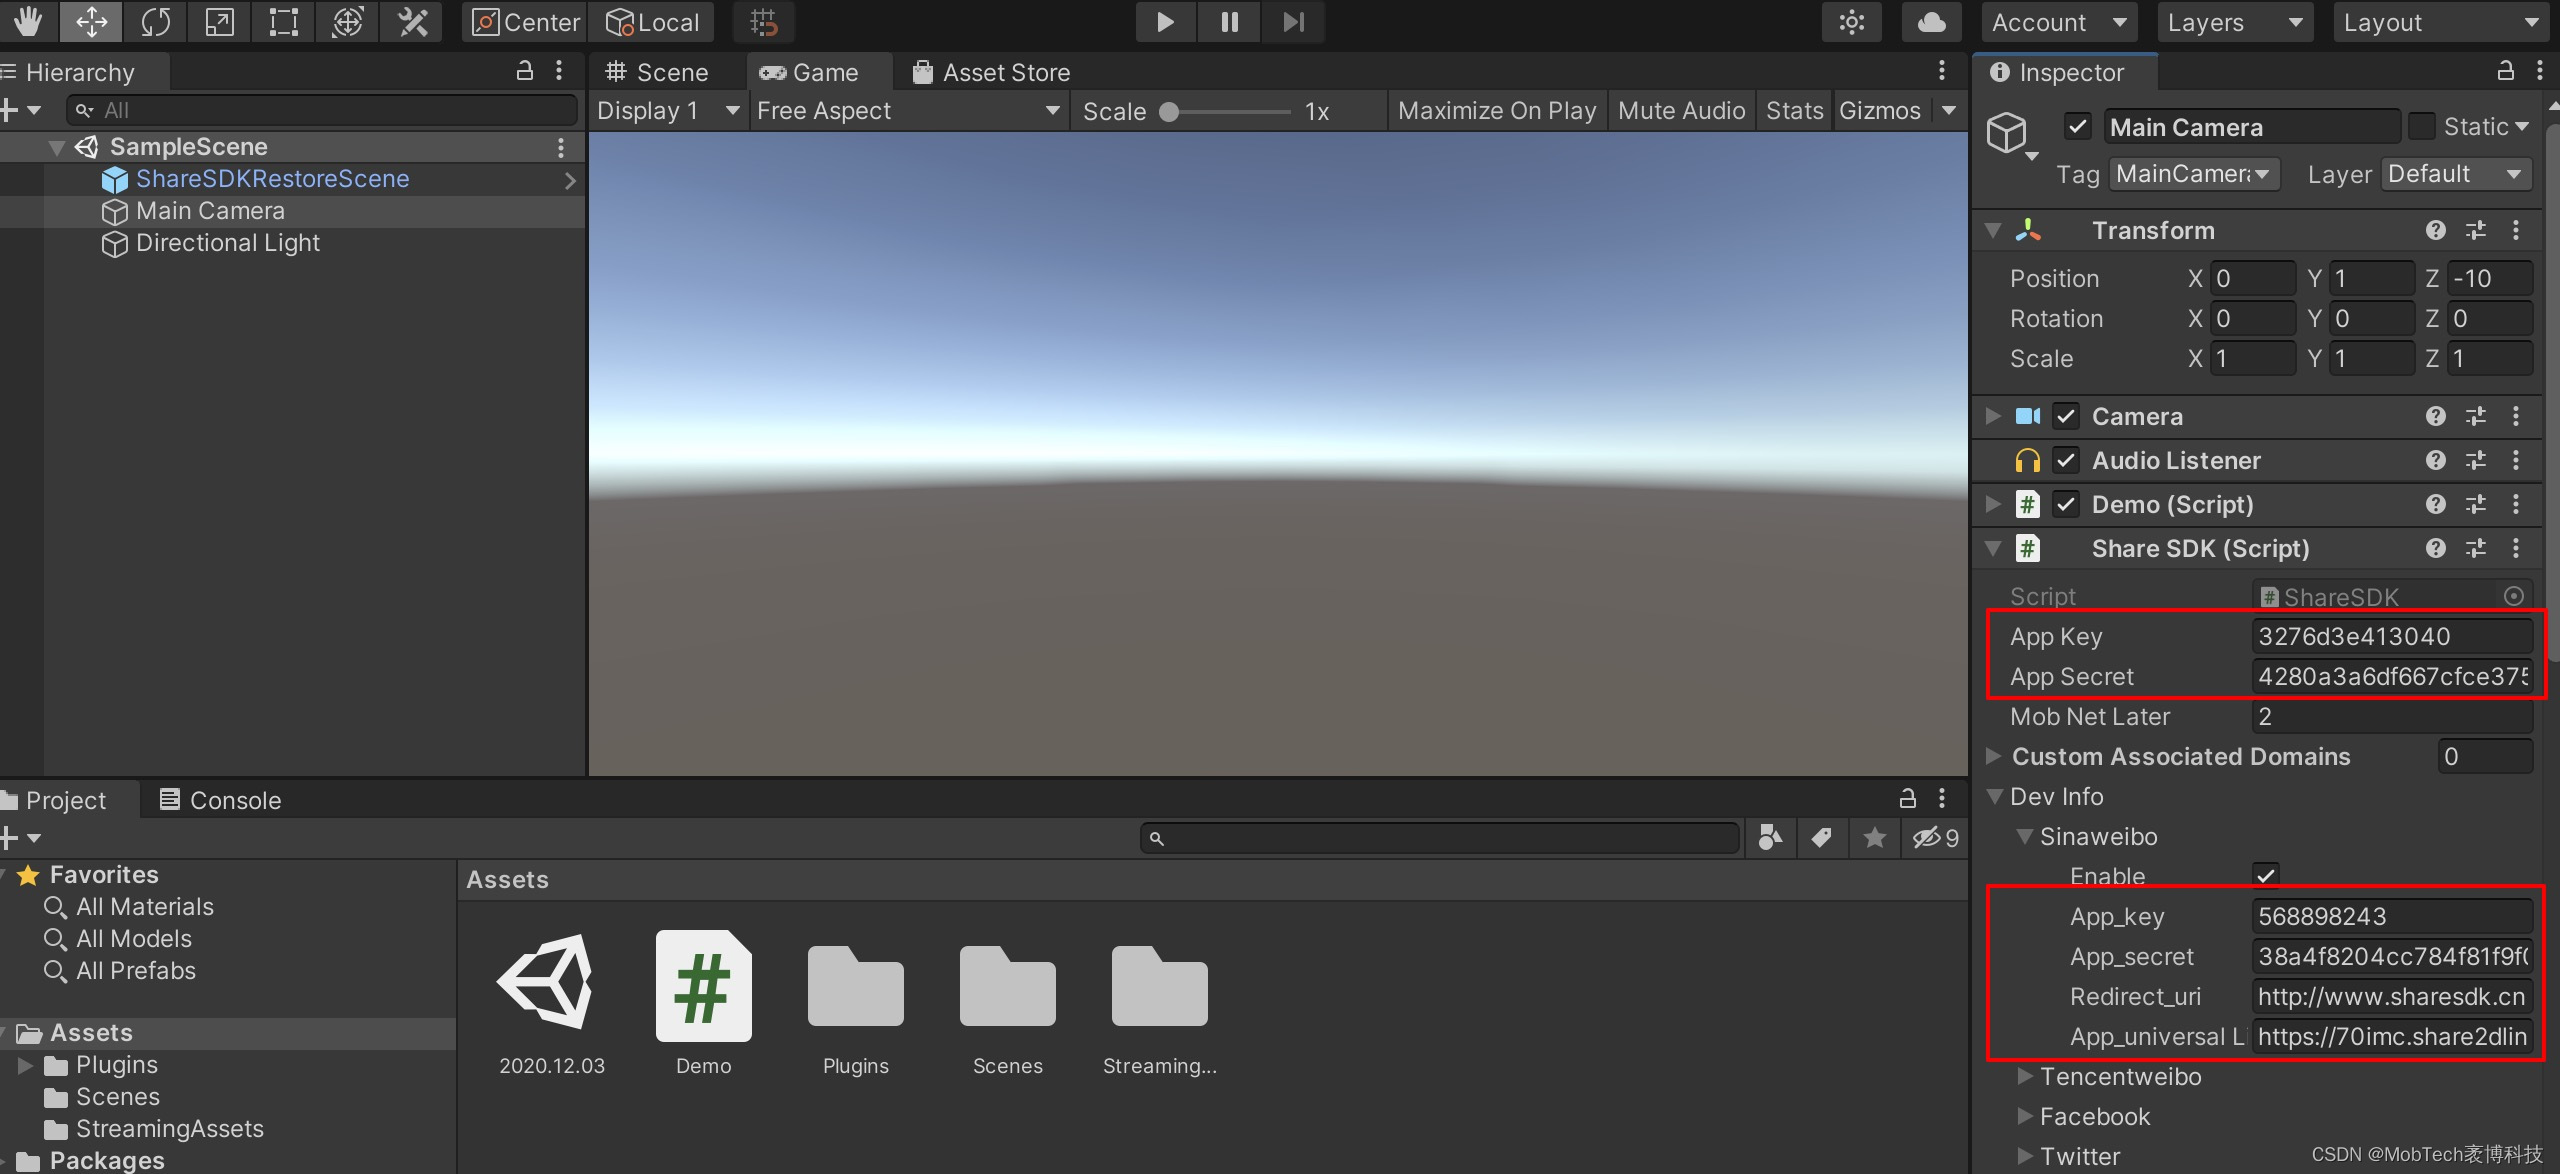
修改初始化我们SDK的AppKey和AppSecret
配置您自己的ShareSDK的AppKey和AppSecret (获取可以点击查看注册流程)
public class ShareSDK : MonoBehaviour {private int reqID;#elif UNITY_IPHONEpublic string appKey = "3276d3e413040";public string appSecret = "4280a3a6df667cfce37528dec03fd9c3";public string mobNetLater = "2";public List<string> customAssociatedDomains = new List<string>();#endif''' '''}修改第三方社交平台初始化信息配置
可以找到ShareSDKDevInfo.cs文件,进行修改。配置所需的平台信息
选择所需要的平台,不想要的可以直接注释或删掉
public class DevInfoSet{public SinaWeiboDevInfo sinaweibo;public WeChat wechat;public QQ qq;public QZone qzone;}配置对应平台的信息(直接修改字符串值即可),例如微信平台修改
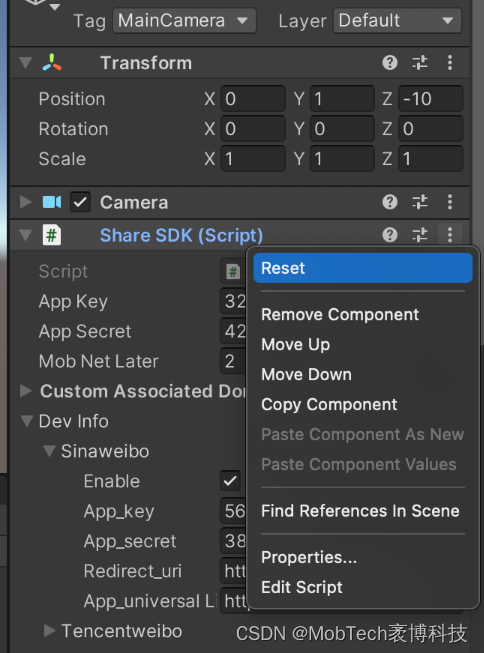
public class WeChat : DevInfo {#if UNITY_ANDROIDpublic string SortId = "5";public const int type = (int) PlatformType.WeChat;public string AppId = "wx4868b35061f87885";public string AppSecret = "64020361b8ec4c99936c0e3999a9f249";public string UserName = "gh_afb25ac019c9@app";public string Path = "/page/API/pages/share/share";public bool BypassApproval = false;public bool WithShareTicket = true;public string MiniprogramType = "0";#elif UNITY_IPHONEpublic const int type = (int) PlatformType.WeChat;public string app_id = "wx617c77c82218ea2c";public string app_secret = "c7253e5289986cf4c4c74d1ccc185fb1";public string app_universalLink = "https://70imc.share2dlink.com/";#endif}[Serializable]public class WeChatMoments : DevInfo {#if UNITY_ANDROIDpublic string SortId = "6";public const int type = (int) PlatformType.WeChatMoments;public string AppId = "wx4868b35061f87885";public string AppSecret = "64020361b8ec4c99936c0e3999a9f249";public bool BypassApproval = true;#elif UNITY_IPHONEpublic const int type = (int) PlatformType.WeChatMoments;public string app_id = "wx617c77c82218ea2c";public string app_secret = "c7253e5289986cf4c4c74d1ccc185fb1";public string app_universalLink = "https://70imc.share2dlink.com/";#endif}[Serializable]public class WeChatFavorites : DevInfo {#if UNITY_ANDROIDpublic string SortId = "7";public const int type = (int) PlatformType.WeChatFavorites;public string AppId = "wx4868b35061f87885";public string AppSecret = "64020361b8ec4c99936c0e3999a9f249";#elif UNITY_IPHONEpublic const int type = (int) PlatformType.WeChatFavorites;public string app_id = "wx617c77c82218ea2c";public string app_secret = "c7253e5289986cf4c4c74d1ccc185fb1";public string app_universalLink = "https://70imc.share2dlink.com/";#endif}public class WechatSeries : DevInfo {#if UNITY_ANDROID//for android,please set the configuraion in class "Wechat" ,class "WechatMoments" or class "WechatFavorite"//对于安卓端,请在类Wechat,WechatMoments或WechatFavorite中配置相关信息↑#elif UNITY_IPHONEpublic const int type = (int) PlatformType.WechatPlatform;public string app_id = "wx617c77c82218ea2c";public string app_secret = "c7253e5289986cf4c4c74d1ccc185fb1";public string app_universalLink = "https://70imc.share2dlink.com/";#endif}确定文件里修改了AppKey等信息之后,要去挂载脚本那边同步看下AppKey是否修改,可以点击Reset,刷新,同步下修改后的信息,也可以自己直接在挂载脚本里面改,最后要确定脚本文件里和挂载脚本里都已经改为了自己的信息
接口调用
回传用户隐私授权结果(submitPolicyGrantResult)
调用示例
传入的第一个参数为Boolean类型的,true 代表同意授权、false代表不同意授权
mobsdk.submitPolicyGrantResult(true);注意:该接口必须接入,否则可能造成无法使用MobTech各SDK提供的相关服务。
分享(ShowPlatformList)
首先引入命名空间:
using cn.sharesdk.unity3d;
public ShareSDK ssdk;
构造分享信息
ShareContent content = new ShareContent();content.SetText("this is a test string.");content.SetImageUrl("https://f1.webshare.mob.com/code/demo/img/1.jpg");content.SetTitle("test title");content.SetTitleUrl("http://www.mob.com");content.SetSite("Mob-ShareSDK");content.SetSiteUrl("http://www.mob.com");content.SetUrl("http://www.mob.com");content.SetComment("test description");content.SetMusicUrl("http://mp3.mwap8.com/destdir/Music/2009/20090601/ZuiXuanMinZuFeng20090601119.mp3");content.SetShareType(ContentType.Webpage);常用的几个传参数方法说明(不常用的方法请看Assets/Plugins/ShareSDK/ShareContent.cs脚本):
Text :分享的文字
Title: 分享的标题
TitleUrl :标题的网络链接(QQ和QQ空间使用 )
SetImageUrl :iOS平台,本地以及网络图片都使用此方法
image:android平台分享本地图片与网络图片都用此方法
Url: 分享的链接(微信,微博,易信,Facebook等平台)
ShareType:分享类型(微信,易信)
FilePath:分享文件路径 (微信,易信)
MusicUrl :分享的音乐链接(微信,QQ,易信)
设置分享回调
ssdk.shareHandler = ShareResultHandler;//以下为回调的定义:void ShareResultHandler (int reqID, ResponseState state, PlatformType type, Hashtable result){if (state == ResponseState.Success){print ("share result :");print (MiniJSON.jsonEncode(result));}else if (state == ResponseState.Fail){print ("fail! throwable stack = " + result["stack"] + "; error msg = " + result["msg"]);}else if (state == ResponseState.Cancel) {print ("cancel !");}}进行分享
//通过分享菜单分享
ssdk.ShowPlatformList (null, content, 100, 100);
//直接通过编辑界面分享
ssdk.ShowShareContentEditor (PlatformType.SinaWeibo, content);
//直接分享
ssdk.ShareContent (PlatformType.SinaWeibo, content);
授权(Authorize)
(每次都会跳转到第三方平台进行授权)
设置授权回调
ssdk.authHandler = AuthResultHandler;
//以下为回调的定义:
void AuthResultHandler(int reqID, ResponseState state, PlatformType type, Hashtable result)
{if (state == ResponseState.Success){print ("authorize success !");}else if (state == ResponseState.Fail){print ("fail! throwable stack = " + result["stack"] + "; error msg = " + result["msg"]);}else if (state == ResponseState.Cancel) {print ("cancel !");}
}
进行授权
ssdk.Authorize(PlatformType.SinaWeibo);获取用户信息(GetUserInfo)
(只会在第一次跳转到第三方平台进行授权)
指定获取用户信息的回调
sdk.showUserHandler = GetUserInfoResultHandler;
//以下为回调的定义:
void GetUserInfoResultHandler (int reqID, ResponseState state, PlatformType type, Hashtable result)
{if (state == ResponseState.Success){print ("get user info result :");print (MiniJSON.jsonEncode(result));}else if (state == ResponseState.Fail){print ("fail! throwable stack = " + result["stack"] + "; error msg = " + result["msg"]);}else if (state == ResponseState.Cancel) {print ("cancel !");}
}
获取用户信息
ssdk.GetUserInfo(PlatformType.SinaWeibo);注意:auth和getuser接口都可以实现授权登录功能,可以任意调用一个
打包使用
进行上述所有修改后,已经可以执行打包操作。
如集成过程中遇到问题,可详询MobTech技术支持,点击立即QQ咨询