

Kafka怎样完成建立和Broker之间的连接?
文章目录
- NetworkClient初始化
- 1.基于Java NIO SocketChannel封装KafkaChannel
- 2.Kafka提供的Selector是如何初始化跟Broker之间的连接的
- 2.1 初始化SocketChannel,发起连接请求
- 2.2 将发起连接请求后的SocketChannel缓存起来
- 3.万能poll()方法之前的准备工作
- 4. 通过不断轮询的poll()方法完成跟Broker之间的连接
- 4.1 挑选出做好准备的SelectionKey
- 4.2 处理SelectionKey
NetworkClient初始化
NetworkClient是一个网络通信组件,而底层最核心的建立连接、发起请求、处理网络I/O,是依靠Selector完成的。Selector是非阻塞的、基于多路复用的。
// Channel和Selector搭配使用
ChannelBuilder channelBuilder = ClientUtils.createChannelBuilder(config.values());
// 构造核心组件:网络通信NetworkClient,NetworkClient组件实现了KafkaClient接口
NetworkClient client = new NetworkClient(// connections.max.idle.ms,默认:9min。跟Broker的一个网络连接最多空闲超过多长时间,就得被回收掉// 跟Broker建立连接,它是最核心的组件(first参数:每个连接最多可以空闲几分钟)// 针对多个Broker的网络连接,基于多路复用,执行非阻塞的I/O操作new Selector(config.getLong(ProducerConfig.CONNECTIONS_MAX_IDLE_MS_CONFIG), this.metrics, time, "producer", channelBuilder),this.metadata,clientId,// max.in.flight.requests.per.connection,默认:5个// 对每个Broker,最多允许有5个request可以暂时收不到响应,放在in-flight集合中config.getInt(ProducerConfig.MAX_IN_FLIGHT_REQUESTS_PER_CONNECTION),// NetworkClient跟Broker建立网络连接如果失败了,间隔reconnect.backoff.ms(默认:50ms),就得重试config.getLong(ProducerConfig.RECONNECT_BACKOFF_MS_CONFIG),// Socket发送缓冲区的大小为:send.buffer.bytes,默认:128kconfig.getInt(ProducerConfig.SEND_BUFFER_CONFIG),// Socket接收缓冲区的大小为:receive.buffer.bytes,默认:32kconfig.getInt(ProducerConfig.RECEIVE_BUFFER_CONFIG),this.requestTimeoutMs, time);
1.基于Java NIO SocketChannel封装KafkaChannel
在构建网络通信组件NetworkClient时,会创建Selector实例。通过Kafka的Selector的构造方法可以看出,Kafka的网络通信底层就是基于Java NIO Selector实现的。
public Selector(int maxReceiveSize, long connectionMaxIdleMs, Metrics metrics, Time time, String metricGrpPrefix, Map metricTags, boolean metricsPerConnection, ChannelBuilder channelBuilder) {try {// 初始化Java NIO Selector作为Kafka Selector的基础// 这是一个多路复用组件,可以一个线程监听多个网络连接的请求、响应this.nioSelector = java.nio.channels.Selector.open();} catch (IOException e) {throw new KafkaException(e);}// 最大能接收的数据大小this.maxReceiveSize = maxReceiveSize;// 一个连接最多能空闲多长时间,超过就要被回收this.connectionsMaxIdleNanos = connectionMaxIdleMs * 1000 * 1000;this.time = time;this.metricGrpPrefix = metricGrpPrefix;this.metricTags = metricTags;// 映射关系为:“Broker ID:KafkaChannel”this.channels = new HashMap<>();// 已经成功发送出去的请求this.completedSends = new ArrayList<>();// 已经接收到的响应,而且已经被处理完了this.completedReceives = new ArrayList<>();// 每个Broker已收到、但尚未被处理的响应this.stagedReceives = new HashMap<>();this.immediatelyConnectedKeys = new HashSet<>();// 已经成功建立连接的Broker列表this.connected = new ArrayList<>();// 尚未成功建立连接的Broker列表this.disconnected = new ArrayList<>();// 发送请求失败的Broker列表this.failedSends = new ArrayList<>();this.sensors = new SelectorMetrics(metrics);this.channelBuilder = channelBuilder;// initial capacity and load factor are default, we set them explicitly because we want to set accessOrder = truethis.lruConnections = new LinkedHashMap<>(16, .75F, true);currentTimeNanos = time.nanoseconds();nextIdleCloseCheckTime = currentTimeNanos + connectionsMaxIdleNanos;this.metricsPerConnection = metricsPerConnection;
}
Kafka Selector内按照映射关系“Broker ID:KafkaChannel”存储了Broker对应的KafkaChannel,而KafkaChannel的底层实现–SocketChannel,最终会被包装到TransportLayer 中。
public class KafkaChannel {// Broker IDprivate final String id;// TransportLayer接口内部封装有Java NIO的SocketChannelprivate final TransportLayer transportLayer;private final Authenticator authenticator;private final int maxReceiveSize;// 这个Channel最近(不断地)读取到的响应private NetworkReceive receive;// 由这个Channel发送出去的请求,发送出去一个之后发另一个private Send send;
}
2.Kafka提供的Selector是如何初始化跟Broker之间的连接的
Sender线程在检查Broker是否ready时,会初始化一个新的连接。
private void initiateConnect(Node node, long now) {// 拿到Broker IDString nodeConnectionId = node.idString();try {log.debug("Initiating connection to node {} at {}:{}.", node.id(), node.host(), node.port());// 将这个Broker ID的节点连接状态,修改为:CONNECTINGthis.connectionStates.connecting(nodeConnectionId, now);// 通过Java NIO Selector建立连接:会在底层初始化一个SocketChannel发起连接请求,将其注册到Selector上。// 由Selector监听负责监听相应的事件,如果Broker返回响应说可以建立连接,Selector就会告诉你:可以通过一个API调用完成底层的网络连接selector.connect(nodeConnectionId, // Broker ID// 根据Broker的host和port,包装成Socket连接地址new InetSocketAddress(node.host(), node.port()),// Socket发送和接收缓冲区,分别为:128k和32kthis.socketSendBuffer,this.socketReceiveBuffer);} catch (IOException e) {/* attempt failed, we'll try again after the backoff */connectionStates.disconnected(nodeConnectionId, now);/* maybe the problem is our metadata, update it */metadataUpdater.requestUpdate();log.debug("Error connecting to node {} at {}:{}:", node.id(), node.host(), node.port(), e);}
}
可以看出这里是通过kafka提供的Selector组件,调用Selector#connect()方法来发起连接请求的。显而易见,KafkaChannel的底层实现就是基于SocketChannel。
2.1 初始化SocketChannel,发起连接请求
初始化出一个SocketChannel,并对它的Socket进行必要配置,然后由SocketChannel发起连接请求。
@Override
public void connect(String id, InetSocketAddress address, int sendBufferSize, int receiveBufferSize) throws IOException {if (this.channels.containsKey(id))throw new IllegalStateException("There is already a connection for id " + id);// 拿到SocketChannelSocketChannel socketChannel = SocketChannel.open();// 配置为:非阻塞socketChannel.configureBlocking(false);// 拿到SocketChannel底层的SocketSocket socket = socketChannel.socket();// 保证Socket网络连接一直存活,不能被回收socket.setKeepAlive(true);if (sendBufferSize != Selectable.USE_DEFAULT_BUFFER_SIZE)// 设置发送缓冲区,128ksocket.setSendBufferSize(sendBufferSize);if (receiveBufferSize != Selectable.USE_DEFAULT_BUFFER_SIZE)// 设置接收缓冲区,32ksocket.setReceiveBufferSize(receiveBufferSize);// false:开启Nagle算法,将网络通信中的小数据包收集起来,组装成大数据包一次性发送出去。大量的小数据包传递会导致网络拥塞// true:关闭Nagle算法,小数据包立即发送出去,保证低延迟socket.setTcpNoDelay(true);boolean connected;try {// 对给定的地址,发起connect请求// 如果连接立马成功,比如客户端、服务端是同一个Broker,那就返回true;// 否则返回false,后面要调用SocketChannel#finishConnect()方法完成最终连接connected = socketChannel.connect(address);} catch (UnresolvedAddressException e) {socketChannel.close();throw new IOException("Can't resolve address: " + address, e);} catch (IOException e) {socketChannel.close();throw e;}// 发起连接之后,就将这个初始化的SocketChannel注册到Java NIO Selector上去,得到SelectionKey(大概可以认为SelectionKey是跟SocketChannel是一一对应的)// 让Selector去监听“OP_CONNECT事件”(看看是否有人同意跟它建立连接)// 如此一来,Selector组件内就有了一堆的Channel,且SelectionKey和SocketChannel是一一对应的SelectionKey key = socketChannel.register(nioSelector, SelectionKey.OP_CONNECT);// 基于ChannelBuilder将SelectionKey、Broker ID封装成KafkaChannelKafkaChannel channel = channelBuilder.buildChannel(id, key, maxReceiveSize);// 调用SelectionKey#attach()方法,将KafkaChannel和SelectionKey关联起来,// 后续通过SelectionKey进行网络请求或处理相应事件时,就能通过SelectionKey将SocketChannel取出来,辅助执行相应的操作key.attach(channel);// 将映射关系为“Broker ID:KafkaChannel”的键值对,存到Map集合中this.channels.put(id, channel);// 如果这个连接在发起之初就建立成功了,例如客户端、服务端在同一个Broker上if (connected) {// OP_CONNECT won't trigger for immediately connected channelslog.debug("Immediately connected to node {}", channel.id());// 将立即就建立好的连接的SelectionKey,add到Set集合中immediatelyConnectedKeys.add(key);key.interestOps(0);}
}
如果SocketChannel被设置为非阻塞的话,那么对SocketChannel#connect()方法的调用,就会初始化出一个非阻塞的连接请求。
如果连接立马就能创建成功,比如客户端、服务端都在同一个Broker上,那就返回true;否则返回false,后面要调用SocketChannel#finishConnect()方法完成最终连接。
2.2 将发起连接请求后的SocketChannel缓存起来
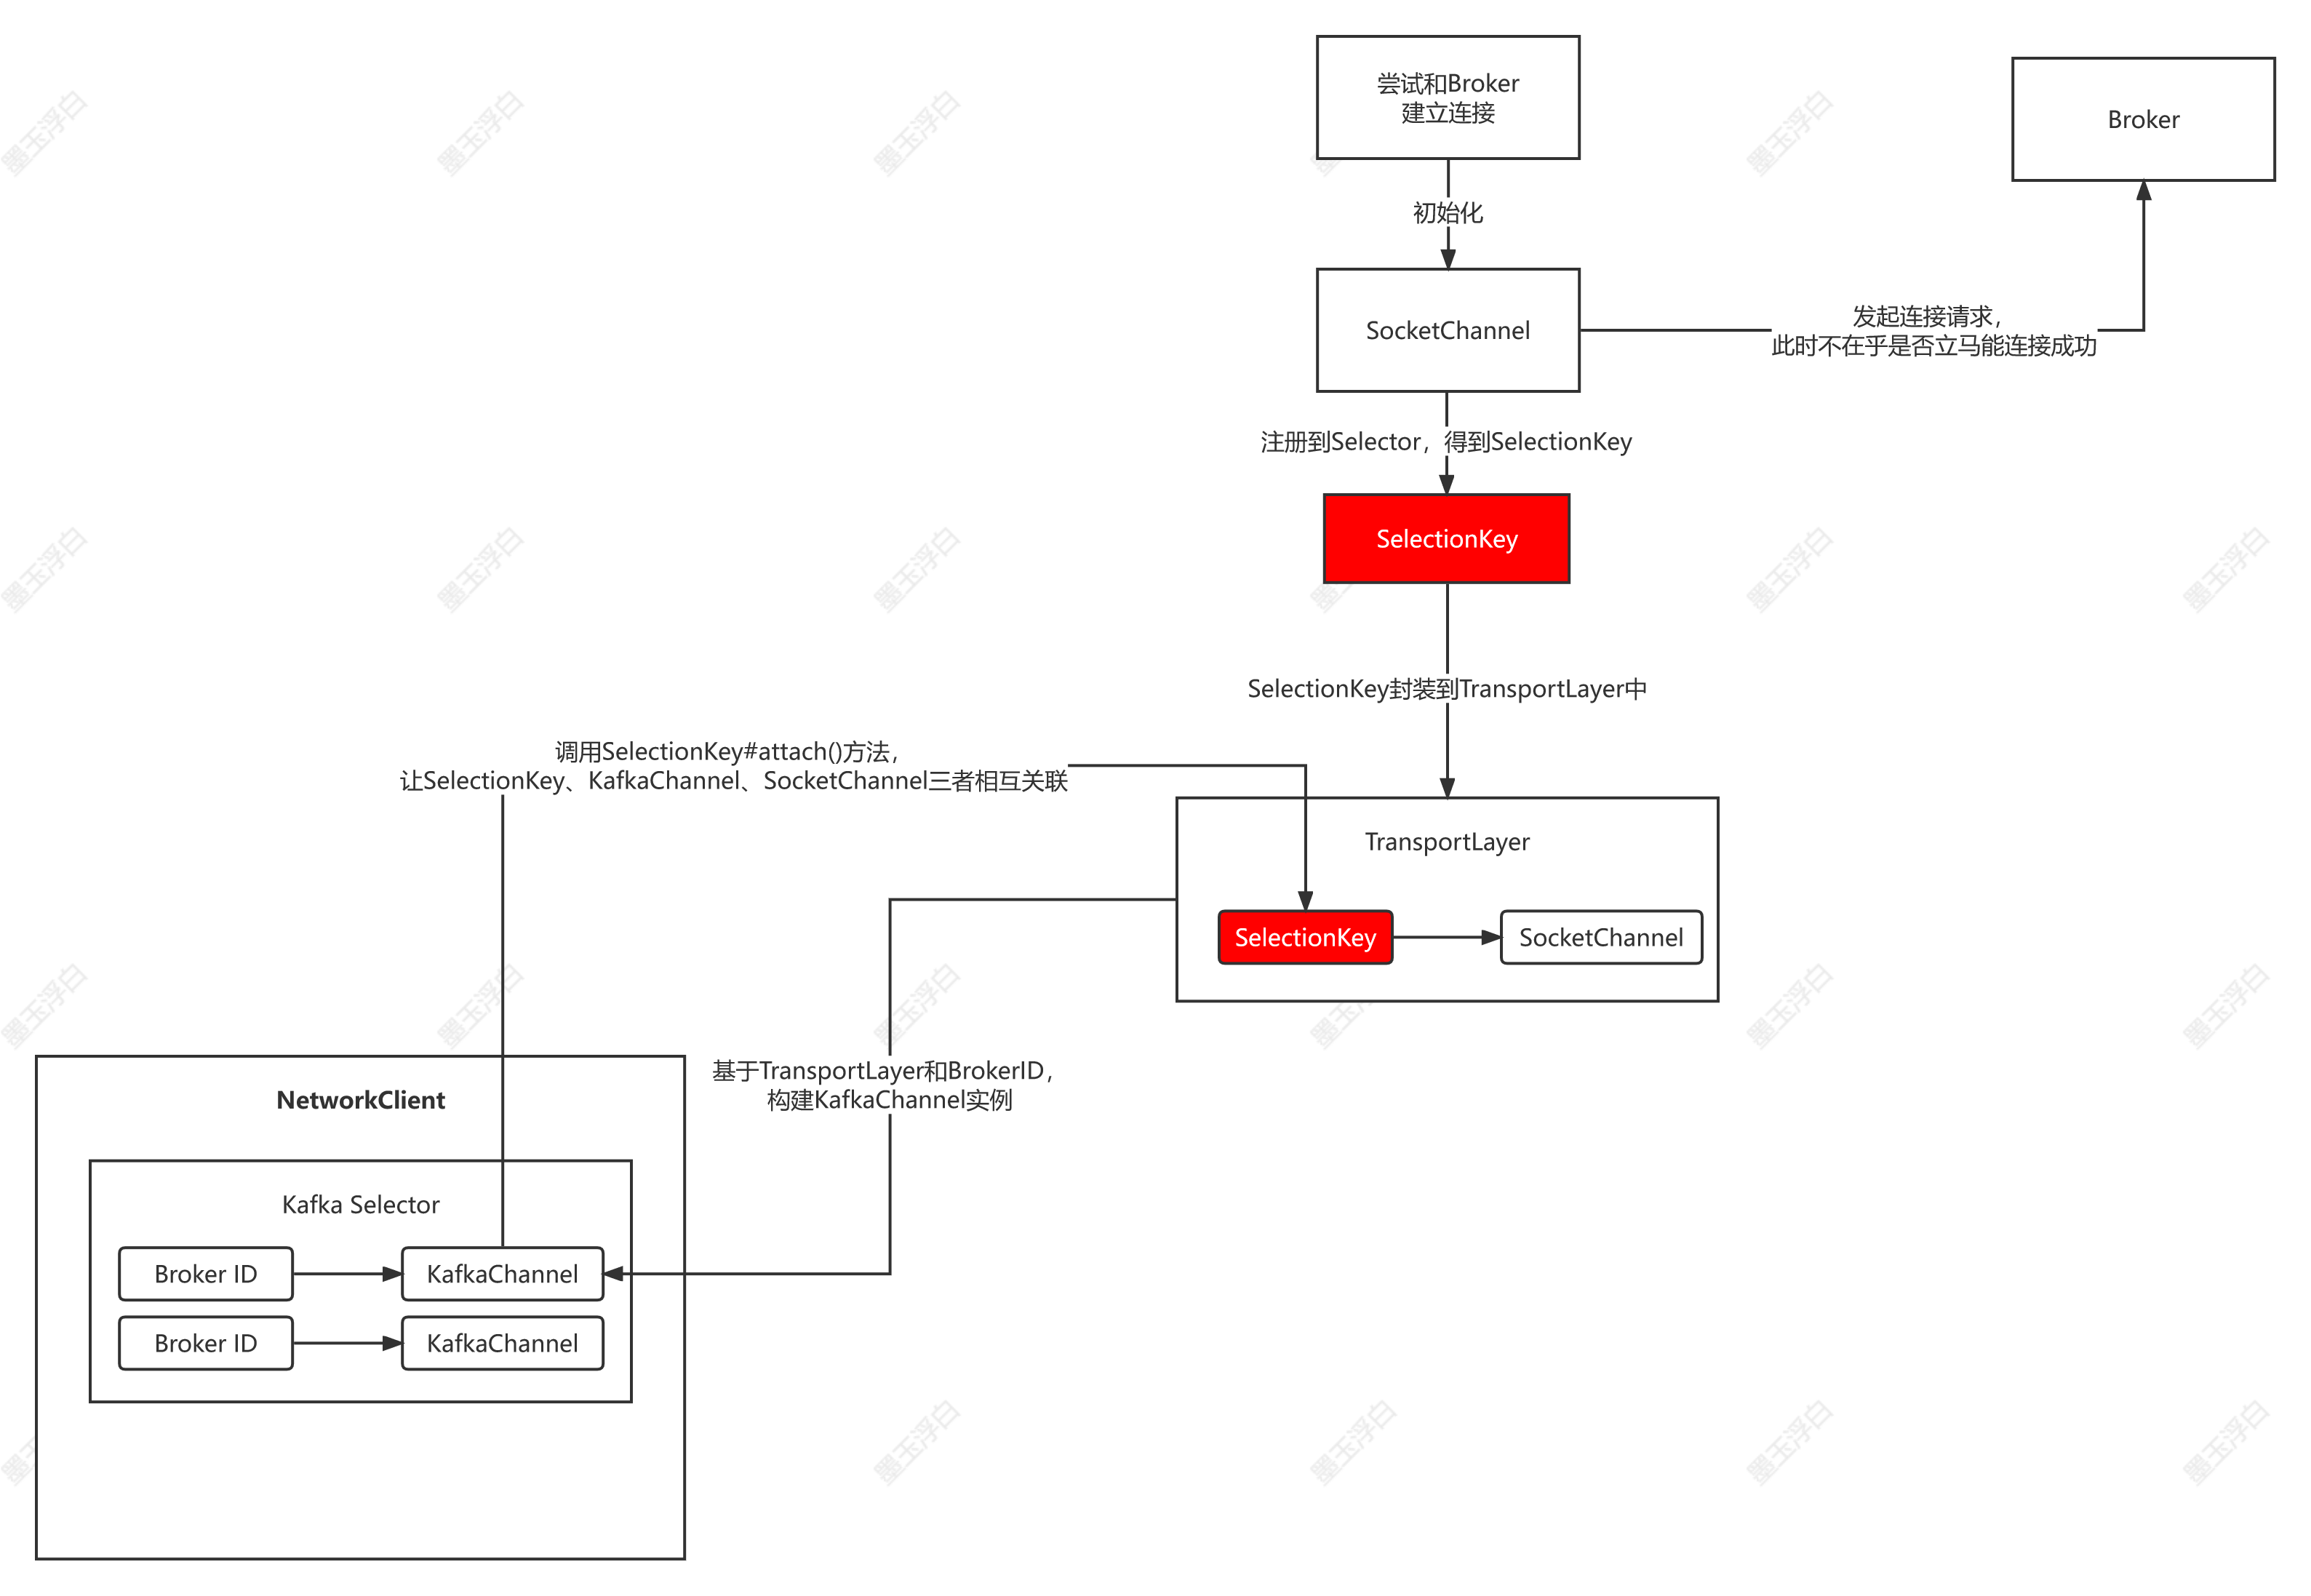
发起连接之后,就将这个初始化的SocketChannel注册到Java NIO Selector上去,让Selector去监听“OP_CONNECT事件”(看看是否有人同意跟它建立连接)。SocketChannel的注册过程会得到一个SelectionKey,我们可以粗略的认为SelectionKey和SocketChannel是一一对应的。
// 发起连接之后,就将这个初始化的SocketChannel注册到Java NIO Selector上去,得到SelectionKey(大概可以认为SelectionKey是跟SocketChannel是一一对应的)
// 让Selector去监听“OP_CONNECT事件”(看看是否有人同意跟它建立连接)
// 如此一来,Selector组件内就有了一堆的Channel,且SelectionKey和SocketChannel是一一对应的
SelectionKey key = socketChannel.register(nioSelector, SelectionKey.OP_CONNECT);
接下来就要利用SelectionKey、Broker ID,通过ChannelBuilder构建出KafkaChannel。
// 基于ChannelBuilder将SelectionKey、Broker ID封装成KafkaChannel
KafkaChannel channel = channelBuilder.buildChannel(id, key, maxReceiveSize);
构建KafkaChannel的具体实现如下:
/*** 创建KafkaChannel实例* SelectionKey和SocketChannel是一一对应的,它俩会一起封装到TransportLayer中,* Broker ID和TransportLayer会一起封装到KafkaChannel中*/
public KafkaChannel buildChannel(String id, SelectionKey key, int maxReceiveSize) throws KafkaException {KafkaChannel channel = null;try {// 根据SelectionKey创建出TransportLayer实例PlaintextTransportLayer transportLayer = new PlaintextTransportLayer(key);Authenticator authenticator = new DefaultAuthenticator();authenticator.configure(transportLayer, this.principalBuilder, this.configs);// 创建KafkaChannel实例channel = new KafkaChannel(id, transportLayer, authenticator, maxReceiveSize);} catch (Exception e) {log.warn("Failed to create channel due to ", e);throw new KafkaException(e);}return channel;
}
从PlaintextTransportLayer的构造方法中可以看出,SelectionKey和SocketChannel之间的关联关系是一一对应的。
public PlaintextTransportLayer(SelectionKey key) throws IOException {// SelectionKeythis.key = key;// SelectionKey和SocketChannel有关联关系this.socketChannel = (SocketChannel) key.channel();
}
用Broker ID和TransportLayer,直接new一个KafkaChannel实例出来。接着调用SelectionKey#attach()方法,将KafkaChannel和SelectionKey关联起来,这样,SelectionKey、SocketChannel和KafkaChannel,三者就相互关联在一起了。
后续在通过SelectionKey进行网络请求和相应处理时,就能通过SelectionKey获取到对应的组件,执行对应的操作,有解耦管理的影子。
最后将创建好的KafkaChannel,按照“Broker ID:KafkaChannel”的映射关系,缓存到Map集合中。
3.万能poll()方法之前的准备工作
Sender线程在发送消息时,要遍历Set< Node >看哪些Broker做好了准备。对于那些发起连接请求后不能立即建立成功的连接请求(绝大部分都是如此),只是将KafkaChannel缓存起来了
// 遍历这个Set,判断是否可以向这些Broker发送数据
while (iter.hasNext()) {Node node = iter.next();// 由NetworkClient判断Set集合中的Broker是否可以发送数据:和这个Broker建立好了长连接// 对于那些尚未成功建立好连接的Broker,在此会将其从Set中remove掉,下面会通过poll完成连接的最终建立if (!this.client.ready(node, now)) {// 如果跟Broker之间的长连接还没建立,就没法发送,就只能将这个Broker从Set集合中移除iter.remove();// 对于那些连接还没建立利索的Broker而言,这里算出来的notReadyTimeout=Long.MAX_VALUEnotReadyTimeout = Math.min(notReadyTimeout, this.client.connectionDelay(node, now));}
}
如果所有的Broker都没有建立好连接,那么此时的Set< Node >就会被remove成空,下面构建的映射关系为“Broker ID:该Broker下所有做好发送准备的RecordBatch”的Map集合也为null,以Broker为单位构建的List也就是空,这种情况下绝对不会向Broker发送请求。
// step 4:以Broker为单位,将RecordBatch分组
// 有很多Partition都做好了发送准备,可能有一些Partition对应的Leader是在同一个Broker上。
// 这里就会以Broker为单位,将同一个Broker下的Partition Leader聚合到一组中。映射关系为:“Broker ID:这个Broker下所有准备好的Partition Leader的RecordBatch”
// 如果所有的Broker都没有建立好连接,那么此时的Set就会被remove成空,下面构建的List也就是空,这种情况下绝对不会向Broker发送请求
Map> batches = this.accumulator.drain(cluster,result.readyNodes,this.maxRequestSize,now);
if (guaranteeMessageOrder) {for (List batchList : batches.values()) {for (RecordBatch batch : batchList)this.accumulator.mutePartition(batch.topicPartition);}
}// 有一些RecordBatch可能在内存缓冲区内“逗留”的时间超过了timeout.ms(默认:30s),就不要了
List expiredBatches = this.accumulator.abortExpiredBatches(this.requestTimeout, now);
for (RecordBatch expiredBatch : expiredBatches)this.sensors.recordErrors(expiredBatch.topicPartition.topic(), expiredBatch.recordCount);sensors.updateProduceRequestMetrics(batches);
// step 5:为每个Broker创建ClientRequest
// 对每个Broker都创建一个ClientRequest:这个Broker上所有做好发送准备的Partition Leader上的RecordBatch,都会走这一个ClientRequest发送出去
List requests = createProduceRequests(batches, now);
// 下一次再去找First RecordBatch是否满足发送条件的最小的间隔时间
long pollTimeout = Math.min(result.nextReadyCheckDelayMs, notReadyTimeout);
if (result.readyNodes.size() > 0) {log.trace("Nodes with data ready to send: {}", result.readyNodes);log.trace("Created {} produce requests: {}", requests.size(), requests);pollTimeout = 0;
}
// 遍历这些ClientRequest,通过NetworkClient将其发送出去
// 如果所有的Broker都没有建立好连接,此时的List就是null,绝对不会发送请求
for (ClientRequest request : requests)client.send(request, now);
当然了,期间会计算出下一次再去检查各个TopicPartition中Deque< RecordBatch >中的First RecordBatch是否做好了发送准备的最小间隔时间。比如10ms,10ms之后再检查First Batch得到一个做好准备的Set< Node >集合,逐个检查这些Broker是否已经成功且彻底的建立好了连接,如果成功就可以准备发送事宜了。这10ms恰恰就是上一批没有彻底成功建立好连接的Broker,给它们时间准备好成功且彻底建立连接。如此一来,10ms之后就能顺利发送了。
4. 通过不断轮询的poll()方法完成跟Broker之间的连接
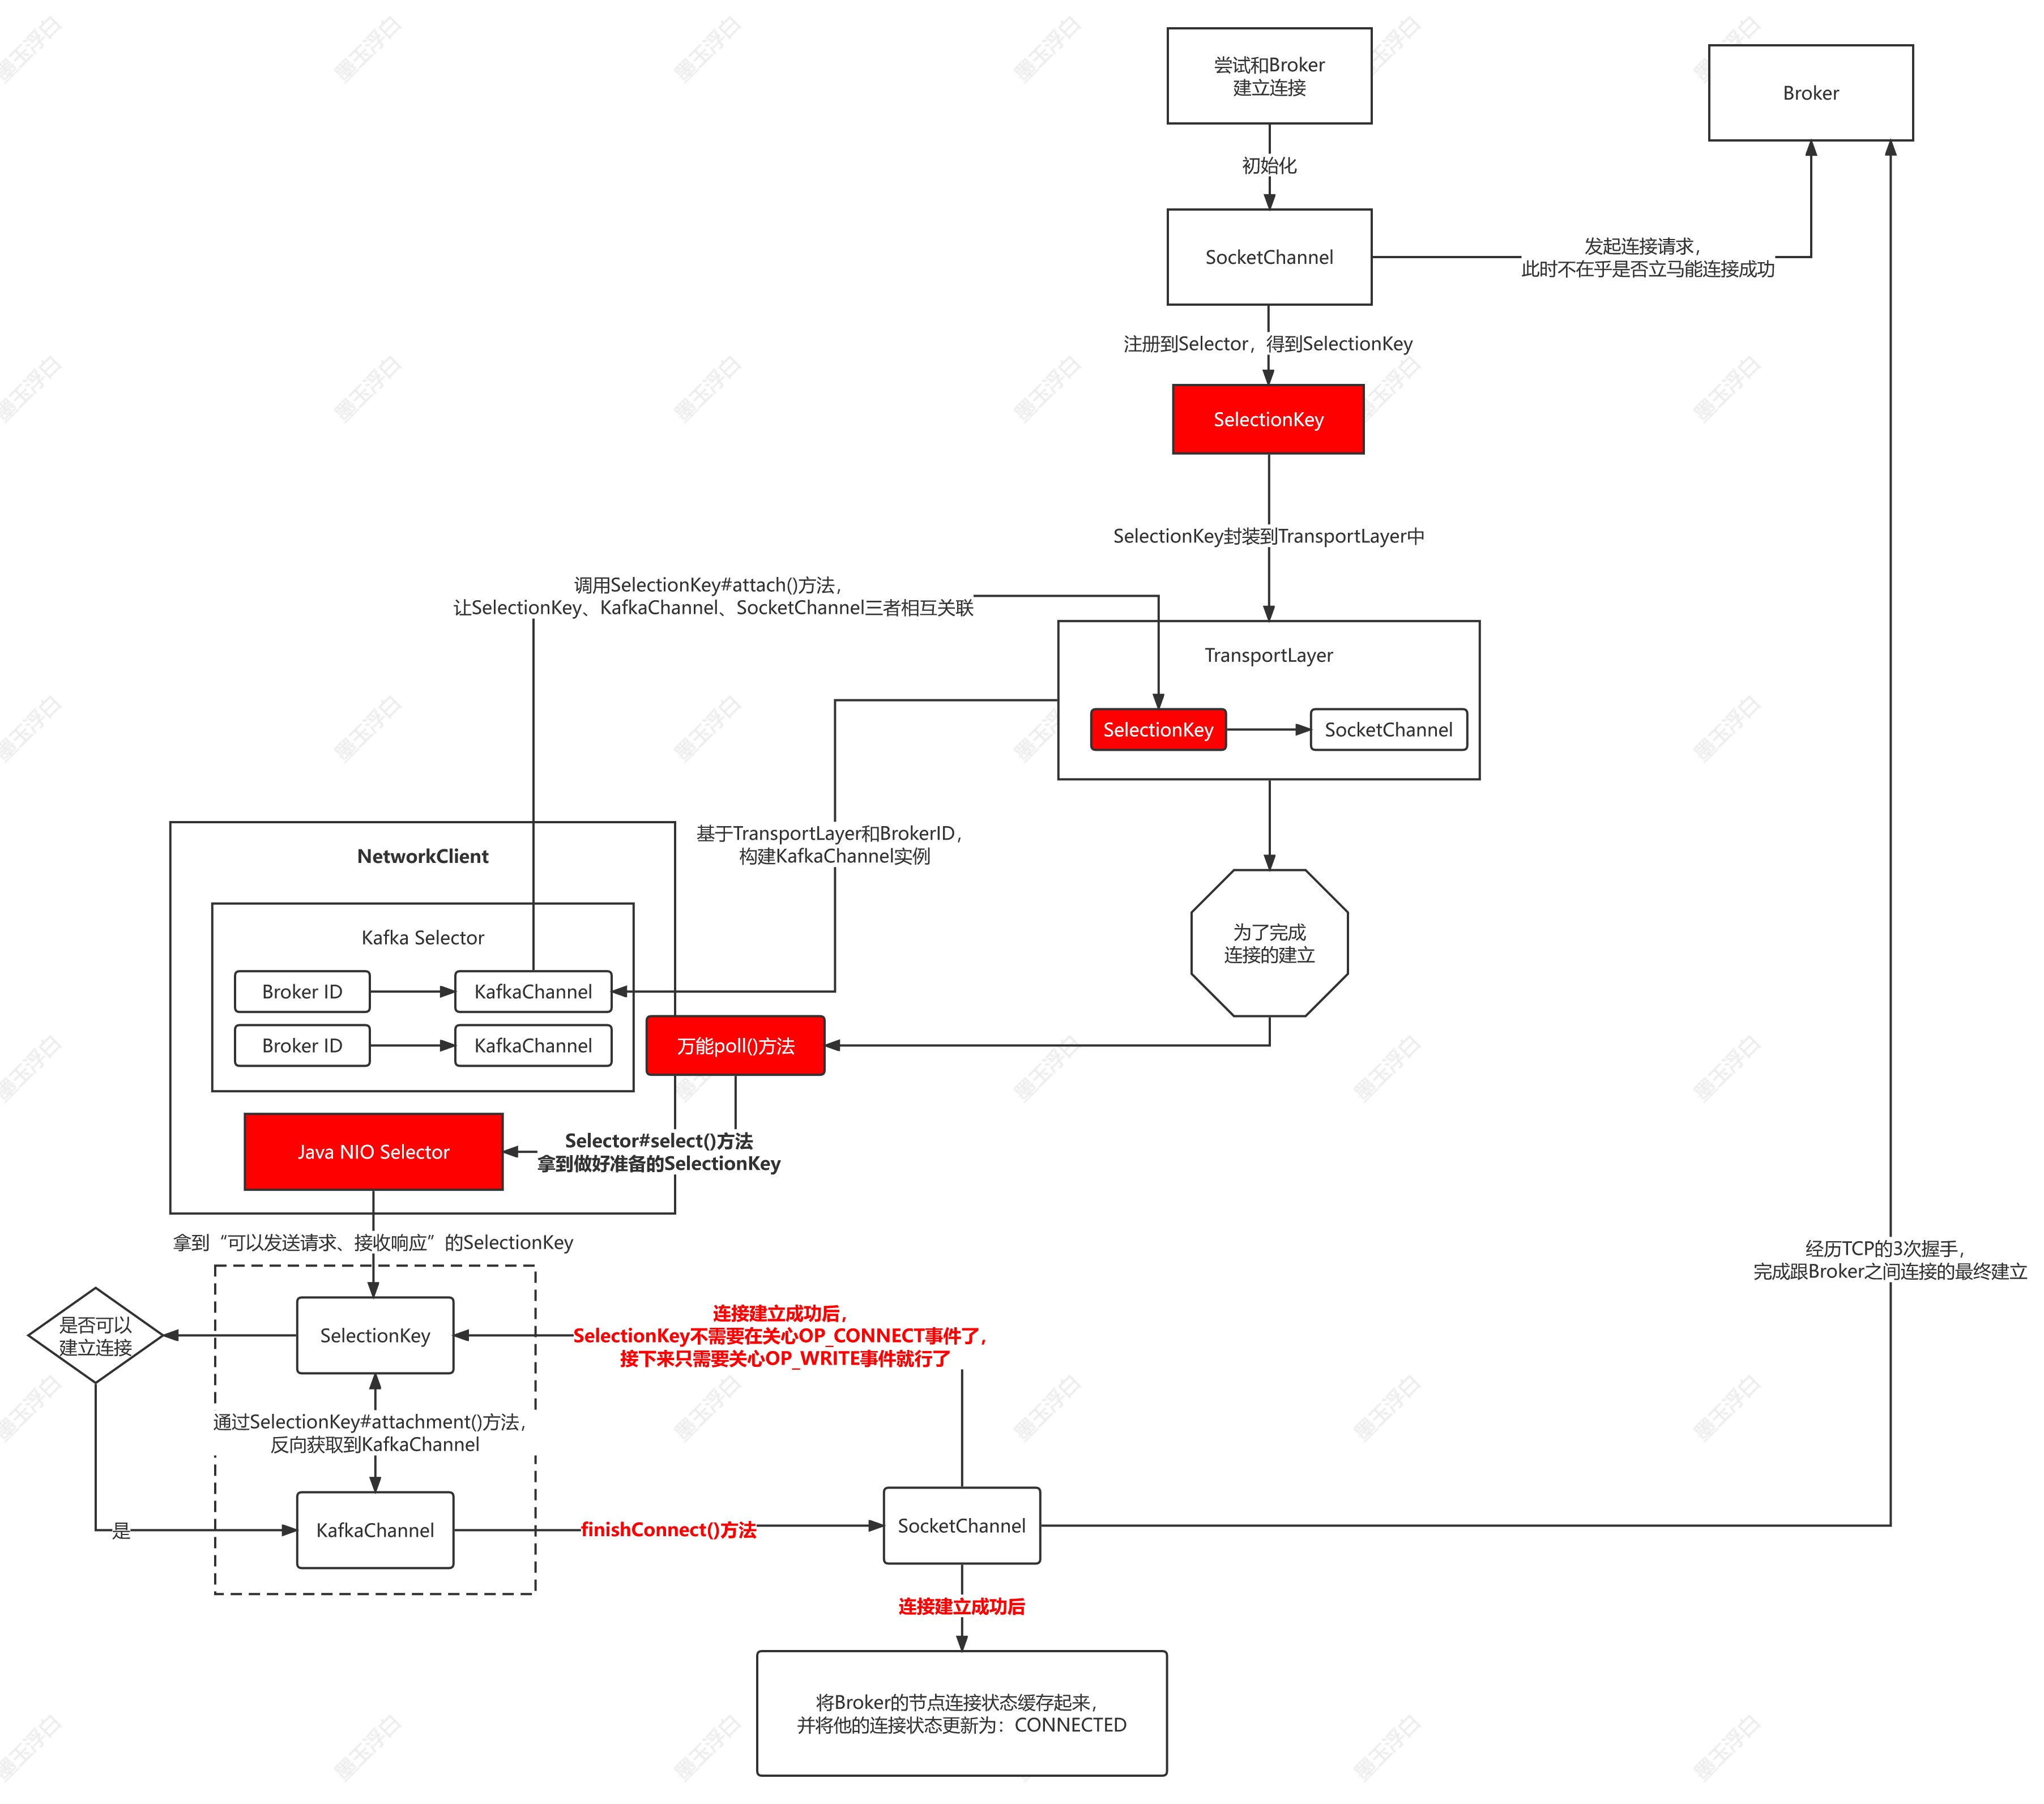
下面要走万能poll()方法,将未能立马就建立成功的请求,完全彻底的建立成功。
// step 6:万能poll()方法
// 如果所有的Broker都没有建立好连接,那么poll()方法内就只会调用SocketChannel#finishConnect()方法完成最终的建立
this.client.poll(pollTimeout, now);
之所以将其称之为“万能poll()方法”,是因为它的工作能力十分强大,既能完全、彻底的建立最终连接,又能发送请求,还能接受响应!
/*** 万能poll()方法的工作范围:*      1.向Broker发送MetadataRequest,请求拉取元数据*      2.完成连接最终的成功建立*      3.发送消息*      4.处理响应(如果是用于拉取元数据的MetadataRequest对应的response,是不会返回ClientResponse的)*/
@Override
public List poll(long timeout, long now) {// MetadataUpdater组件是专门用来更新元数据的,调用MetadataUpdater#maybeUpdate()拉取元数据// 内部会构建专门用于向Broker发送请求的MetadataRequest// 之所以在此可能拉取元数据,是因为Sender线程的step 2步骤,可能有某个Partition还不知道它的Leader是谁long metadataTimeout = metadataUpdater.maybeUpdate(now);try {// pollTimeout、元数据加载的超时时间、请求的超时时间,三者取最小值// 通过Selector#poll()方法完成最终连接的建立this.selector.poll(Utils.min(timeout, metadataTimeout, requestTimeoutMs));} catch (IOException e) {log.error("Unexpected error during I/O", e);}// process completed actionslong updatedNow = this.time.milliseconds();List responses = new ArrayList<>();handleCompletedSends(responses, updatedNow);// 发送出去的MetadataRequest,收到了响应,现在处理这些响应handleCompletedReceives(responses, updatedNow);handleDisconnections(responses, updatedNow);// 成功建立好连接之后,将这个Broker的节点连接状态缓存起来,并将它的状态修改为:CONNECTEDhandleConnections();handleTimedOutRequests(responses, updatedNow);// invoke callbacksfor (ClientResponse response : responses) {if (response.request().hasCallback()) {try {response.request().callback().onComplete(response);} catch (Exception e) {log.error("Uncaught error in request completion:", e);}}}return responses;
}
我们眼下现在最要紧的事就是建立跟Broker之间的连接,这个核心行为是通过Selector完成的:
@Override
public void poll(long timeout) throws IOException {if (timeout < 0)throw new IllegalArgumentException("timeout should be >= 0");// 先将一些数据结构clear掉,重新放,防止干扰clear();if (hasStagedReceives() || !immediatelyConnectedKeys.isEmpty())timeout = 0;/* check ready keys */// 检查做好准备的SelectionKeylong startSelect = time.nanoseconds();// 底层调用Java NIO Selector#select()方法,谁做好了执行I/O读写操作的准备(因为Selector内注册了很多KafkaChannel,看哪个KafkaChannel现在可以发送请求或者接收响应),// 就返回谁的SelectionKey。这里得到的是SelectionKey的个数int readyKeys = select(timeout);long endSelect = time.nanoseconds();currentTimeNanos = endSelect;this.sensors.selectTime.record(endSelect - startSelect, time.milliseconds());// 有做好准备执行I/O读写操作的SelectionKey,或者当初建立连接时谁的连接立马就创建成功了(客户端、服务端在同一个Broker上)if (readyKeys > 0 || !immediatelyConnectedKeys.isEmpty()) {// 核心逻辑:处理SelectionKey(建立连接、发送请求、接收响应)// 1.如果某些SelectionKey对应的连接在创建之时没成功,后来做好了准备(走万能poll()方法完成的,绝大部分都是如此),传false// 2.如果某些SelectionKey对应的连接在创建之时立马就成功了(客户端、服务端都在同一个Broker上),此时传true;pollSelectionKeys(this.nioSelector.selectedKeys(), false);pollSelectionKeys(immediatelyConnectedKeys, true);}// 处理接收到的响应addToCompletedReceives();long endIo = time.nanoseconds();this.sensors.ioTime.record(endIo - endSelect, time.milliseconds());// 按照LRU算法关闭响应的连接maybeCloseOldestConnection();
}
4.1 挑选出做好准备的SelectionKey
由于Selector中注册了一堆的Channel,现在就是要看哪个Channel做好了执行I/O读写操作的准备(谁现在可以发送请求或者接收响应)。
// 底层调用Java NIO Selector#select()方法,谁做好了执行I/O读写操作的准备(因为Selector内注册了很多KafkaChannel,看哪个KafkaChannel现在可以发送请求或者接收响应),
// 就返回谁的SelectionKey。这里得到的是SelectionKey的个数
int readyKeys = select(timeout);private int select(long ms) throws IOException {if (ms < 0L)throw new IllegalArgumentException("timeout should be >= 0");// 底层调用Java NIO Selector#select()方法,它会去看看注册到它的所有的Channel中,// 谁做好了执行I/O读写操作(谁可以发送一个请求出去,或者能接收一个响应),就将谁的SelectionKey返回。// 最终返回的是SelectionKey的个数if (ms == 0L)return this.nioSelector.selectNow();else// 如果超时时间为0,直接完事;否则,有一个最多的等待时间,不会无限制等待下去return this.nioSelector.select(ms);
}
最终得到的就是做好准备的SelectionKey的个数。
4.2 处理SelectionKey
如果哪个SelectionKey曾经在建立连接之初立马就成功了(客户端、服务端在同一个Broker上),或者现在做好准备的SelectionKey的个数不为0,那就开始着手处理这些SelectionKey。
// 有做好准备执行I/O读写操作的SelectionKey,或者当初建立连接时谁的连接立马就创建成功了(客户端、服务端在同一个Broker上)
if (readyKeys > 0 || !immediatelyConnectedKeys.isEmpty()) {// 核心逻辑:处理SelectionKey(建立连接、发送请求、接收响应)// 1.如果某些SelectionKey对应的连接在创建之时没成功,后来做好了准备(走万能poll()方法完成的,绝大部分都是如此),传false// 2.如果某些SelectionKey对应的连接在创建之时立马就成功了(客户端、服务端都在同一个Broker上),此时传true;pollSelectionKeys(this.nioSelector.selectedKeys(), false);pollSelectionKeys(immediatelyConnectedKeys, true);
}
处理SelectionKey的核心逻辑是“万能poll()方法”的称呼又来,因为处理SelectionKey的核心逻辑包括了:建立连接、发送请求、接收响应。在此可以遍历每个SelectionKey,通过一个线程全部解决。
/*** 处理SelectionKey(处理读请求、写请求)*      1.有做好准备执行I/O读写操作的SelectionKey*      2.当初建立连接时谁的连接立马就创建成功了*/
private void pollSelectionKeys(Iterable selectionKeys, boolean isImmediatelyConnected) {// 现在已经做好准备的SelectionKey的迭代器Iterator iterator = selectionKeys.iterator();// 遍历每个SelectionKey,对这个SelectionKey的处理包括:建立最终连接、发送请求、接收响应。一个线程就将其全部搞定!while (iterator.hasNext()) {// 获取到SelectionKeySelectionKey key = iterator.next();// 这个SelectionKey马上要被处理了,先把这个SelectionKey从迭代器移除iterator.remove();// 通过SelectionKey#attachment()方法,根据SelectionKey和KafkaChannel的对应关系(attach的时候建立的映射关系),反向拿到KafkaChannel// 这里用到了SelectionKey、KafkaChannel和SocketChannel三者之间的关联关系KafkaChannel channel = channel(key);// register all per-connection metrics at oncesensors.maybeRegisterConnectionMetrics(channel.id());// 一个客户端不能放太多的Socket连接资源,否则会让客户端负载过重。使用LRU淘汰掉最近、最少使用的Socket连接// 将映射关系为“Broker ID:最近使用这个Socket连接的时间”的键值对,更新到Map中lruConnections.put(channel.id(), currentTimeNanos);try {/* complete any connections that have finished their handshake (either normally or immediately) */// 如果当前SelectionKey所处的状态可以建立连接,那就通过SocketChannel建立最终连接://      1.这个SelectionKey对应的连接最初就立马创建成功了//      2.这个SelectionKey是可以建立连接的if (isImmediatelyConnected || key.isConnectable()) {// 底层调用TransportLayer#finishConnect() ---> SocketChannel#finishConnect()完成连接的创建,直到创建完成if (channel.finishConnect()) {// 将创建好连接的KafkaChannel的ID添加到List集合中缓存起来,// 至此,跟这个Broker之间的连接就算是正式建立成功了this.connected.add(channel.id());this.sensors.connectionCreated.record();} elsecontinue;}/* if channel is not ready finish prepare */// 如果连接已经建立成功了,但是尚未完成认证、授权if (channel.isConnected() && !channel.ready())// 那就得给他授权认证channel.prepare();/* if channel is ready read from any connections that have readable data */// 如果KafkaChannel已经准备好了,并且能支持处理OP_READ事件if (channel.ready() && key.isReadable() && !hasStagedReceive(channel)) {NetworkReceive networkReceive;while ((networkReceive = channel.read()) != null)addToStagedReceives(channel, networkReceive);}/* if channel is ready write to any sockets that have space in their buffer and for which we have data */// 如果KafkaChannel已经准备好了,并且能支持处理OP_WRITE事件if (channel.ready() && key.isWritable()) {Send send = channel.write();if (send != null) {this.completedSends.add(send);this.sensors.recordBytesSent(channel.id(), send.size());}}/* cancel any defunct sockets */if (!key.isValid()) {close(channel);this.disconnected.add(channel.id());}} catch (Exception e) {String desc = channel.socketDescription();if (e instanceof IOException)log.debug("Connection with {} disconnected", desc, e);elselog.warn("Unexpected error from {}; closing connection", desc, e);close(channel);this.disconnected.add(channel.id());}}
}
遍历得到每一个SelectionKey后,通过SelectionKey#attachment()方法,根据SelectionKey、SocketChannel和KafkaChannel三者之间的对应关系,反向获取到KafkaChannel。然后底层通过SocketChannel#finishConnect()方法走TCP的3次握手完成连接的最终的、成功的建立。
/*** 底层调用SocketChannel#finishConnect()方法完成连接的最终创建*/
public boolean finishConnect() throws IOException {return transportLayer.finishConnect();
}@Override
public boolean finishConnect() throws IOException {// 调用SocketChannel#finishConnect()方法完成连接的最终创建boolean connected = socketChannel.finishConnect();// 连接建立之后,对这个Channel就不要关注OP_CONNECT事件了,接下来只需要关注OP_WRITE事件就可以了if (connected)key.interestOps(key.interestOps() & ~SelectionKey.OP_CONNECT | SelectionKey.OP_READ);// 返回连接状态return connected;
}
首先要告诉SelectionKey,以后不需要在关注OP_CONNECT事件了,接下来只需要关注OP_WRITE事件就可以了。
连接建立成功之后,将创建好连接的KafkaChannel的ID添加到List集合中缓存起来,以后跟这个Broker之间的交互往来都复用这个KafkaChannel。
NetworkClient#poll()方法建立好连接后,就要处理对应的响应了。这里需要注意的是:只有当这个请求不是metadata request时,才会将List返回给客户端的
private void handleCompletedReceives(List responses, long now) {for (NetworkReceive receive : this.selector.completedReceives()) {String source = receive.source();ClientRequest req = inFlightRequests.completeNext(source);Struct body = parseResponse(receive.payload(), req.request().header());// 如果这个请求是一个metadata request,那就返回true。如果是其他请求,就返回false。// 根据以下判断,只有当这个请求不是metadata request时,才会将List返回给客户端的if (!metadataUpdater.maybeHandleCompletedReceive(req, now, body))responses.add(new ClientResponse(req, now, false, body));}
}
然后就要把这个Broker的“节点连接状态”缓存起来,并将它的状态更新为:CONNECTED
/*** 将完全、彻底建立好连接的Broker的节点连接状态缓存起来,并将它的状态更新为:CONNECTED*/
private void handleConnections() {// 遍历出已经成功建立好连接的Brokerfor (String node : this.selector.connected()) {log.debug("Completed connection to node {}", node);// 将这个Broker ID对应的节点连接状态,缓存到NodeConnectionState中this.connectionStates.connected(node);}
}