
SPI 机制详解
SPI 全称为 Service Provider Interface ,它是一种服务发现机制。它通过在 ClassPath 路径下的 META-INF/services 文件夹查找文件,自动加载文件里所定义的类。这一机制为很多框架拓展提供了可能,比如在Dubbo,JDBC中都使用到了SPI机制。
我们先通过如下的简单案例看看它是怎么使用的。
简单案例
首先,我们需要定义一个接口:
public interface SPIService {void doSomething();}
然后,定义两个实现类,随便输出一句话即可:
public class SpiServiceImpl1 implements SPIService{@Overridepublic void doSomething() {System.out.println("一号选手已就位!");}
}public class SpiServiceImpl2 implements SPIService{@Overridepublic void doSomething() {System.out.println("二号选手已就位!");}
}
最后需要在 ClassPath路径下配置相关文件。文件名字是接口的全限定类名,内容是实现类的全限定类名,多个实现类用换行符分隔即可。
文件路径如下:
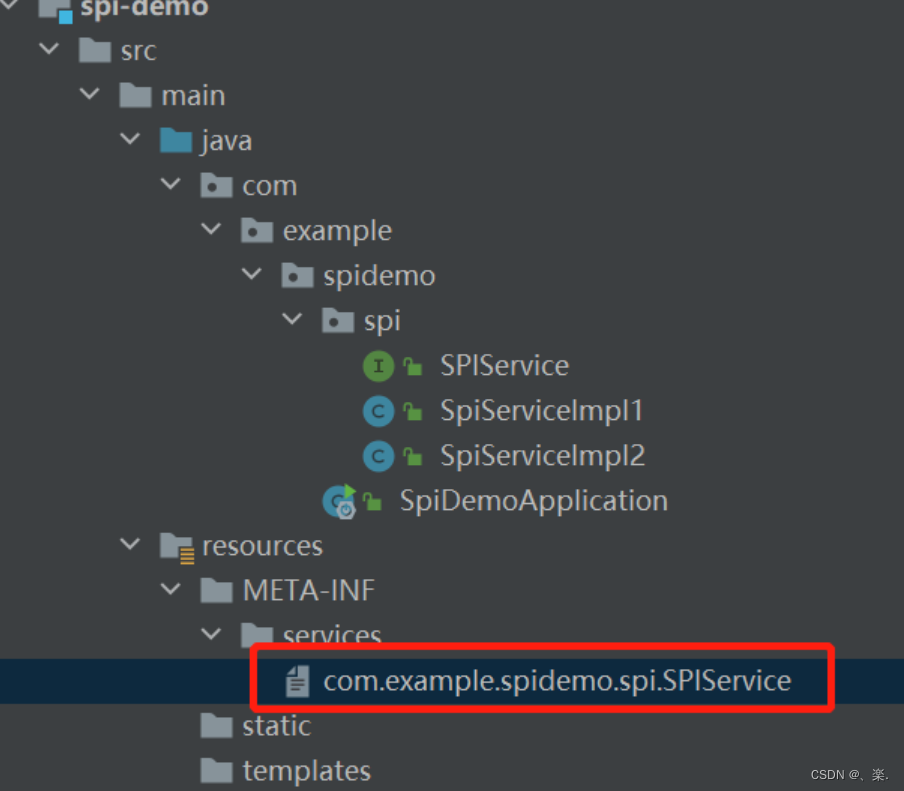
文件内容如下:
com.example.spidemo.spi.SpiServiceImpl1
com.example.spidemo.spi.SpiServiceImpl2
以上步骤执行完成后,我们就可以通过ServiceLoader.load或者Service.providers方法拿到实现类的实例。其中,ServiceLoader.load包位于java.util.ServiceLoader下,而Service.providers包位于 sun.misc.Service;下。
两种方式的输出结果都是相同的。
public class Test {public static void main(String[] args) {Iterator providers = Service.providers(SPIService.class);ServiceLoader load = ServiceLoader.load(SPIService.class);while(providers.hasNext()) {SPIService ser = providers.next();ser.doSomething();}System.out.println("--------------------------------");Iterator iterator = load.iterator();while(iterator.hasNext()) {SPIService ser = iterator.next();ser.doSomething();}for(SPIService db:load){db.doSomething();}}}
源码分析
我们这里以ServiceLoader.load为例,通过源码看看它立马到底做了什么。
-
ServiceLoader
首先,我们先来看看
ServiceLoader的类结构:从配置文件的路径我们就可以明白为啥我们要在ClassPath路径下创建相关路径,因为这是约定好的,我们要遵从约定。
public final class ServiceLoaderimplements Iterable{// 配置文件的路径private static final String PREFIX = "META-INF/services/";// 加载的服务类或接口// The class or interface representing the service being loadedprivate final Classservice;// 类加载器// The class loader used to locate, load, and instantiate providersprivate final ClassLoader loader;// The access control context taken when the ServiceLoader is createdprivate final AccessControlContext acc;// 已加载的服务类集合// Cached providers, in instantiation orderprivate LinkedHashMap -
load
load 方法创建了一些属性,重要的实例化了内部类
LazyIterator。最后返回ServiceLoader的实例。private ServiceLoader(Classsvc, ClassLoader cl) {// 要加载的接口service = Objects.requireNonNull(svc, "Service interface cannot be null");// 类加载器loader = (cl == null) ? ClassLoader.getSystemClassLoader() : cl;// 访问控制器acc = (System.getSecurityManager() != null) ? AccessController.getContext() : null;reload(); }public void reload() {// 先清空providers.clear();// 实例化内部类lookupIterator = new LazyIterator(service, loader); } -
查找实现类
查找实现类和创建实现类的过程都在
LazyIterator中完成。当我们调用iterator.hasNext()和iterator.next()的时候,实际上都是在调用LazyIterator相应的方法。public Iteratoriterator() {return new Iterator() {Iterator我们这里直接看
hasnext方法,它最终会调用到hasNextService。public boolean hasNext() {if (acc == null) {return hasNextService();} else {PrivilegedActionaction = new PrivilegedAction () {public Boolean run() { return hasNextService(); }};return AccessController.doPrivileged(action, acc);} } private boolean hasNextService() {// 第二次调用的时候已经解析完成了,直接返回即可if (nextName != null) {return true;}if (configs == null) {try {// META-INF/services/ 加上接口的全限定名 对应 文件名String fullName = PREFIX + service.getName();// 将文件路径转换成URL对象if (loader == null)configs = ClassLoader.getSystemResources(fullName);elseconfigs = loader.getResources(fullName);} catch (IOException x) {fail(service, "Error locating configuration files", x);}}while ((pending == null) || !pending.hasNext()) {if (!configs.hasMoreElements()) {return false;}// 解析 URL 内容 ,将其返回pending = parse(service, configs.nextElement());}// 拿到第一个实现类的类名nextName = pending.next();return true; } -
创建实例
调用
next方法的时候实际调用到的是LazyIterator的nextService方法。它通过反射的方式创建类的实例并返回。private S nextService() {if (!hasNextService())throw new NoSuchElementException();// 全限定类名String cn = nextName;nextName = null;// 创建类的 class 对象Class c = null;try {c = Class.forName(cn, false, loader);} catch (ClassNotFoundException x) {fail(service,"Provider " + cn + " not found");}if (!service.isAssignableFrom(c)) {fail(service,"Provider " + cn + " not a subtype");}try {// 通过 newINstance 实例化S p = service.cast(c.newInstance());// 放入集合 返回实例providers.put(cn, p);return p;} catch (Throwable x) {fail(service,"Provider " + cn + " could not be instantiated",x);}throw new Error(); // This cannot happen }
看到这里,相信大家已经搞清楚SPI的机制了。这是 jdk 中的 spi机制,springboot 的spi机制稍有不同,区别在于读取录取以及文件内容不同,这部分在后续自动装配原理的时候在说明。
JDBC中的应用
我们开头说,SPI机制为很多框架的拓展提供了可能,其实JDBC就应用到了这一机制。使用JDBC的步骤无非就是加载驱动程序,然后通过DriverManager获取数据库连接。那么它是如何分别是那种数据库的呢?答案就在SPI中。
-
加载
我们来看看
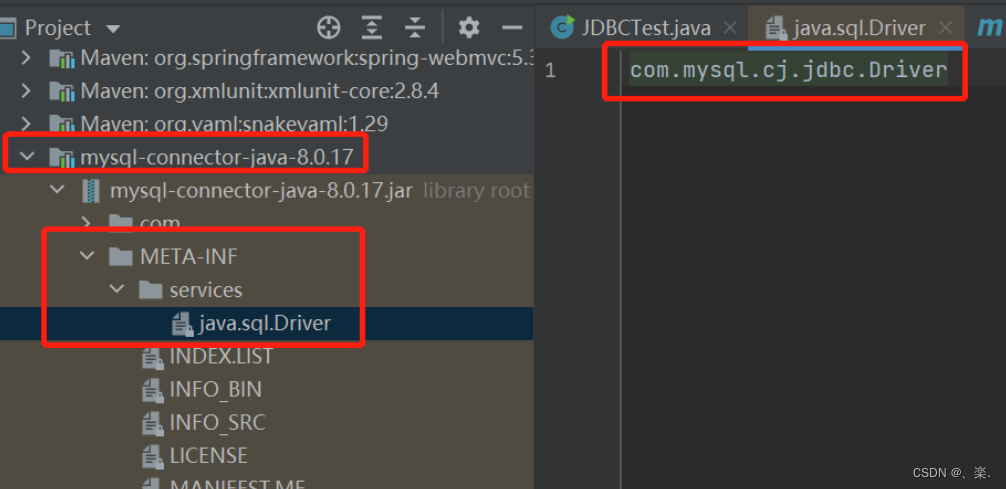
DriverManager类,它在静态代码块立马做了一件比较重要的事情。很明显,它以及通过SPI机制把数据库驱动连接初始化了。public class DriverManager {/* Prevent the DriverManager class from being instantiated. */private DriverManager(){}/*** Load the initial JDBC drivers by checking the System property* jdbc.properties and then use the {@code ServiceLoader} mechanism*/static {loadInitialDrivers();println("JDBC DriverManager initialized");} }具体过程还得看
loadInitialDrivers方法,它在里面找的是Driver接口的服务类,所以它的文件路径就是:META-INF/services/java.sql.Driver。private static void loadInitialDrivers() {String drivers;try {drivers = AccessController.doPrivileged(new PrivilegedAction() {public String run() {return System.getProperty("jdbc.drivers");}});} catch (Exception ex) {drivers = null;}AccessController.doPrivileged(new PrivilegedAction () {public Void run() {// 这里很明显的可以看出它要加载Driver接口的服务,Driver接口的包为:java.sql.Driver// 所以这里要找的就是META-INF/services/java.sql.Driver文件ServiceLoader loadedDrivers = ServiceLoader.load(Driver.class);Iterator driversIterator = loadedDrivers.iterator();try{// 查询之后创建对象while(driversIterator.hasNext()) {driversIterator.next();}} catch(Throwable t) {// Do nothing}return null;}});println("DriverManager.initialize: jdbc.drivers = " + drivers);if (drivers == null || drivers.equals("")) {return;}String[] driversList = drivers.split(":");println("number of Drivers:" + driversList.length);for (String aDriver : driversList) {try {println("DriverManager.Initialize: loading " + aDriver);Class.forName(aDriver, true,ClassLoader.getSystemClassLoader());} catch (Exception ex) {println("DriverManager.Initialize: load failed: " + ex);}} } 那么,这个文件在哪呢?我们看看MYSQL的jar包即可,一眼看出就是通过SPI机制进行拓展。
-
·创建实例
上一步已经找到了MySQL中的com.mysql.cj.jdbc.Driver全限定类名,当调用next方法的时候就会创建实例。mysql的实现类里面就完成了一件事,想DriverManager注册自身的实例。
public class Driver extends NonRegisteringDriver implements java.sql.Driver {public Driver() throws SQLException {}static {try {// 调用注册方法往registerDrivers集合中加入实例DriverManager.registerDriver(new Driver());} catch (SQLException var1) {throw new RuntimeException("Can't register driver!");}} } -
创建 Connection
在
DriverManager.getConnection方法就是创建连接的地方,它通过循环已注册的数据库驱动程序,调用其connect方法,获取连接并返回。private static Connection getConnection(String url, java.util.Properties info, Class caller) throws SQLException {/** When callerCl is null, we should check the application's* (which is invoking this class indirectly)* classloader, so that the JDBC driver class outside rt.jar* can be loaded from here.*/ClassLoader callerCL = caller != null ? caller.getClassLoader() : null;synchronized(DriverManager.class) {// synchronize loading of the correct classloader.if (callerCL == null) {callerCL = Thread.currentThread().getContextClassLoader();}}if(url == null) {throw new SQLException("The url cannot be null", "08001");}println("DriverManager.getConnection(\"" + url + "\")");// Walk through the loaded registeredDrivers attempting to make a connection.// Remember the first exception that gets raised so we can reraise it.SQLException reason = null;// 循环已经注册的Driver实例for(DriverInfo aDriver : registeredDrivers) {// If the caller does not have permission to load the driver then// skip it.if(isDriverAllowed(aDriver.driver, callerCL)) {try {println(" trying " + aDriver.driver.getClass().getName());// 创建连接Connection con = aDriver.driver.connect(url, info);if (con != null) {// Success!println("getConnection returning " + aDriver.driver.getClass().getName());return (con);}} catch (SQLException ex) {if (reason == null) {reason = ex;}}} else {println(" skipping: " + aDriver.getClass().getName());}}// if we got here nobody could connect.if (reason != null) {println("getConnection failed: " + reason);throw reason;}println("getConnection: no suitable driver found for "+ url);throw new SQLException("No suitable driver found for "+ url, "08001"); }
手写自己的数据库连接驱动
既然我们已经知道JDBC是怎么创建数据库连接的,那我们是不是可以创建一个我们自己的 Driver 文件。
我们首先创建实现类,继承自MySQL中的 NonRegisteringDriver,还要实现java.sql.Driver接口。这样在调用connect的时候就会调用到此类,但实际的创建过程还是靠MYSQL完成。
public class MyDriver extends NonRegisteringDriver implements Driver {// 仿照 mysql 的Driver , 先进行注册static {try {DriverManager.registerDriver(new MyDriver());} catch (SQLException var1) {throw new RuntimeException("Can't register driver!");}}public MyDriver() throws SQLException {}// 重写连接方法@Overridepublic Connection connect(String url, Properties info) throws SQLException {System.out.println("准备创建数据库连接 url:" + url);System.out.println("JDBC 配置信息:" + info);info.setProperty("user","root");Connection connect = super.connect(url, info);System.out.println("数据库连接创建完成:" + connect.toString());return connect;}
}
然后按照 SPI 的配置,我们去classpath下创建相关文件 java.sql.Driver (接口的全限定类名):
内容为实现类的全限定类名。
下一篇:(十)再探反向传播和神经网络优化