
(15)点云数据处理学习——单目深度估计获得RGBD图再重建点云
1、主要参考
(1)大佬视频
Create Your Own Point Clouds from Depth Maps - Point Cloud Processing in Open3D_哔哩哔哩_bilibili
(2)重要!!!我前面的教程
(7)点云数据处理学习——单摄像头深度估计_chencaw的博客-CSDN博客
(6)点云数据处理学习——RGBD图_chencaw的博客-CSDN博客_点云图由几张rgb图像生成
2、 前提回顾和实现
2.1 思路
陈PS:
- 用普通相机获得彩色的RGB图
- 然后用MiDaS深度学习模型获得深度图
- 然后这两个图已对应不就是RGBD图了嘛
- 然后用open3D三维点云重建一下。
2.2摄像头标定和参数
(1)根据我前面的教程,可以进行摄像头标定和内参获取
(7)点云数据处理学习——单摄像头深度估计_chencaw的博客-CSDN博客
(2)内参矩阵为
mtx:
[[801.31799138 0. 319.96097314]
[ 0. 804.76125593 206.79594003]
[ 0. 0. 1. ]]
dist畸变值:
[[-7.21246445e-02 -6.84714453e-01 -1.25501966e-02 5.75752614e-03
9.50679972e+00]]
(3)外部调节参数
3
3
d
1.1476093750000000e+03 0. 2.8008979619154707e+02 0.
1.1125493164062500e+03 2.7150911855935556e+02 0. 0. 1.
2.3 根据单目深度模型获得RGB图和深度图
(1)本次实现的代码34mono_to_rgbd.py
import torch
import matplotlib.pyplot as plt
import cv2
import numpy as np
import timergbd_save_path = "D:/RGBD_CAMERA/python_3d_process/chen_rgbd/"##直接将D:/RGBD_CAMERA/mis/MiDaS-master/hubconf.py中的transforms拿来使用
def transforms():import cv2from torchvision.transforms import Composefrom midas.transforms import Resize, NormalizeImage, PrepareForNetfrom midas import transformstransforms.default_transform = Compose([lambda img: {"image": img / 255.0},Resize(384,384,resize_target=None,keep_aspect_ratio=True,ensure_multiple_of=32,resize_method="upper_bound",image_interpolation_method=cv2.INTER_CUBIC,),NormalizeImage(mean=[0.485, 0.456, 0.406], std=[0.229, 0.224, 0.225]),PrepareForNet(),lambda sample: torch.from_numpy(sample["image"]).unsqueeze(0),])transforms.small_transform = Compose([lambda img: {"image": img / 255.0},Resize(256,256,resize_target=None,keep_aspect_ratio=True,ensure_multiple_of=32,resize_method="upper_bound",image_interpolation_method=cv2.INTER_CUBIC,),NormalizeImage(mean=[0.485, 0.456, 0.406], std=[0.229, 0.224, 0.225]),PrepareForNet(),lambda sample: torch.from_numpy(sample["image"]).unsqueeze(0),])transforms.dpt_transform = Compose([lambda img: {"image": img / 255.0},Resize(384,384,resize_target=None,keep_aspect_ratio=True,ensure_multiple_of=32,resize_method="minimal",image_interpolation_method=cv2.INTER_CUBIC,),NormalizeImage(mean=[0.5, 0.5, 0.5], std=[0.5, 0.5, 0.5]),PrepareForNet(),lambda sample: torch.from_numpy(sample["image"]).unsqueeze(0),])return transforms# (一)方法一、使用torch.hub或者从官网下载
# https://github.com/isl-org/MiDaS#Accuracy
# model_type = "DPT_Large" # MiDaS v3 - Large (highest accuracy, slowest inference speed)
# #model_type = "DPT_Hybrid" # MiDaS v3 - Hybrid (medium accuracy, medium inference speed)
# #model_type = "MiDaS_small" # MiDaS v2.1 - Small (lowest accuracy, highest inference speed)
# midas = torch.hub.load("intel-isl/MiDaS", model_type)# (二)方法二、下载本地后直接加载
# (1)Load a model
model_type = "DPT_Large"
# midas = torch.hub.load('intel-isl/MiDaS', path='D:/BaiduNetdiskDownload/dpt_large-midas-2f21e586.pt', source='local',model =model_type )
# midas = torch.hub.load('D:/RGBD_CAMERA/mis/MiDaS-master', path='D:/BaiduNetdiskDownload/dpt_large-midas-2f21e586.pt', source='local',model =model_type,force_reload = False )
midas = torch.hub.load('D:/RGBD_CAMERA/mis/MiDaS-master', source='local',model =model_type,force_reload = False )#(2)Move model to GPU if available
device = torch.device("cuda") if torch.cuda.is_available() else torch.device("cpu")
midas.to(device)
midas.eval()#(3)Load transforms to resize and normalize the image for large or small model
# midas_transforms = torch.hub.load("intel-isl/MiDaS", "transforms")
midas_transforms = transforms()if model_type == "DPT_Large" or model_type == "DPT_Hybrid":transform = midas_transforms.dpt_transform
else:transform = midas_transforms.small_transformprint("chen0")#(4)Load image and apply transforms
# filename = 'D:/RGBD_CAMERA/python_3d_process/dog.jpg'
# img = cv2.imread(filename)
# img = cv2.cvtColor(img, cv2.COLOR_BGR2RGB)# Open up the video capture from a webcam
cap = cv2.VideoCapture(1)
print("chencap")
success, img = cap.read()
cv2.imshow("origin_pic",img)
cv2.waitKey(3)
img = cv2.cvtColor(img, cv2.COLOR_BGR2RGB)print("chen1")
input_batch = transform(img).to(device)#(5)Predict and resize to original resolution
with torch.no_grad():prediction = midas(input_batch)prediction = torch.nn.functional.interpolate(prediction.unsqueeze(1),size=img.shape[:2],mode="bicubic",align_corners=False,).squeeze()output = prediction.cpu().numpy()
print(output.shape)
print("chen2")
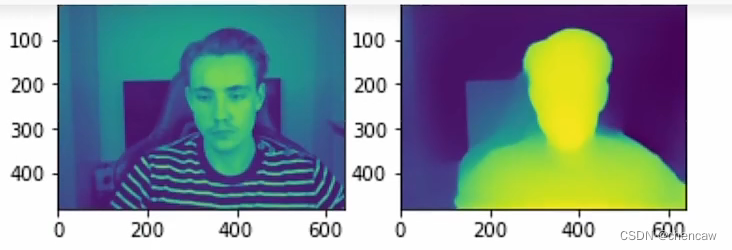
#(6)Show result
plt.subplot(1,2,1)
plt.imshow(img)
plt.subplot(1,2,2)
plt.imshow(output)
plt.show()cv2.imwrite(rgbd_save_path+"chen_depth_img.png",output)#转换回来
img = cv2.cvtColor(img, cv2.COLOR_RGB2BGR)
cv2.imwrite(rgbd_save_path+"chen_color_img.jpg",img)cap.release()
cv2.destroyAllWindows()(2)RGBD的处理代码
可以参考我前面的教程
(6)点云数据处理学习——RGBD图_chencaw的博客-CSDN博客_点云图由几张rgb图像生成
import open3d as o3d
import numpy as np
from matplotlib import pyplot as pltrgbd_save_path = "D:/RGBD_CAMERA/python_3d_process/chen_rgbd/"
color_raw = o3d.io.read_image(rgbd_save_path+"chen_color_img.jpg")
# print(np.asarray(color_raw))
# plt.imshow(np.asarray(color_raw))
# plt.show()depth_raw = o3d.io.read_image(rgbd_save_path+"chen_depth_img.png")
# plt.imshow(np.asarray(depth_raw))
# plt.show()rgbd_image = o3d.geometry.RGBDImage.create_from_color_and_depth(color_raw, depth_raw)
print(rgbd_image)plt.subplot(1, 2, 1)
plt.title('SUN grayscale image')
plt.imshow(rgbd_image.color)
plt.subplot(1, 2, 2)
plt.title('SUN depth image')
plt.imshow(rgbd_image.depth)
plt.show()pcd = o3d.geometry.PointCloud.create_from_rgbd_image(rgbd_image,o3d.camera.PinholeCameraIntrinsic(o3d.camera.PinholeCameraIntrinsicParameters.PrimeSenseDefault))
# Flip it, otherwise the pointcloud will be upside down
# pcd.transform([[1, 0, 0, 0], [0, -1, 0, 0], [0, 0, -1, 0], [0, 0, 0, 1]])
pcd.transform([[1, 0, 0, 0], [0, -1, 0, 0], [0, 0, 1, 0], [0, 0, 0, 1]])
# o3d.visualization.draw_geometries([pcd], zoom=0.5)
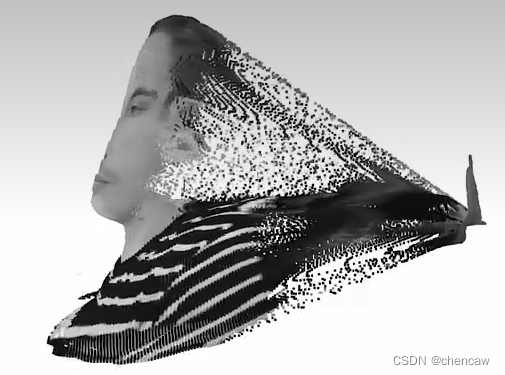
o3d.visualization.draw_geometries([pcd])(3)效果,咳咳,还是不错的,但是还是放大佬的图吧
2.3 把摄像头内参用起来,提高精度
2.3.1 默认内参
(1)注意,以下是默认内参。刚才上面的程序使用了默认内参来实现RGBD图转点云显示
o3d.camera.PinholeCameraIntrinsic(
o3d.camera.PinholeCameraIntrinsicParameters.PrimeSenseDefault)
默认内参的值,参照官方教程
RGBD images — Open3D 0.16.0 documentation
这里我们使用PinholeCameraIntrinsicParameters。PrimeSenseDefault作为默认的相机参数。它具有图像分辨率640x480,焦距(fx, fy) =(525.0, 525.0),光学中心(cx, cy) =(319.5, 239.5)。
2.3.2 使用自己标定的内参
(1)注意:使用了外部调整参数!!!!!
import open3d as o3d
import numpy as np
from matplotlib import pyplot as plt
import cv2rgbd_save_path = "D:/RGBD_CAMERA/python_3d_process/chen_rgbd/"
color_raw = o3d.io.read_image(rgbd_save_path+"chen_color_img.jpg")
# print(np.asarray(color_raw))
# plt.imshow(np.asarray(color_raw))
# plt.show()depth_raw = o3d.io.read_image(rgbd_save_path+"chen_depth_img.png")
# plt.imshow(np.asarray(depth_raw))
# plt.show()rgbd_image = o3d.geometry.RGBDImage.create_from_color_and_depth(color_raw, depth_raw)
print(rgbd_image)plt.subplot(1, 2, 1)
plt.title('SUN grayscale image')
plt.imshow(rgbd_image.color)
plt.subplot(1, 2, 2)
plt.title('SUN depth image')
plt.imshow(rgbd_image.depth)
plt.show()#方法(一)默认摄像头内参
# pcd = o3d.geometry.PointCloud.create_from_rgbd_image(
#     rgbd_image,
#     o3d.camera.PinholeCameraIntrinsic(
#         o3d.camera.PinholeCameraIntrinsicParameters.PrimeSenseDefault))#方法(二)设定自己的摄像机外部调整参数
cv_file = cv2.FileStorage()
cv_file.open('D:/RGBD_CAMERA/python_3d_process/1mono_to_3d/cameraIntrinsic.xml',cv2.FileStorage_READ)
camera_intrinsic = cv_file.getNode('intrinsic').mat()
print(camera_intrinsic)
camera_intrinsic_o3d =  o3d.camera.PinholeCameraIntrinsic(width=640,height=480,fx=camera_intrinsic[0][0],fy=camera_intrinsic[1][1],cx=camera_intrinsic[0][2],cy=camera_intrinsic[1][2])
print(camera_intrinsic_o3d.intrinsic_matrix)
pcd = o3d.geometry.PointCloud.create_from_rgbd_image(rgbd_image,camera_intrinsic_o3d)# Flip it, otherwise the pointcloud will be upside down
# pcd.transform([[1, 0, 0, 0], [0, -1, 0, 0], [0, 0, -1, 0], [0, 0, 0, 1]])#注意:左右转换了一下!否则显示是镜像图
pcd.transform([[1, 0, 0, 0], [0, -1, 0, 0], [0, 0, 1, 0], [0, 0, 0, 1]])
# o3d.visualization.draw_geometries([pcd], zoom=0.5)
o3d.visualization.draw_geometries([pcd])
(2)效果还是很不错的,图就不上了,完结撒花
上一篇:Git版本控制器