
UACANet: Uncertainty Augmented Context Attention for Polyp Segmentation代码
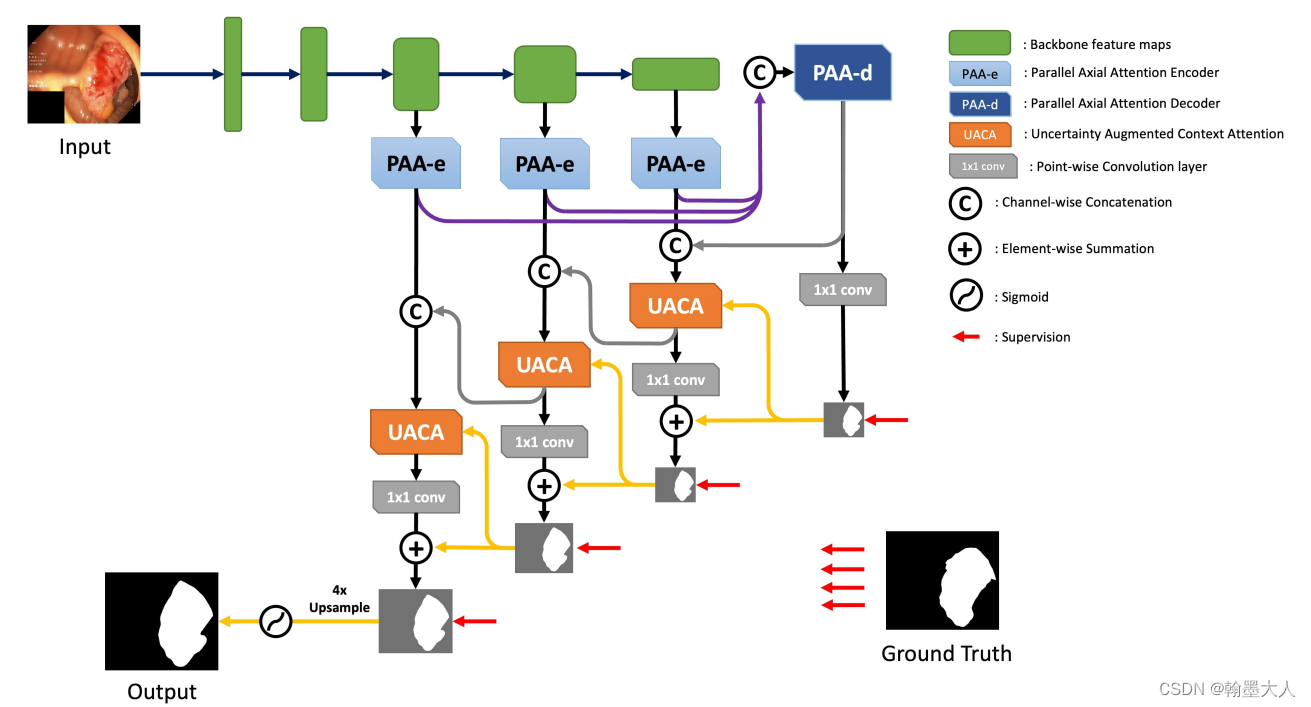
看一下整体的结构:
首先按照惯例我们测试一下模型的参数和计算量:
def main():model = UACANet(channels=256, output_stride=16, pretrained=True) # (传入参数)model.eval()rgb = torch.randn(1,3, 352, 352)summary(model, input_size=[(3, 352,352)], device='cpu')with torch.no_grad():output = model(rgb)print(output)flops, params = profile(model, inputs=(rgb,))print(flops,params)if __name__ == '__main__':main()
实例化模型,采用UACANet-L,所有卷积通道为256,用torch.summary计算参数量,用thop计算参数量和计算量。
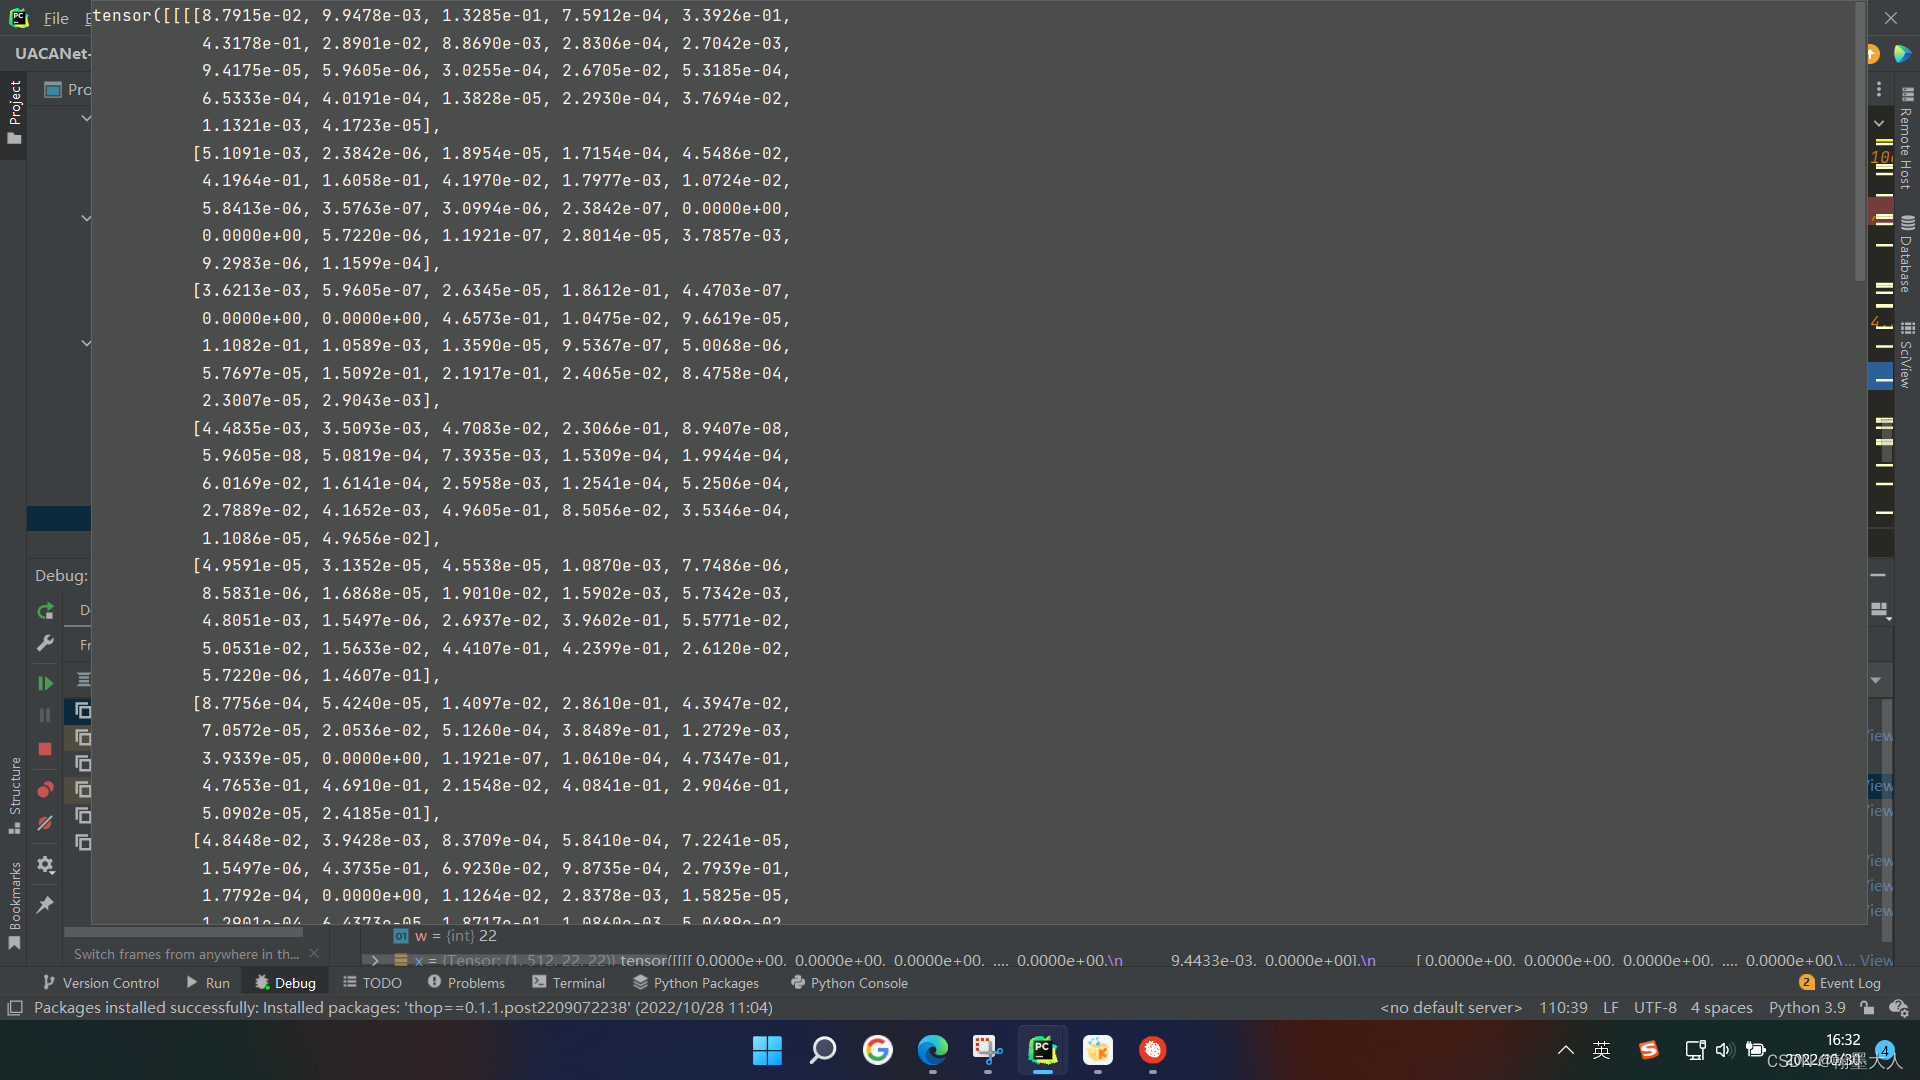
summary结果:

thop结果:(相差不大,大约在68M左右,有点大,对比之前的CMX(67M)等双输入网络,本文只有一个rgb输入,且是二分类。)

接着看模型是如何设计的:
class UACANet(nn.Module):# res2net based encoder decoderdef __init__(self, channels=256, output_stride=16, pretrained=True):super(UACANet, self).__init__()self.resnet = res2net50_v1b_26w_4s(pretrained=pretrained, output_stride=output_stride)self.context2 = PAA_e(512, channels)self.context3 = PAA_e(1024, channels)self.context4 = PAA_e(2048, channels)self.decoder = PAA_d(channels)self.attention2 = UACA(channels * 2, channels)self.attention3 = UACA(channels * 2, channels)self.attention4 = UACA(channels * 2, channels)self.loss_fn = bce_iou_lossself.ret = lambda x, target: F.interpolate(x, size=target.shape[-2:], mode='bilinear', align_corners=False)self.res = lambda x, size: F.interpolate(x, size=size, mode='bilinear', align_corners=False)def forward(self, sample):x = sample['image']if 'gt' in sample.keys():y = sample['gt']else:y = Nonebase_size = x.shape[-2:]x = self.resnet.conv1(x)x = self.resnet.bn1(x)x = self.resnet.relu(x)x = self.resnet.maxpool(x)x1 = self.resnet.layer1(x)x2 = self.resnet.layer2(x1)x3 = self.resnet.layer3(x2)x4 = self.resnet.layer4(x3)x2 = self.context2(x2)x3 = self.context3(x3)x4 = self.context4(x4)f5, a5 = self.decoder(x4, x3, x2)out5 = self.res(a5, base_size)f4, a4 = self.attention4(torch.cat([x4, self.ret(f5, x4)], dim=1), a5)out4 = self.res(a4, base_size)f3, a3 = self.attention3(torch.cat([x3, self.ret(f4, x3)], dim=1), a4)out3 = self.res(a3, base_size)_, a2 = self.attention2(torch.cat([x2, self.ret(f3, x2)], dim=1), a3)out2 = self.res(a2, base_size)if y is not None:loss5 = self.loss_fn(out5, y)loss4 = self.loss_fn(out4, y)loss3 = self.loss_fn(out3, y)loss2 = self.loss_fn(out2, y)loss = loss2 + loss3 + loss4 + loss5debug = [out5, out4, out3]else:loss = 0debug = []return {'pred': out2, 'loss': loss, 'debug': debug}
看forward函数,我们获得原始图像和gt。
1:获得图像的大小(352,352)
2:输入到resnet中,跳到resnet函数,文中指明采用Res2Net,26wx4s:
2.1: 注意几个参数,Bottle2neck, [3, 4, 6, 3], baseWidth=26, scale=4。
2.1.1:跳到Res2Net
import torch.nn as nn
import math
import torch.utils.model_zoo as model_zoo
import torch
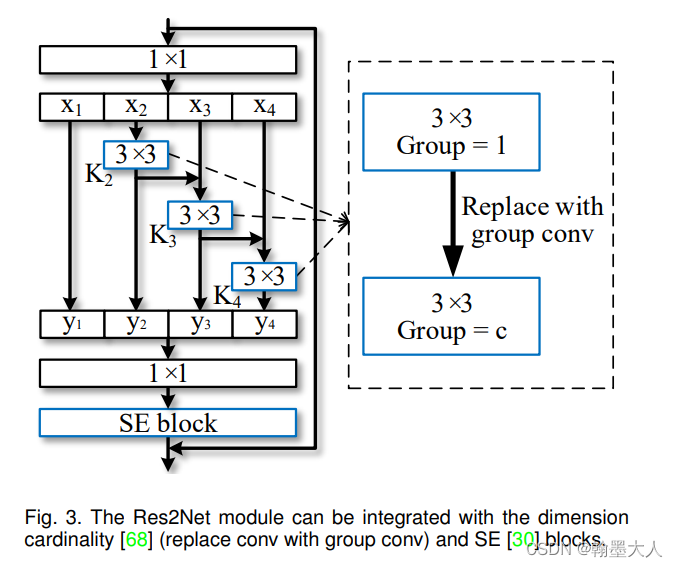
import torch.nn.functional as F__all__ = ['Res2Net', 'res2net50_v1b', 'res2net101_v1b', 'res2net50_v1b_26w_4s']class Bottle2neck(nn.Module):expansion = 4def __init__(self, inplanes, planes, stride=1, dilation=1, downsample=None, baseWidth=26, scale=4, stype='normal'):super(Bottle2neck, self).__init__()width = int(math.floor(planes * (baseWidth / 64.0)))self.conv1 = nn.Conv2d(inplanes, width * scale, kernel_size=1, bias=False)self.bn1 = nn.BatchNorm2d(width * scale)if scale == 1:self.nums = 1else:self.nums = scale - 1if stype == 'stage':self.pool = nn.AvgPool2d(kernel_size=3, stride=stride, padding=1)convs = []bns = []for i in range(self.nums):convs.append(nn.Conv2d(width, width, kernel_size=3, stride=stride, dilation=dilation, padding=dilation, bias=False))bns.append(nn.BatchNorm2d(width))self.convs = nn.ModuleList(convs)self.bns = nn.ModuleList(bns)self.conv3 = nn.Conv2d(width * scale, planes * self.expansion, kernel_size=1, bias=False)self.bn3 = nn.BatchNorm2d(planes * self.expansion)self.relu = nn.ReLU(inplace=True)self.downsample = downsampleself.stype = stypeself.scale = scaleself.width = widthdef forward(self, x):residual = xout = self.conv1(x)out = self.bn1(out)out = self.relu(out)spx = torch.split(out, self.width, 1)for i in range(self.nums):if i == 0 or self.stype == 'stage':sp = spx[i]else:sp = sp + spx[i]sp = self.convs[i](sp)sp = self.relu(self.bns[i](sp))if i == 0:out = spelse:out = torch.cat((out, sp), 1)if self.scale != 1 and self.stype == 'normal':out = torch.cat((out, spx[self.nums]), 1)elif self.scale != 1 and self.stype == 'stage':out = torch.cat((out, self.pool(spx[self.nums])), 1)out = self.conv3(out)out = self.bn3(out)if self.downsample is not None:residual = self.downsample(x)out += residualout = self.relu(out)return out
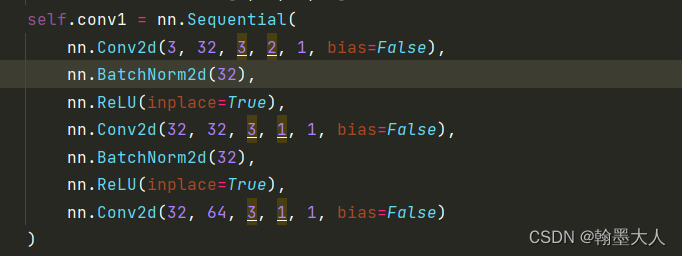
class Res2Net(nn.Module):def __init__(self, block, layers, baseWidth=26, scale=4, num_classes=1000, output_stride=32):self.inplanes = 64super(Res2Net, self).__init__()self.baseWidth = baseWidthself.scale = scaleif output_stride == 8:self.grid = [1, 2, 1]self.stride = [1, 2, 1, 1]self.dilation = [1, 1, 2, 4]elif output_stride == 16:self.grid = [1, 2, 4]self.stride = [1, 2, 2, 1]self.dilation = [1, 1, 1, 2]elif output_stride == 32:self.grid = [1, 2, 4]self.stride = [1, 2, 2, 2]self.dilation = [1, 1, 2, 4]self.conv1 = nn.Sequential(nn.Conv2d(3, 32, 3, 2, 1, bias=False),nn.BatchNorm2d(32),nn.ReLU(inplace=True),nn.Conv2d(32, 32, 3, 1, 1, bias=False),nn.BatchNorm2d(32),nn.ReLU(inplace=True),nn.Conv2d(32, 64, 3, 1, 1, bias=False))self.bn1 = nn.BatchNorm2d(64)self.relu = nn.ReLU()self.maxpool = nn.MaxPool2d(kernel_size=3, stride=2, padding=1)self.layer1 = self._make_layer(block, 64, layers[0], stride=self.stride[0], dilation=self.dilation[0])self.layer2 = self._make_layer(block, 128, layers[1], stride=self.stride[1], dilation=self.dilation[1])self.layer3 = self._make_layer(block, 256, layers[2], stride=self.stride[2], dilation=self.dilation[2])self.layer4 = self._make_layer(block, 512, layers[3], stride=self.stride[3], dilation=self.dilation[3])self.avgpool = nn.AdaptiveAvgPool2d(1)self.fc = nn.Linear(512 * block.expansion, num_classes)for m in self.modules():if isinstance(m, nn.Conv2d):nn.init.kaiming_normal_(m.weight, mode='fan_out', nonlinearity='relu')elif isinstance(m, nn.BatchNorm2d):nn.init.constant_(m.weight, 1)nn.init.constant_(m.bias, 0)def _make_layer(self, block, planes, blocks, stride=1, dilation=1):downsample = Noneif stride != 1 or self.inplanes != planes * block.expansion:downsample = nn.Sequential(nn.AvgPool2d(kernel_size=stride, stride=stride,ceil_mode=True, count_include_pad=False),nn.Conv2d(self.inplanes, planes * block.expansion,kernel_size=1, stride=1, bias=False),nn.BatchNorm2d(planes * block.expansion),)layers = []layers.append(block(self.inplanes, planes, stride, dilation, downsample=downsample,stype='stage', baseWidth=self.baseWidth, scale=self.scale))self.inplanes = planes * block.expansionfor i in range(1, blocks):layers.append(block(self.inplanes, planes, dilation=dilation, baseWidth=self.baseWidth, scale=self.scale))return nn.Sequential(*layers)def forward(self, x):x = self.conv1(x)x = self.bn1(x)x = self.relu(x)x = self.maxpool(x)x = self.layer1(x)x = self.layer2(x)x = self.layer3(x)x = self.layer4(x)x = self.avgpool(x)x = x.view(x.size(0), -1)x = self.fc(x)return xdef res2net50_v1b_26w_4s(pretrained=False, **kwargs):model = Res2Net(Bottle2neck, [3, 4, 6, 3], baseWidth=26, scale=4, **kwargs)if pretrained:model.load_state_dict(torch.load('D:/Ai论文代码/UACANet-main/backbone_ckpt/res2net50_v1b_26w_4s-3cf99910.pth',map_location=torch.device('cpu')))return model
def res2net101_v1b_26w_4s(pretrained=False, **kwargs):model = Res2Net(Bottle2neck, [3, 4, 23, 3], baseWidth=26, scale=4, **kwargs)if pretrained:model.load_state_dict(model_zoo.load_url(model_urls['res2net101_v1b_26w_4s']),map_location=torch.device('cpu'))return model
def res2net152_v1b_26w_4s(pretrained=False, **kwargs):model = Res2Net(Bottle2neck, [3, 8, 36, 3], baseWidth=26, scale=4, **kwargs)if pretrained:model.load_state_dict(model_zoo.load_url(model_urls['res2net152_v1b_26w_4s']))return modelif __name__ == '__main__':images = torch.rand(1, 3, 224, 224).cuda(0)model = res2net50_v1b_26w_4s(pretrained=True)model = model.cuda(0)print(model(images).size())看一下res2net的块结构:
看代码:
x首先经过conv1:相比传统的卷积,中间多了两层,不是由3直接到64,而是3-32-32-64,只在第一层进行下采样。
接着是bn,relu,maxpool和普通的resnet一样。

然后经过四个stage,每个stage里面的layer分别为【3,4,6,3】。会跳到Res2Net的layer函数,接着跳到Bottle2neck函数。
经过之前的卷积核最大池化,尺寸由(1,3,352,352,)---->(1,64,88,88)。
首先看一下Bottle2neck的一些参数:
inplane=64,planes=64,width=26,scale=4
经过conv1,x由(1,64,88,88)变为(1,104,88,88)。接着将输出按26为一份,划分四份,spx是一个元组里面包含四个tensor。

接着进行遍历,即第一个stage里面有三个layer。
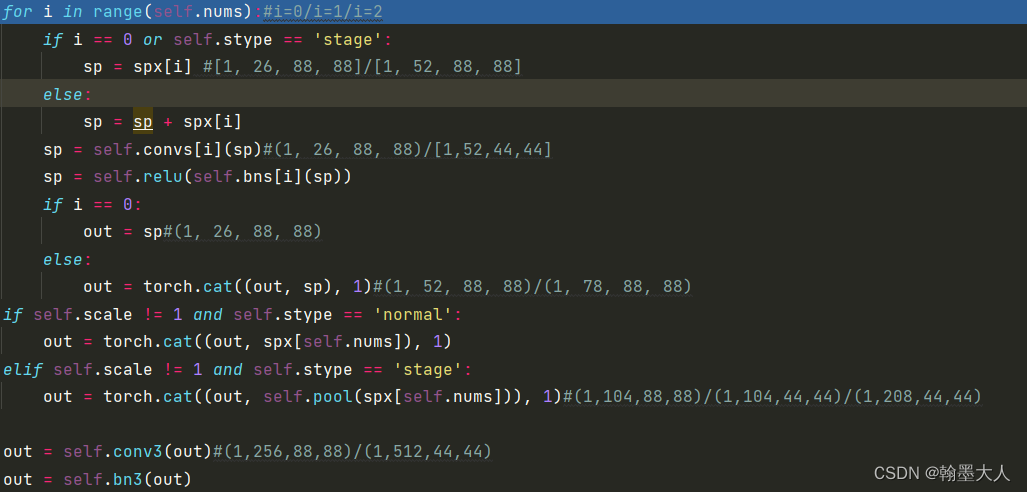
i = 0,sp = spx[0]=(1,26,88,88)。convs列表里面包含了三个卷积,bn列表里面包含了三个bn。
ModuleList(
(0): Conv2d(26, 26, kernel_size=(3, 3), stride=(1, 1), padding=(1, 1), bias=False)
(1): Conv2d(26, 26, kernel_size=(3, 3), stride=(1, 1), padding=(1, 1), bias=False)
(2): Conv2d(26, 26, kernel_size=(3, 3), stride=(1, 1), padding=(1, 1), bias=False)
)
结果经过convs[0](sp),仍为(1,26,88,88)。out=(1,26,88,88)。
接着进行第二次迭代,i=1:仍然执行下面一行,即stype非默认的normal。

sp仍为(1,26,88,88)。然后out和sp在维度方向进行concat,维度变为(1,52,88,88)。
执行四次后,维度变为(1,78,88,88),然后spx最后一个tensor经过平均池化后拼接起来,维度变为(1,104,88,88),经过conv3,维度变为(1,256,28,28)。
再经过一个downsample。得到最终输出(1,256,88,88)。x初始维度为64,不经过downsample无法进行逐像素融合,这里其实起到了升维的作用。
downsample = nn.Sequential(nn.AvgPool2d(kernel_size=stride, stride=stride,ceil_mode=True, count_include_pad=False),nn.Conv2d(self.inplanes, planes * block.expansion,kernel_size=1, stride=1, bias=False),nn.BatchNorm2d(planes * block.expansion),)
接着x进入context函数,即PAA_e,参数为:输入通道为(512,1024,2048)输出通道都为256。
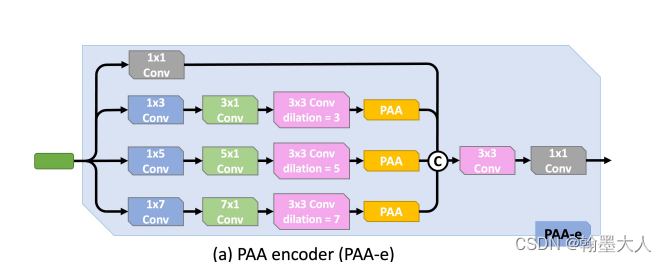
在PAA_e中,x首先经过self.branch0 = conv(in_channel, out_channel, 1)。再经过self.branch1 = PAA_kernel(in_channel, out_channel, 3),对应于:
class PAA_kernel(nn.Module):def __init__(self, in_channel, out_channel, receptive_size=3):super(PAA_kernel, self).__init__()self.conv0 = conv(in_channel, out_channel, 1)self.conv1 = conv(out_channel, out_channel, kernel_size=(1, receptive_size))self.conv2 = conv(out_channel, out_channel, kernel_size=(receptive_size, 1))self.conv3 = conv(out_channel, out_channel, 3, dilation=receptive_size)self.Hattn = self_attn(out_channel, mode='h')self.Wattn = self_attn(out_channel, mode='w')def forward(self, x):x = self.conv0(x)x = self.conv1(x)x = self.conv2(x)Hx = self.Hattn(x)Wx = self.Wattn(x)x = self.conv3(Hx + Wx)return xx进过conv0对应于:
class conv(nn.Module):def __init__(self, in_channels, out_channels, kernel_size, stride=1, dilation=1, groups=1, padding='same', bias=False, bn=True, relu=False):super(conv, self).__init__()if '__iter__' not in dir(kernel_size):kernel_size = (kernel_size, kernel_size)if '__iter__' not in dir(stride):stride = (stride, stride)if '__iter__' not in dir(dilation):dilation = (dilation, dilation)if padding == 'same':width_pad_size = kernel_size[0] + (kernel_size[0] - 1) * (dilation[0] - 1)height_pad_size = kernel_size[1] + (kernel_size[1] - 1) * (dilation[1] - 1)elif padding == 'valid':width_pad_size = 0height_pad_size = 0else:if '__iter__' in dir(padding):width_pad_size = padding[0] * 2height_pad_size = padding[1] * 2else:width_pad_size = padding * 2height_pad_size = padding * 2width_pad_size = width_pad_size // 2 + (width_pad_size % 2 - 1)height_pad_size = height_pad_size // 2 + (height_pad_size % 2 - 1)pad_size = (width_pad_size, height_pad_size)self.conv = nn.Conv2d(in_channels, out_channels, kernel_size, stride, pad_size, dilation, groups, bias=bias)self.reset_parameters()if bn is True:self.bn = nn.BatchNorm2d(out_channels)else:self.bn = Noneif relu is True:self.relu = nn.ReLU(inplace=True)else:self.relu = Nonedef forward(self, x):x = self.conv(x)if self.bn is not None:x = self.bn(x)if self.relu is not None:x = self.relu(x)return x
首先判断__iter__是否在dir(3)的属性中,我们打印一下(猜测3是int类型,不可迭代):

经过打印确实不在,kernel=(1,1)。stride=1,dilation=1。
width_pad_size=height_pad_size=1.
width_pad_size = width_pad_size // 2 + (width_pad_size % 2 - 1)height_pad_size = height_pad_size // 2 + (height_pad_size % 2 - 1)pad_size = (width_pad_size, height_pad_size)
则,pad_size=(0,0)。bn = True,relu=True。
x由原始的(1,512,44,44)变为(1,256,44,44)。
然后x经过第二个branch,x经过PAA_kernel。
class PAA_kernel(nn.Module):def __init__(self, in_channel, out_channel, receptive_size=3):super(PAA_kernel, self).__init__()self.conv0 = conv(in_channel, out_channel, 1)self.conv1 = conv(out_channel, out_channel, kernel_size=(1, receptive_size))self.conv2 = conv(out_channel, out_channel, kernel_size=(receptive_size, 1))self.conv3 = conv(out_channel, out_channel, 3, dilation=receptive_size)self.Hattn = self_attn(out_channel, mode='h')self.Wattn = self_attn(out_channel, mode='w')def forward(self, x):x = self.conv0(x)x = self.conv1(x)x = self.conv2(x)Hx = self.Hattn(x)Wx = self.Wattn(x)x = self.conv3(Hx + Wx)return x
x分别经过conv0,1,2.维度分别(1,512,44,44)变为(1,256,44,44)---->(1,256,44,44)---->(1,256,44,44).

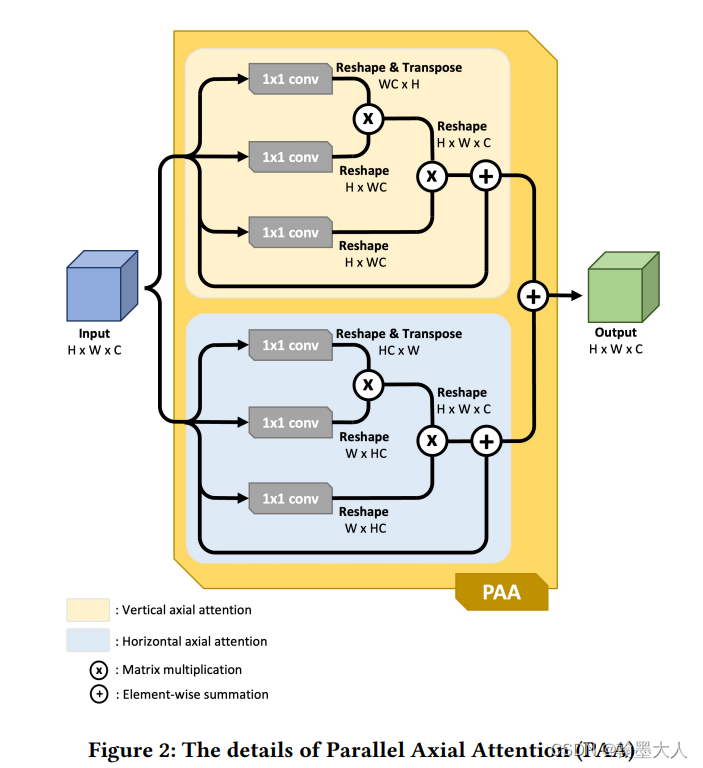
然后在经过self.attention,即轴注意力,首先是h轴。
class self_attn(nn.Module):def __init__(self, in_channels, mode='hw'):#mode=h/wsuper(self_attn, self).__init__()self.mode = modeself.query_conv = conv(in_channels, in_channels // 8, kernel_size=(1, 1))self.key_conv = conv(in_channels, in_channels // 8, kernel_size=(1, 1))self.value_conv = conv(in_channels, in_channels, kernel_size=(1, 1))self.gamma = nn.Parameter(torch.zeros(1))self.softmax = nn.Softmax(dim=-1)def forward(self, x):#(1,256,44,44)batch_size, channel, height, width = x.size()axis = 1if 'h' in self.mode:axis *= height # 44if 'w' in self.mode:axis *= widthview = (batch_size, -1, axis)#(1,-1,44)projected_query = self.query_conv(x).view(*view).permute(0, 2, 1)projected_key = self.key_conv(x).view(*view)attention_map = torch.bmm(projected_query, projected_key)attention = self.softmax(attention_map)projected_value = self.value_conv(x).view(*view)out = torch.bmm(projected_value, attention.permute(0, 2, 1))out = out.view(batch_size, channel, height, width)out = self.gamma * out + xreturn out
self.mode = h,axis =44,view=(1,-1,44)。
接着是query函数:
conv(
(conv): Conv2d(256, 32, kernel_size=(1, 1), stride=(1, 1), bias=False)
(bn): BatchNorm2d(32, eps=1e-05, momentum=0.1, affine=True, track_running_stats=True)
)
x由(1,256,44,44)—>(1,32,44,44)—>(1,1408,44)—>(1,44,1408)。
x再经过key:
conv(
(conv): Conv2d(256, 32, kernel_size=(1, 1), stride=(1, 1), bias=False)
(bn): BatchNorm2d(32, eps=1e-05, momentum=0.1, affine=True, track_running_stats=True)
)
x由(1,256,44,44)—>(1,32,44,44)—>(1,1408,44)。
attention_map=q@k=(1,44,44)。
x经过value:
conv(
(conv): Conv2d(256, 256, kernel_size=(1, 1), stride=(1, 1), bias=False)
(bn): BatchNorm2d(256, eps=1e-05, momentum=0.1, affine=True, track_running_stats=True)
)
x有(1,256,44,44)变为**(1,1126,44)**。这里维度保持不变。
attention_map维度进行转变为(1,44,44)。
out= (1,1126,44)
reshape为原始的形状:(1,256,44,44)
out = self.gamma * out + x=(1,256,44,44)。这样Hx = self.Hattn(x)计算完毕。
接着执行:Wx = self.Wattn(x),即w轴注意力。axis=width,其他人写的轴注意力:添加链接描述
将两个轴的结果相加经过一个卷积进行融合,维度仍为(1,256,44,44)。这样PAA_kernel(kernel=3)计算完毕。其余的PAA_kernel(kernel=5,7)同理。
将生成的四个结果进行conat,然后经过一个卷积进行融合。然后再与原始的x经过1x1卷积后,相加。x=(1,256,44,44)。这样context2计算完毕。
同理x3=(1,256,22,22),x4=(1,256,22,22)。
decoder:
将x2,x3,x4输入到decoder中,PAA_d。
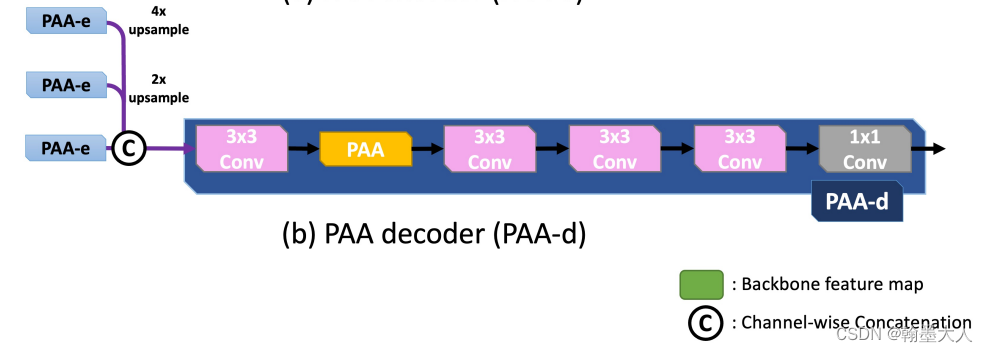
class PAA_d(nn.Module):# dense decoder, it can be replaced by other decoder previous, such as DSS, amulet, and so on.# used after MSFdef __init__(self, channel):super(PAA_d, self).__init__()self.conv1 = conv(channel * 3 ,channel, 3)self.conv2 = conv(channel, channel, 3)self.conv3 = conv(channel, channel, 3)self.conv4 = conv(channel, channel, 3)self.conv5 = conv(channel, 1, 3, bn=False)self.Hattn = self_attn(channel, mode='h')self.Wattn = self_attn(channel, mode='w')self.upsample = lambda img, size: F.interpolate(img, size=size, mode='bilinear', align_corners=True)def forward(self, f1, f2, f3):#(1,256,22,22)/(1,256,22,22)/(1,256,44,44)f1 = self.upsample(f1, f3.shape[-2:])f2 = self.upsample(f2, f3.shape[-2:])f3 = torch.cat([f1, f2, f3], dim=1)f3 = self.conv1(f3)Hf3 = self.Hattn(f3)Wf3 = self.Wattn(f3)f3 = self.conv2(Hf3 + Wf3)f3 = self.conv3(f3)f3 = self.conv4(f3)out = self.conv5(f3)return f3, out
将x2,x3上采样到x4大小。然后concat,经过3x3卷积,再经过一个PAA,再经过3个3x3卷积,输出out维度为(1,1,44,44),f3维度为(1,256,44,44)。
将PAA-d的一个上采样到PAA-e的输出一样的大小,进行拼接后和PAA-d的另一个输出m一起输送到UACA中。
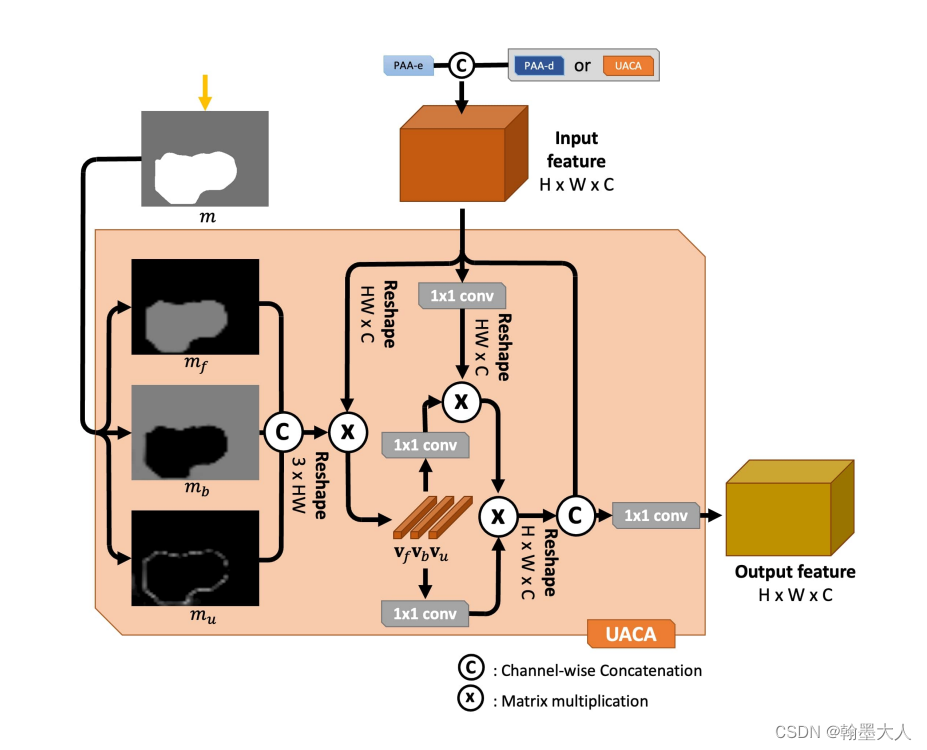
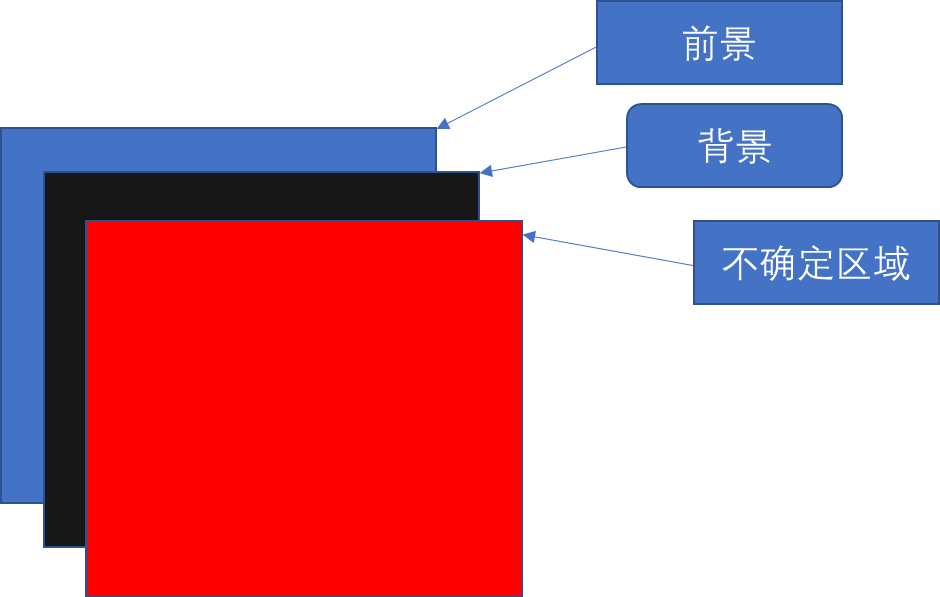
然后将map上采样到x一样的小。即(1,1,22,22)。然后将map进行softmax。获得一个分数图与0.5比较大小。

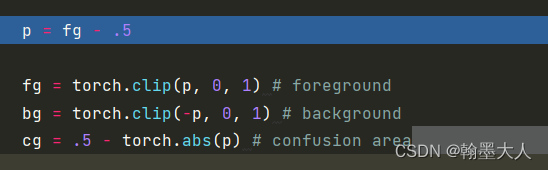
clip函数将p限制到0到1之间,如果小于0则为0,大于0,则为它本身。其中p=m-0.5。
对于mf,如果p大于0,则max=p,对于fg,1>p>0,则fg=p。
如果p小于0,则max=0,对于fg,p<0,fg=0。
对于bg同理。
看一下p的内部是什么样子:
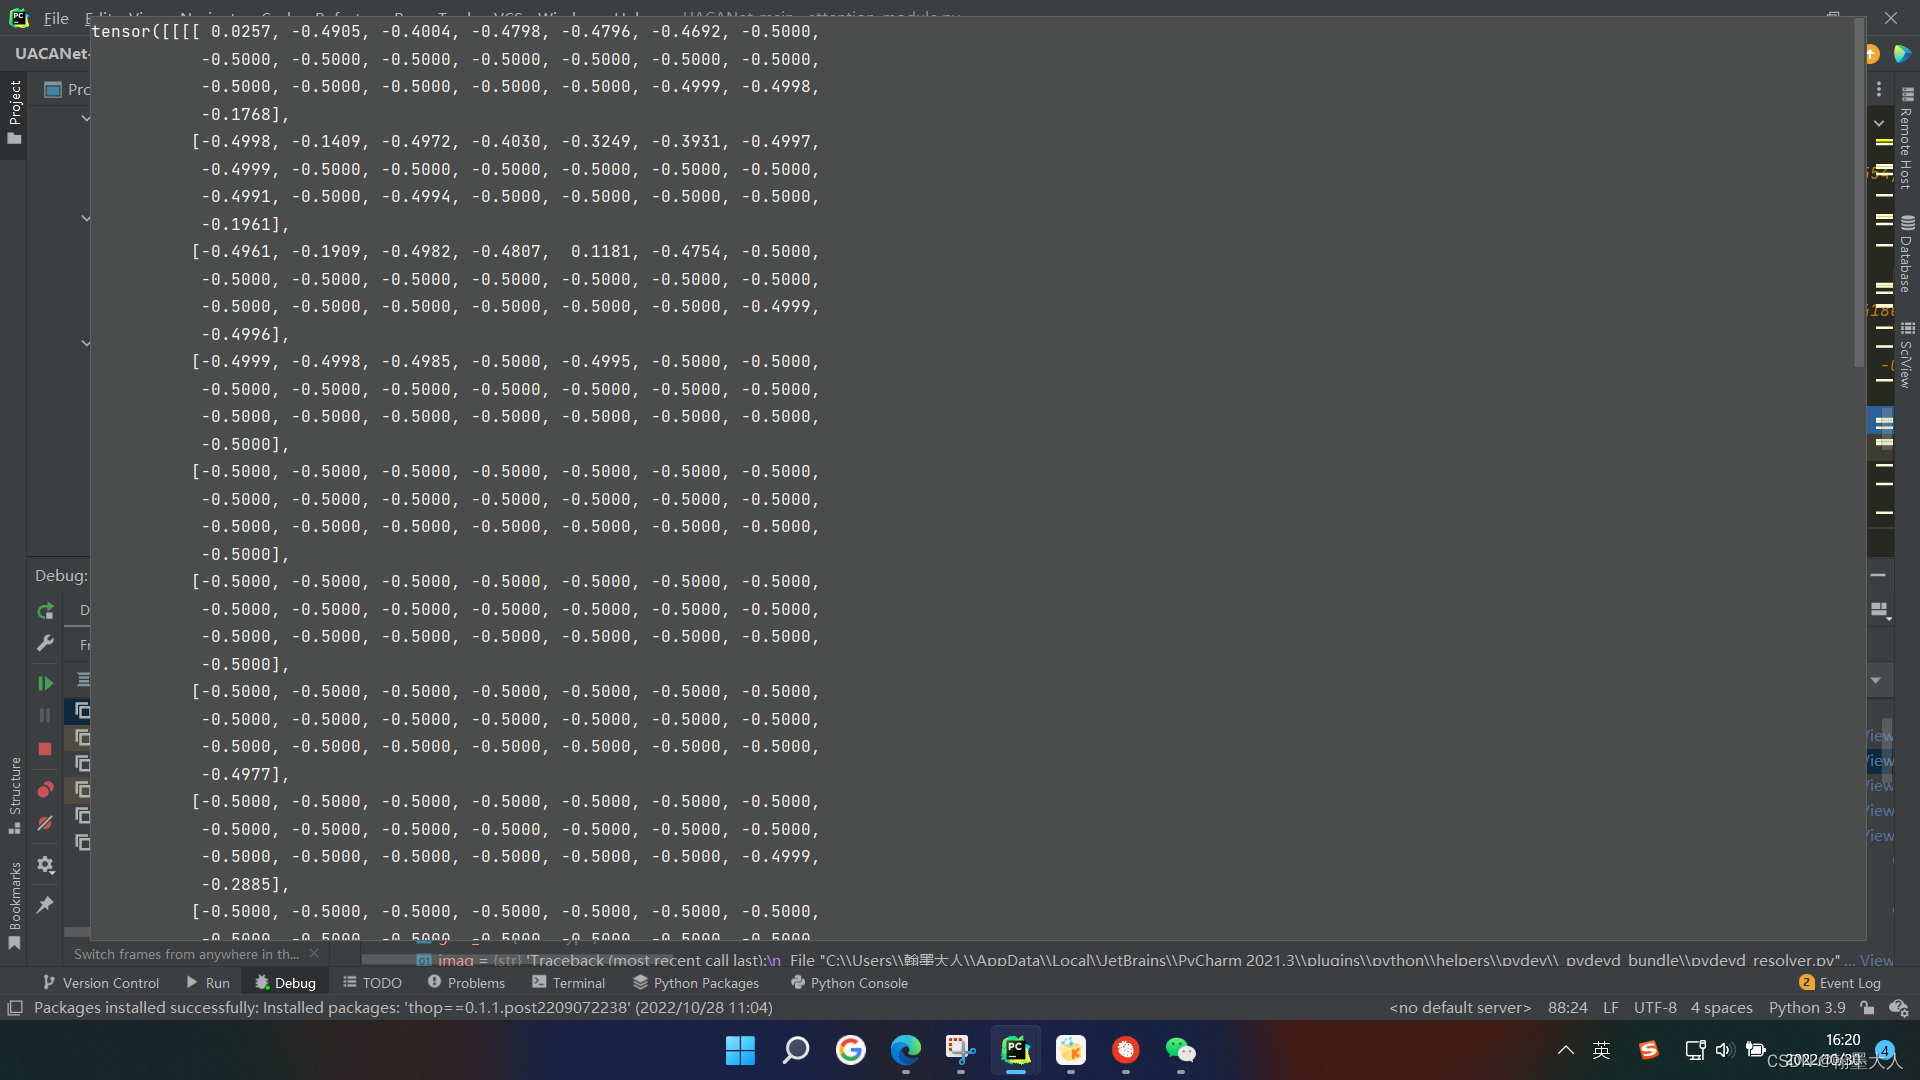
我们选择大于0的点和小于0用0代替的点表示前景:
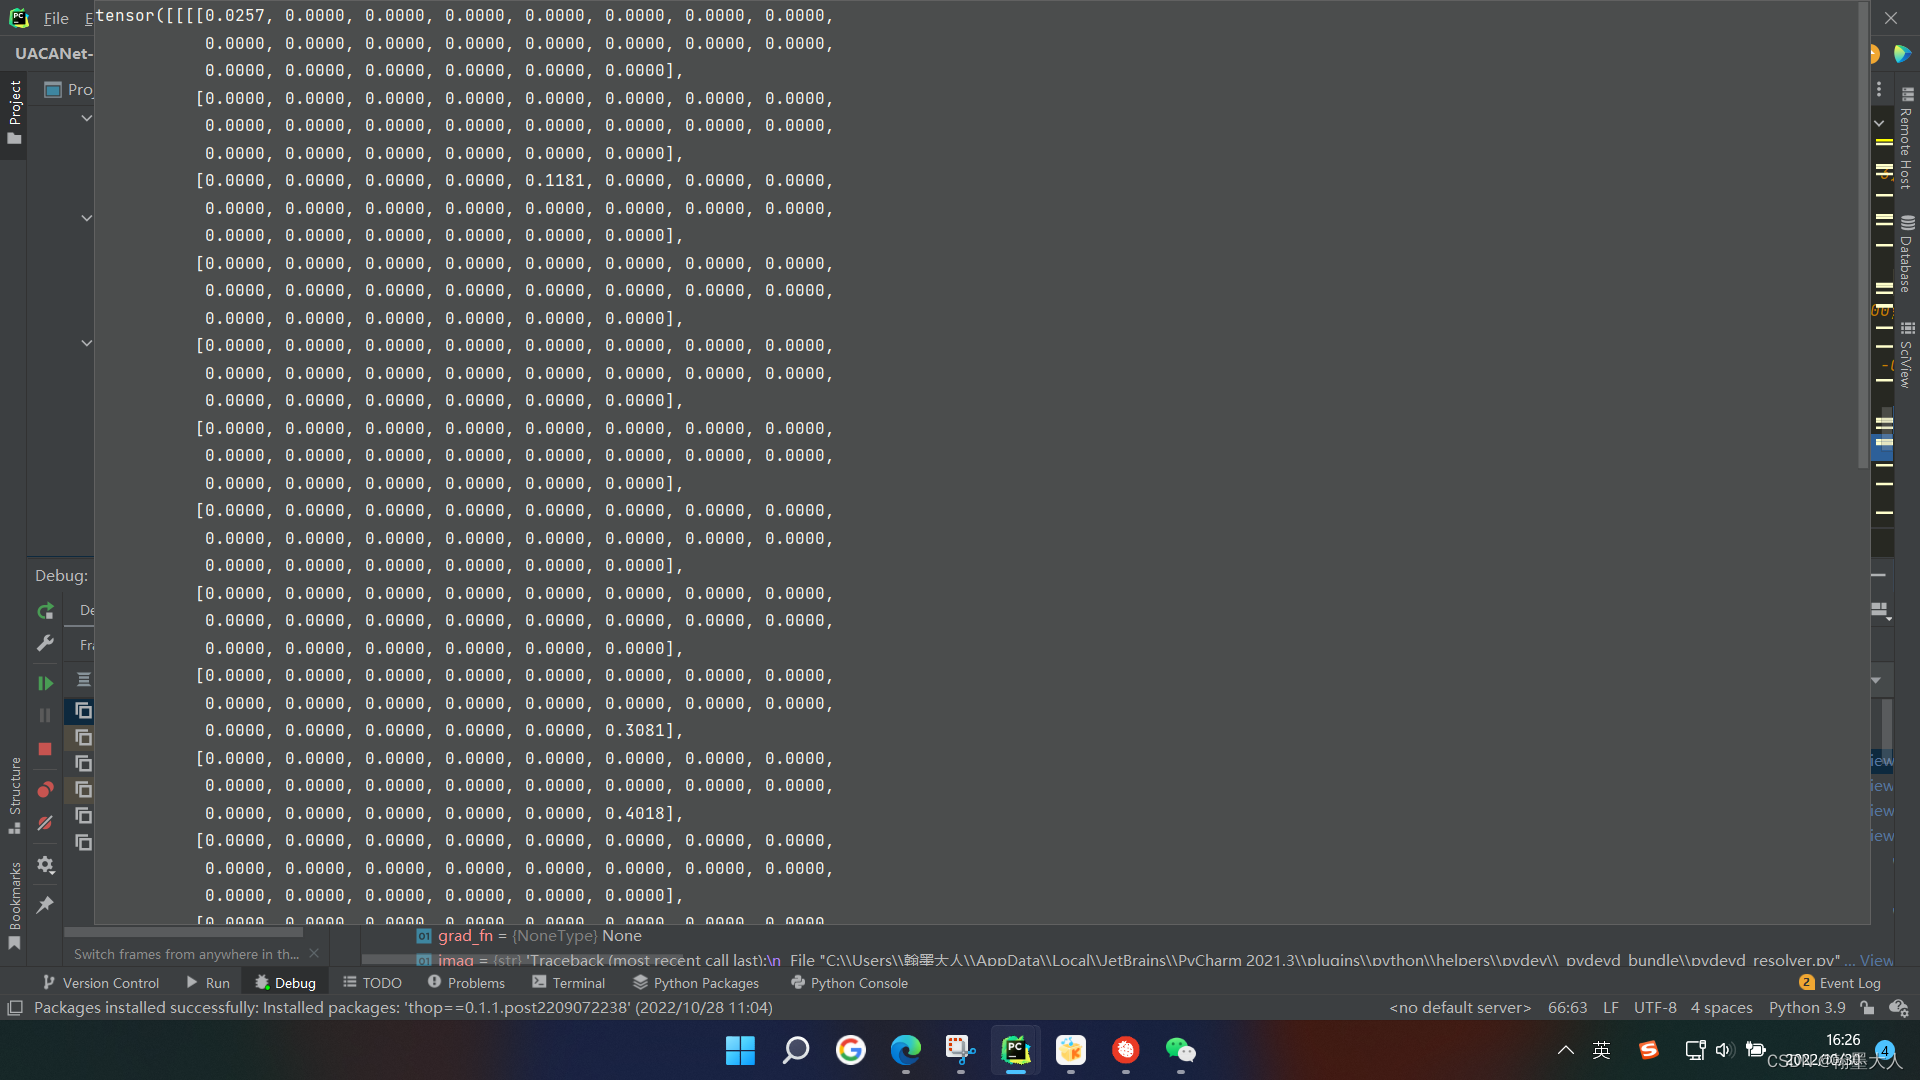
用0.5-m和等于0的点表示背景:
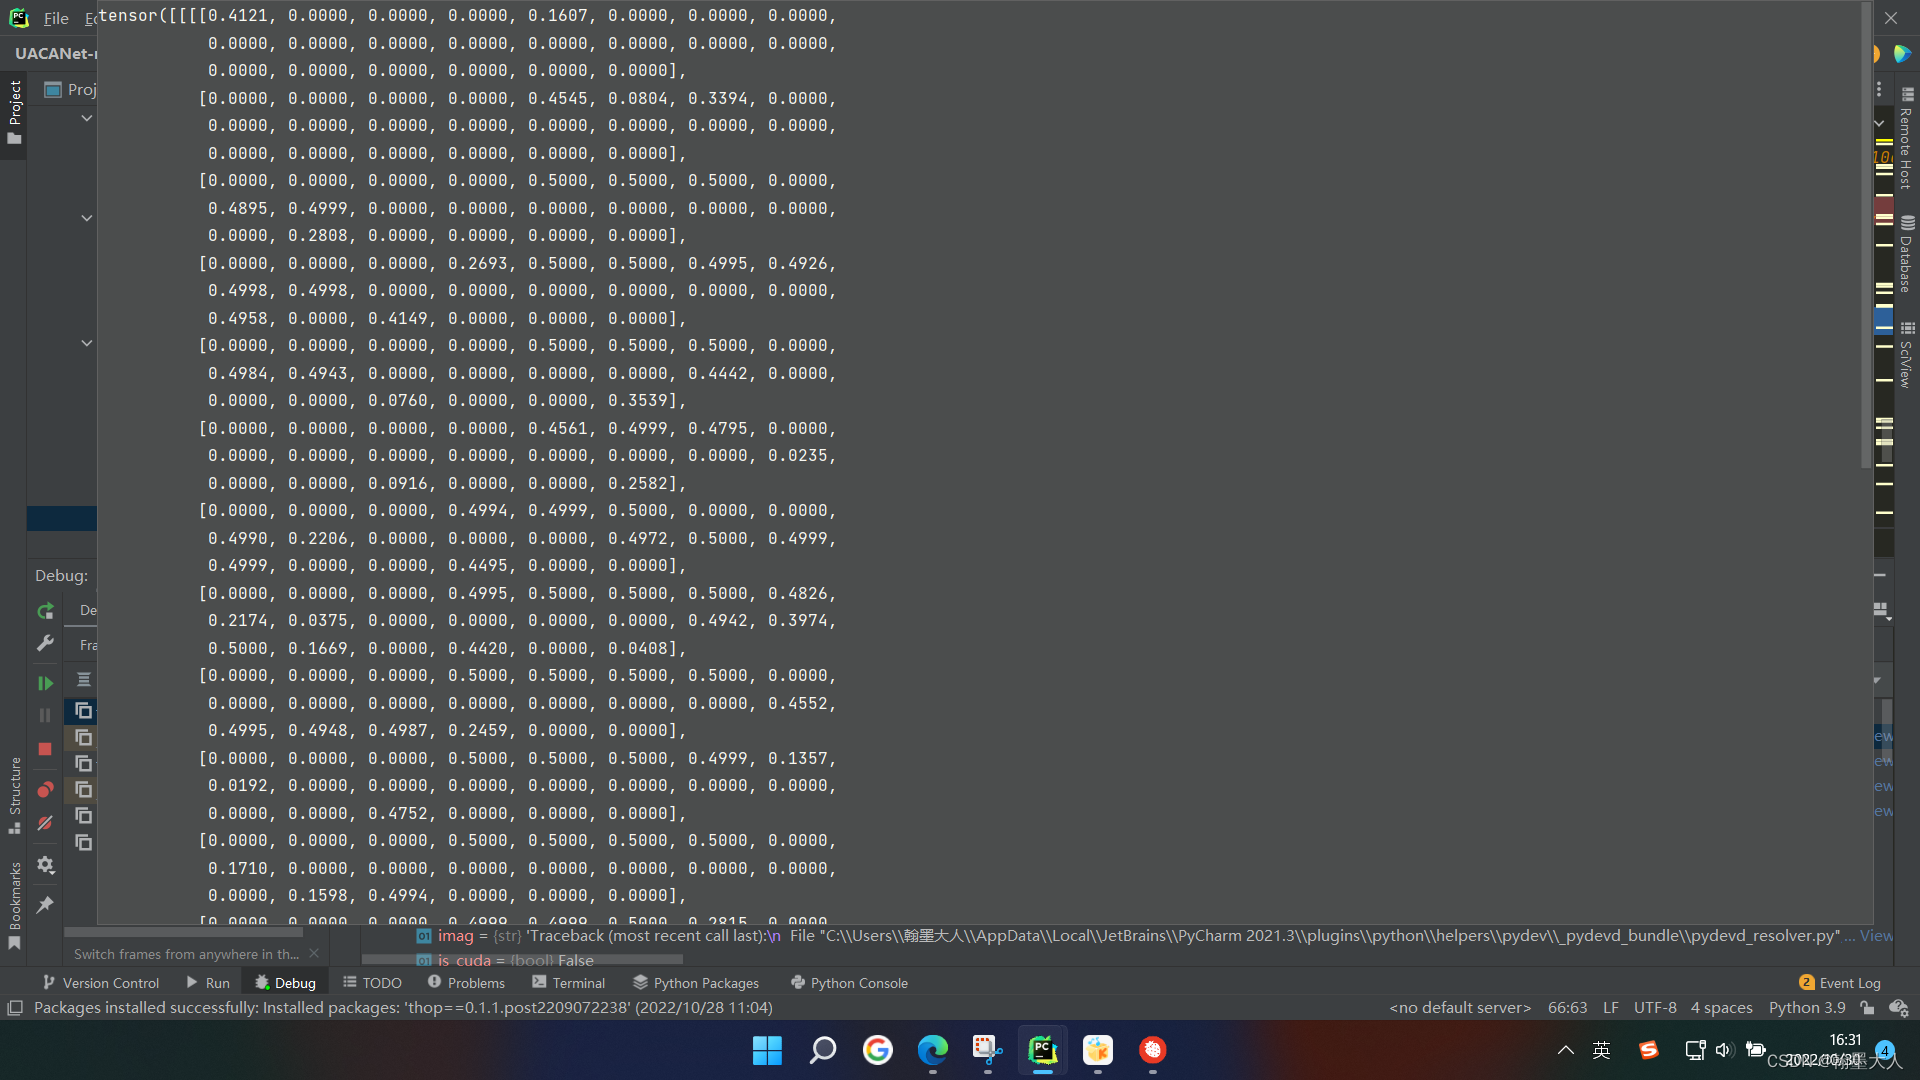
不确定区域;
将生成的三个特征图concat。
将x进行reshape(1,484,512),将prob进行reshape(1,3,484)。
将prob概率图与经过reshape的x进行相乘。维度变为(1,3,512)。再进行permute和unsqueeze。维度变为(1,512,3,1)。
x生成query,context生成key和value。

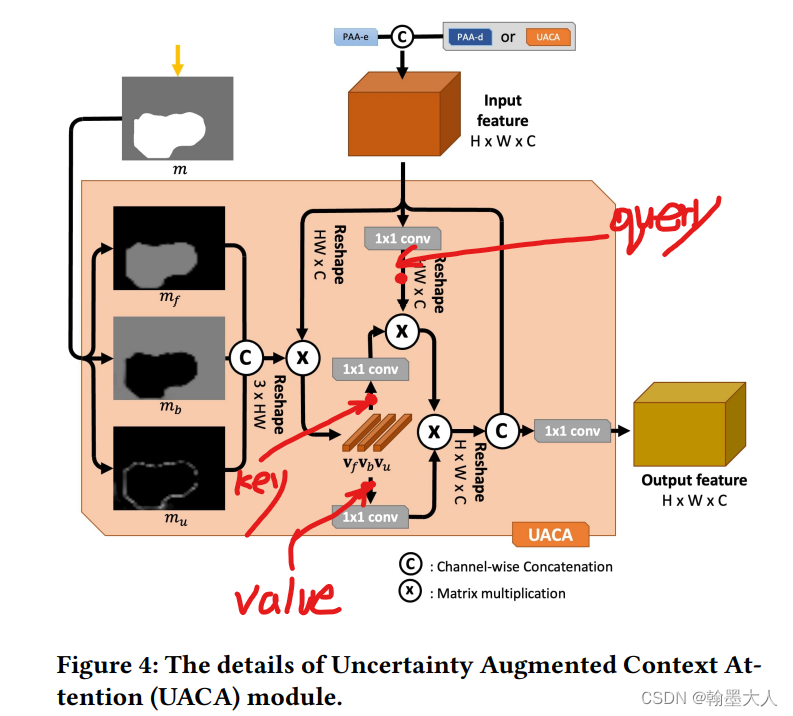
然后就是进行注意力计算再进行reshape,得到(1,256,22,22)。将生成的结果与原始的x进行concat。进行卷积得到最终的x,(1,256,22,22)。在经过一个维度为1的卷积与第一个输出图相加得到第二个输出图。即为f4和a4.
接着将x3和a4作为输入,再输入到UACA中。一直到最后一个a2的输出,上采样到原始图像大小。即(1,1,352,352)。
------------------------------------------------------------------------整体模型搭建结束------------------------------------------------------------------