
数据增强方法汇总
数据增强
- 1.有监督数据增强
- 1.1 单样本数据增强
- augly安装
- augly使用方法
- 1.2 多样本数据增强
- 1.2.1 SMOTE
- python实现
- 1.2.2 SamplePairing
- python实现
- 1.2.3 mixup
- python实现
- 2.无监督数据增强
- 2.1 GAN
- 2.2 Diffunsion
- 2.3 Autoaugmentation
1.有监督数据增强
1.1 单样本数据增强
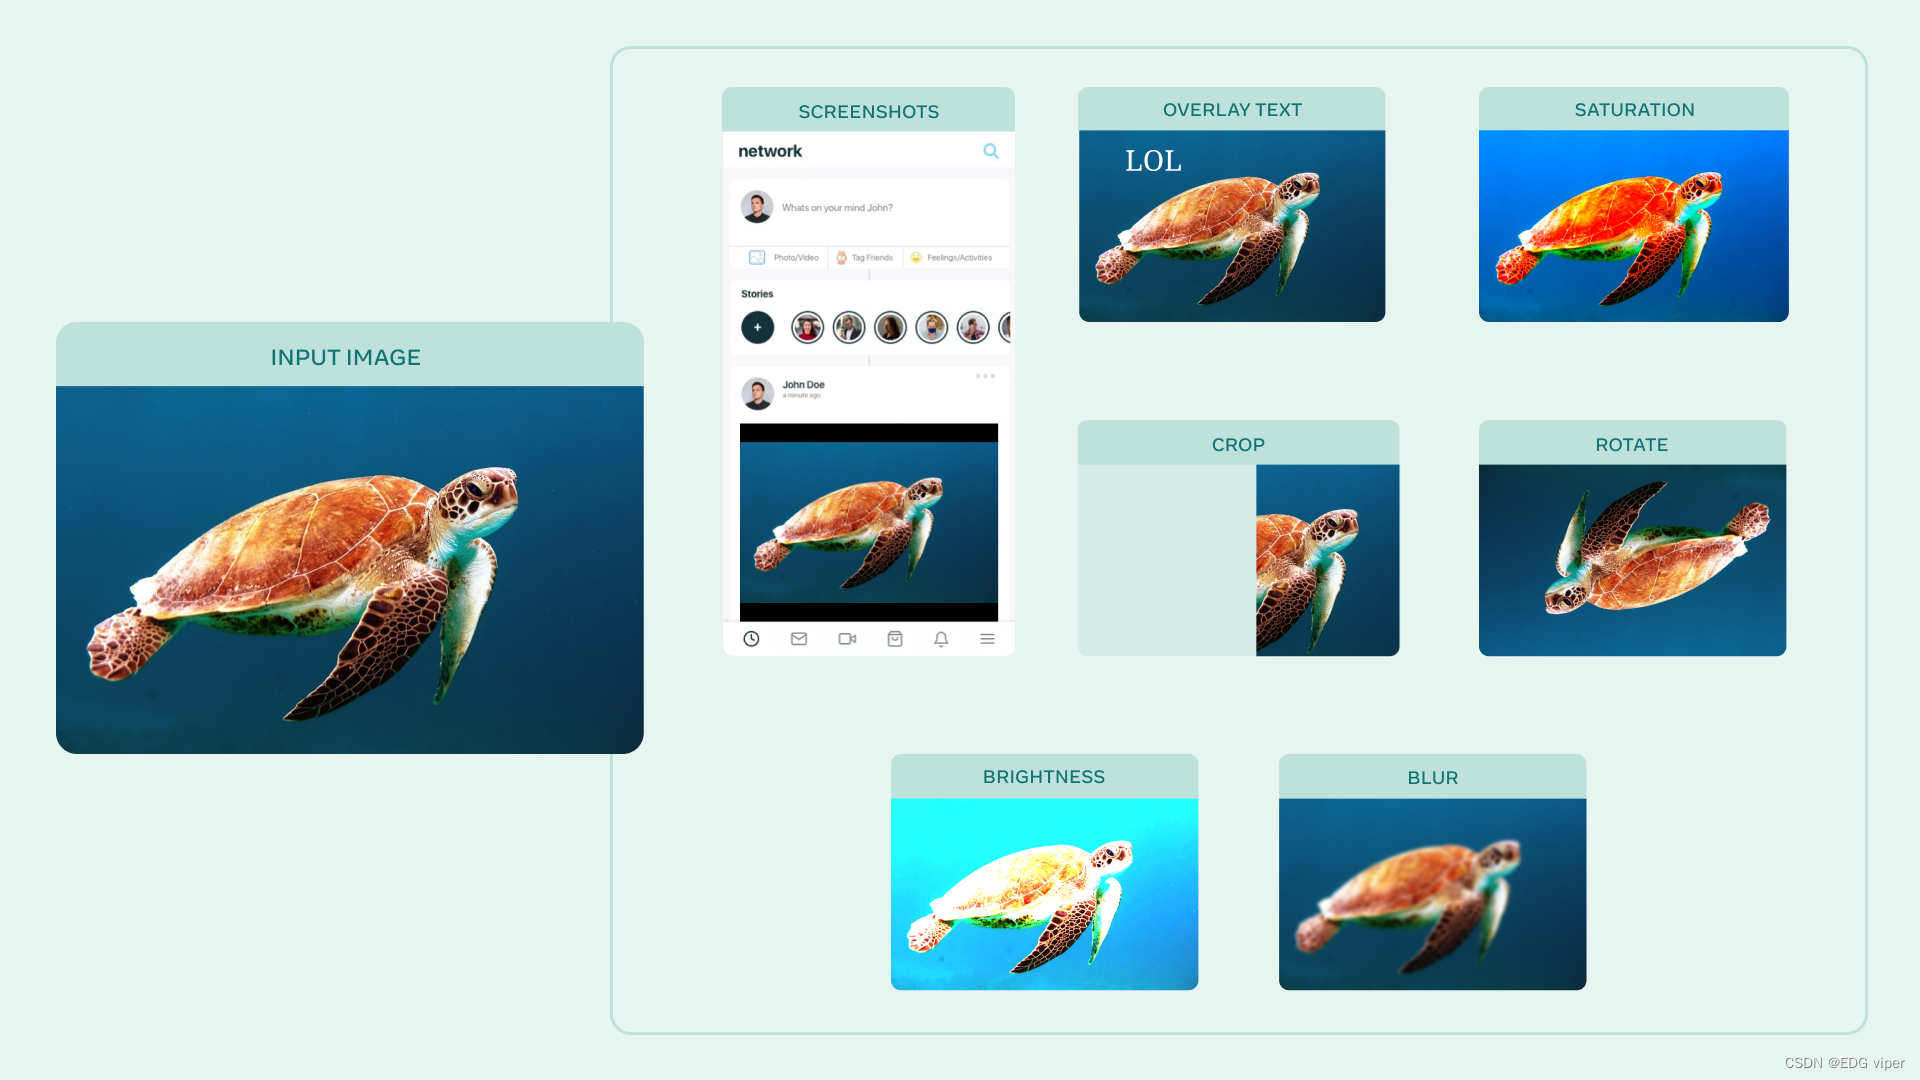
augly安装
AugLy是一个数据增强库,目前支持四种模式(音频、图像、文本和视频)和100多种增强。每个模态的增强包含在自己的子库中。这些子库包括基于函数和基于类的变换、组合运算符,并可以选择提供有关所应用转换的元数据,包括其强度。
该库基于Python,至少需要Python 3.6+版本、
官网地址 :https://github.com/facebookresearch/AugLy
安装该库方法
pip install augly[all]
也可以只安装某一个应用,比如只安装音频
pip install augly[audio]
也可以克隆git
git clone git@github.com:facebookresearch/AugLy.git && cd AugLy
[Optional, but recommended] conda create -n augly && conda activate augly && conda install pip
pip install -e .[all]
augly使用方法
augly.image所有函数都接受要作为输入增强的图像或PIL图像对象的路径,并返回增强的PIL图像对象。如果指定了输出路径,图像也将保存到文件中。
import augly.image as imaugsimage_path = "your_img_path.png"
output_path = "your_output_path.png"aug_image = imaugs.overlay_emoji(image_path, opacity=1.0, emoji_size=0.15)#增强功能也可以接受PIL图像作为输入
aug_image = imaugs.pad_square(aug_image)#如果指定了输出路径,图像也将保存到文件中
aug_image = imaugs.overlay_onto_screenshot(aug_image, output_path=output_path)
🎵🕺🗣🏀使用augly与pytorch transforms集成
import torchvision.transforms as transforms
import augly.image as imaugsCOLOR_JITTER_PARAMS = {"brightness_factor": 1.2,"contrast_factor": 1.2,"saturation_factor": 1.4,
}AUGMENTATIONS = [imaugs.Blur(),imaugs.ColorJitter(**COLOR_JITTER_PARAMS),imaugs.OneOf([imaugs.OverlayOntoScreenshot(), imaugs.OverlayEmoji(), imaugs.OverlayText()]),
]#一种是应用到PIL图像
image = Image.open("your_img_path.png")
TRANSFORMS = imaugs.Compose(AUGMENTATIONS)
aug_image = TRANSFORMS(image)#也可以应用到tensor张量
TENSOR_TRANSFORMS = transforms.Compose(AUGMENTATIONS + [transforms.ToTensor()])
aug_tensor_image = TENSOR_TRANSFORMS(image)
增强函数方法很多 也可以查看文档
https://augly.readthedocs.io/en/latest/augly.image.html
1.2 多样本数据增强
1.2.1 SMOTE
SMOTE全称“Synthetic Minority Over-sampling Technique”
过度采样技术
主要是针对不平衡的数据集使用。可以采用随机欠采样或过采样技术,对数据集进行调整,使其趋于均衡。
原理
它是基于随机过采样算法的一种改进方案,由于随机过采样采取简单复制样本的策略来增加少数类样本,这样容易产生模型过拟合的问题,即使得模型学习到的信息过于特别(Specific)而不够泛化(General),算法的基本思想是对少数类样本进行分析并根据少数类样本人工合成新样本添加到数据集中,具体如下图所示:
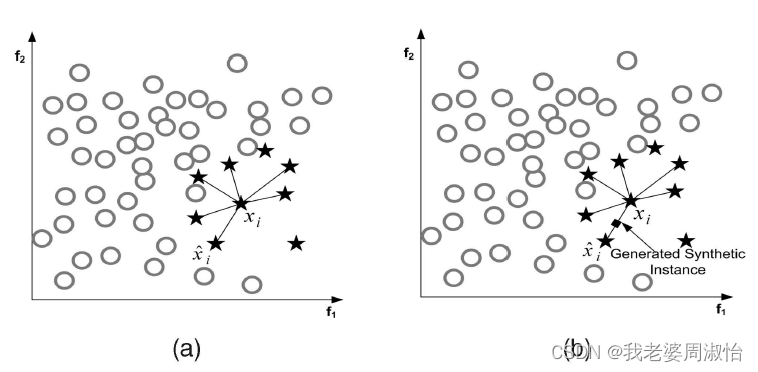
算法流程
- 将每一个图像看成是一个特征空间,将特征映射到空间上类似于聚类算法将各数据点展示出来
- 对于小样本的图像(x,y)(x,y)(x,y),按欧式距离找出k个最近邻的样本,从中随机选择一个样本点,选择为近邻点(xn,yn)(x_n,y_n)(xn,yn)
- 将特征空间中的样本点与最近邻的样本点连线。随机选取线上一点作为新的样本(这里的特征空间样本点,也可以是样本的中心聚类中心这种)
- 重复1,2,3直到数据集平衡
算法公式
(xnew,ynew=(x,y)+rand(0,1)∗((xn−x),(yn−y))(x_{new},y_{new}=(x,y)+rand(0,1)*((x_n -x),(y_n-y))(xnew,ynew=(x,y)+rand(0,1)∗((xn−x),(yn−y))
python实现
安装
pip install imbalanced-learn
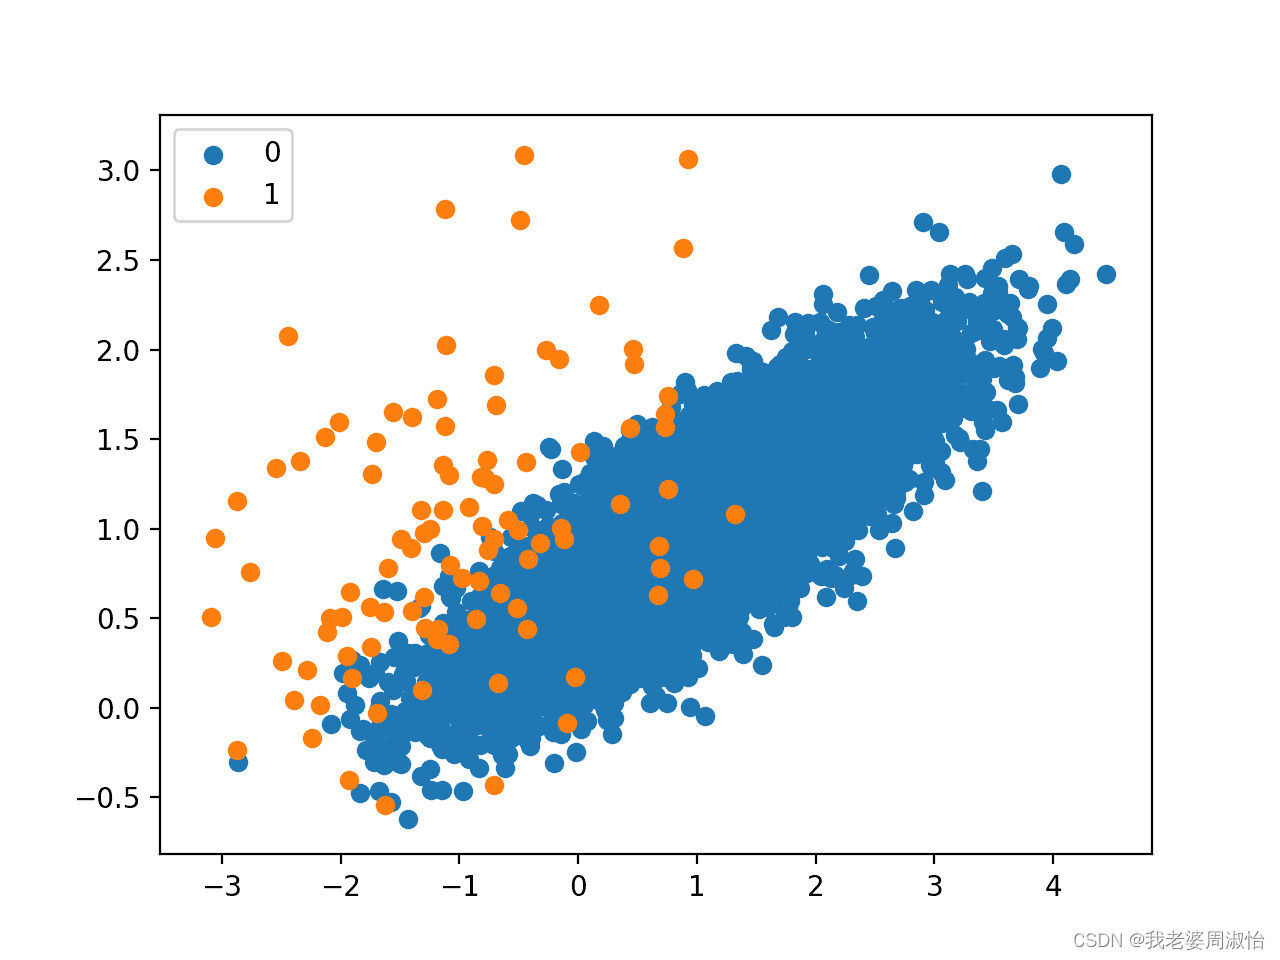
我们将通过一个不平衡的二分类问题来实现SMOTE算法
from collections import Counter
from sklearn.datasets import make_classification
from matplotlib import pyplot
from numpy import where
# 定义数据集
X, y = make_classification(n_samples=10000, n_features=2, n_redundant=0,n_clusters_per_class=1, weights=[0.99], flip_y=0, random_state=1)
# 汇总类分布
counter = Counter(y)
print(counter)
# 绘制散点图
for label, _ in counter.items():row_ix = where(y == label)[0]pyplot.scatter(X[row_ix, 0], X[row_ix, 1], label=str(label))
pyplot.legend()
pyplot.show()
Counter输出分类汇总({0: 9900, 1: 100})
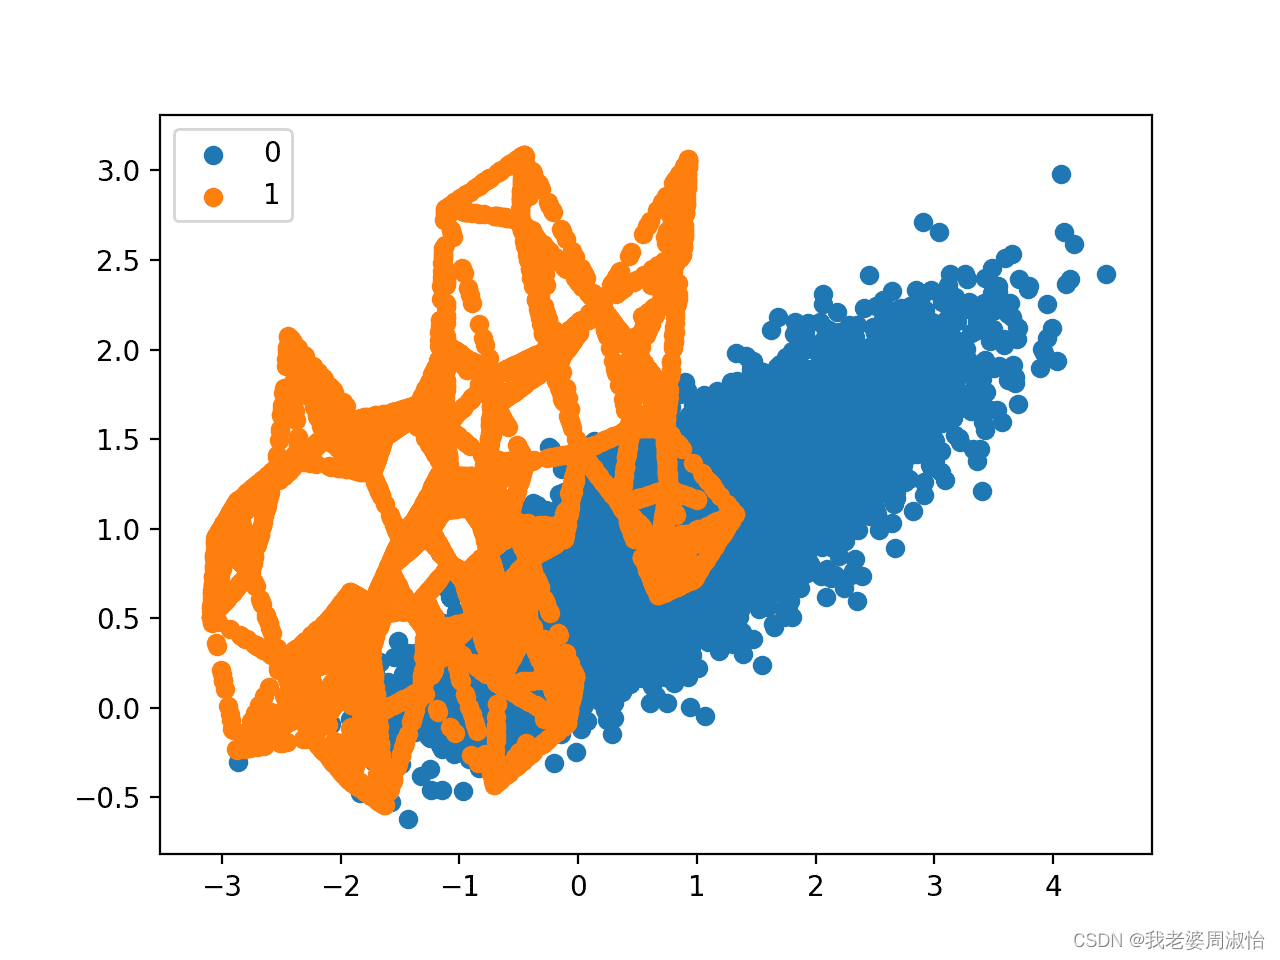
接下来,使用SMOTE对少数类进行过采样,并绘制转换后的数据集。
oversample = SMOTE()
X, y = oversample.fit_resample(X, y)
counter = Counter(y)
print(counter)
for label, _ in counter.items():row_ix = where(y == label)[0]pyplot.scatter(X[row_ix, 0], X[row_ix, 1], label=str(label))
pyplot.legend()
pyplot.show()
Counter输出分类汇总({0: 9900, 1: 9900})
1.2.2 SamplePairing
Sample是通过样本配对的方法实现数据增强,顾名思义使用几张样本图像,进行图像组合融合来实现数据增强的功能
Sample Pairing 采用最简单的方法混合两个图像;取两张图片的平均值。它只使用第一个标签并丢弃第二个标签
python实现
class SamplePairing(object):def __init__(self, train_data_dir, p=1):self.train_data_dir = train_data_dirself.pool = self.load_dataset()self.p = pdef load_dataset(self):dataset_train_raw = vdatasets.ImageFolder(self.train_data_dir)return dataset_train_rawdef __call__(self, img):toss = np.random.choice([1, 0], p=[self.p, 1 - self.p])if toss:img_a_array = np.asarray(img)# pick one image from the poolimg_b, _ = random.choice(self.pool)img_b_array = np.asarray(img_b.resize((197, 197)))# mix two imagesmean_img = np.mean([img_a_array, img_b_array], axis=0)img = Image.fromarray(np.uint8(mean_img))# could have used PIL.Image.blendreturn img
1.2.3 mixup
mixup也是将两个样本图像配对混合在一起,创建新的图像样本
算法原理,
假设数据和标签的配对(x1,y1),(x2,y2)(x1,y1),(x2,y2)(x1,y1),(x2,y2)
新的训练样本。(x,y)(x,y)(x,y) 制作在这里标签y1,y2y1,y2y1,y2
假设是one-hot表示的向量。x1,x2x1,x2x1,x2是任意的向量或张量
x=λx1+(1−λ)x2x=\lambda x_1+(1−\lambda)x_2x=λx1+(1−λ)x2y=λy1+(1−λ)y2y=\lambda y_1+(1−\lambda)y_2y=λy1+(1−λ)y2
在这里λ∈[0,1]\lambda \in[0,1]λ∈[0,1]
python实现
import numpy as npclass MixupGenerator():def __init__(self, X_train, y_train, batch_size=32, alpha=0.2, shuffle=True, datagen=None):self.X_train = X_trainself.y_train = y_trainself.batch_size = batch_sizeself.alpha = alphaself.shuffle = shuffleself.sample_num = len(X_train)self.datagen = datagendef __call__(self):while True:indexes = self.__get_exploration_order()itr_num = int(len(indexes) // (self.batch_size * 2))for i in range(itr_num):batch_ids = indexes[i * self.batch_size * 2:(i + 1) * self.batch_size * 2]X, y = self.__data_generation(batch_ids)yield X, ydef __get_exploration_order(self):indexes = np.arange(self.sample_num)if self.shuffle:np.random.shuffle(indexes)return indexesdef __data_generation(self, batch_ids):_, h, w, c = self.X_train.shape_, class_num = self.y_train.shapeX1 = self.X_train[batch_ids[:self.batch_size]]X2 = self.X_train[batch_ids[self.batch_size:]]y1 = self.y_train[batch_ids[:self.batch_size]]y2 = self.y_train[batch_ids[self.batch_size:]]l = np.random.beta(self.alpha, self.alpha, self.batch_size)X_l = l.reshape(self.batch_size, 1, 1, 1)y_l = l.reshape(self.batch_size, 1)X = X1 * X_l + X2 * (1 - X_l)y = y1 * y_l + y2 * (1 - y_l)if self.datagen:for i in range(self.batch_size):X[i] = self.datagen.random_transform(X[i])return X, y
2.无监督数据增强
2.1 GAN
最常见的就是GAN,其原理可以阅读鄙人的这篇文章
Generative Model - 李宏毅笔记
2.2 Diffunsion
还有以及现在最火的ai 扩散算法,原理也可以阅读下面这篇文章
Diffusion Model算法
2.3 Autoaugmentation
AutoAugment是Google提出的自动选择最优数据增强方案的研究,这是无监督数据增强的重要研究方向。它的基本思路是使用增强学习从数据本身寻找最佳图像变换策略
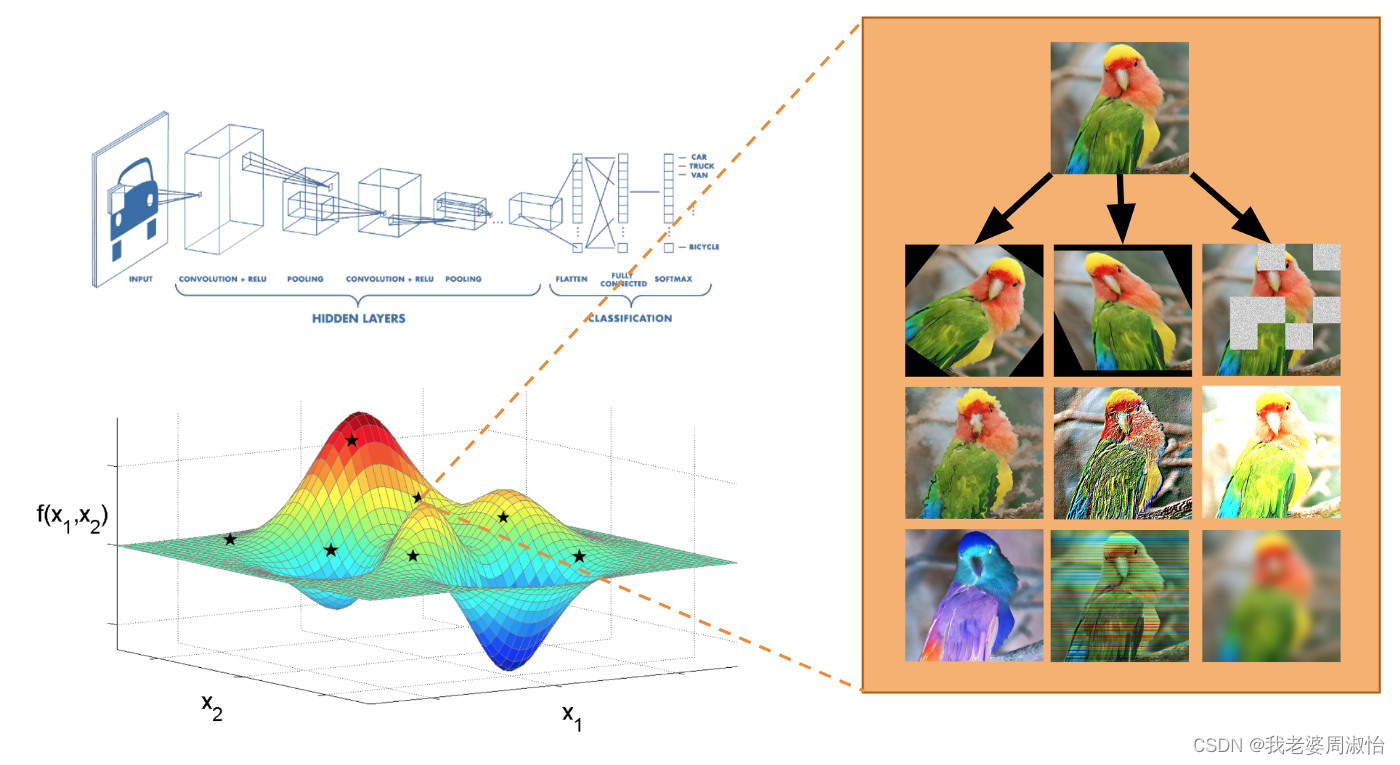
例如指导基本图像转换操作的选择,例如水平/垂直翻转图像、旋转图像、更改图像颜色等。AutoAugment不仅预测要组合哪些图像转换,还可以预测所用变换的每个图像概率和大小,因此图像并不总是以相同的方式进行操作。AutoAugment能够大量的图像转换可能性的搜索空间中选择最佳策略。
AutoAugment根据运行的数据集学习不同的转换。例如,对于涉及房屋号码街景(SVHN)的图像,包括数字的自然场景图像,AutoAugment专注于剪切和平移等几何变换,这些变换代表了该数据集中常见的失真。此外,鉴于世界上不同建筑和房屋编号材料的多样性,AutoAugment已经学会了完全反转原始SVHN数据集中自然出现的颜色。
简单说就是AutoAugment,自己不需要去设定需要增强的元素,算法会自动结合所有的增强策略选择最优的策略进行输出,输出一个增强后的图像
DeepAugment是一个专注于数据增强的AutoML工具。它利用贝叶斯优化来发现您的图像数据集的特点,并量身定制的数据增强策略。DeepAugment的主要优势和特点是:
- 降低CNN模型的错误率
- 通过自动化流程节省时间
- 比谷歌之前的解决方案快50倍-AutoAugment
安装
pip install deepaugment
使用方法
from deepaugment.deepaugment import DeepAugmentdeepaug = DeepAugment(my_images,my_labels)best_policies = deepaug.optimize(300)
通过配置DeepAugment,实现增强用法
from keras.datasets import cifar10# my configuration
my_config = {"model": "basiccnn","method": "bayesian_optimization","train_set_size": 2000,"opt_samples": 3,"opt_last_n_epochs": 3,"opt_initial_points": 10,"child_epochs": 50,"child_first_train_epochs": 0,"child_batch_size": 64
}(x_train, y_train), (x_test, y_test) = cifar10.load_data()
# X_train.shape -> (N, M, M, 3)
# y_train.shape -> (N)
deepaug = DeepAugment(x_train, y_train, config=my_config)best_policies = deepaug.optimize(300)
CIFAR-10在WRN-28-10上测试的最佳政策
方法:Wide-ResNet-28-10通过最佳策略使用CIFAR-10增强图像和未增强图像(其他一切相同)进行训练。
结果:DeepAugment的误差减少60%(准确率提高8.5%)
有关更详细的安装/使用信息 参考官方地址
https://github.com/barisozmen/deepaugment
下一篇:线性表详细讲述(带图)