
yolov5 模型输出的格式解析
工作需要, 又需要对yolov5 输出的模型进行转onnx 再用c++进行后续处理。
两个问题。
- yolov5 的模型输出的是个啥啊?
- 转成onnx后输出的和yolov5输出的处理是否一样呢?
关于第一个问题,yolov5 的模型输出的是个啥啊?
以前只知道抄代码就行, 也不知道里面干了啥 , 输出的后处理也都是由现成的代码来实现。 我也懒得考虑内部的原理, 反正代码正常跑。系统正常运行就可以。
但是今天不行啦, 得自己解析输出。 被逼无奈之下, 只能仔细研究下yolov5的模型和其内部的神经网络结构。关于神经网络的结构, 主要是在文件 models\yolov5s.yaml 中定义的。具体的我在下面的文件中注释写进去了。
# YOLOv5 🚀 by Ultralytics, GPL-3.0 license# Parameters
nc: 80  # number of classes
depth_multiple: 0.33  # model depth multiple
width_multiple: 0.50  # layer channel multiple
anchors:- [10,13, 16,30, 33,23]  # P3/8- [30,61, 62,45, 59,119]  # P4/16- [116,90, 156,198, 373,326]  # P5/32# YOLOv5 v6.0 backbone
backbone:# [from, number, module, args] # 关键是这个说明, 这里得分成4个看,分别是# [from 数据从哪里来, number 有几个这样的层, module 层的名称, args参数] [[-1, 1, Conv, [64, 6, 2, 2]],  # 0-P1/2[-1, 1, Conv, [128, 3, 2]],  # 1-P2/4#下面这个配置的意思是,数据从-1层(上一层)来,创建3层类名叫C3的层, 参数是128[-1, 3, C3, [128]], #下面这个配置的意思是,数据从-1层(上一层)来,创建1层类名叫Conv的层, 参数是256, 3, 2[-1, 1, Conv, [256, 3, 2]],  # 3-P3/8[-1, 6, C3, [256]],[-1, 1, Conv, [512, 3, 2]],  # 5-P4/16[-1, 9, C3, [512]],[-1, 1, Conv, [1024, 3, 2]],  # 7-P5/32[-1, 3, C3, [1024]],[-1, 1, SPPF, [1024, 5]],  # 9]# YOLOv5 v6.0 head
head:[[-1, 1, Conv, [512, 1, 1]],[-1, 1, nn.Upsample, [None, 2, 'nearest']],[[-1, 6], 1, Concat, [1]],  # cat backbone P4[-1, 3, C3, [512, False]],  # 13[-1, 1, Conv, [256, 1, 1]],[-1, 1, nn.Upsample, [None, 2, 'nearest']],[[-1, 4], 1, Concat, [1]],  # cat backbone P3[-1, 3, C3, [256, False]],  # 17 (P3/8-small)[-1, 1, Conv, [256, 3, 2]],[[-1, 14], 1, Concat, [1]],  # cat head P4[-1, 3, C3, [512, False]],  # 20 (P4/16-medium)[-1, 1, Conv, [512, 3, 2]],[[-1, 10], 1, Concat, [1]],  # cat head P5[-1, 3, C3, [1024, False]],  # 23 (P5/32-large)[[17, 20, 23], 1, Detect, [nc, anchors]],  # Detect(P3, P4, P5)]
这个配置文件的解析是在models\yolo.py 文件中 由 parse_model() 方法执行解析的。
下面贴一下这个函数的代码,如果没兴趣可以不看
从代码中可以看的出来,配置文件中的最后一列 arg参数, 并不是跟代码中class的参数一一对应的。
例如Conv参数在代码中需要好多个参数, 而配置文件中只配置了3个。(我非常反感这种配置来配置去,搞脑子的写法, 因为非常的不方便代码理解, 不如直接在代码中硬编码, 最好的代码是一看就懂。
)
def parse_model(d, ch): # model_dict, input_channels(3)# Parse a YOLOv5 model.yaml dictionaryLOGGER.info(f"\n{'':>3}{'from':>18}{'n':>3}{'params':>10} {'module':<40}{'arguments':<30}")anchors, nc, gd, gw, act = d['anchors'], d['nc'], d['depth_multiple'], d['width_multiple'], d.get('activation')if act:Conv.default_act = eval(act) # redefine default activation, i.e. Conv.default_act = nn.SiLU()LOGGER.info(f"{colorstr('activation:')} {act}") # printna = (len(anchors[0]) // 2) if isinstance(anchors, list) else anchors # number of anchorsno = na * (nc + 5) # number of outputs = anchors * (classes + 5)layers, save, c2 = [], [], ch[-1] # layers, savelist, ch outfor i, (f, n, m, args) in enumerate(d['backbone'] + d['head']): # from, number, module, argsm = eval(m) if isinstance(m, str) else m # eval stringsfor j, a in enumerate(args):with contextlib.suppress(NameError):args[j] = eval(a) if isinstance(a, str) else a # eval stringsn = n_ = max(round(n * gd), 1) if n > 1 else n # depth gainif m in {Conv, GhostConv, Bottleneck, GhostBottleneck, SPP, SPPF, DWConv, MixConv2d, Focus, CrossConv,BottleneckCSP, C3, C3TR, C3SPP, C3Ghost, nn.ConvTranspose2d, DWConvTranspose2d, C3x}:c1, c2 = ch[f], args[0]if c2 != no: # if not outputc2 = make_divisible(c2 * gw, 8)args = [c1, c2, *args[1:]]if m in {BottleneckCSP, C3, C3TR, C3Ghost, C3x}:args.insert(2, n) # number of repeatsn = 1elif m is nn.BatchNorm2d:args = [ch[f]]elif m is Concat:c2 = sum(ch[x] for x in f)# TODO: channel, gw, gdelif m in {Detect, Segment}:args.append([ch[x] for x in f])if isinstance(args[1], int): # number of anchorsargs[1] = [list(range(args[1] * 2))] * len(f)if m is Segment:args[3] = make_divisible(args[3] * gw, 8)elif m is Contract:c2 = ch[f] * args[0] ** 2elif m is Expand:c2 = ch[f] // args[0] ** 2else:c2 = ch[f]print("模型结构" + str(m) + str(args)+"\r\n")m_ = nn.Sequential(*(m(*args) for _ in range(n))) if n > 1 else m(*args) # modulet = str(m)[8:-2].replace('__main__.', '') # module typenp = sum(x.numel() for x in m_.parameters()) # number paramsm_.i, m_.f, m_.type, m_.np = i, f, t, np # attach index, 'from' index, type, number paramsLOGGER.info(f'{i:>3}{str(f):>18}{n_:>3}{np:10.0f} {t:<40}{str(args):<30}') # printsave.extend(x % i for x in ([f] if isinstance(f, int) else f) if x != -1) # append to savelistlayers.append(m_)if i == 0:ch = []ch.append(c2)return nn.Sequential(*layers), sorted(save)
好了回归正题, 根据yolov5s.yaml配置文件来看, 模型的最后一层是Detect层
只要看懂了Detect的代码既能理解yolov5到底输出了啥。
为方波快速理解,我下面把Detect层的 class 源代码贴出来。
源代码在models\yolo.py 文件中 38 行
class Detect(nn.Module):# YOLOv5 Detect head for detection modelsstride = None # strides computed during builddynamic = False # force grid reconstructionexport = False # export modedef __init__(self, nc=80, anchors=(), ch=(), inplace=True): # detection layersuper().__init__()self.nc = nc # number of classesself.no = nc + 5 # number of outputs per anchorself.nl = len(anchors) # number of detection layersself.na = len(anchors[0]) // 2 # number of anchorsself.grid = [torch.empty(0) for _ in range(self.nl)] # init gridself.anchor_grid = [torch.empty(0) for _ in range(self.nl)] # init anchor gridself.register_buffer('anchors', torch.tensor(anchors).float().view(self.nl, -1, 2)) # shape(nl,na,2)self.m = nn.ModuleList(nn.Conv2d(x, self.no * self.na, 1) for x in ch) # output convself.inplace = inplace # use inplace ops (e.g. slice assignment)def forward(self, x):z = [] # inference outputfor i in range(self.nl):x[i] = self.m[i](x[i]) # convbs, _, ny, nx = x[i].shape # x(bs,255,20,20) to x(bs,3,20,20,85)x[i] = x[i].view(bs, self.na, self.no, ny, nx).permute(0, 1, 3, 4, 2).contiguous()if not self.training: # inferenceif self.dynamic or self.grid[i].shape[2:4] != x[i].shape[2:4]:self.grid[i], self.anchor_grid[i] = self._make_grid(nx, ny, i)if isinstance(self, Segment): # (boxes + masks)xy, wh, conf, mask = x[i].split((2, 2, self.nc + 1, self.no - self.nc - 5), 4)xy = (xy.sigmoid() * 2 + self.grid[i]) * self.stride[i] # xywh = (wh.sigmoid() * 2) ** 2 * self.anchor_grid[i] # why = torch.cat((xy, wh, conf.sigmoid(), mask), 4)else: # Detect (boxes only)xy, wh, conf = x[i].sigmoid().split((2, 2, self.nc + 1), 4)xy = (xy * 2 + self.grid[i]) * self.stride[i] # xywh = (wh * 2) ** 2 * self.anchor_grid[i] # wh# xy 是中心点# wh 是宽高# conf 是confidence 即可信度y = torch.cat((xy, wh, conf), 4) z.append(y.view(bs, self.na * nx * ny, self.no))return x if self.training else (torch.cat(z, 1),) if self.export else (torch.cat(z, 1), x)def _make_grid(self, nx=20, ny=20, i=0, torch_1_10=check_version(torch.__version__, '1.10.0')):d = self.anchors[i].devicet = self.anchors[i].dtypeshape = 1, self.na, ny, nx, 2 # grid shapey, x = torch.arange(ny, device=d, dtype=t), torch.arange(nx, device=d, dtype=t)yv, xv = torch.meshgrid(y, x, indexing='ij') if torch_1_10 else torch.meshgrid(y, x) # torch>=0.7 compatibilitygrid = torch.stack((xv, yv), 2).expand(shape) - 0.5 # add grid offset, i.e. y = 2.0 * x - 0.5anchor_grid = (self.anchors[i] * self.stride[i]).view((1, self.na, 1, 1, 2)).expand(shape)return grid, anchor_grid从代码
# xy 是中心点
# wh 是宽高
# conf 是confidence 即可信度
y = torch.cat((xy, wh, conf), 4)
中可以看的出, 这里是输出的主要数据的格式, 分别是3个参数 xy 中心点, wh 宽高,conf 可信度
经过调试发现数据的格式如下。
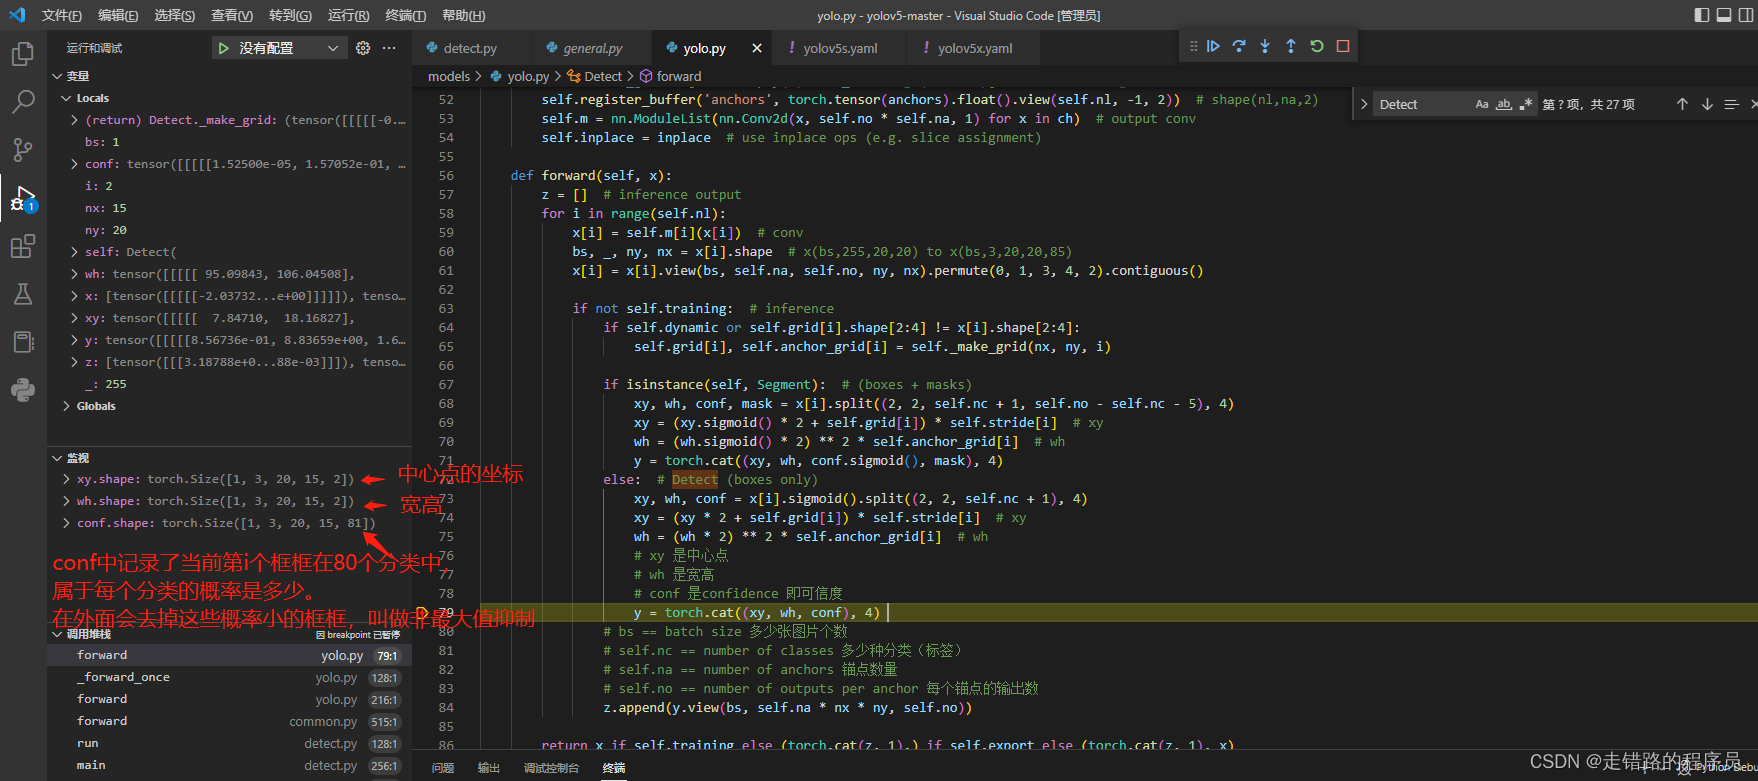
关键要看shape的最后一位,在这一步的时候,不是最终输出的格式,这里只是把它们合并起来了。后面还有个y.view进行了重新改变维度, 让这个组合的矩阵变的更加的直观, 改变维度后, 它的shape变成了
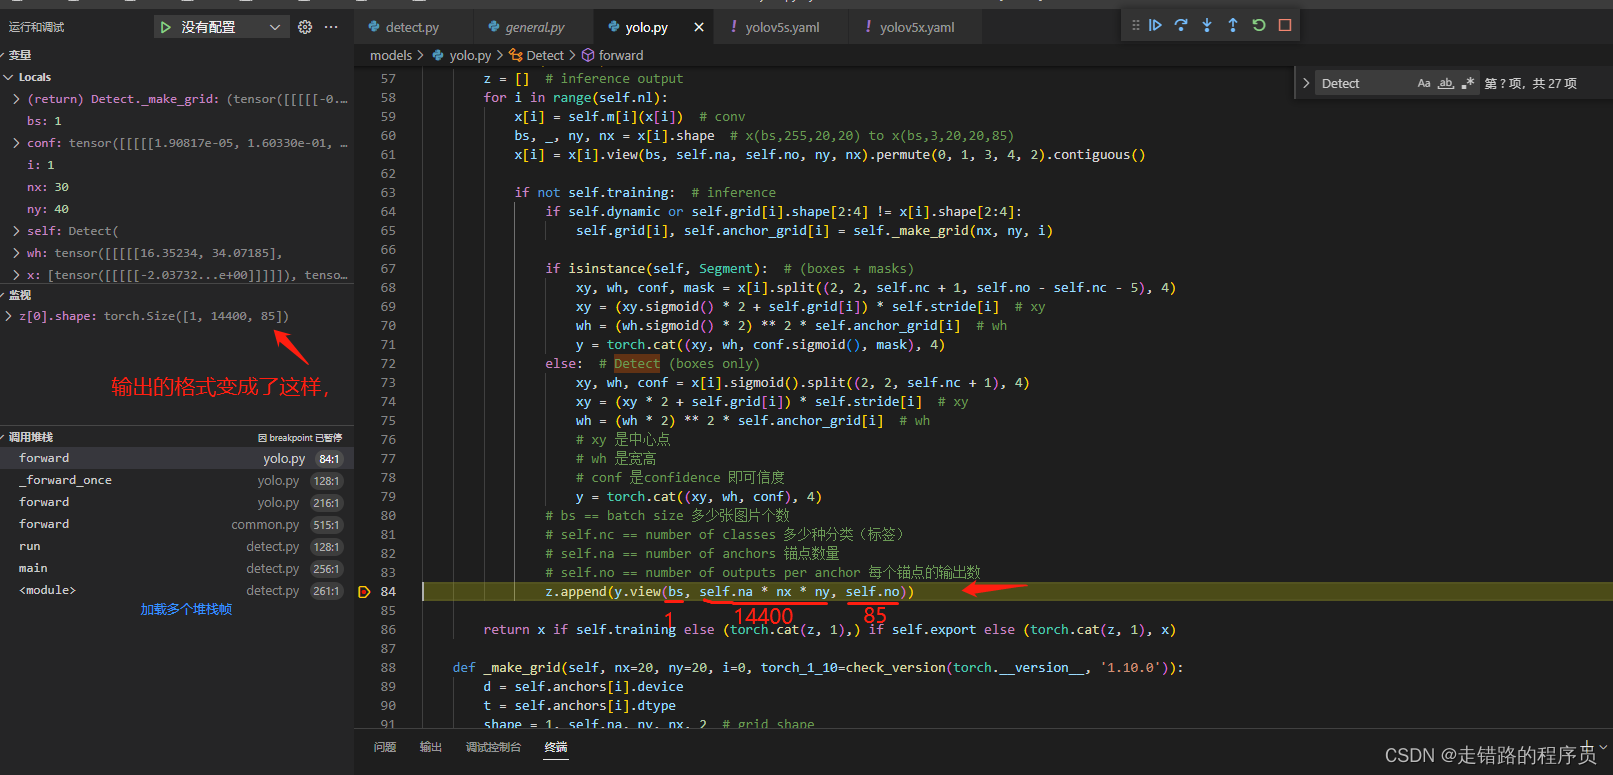
实际内部存储仍然是
[xy1,wh1,conf1,xy2,wh2,conf2,xy3,wh3,conf3,....]
这里再补充一下,实际内部格式是
[x1,y1,w1,h1,conf1,x2,y2,w2,h2,conf2,x3,y3,w3,h3,conf3,....]
5位数,代表一个识别的框框box。
这里的xy,wh的单位,不是像素哦, 是归一化后的数值, 需要按比例转换成像素值。 然后画到图片上就行了
xy的坐标是框框中心点的坐标,而不是左上角的坐标哦。
知道了存储的数据格式,后续的处理,实际上就很简单了。
分别是去掉可信度比较低的框框, 叫做非极值抑制,也就是这个函数non_max_suppression(). 有的叫 nms
然后就是把可信度比较高的框框画到图片上。剩下的应该都能看的懂。