
Spring框架学习--xml和Annotation方式实现IOC
Annotation+Xml的spring-IOC和全Annotation的spring-IOC
文章目录
- Annotation+Xml的spring-IOC和全Annotation的spring-IOC
- 学习目标
- 第二章 基于Annotation+Xml的spring-IOC【重点】
- 1、annotation+xml【入门案例】(5)
- 【1】目标
- 【2】实现
- 【2.1】创建项目
- 【2.3】改写AccountDaoImpl
- 【2.4】改写AccountServiceImpl
- 【2.5】改写AccountController
- 【2.6】测试
- 【3】入门案例小结
- 第三章 spring基础注解【重点】
- 1、注解和xml对照表
- 2、bean实例化相关
- 【1】@Component
- 【2】@Controller、@Service、@Repository(6)
- 【2.1】目标
- 【2.2】实现
- 【2.2.1】创建服务
- 【2.2.2】修改AccountController
- 【2.2.3】修改AccountServiceImpl
- 【2.2.4】修改AccountDaoImpl
- 【2.2.5】测试
- 【2.3】衍生小结
- 3、bean依赖注入相关
- 【1】@Autowired、@Qualifier(7)
- 【1.1】目标
- 【1.2】实现
- 【1.2.1】创建项目
- 【1.2.2】第一次运行
- 【1.2.3】新增AccountDaoImplB
- 【1.2.4】修改AccountServiceImpl
- 【1.2.5】第二次运行
- 【1.2.6】再次修改AccountServiceImpl
- 【1.2.7】第三次运行
- 【1.2.8】再次修改AccountServiceImpl
- 【1.2.9】第四次运行
- 【1.3】@Autowired、@Qualifier小结
- 【2】@Resource(8)
- 【2.1】目标
- 【2.2】实现
- 【2.2.1】创建项目
- 【2.2.2】修改AccountServiceImpl
- 【2.2.3】第一次运行
- 【2.2.4】再次修改AccountServiceImpl
- 【2.2.5】第二次运行
- 【2.2.6】修改dao层
- 【2.2.7】再次修改AccountServiceImpl
- 【2.2.8】第三次运行
- 【2.2.9】再次修改AccountServiceImpl
- 【2.2.10】第四次运行
- 【2.3】@Resource小结
- 【3】@Value(9)
- 【3.1】创建项目
- 【3.2】添加DbConfig类
- 【3.3】添加DbConfigTest测试
- 【3.4】运行结果
- 【3.5】@Value小结
- 4、bean作用域@Scope (10)
- 【1】目标
- 【2】实现
- 【2.1】创建项目
- 【2.2】修改DbConfig
- 【2.3】修改DbConfigTest
- 【2.4】运行DbConfigTest
- 【3】作用域@Scope小结
- 5、bean生命周期(11)
- 【1】目标
- 【2】实现
- 【2.1】创建项目
- 【2.2】修改DbConfig
- 【2.3】修改DbConfigTest
- 【2.4】运行结果
- 【3】bean生命周期小结
- 第四章 基于全Annotation的spring-IOC【重点】
- 1、思考
- 2、annotation案例(12)
- 【1】配置类注解与XML对照表
- 【2】加载方式
- 【3】目标
- 【4】实现
- 【4.1】创建项目
- 【4.2】编写SpringConfig类
- 【4.3】编写DbConfig类
- 【4.4】修改ClientControllergTest
- 【4.5】测试
- 3、小结
- 第五章 Spring整合junit【掌握】
- 1、思考
- 2、测试注解说明
- 3、XML方式(13)
- 【1】目标
- 【2】实现
- 【2.1】创建项目
- 【2.2】导入spring-test依赖
- 【2.3】修改ClientControllerTest
- 【2.4】测试结果
- 【3】小结
- 4、全注解方式(14)
- 【1】目标
- 【2】实现
- 【2.1】创建项目
- 【2.2】导入spring-test依赖
- 【2.3】修改AccountControllerTest
- 【2.4】测试结果
- 【3】小结
学习目标
1、了解JdbcTemplate使用
2、完成spring-ioc-xml案例
3、完成spring-ioc-xml+annotation案例
4、完成spring-ioc-annotation全注解案例
5、掌握spring的配置注解
6、完成spring整合junit
第二章 基于Annotation+Xml的spring-IOC【重点】
1、annotation+xml【入门案例】(5)
前面的课程使用xml方式配置spring IOC我都已经会了,在我们前面学习的知识点中,好像注解也是用于配置的。不知道在spring框架中,该如何使用注解实现配置呢?
入门案例中使用到的annotation和xml标签对照表
| XML | Annotation | 说明 |
|---|---|---|
| < bean > | @Component | 声明一个bean交于spring容器管理 |
| ref属性 | @Autowired | 输入赋值(DI机制) |
【注解生效】–>约定大于配置
| 标签 | 说明 |
|---|---|
| context:component-scan | 启动自动扫描机制,使用base-package属性指定扫描包位置 |
通常情况下我们在创建spring项目的时候在xml配置文件中都会配置这个标签,配置完这个标签后,spring就会去自动扫描base-package对应的路径或者该路径的子包下面的java文件,如果扫描到文件中带有@Component这个注解的类,则把这些类注册为bean ,如果在类的属性上有@Autowired注解,我们就会按属性的类型去找对应的bean去注入
【1】目标
1、掌握spring的使用@Component创建bean-(IOC)
2、掌握@Autowired的di注入(依赖注入)
3、掌握bean.xml中配置标签context:component-scan使注解生效(约定大于配置)
【2】实现
步骤:1、修改bean.xml2、修改AccountDaoImpl3、修改AccountServiceImpl4、修改AccountController
【2.1】创建项目
创建spring-day02-05annotation-xml-ioc
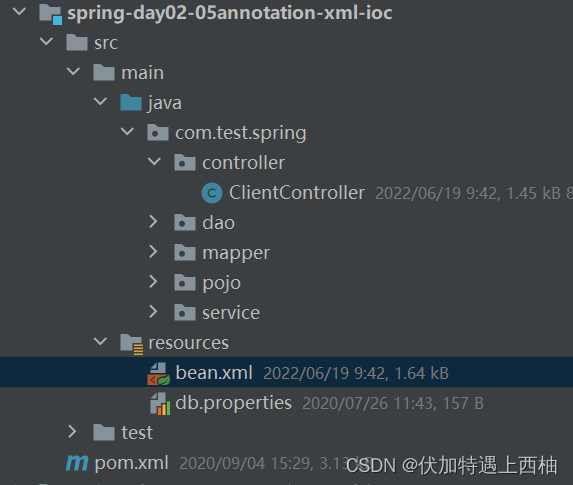
【2.2】修改bean.xml
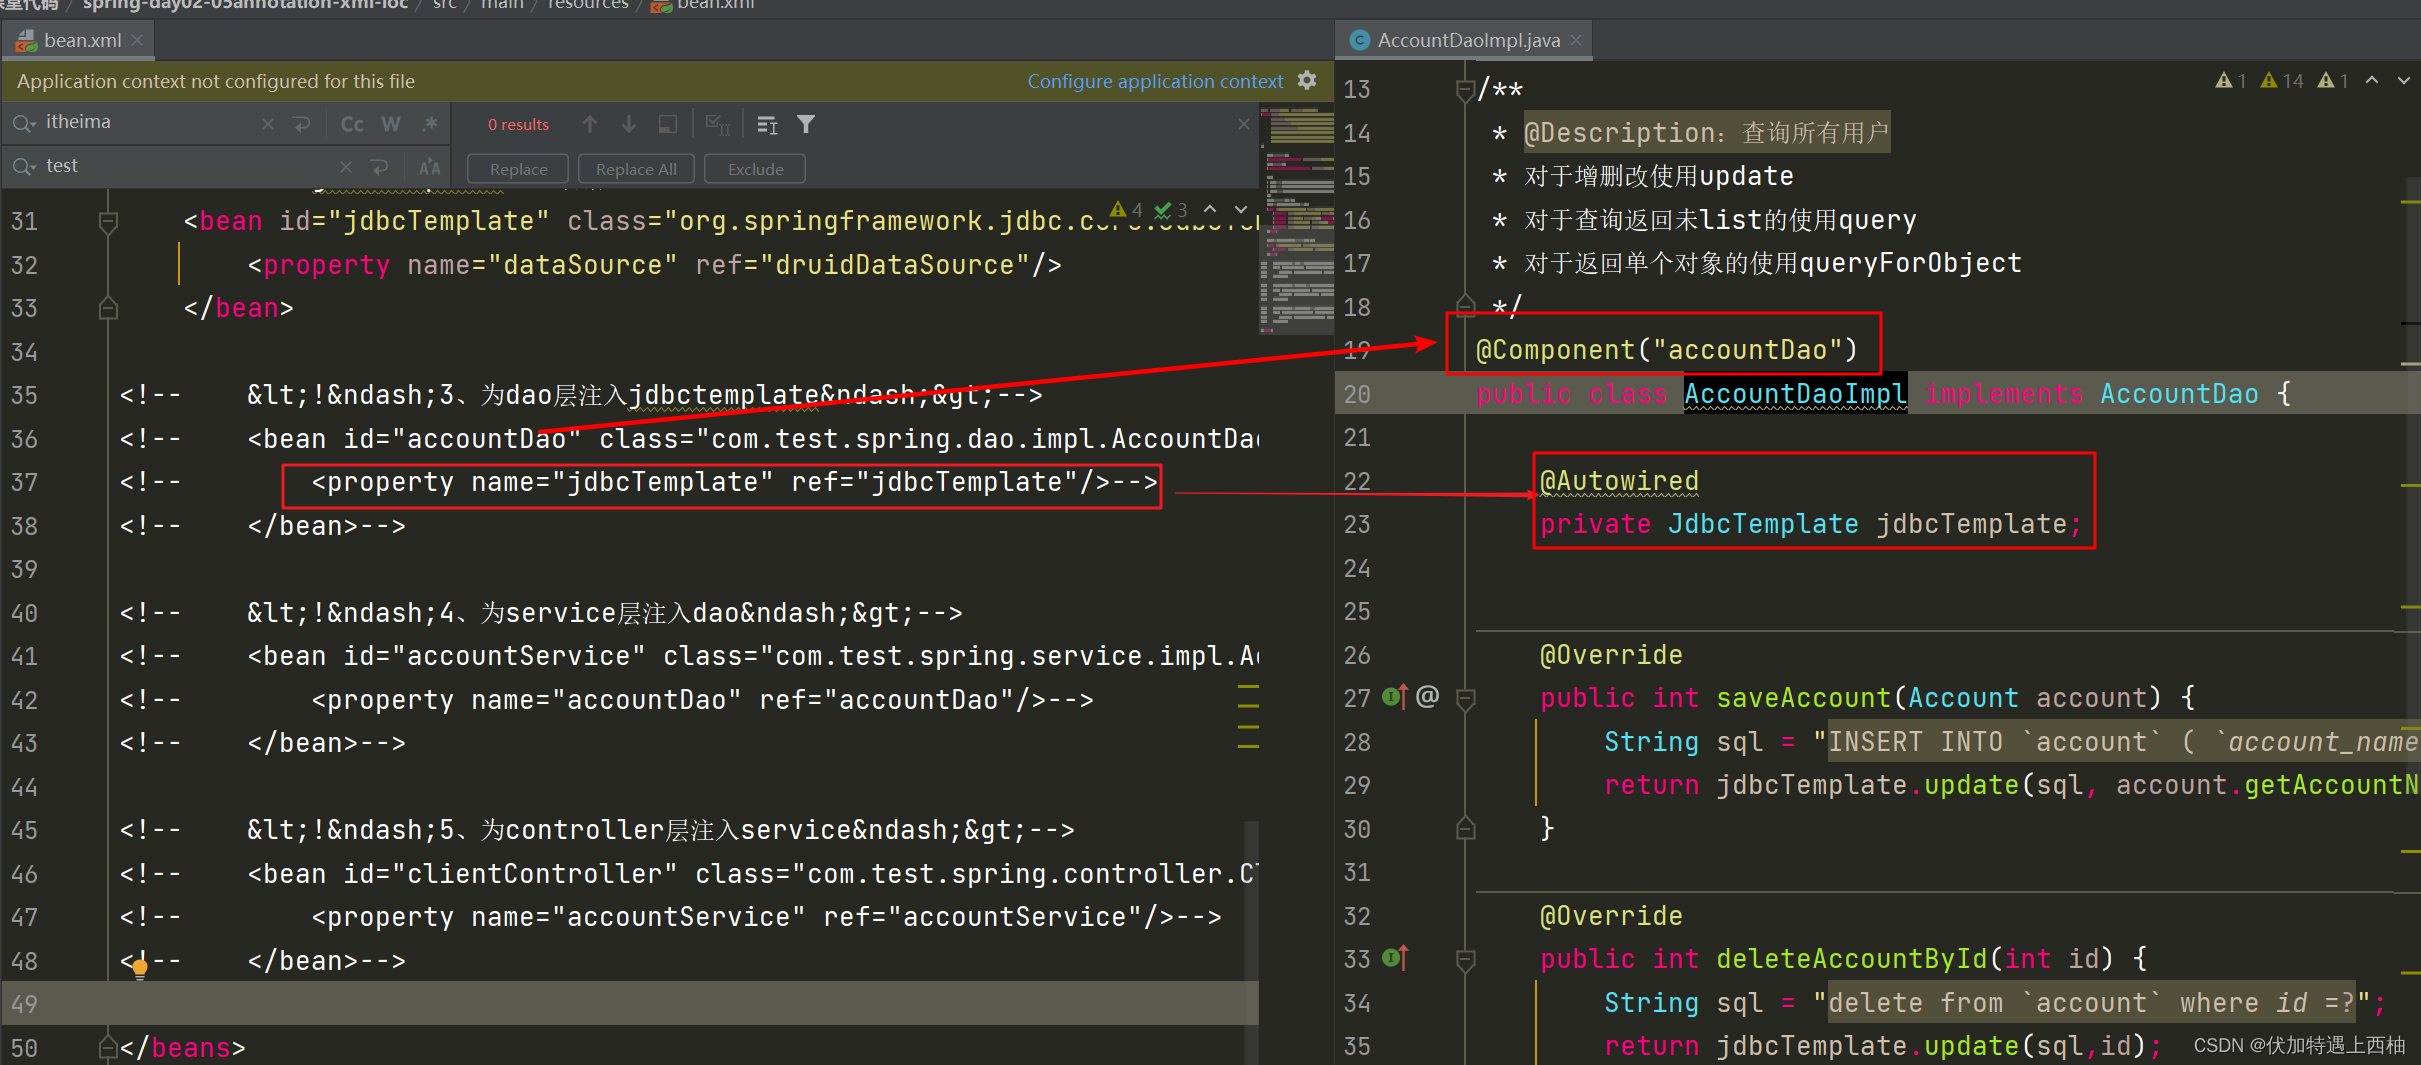
【2.3】改写AccountDaoImpl
package com.test.spring.dao.impl;import com.test.spring.dao.AccountDao;
import com.test.spring.mapper.AccountMapper;
import com.test.spring.pojo.Account;
import org.springframework.beans.factory.annotation.Autowired;
import org.springframework.jdbc.core.BeanPropertyRowMapper;
import org.springframework.jdbc.core.JdbcTemplate;
import org.springframework.stereotype.Component;import java.util.List;/*** @Description:查询所有用户* 对于增删改使用update* 对于查询返回未list的使用query* 对于返回单个对象的使用queryForObject*/
@Component("accountDao")
public class AccountDaoImpl implements AccountDao {@Autowiredprivate JdbcTemplate jdbcTemplate;@Overridepublic int saveAccount(Account account) {String sql = "INSERT INTO `account` ( `account_name`, `money`) VALUES ( ?, ?)";return jdbcTemplate.update(sql, account.getAccountName(),account.getMoney());}@Overridepublic int deleteAccountById(int id) {String sql = "delete from `account` where id =?";return jdbcTemplate.update(sql,id);}@Overridepublic int updateAccountById(Account account) {String sql = "update account set account_name=?,money=? where id = ?";return jdbcTemplate.update(sql, account.getAccountName(),account.getMoney(),account.getId());}@Overridepublic Account findAccountById(int id) {String sql = "select * from account where id =?";return jdbcTemplate.queryForObject(sql, new AccountMapper(),id);}@Overridepublic List findAll() {String sql = "select * from account";return jdbcTemplate.query(sql, new BeanPropertyRowMapper<>(Account.class));}@Overridepublic Integer countAccount() {String sql = "select count(1) from account";return jdbcTemplate.queryForObject(sql, Integer.class);}public void setJdbcTemplate(JdbcTemplate jdbcTemplate) {this.jdbcTemplate = jdbcTemplate;}}
【2.4】改写AccountServiceImpl
package com.test.spring.service.impl;import com.test.spring.dao.AccountDao;
import com.test.spring.pojo.Account;
import com.test.spring.service.AccountService;
import org.springframework.beans.factory.annotation.Autowired;
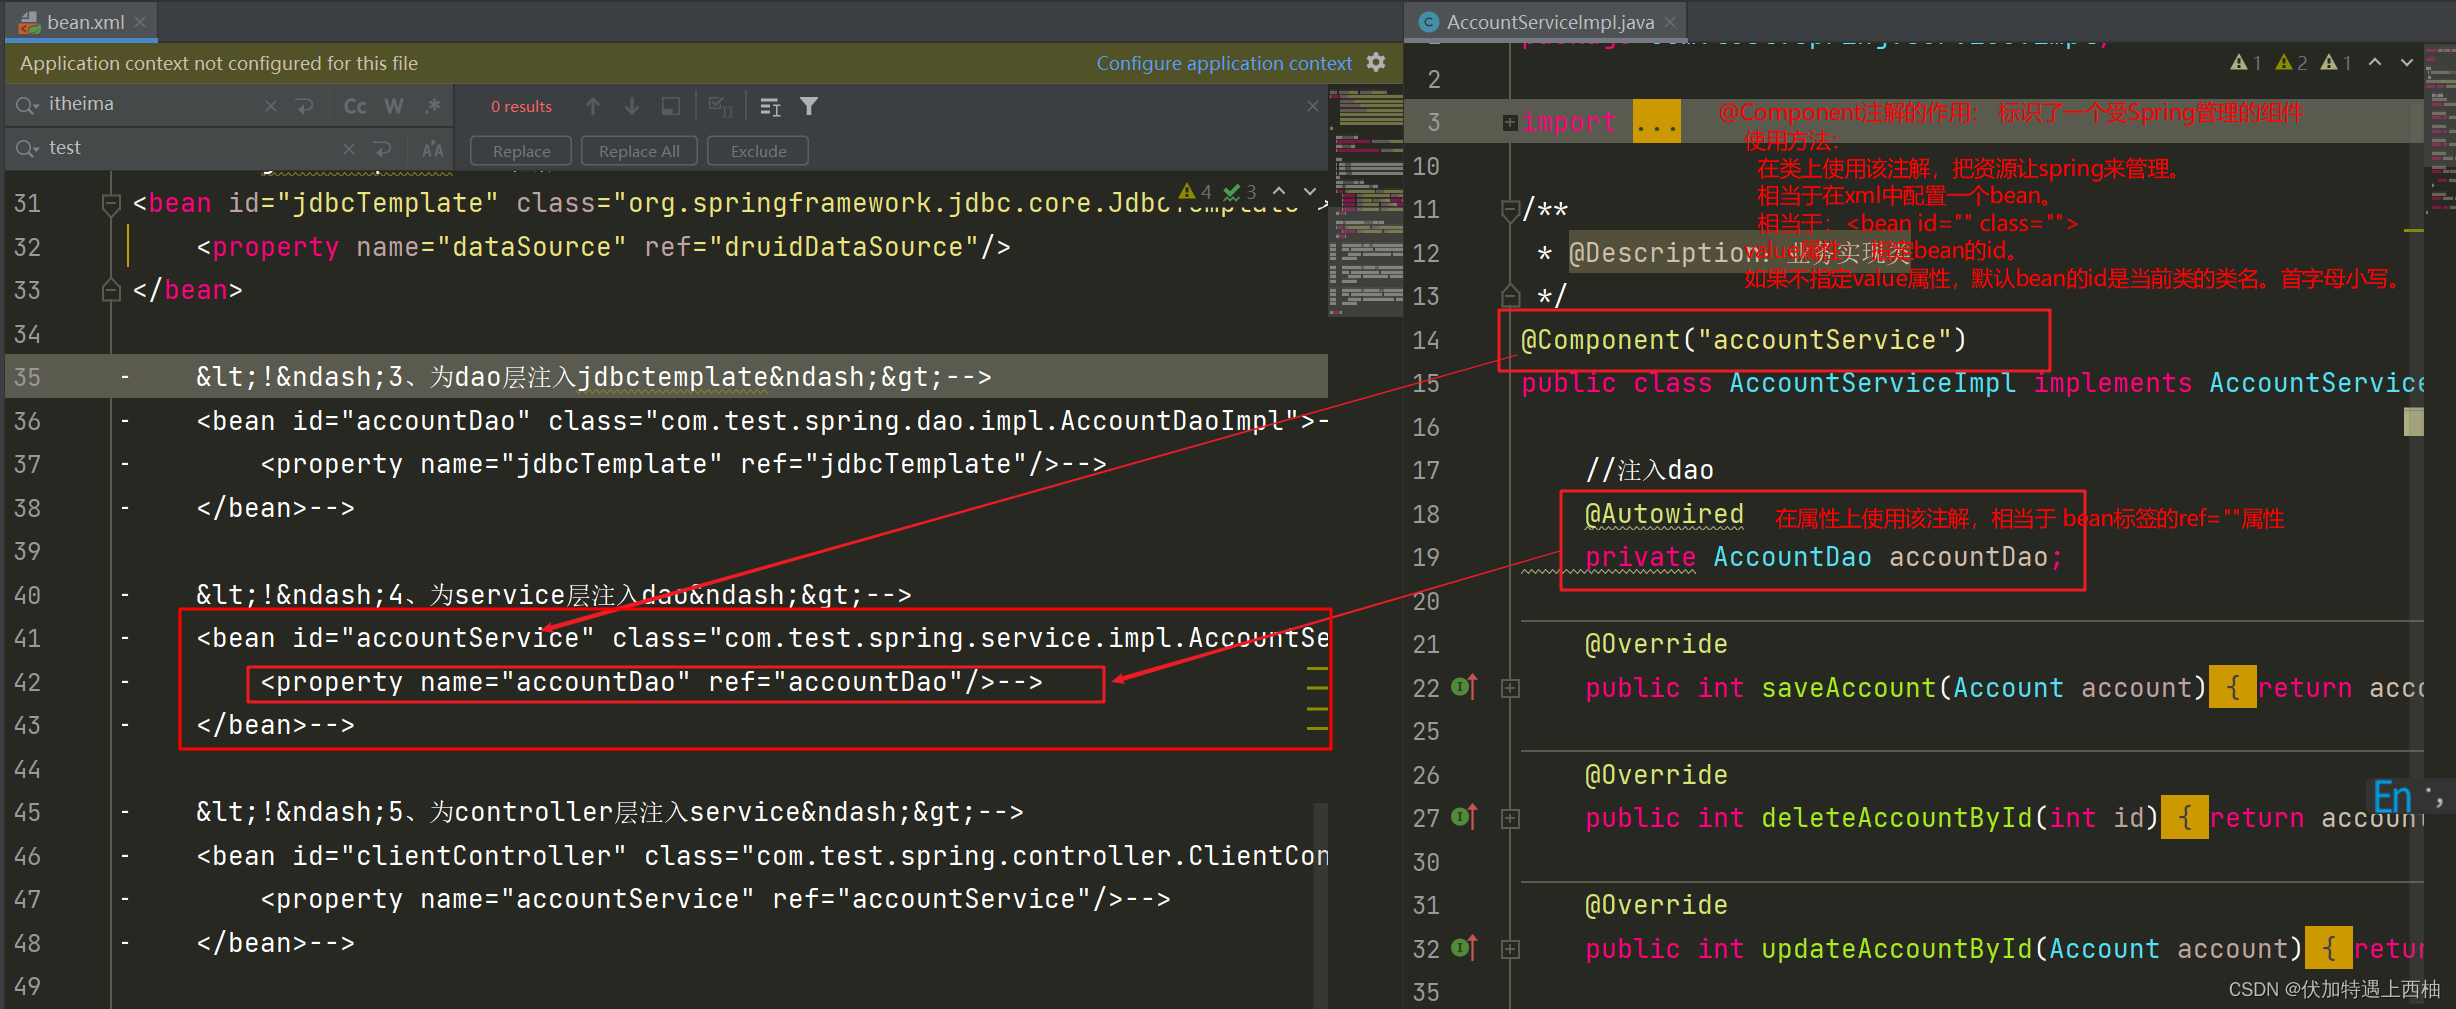
import org.springframework.stereotype.Component;import java.util.List;/*** @Description:业务实现类*/
@Component("accountService")
public class AccountServiceImpl implements AccountService {//注入dao@Autowiredprivate AccountDao accountDao;@Overridepublic int saveAccount(Account account) {return accountDao.saveAccount(account);}@Overridepublic int deleteAccountById(int id) {return accountDao.deleteAccountById(id);}@Overridepublic int updateAccountById(Account account) {return accountDao.updateAccountById(account);}@Overridepublic Account findAccountById(int id) {return accountDao.findAccountById(id);}@Overridepublic List findAll() {return accountDao.findAll();}@Overridepublic Integer countAccount() {return accountDao.countAccount();}public void setAccountDao(AccountDao accountDao) {this.accountDao = accountDao;}
} 【2.5】改写AccountController
package com.test.spring.controller;import com.test.spring.pojo.Account;
import com.test.spring.service.AccountService;
import org.springframework.beans.factory.annotation.Autowired;
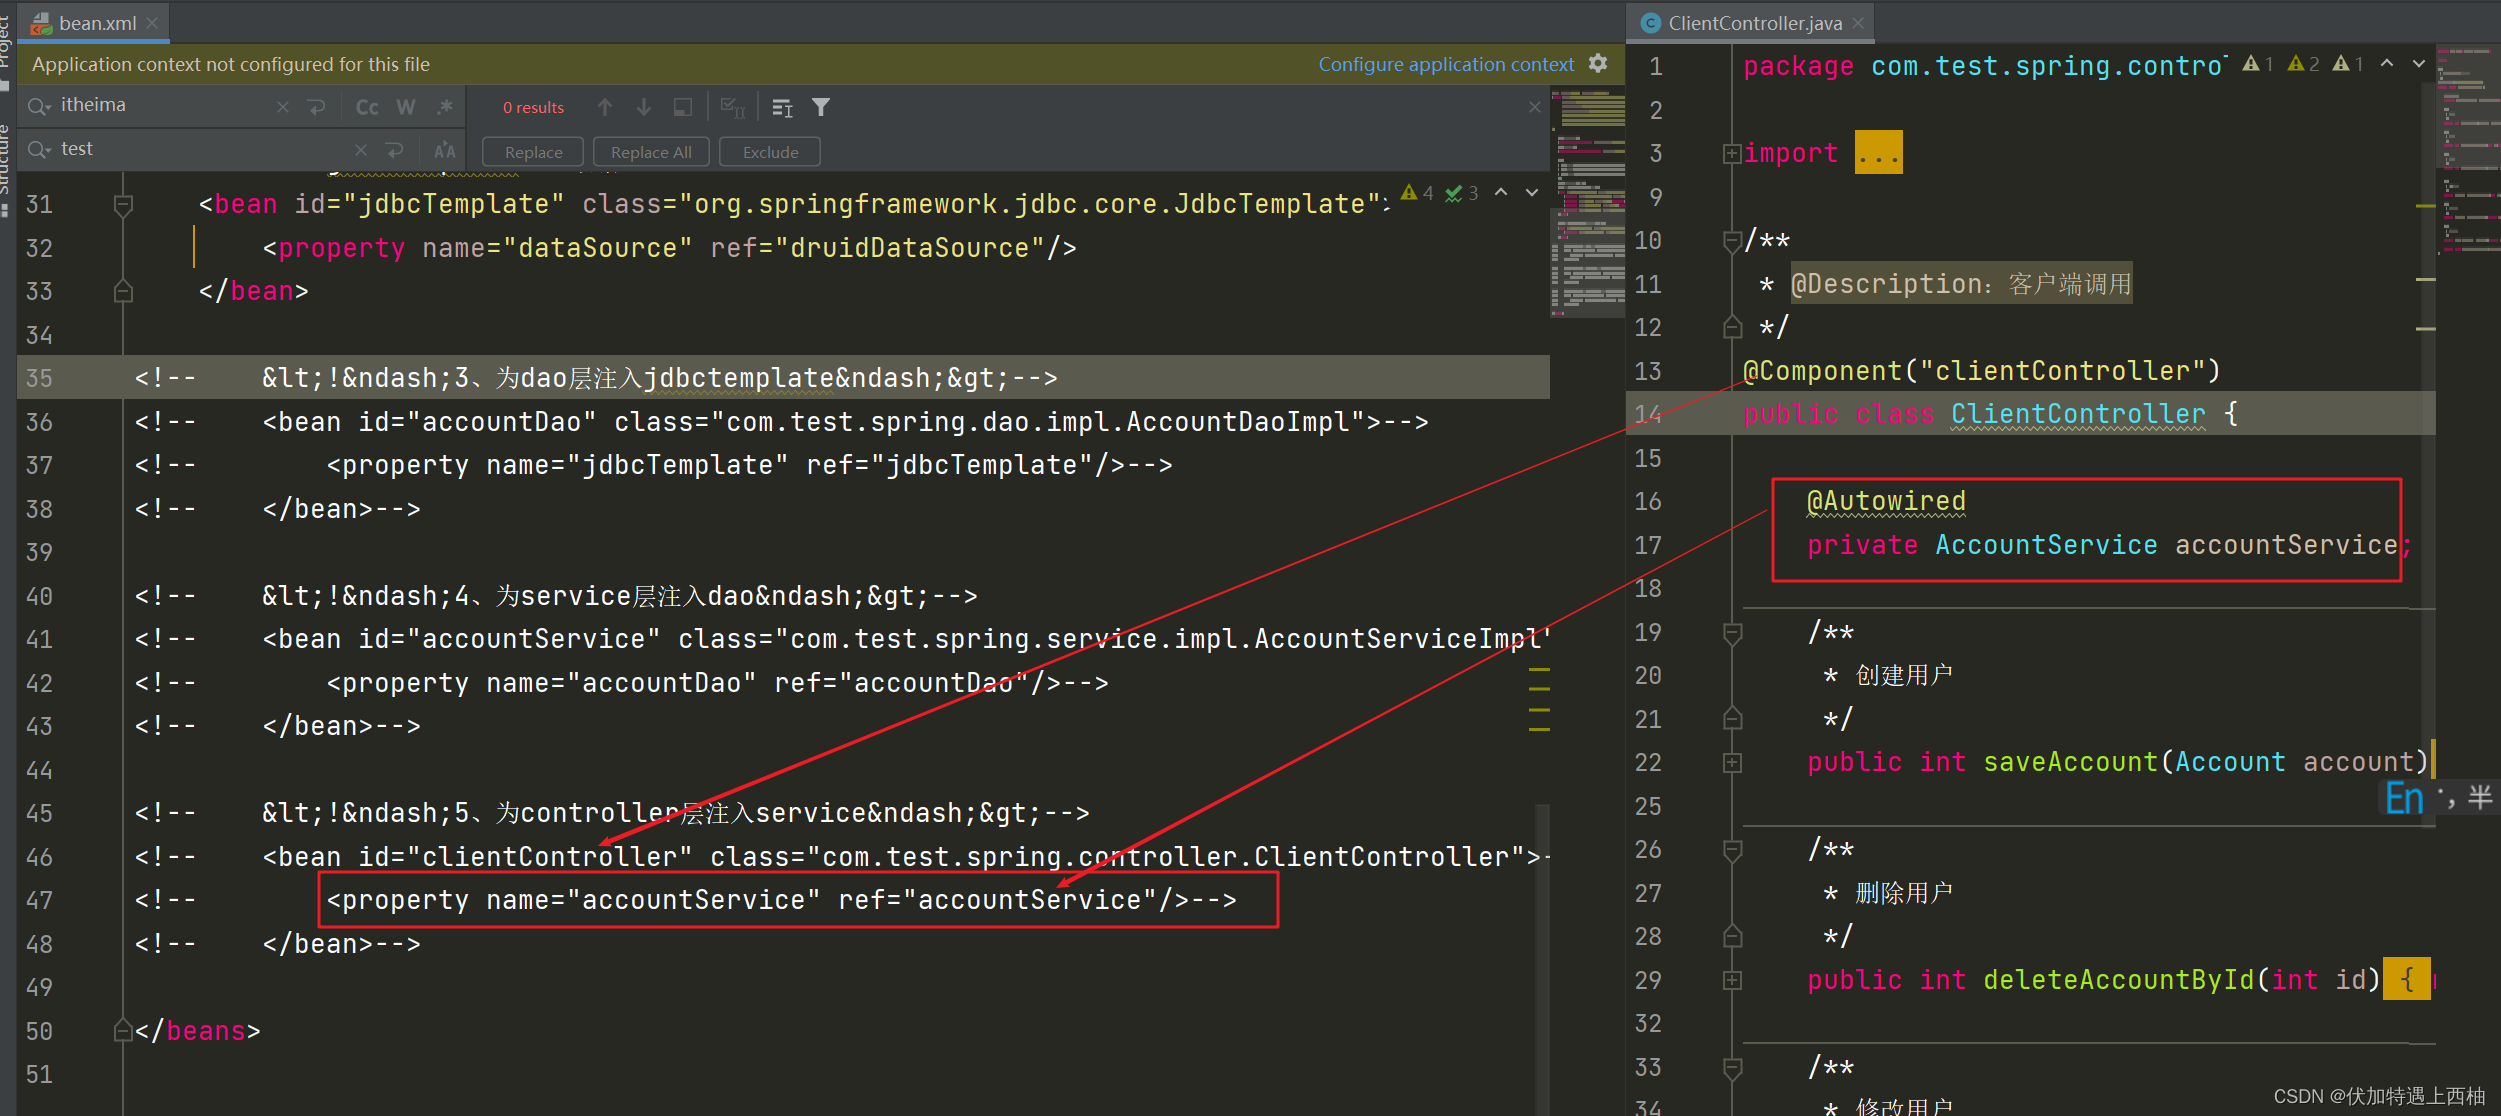
import org.springframework.stereotype.Component;import java.util.List;/*** @Description:客户端调用*/
@Component("clientController")
public class ClientController {@Autowiredprivate AccountService accountService;/*** 创建用户*/public int saveAccount(Account account) {return accountService.saveAccount(account);}/*** 删除用户*/public int deleteAccountById(int id) {return accountService.deleteAccountById(id);}/*** 修改用户*/public int updateAccountById(Account account) {return accountService.updateAccountById(account);}/*** 按ID查询用户*/public Account findAccountById(int id) {return accountService.findAccountById(id);}/*** 统计用户个数*/public Integer countAccount() {return accountService.countAccount();}/*** 查询所有用户*/public List findAll() {return accountService.findAll();}public void setAccountService(AccountService accountService) {this.accountService = accountService;}
} 【2.6】测试
执行ClientControllergTest的findAll()测试
【3】入门案例小结
@Component注解的作用: 标识了一个受Spring管理的组件使用方法:在类上使用该注解,把资源让spring来管理。相当于在xml中配置一个bean。 相当于: value属性: 指定bean的id。如果不指定value属性,默认bean的id是当前类的类名。首字母小写。@Autowired:使用方法:在属性上使用该注解,相当于 bean标签的ref=""属性context:component-scan:使用自动扫描使得注解生效使用方式:第一步:导入空间和约束第二步:context:component-scan 申明扫描base-package:扫描的位置 第三章 spring基础注解【重点】
1、注解和xml对照表
| 注解 | xml | 说明 |
|---|---|---|
| @Component父注解 @Controller:用于表现层的注解 @Service:用于业务层的注解 @Repository:一般用于持久层的注解 | < bean id=“” class=“”> | 声明bean交于springIOC管理 |
| @Scope | scope=“singleton/prototype” | 生命周期 |
| @PostConstruct | init-method | 初始化方法 |
| @PreDestroy | destroy-method | 销毁方法 |
| @Autowired、@Qualifier @Resource | ref=“自定义类型” | 依赖注入 |
| @Value | value=“基础数据类型” | 基本数据类型注入 |
2、bean实例化相关
【1】@Component
在入门案例中,我们有使用到@component注解,我们现在回顾一下:
@Component注解的作用: 标识了一个受Spring管理的bean使用方法:在类上使用该注解,把资源让spring来管理。相当于在xml中配置一个bean: value属性: 指定bean的id,默认bean的id是当前类的类名。首字母小写。
【2】@Controller、@Service、@Repository(6)
@Controller @Service @Repository
他们三个注解都是针对每层的衍生注解,他们的作用及属性都是一模一样的。
他们只不过是提供了更加明确的语义化。 @Controller:一般用于表现层的注解。 @Service:一般用于业务层的注解。 @Repository:一般用于持久层的注解。
【2.1】目标
使用@Controller、@Service、@Repository注解完成controller,service和dao的bean装配
【2.2】实现
【2.2.1】创建服务
创建spring-day02-06annotation-xml-ioc-csr

【2.2.2】修改AccountController
使用@Controller注解
package com.test.spring.controller;import com.test.spring.pojo.Account;
import com.test.spring.service.AccountService;
import org.springframework.beans.factory.annotation.Autowired;
import org.springframework.stereotype.Controller;import java.util.List;/*** @Description:客户端调用*/
@Controller("clientController")
public class ClientController {@Autowiredprivate AccountService accountService;/*** 创建用户*/public int saveAccount(Account account) {return accountService.saveAccount(account);}/*** 删除用户*/public int deleteAccountById(int id) {return accountService.deleteAccountById(id);}/*** 修改用户*/public int updateAccountById(Account account) {return accountService.updateAccountById(account);}/*** 按ID查询用户*/public Account findAccountById(int id) {return accountService.findAccountById(id);}/*** 统计用户个数*/public Integer countAccount() {return accountService.countAccount();}/*** 查询所有用户*/public List findAll() {return accountService.findAll();}public void setAccountService(AccountService accountService) {this.accountService = accountService;}
}
【2.2.3】修改AccountServiceImpl
使用@service注解
/*** @Description:业务实现类*/
@Service("accountService")
public class AccountServiceImpl implements AccountService {/*** @Description* Autowired:*      作用:* 	        默认按照bean的类型注入数据,如果类型相同,则按名称注入*      属性:* 	        required:指定目标bean是否必须存在于spring的IOC容器(true必须存在;false:可以不存在;默认true)* @return*/@Autowiredprivate AccountDao accountDao;@Overridepublic int saveAccount(Account account) {return accountDao.saveAccount(account);}@Overridepublic int deleteAccountById(int id) {return accountDao.deleteAccountById(id);}@Overridepublic int updateAccountById(Account account) {return accountDao.updateAccountById(account);}@Overridepublic Account findAccountById(int id) {return accountDao.findAccountById(id);}@Overridepublic List findAll() {return accountDao.findAll();}@Overridepublic Integer countAccount() {return accountDao.countAccount();}public void setAccountDao(AccountDao accountDao) {this.accountDao = accountDao;}
}
【2.2.4】修改AccountDaoImpl
使用@Repository注解
/*** @Description:查询所有用户* 对于增删改使用update* 对于查询返回未list的使用query* 对于返回单个对象的使用queryForObject*/
@Repository("accountDao")
public class AccountDaoImpl implements AccountDao {@Autowiredprivate JdbcTemplate jdbcTemplate;@Overridepublic int saveAccount(Account account) {String sql = "INSERT INTO `account` ( `account_name`, `money`) VALUES ( ?, ?)";return jdbcTemplate.update(sql, account.getAccountName(),account.getMoney());}@Overridepublic int deleteAccountById(int id) {String sql = "delete from `account` where id =?";return jdbcTemplate.update(sql,id);}@Overridepublic int updateAccountById(Account account) {String sql = "update account set account_name=?,money=? where id = ?";return jdbcTemplate.update(sql, account.getAccountName(),account.getMoney(),account.getId());}@Overridepublic Account findAccountById(int id) {String sql = "select * from account where id =?";return jdbcTemplate.queryForObject(sql, new AccountMapper(),id);}@Overridepublic List findAll() {String sql = "select * from account";return jdbcTemplate.query(sql, new BeanPropertyRowMapper<>(Account.class));}@Overridepublic Integer countAccount() {String sql = "select count(1) from account";return jdbcTemplate.queryForObject(sql, Integer.class);}public void setJdbcTemplate(JdbcTemplate jdbcTemplate) {this.jdbcTemplate = jdbcTemplate;}}
【2.2.5】测试
执行ClientControllergTest的findAll()测试
【2.3】衍生小结
Spring提供了装配bean的四个注解:
1、@Component:装配的对象装配注解
2、@Controller:装配表现层的注解
3、@Service:装配业务层的注解
4、@Repository:装配持久层的注解
3、bean依赖注入相关
【1】@Autowired、@Qualifier(7)
@Autowired
作用:
默认按照bean的类型注入数据,如果类型相同,则按名称注入
属性:
required:指定目标bean是否必须存在于spring的IOC容器(true必须存在;false:可以不存在;默认true)
@Qualifier
作用:
与@Autowired注解一起使用,指定在按照bean类型注入的基础上,再按照bean的名称注入
属性:
value:指定bean的名称
【1.1】目标
1、使用@Autowired,且理解他的匹配方式
2、@Qualifier与@Autowired一起使用,且理解他的使用方式
【1.2】实现
【1.2.1】创建项目
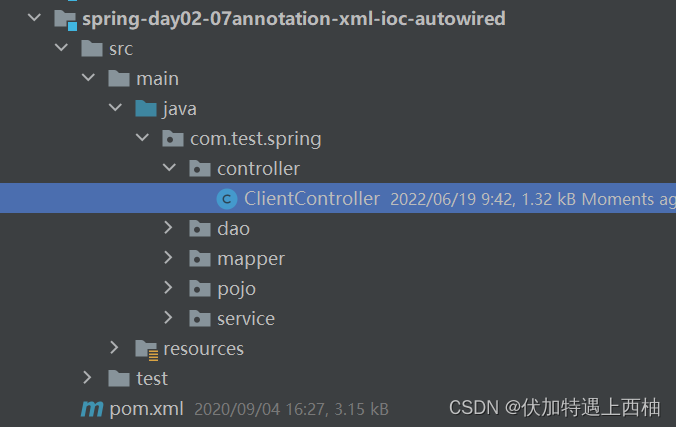
创建spring-day02-07annotation-xml-ioc-autowired
修改AccountDaoImpl添加打印
package com.itheima.spring.dao.impl;import com.itheima.spring.dao.AccountDao;
import com.itheima.spring.mapper.AccountMapper;
import com.itheima.spring.pojo.Account;
import org.springframework.beans.factory.annotation.Autowired;
import org.springframework.jdbc.core.BeanPropertyRowMapper;
import org.springframework.jdbc.core.JdbcTemplate;
import org.springframework.stereotype.Component;
import org.springframework.stereotype.Repository;import java.util.List;/*** @Description:账户dao接口定义实现*/
@Repository("accountDao")
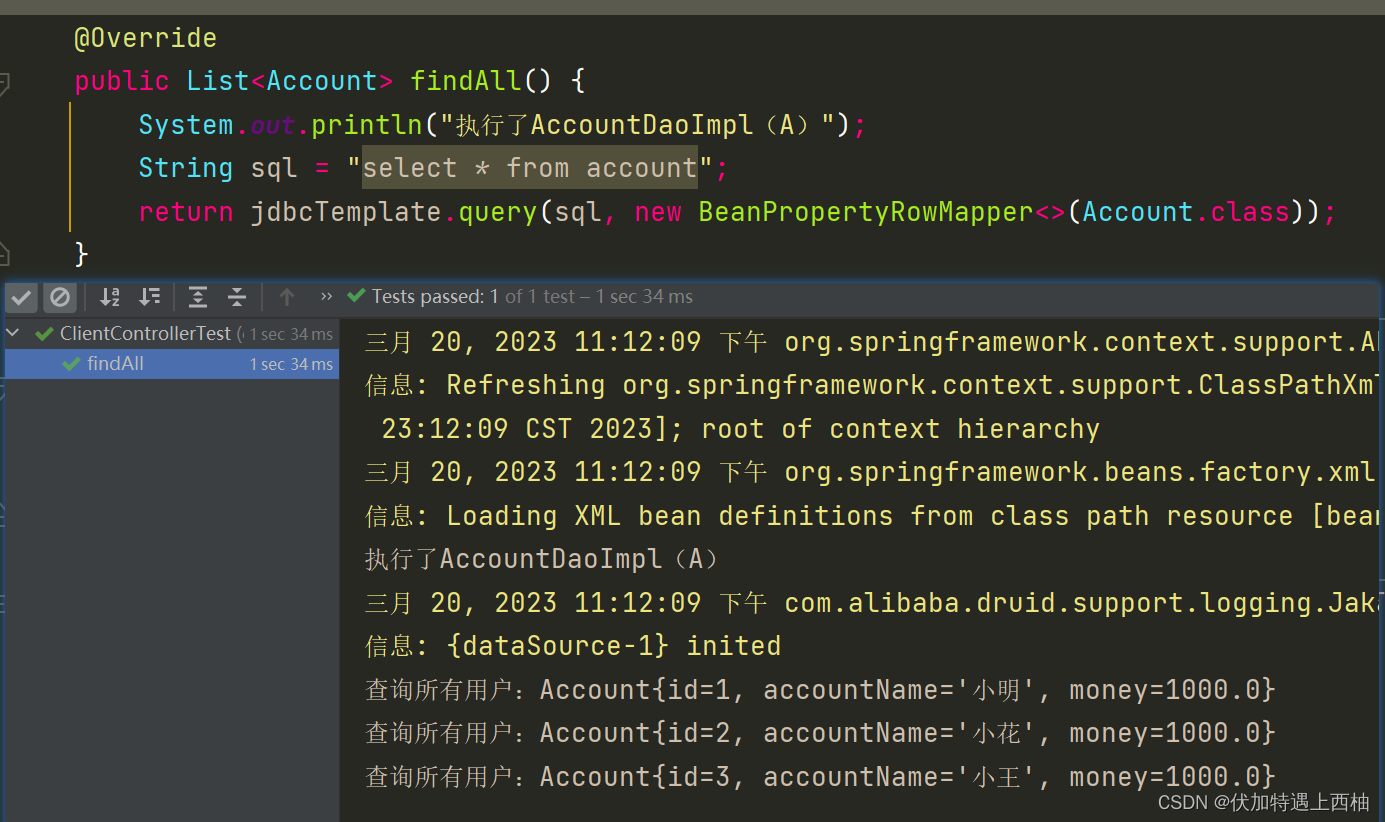
public class AccountDaoImpl implements AccountDao {.........@Overridepublic List findAll() {System.out.println("执行了AccountDaoImpl(A)");String sql = "select * from account";return jdbcTemplate.query(sql, new BeanPropertyRowMapper<>(Account.class));}
......
} 【1.2.2】第一次运行
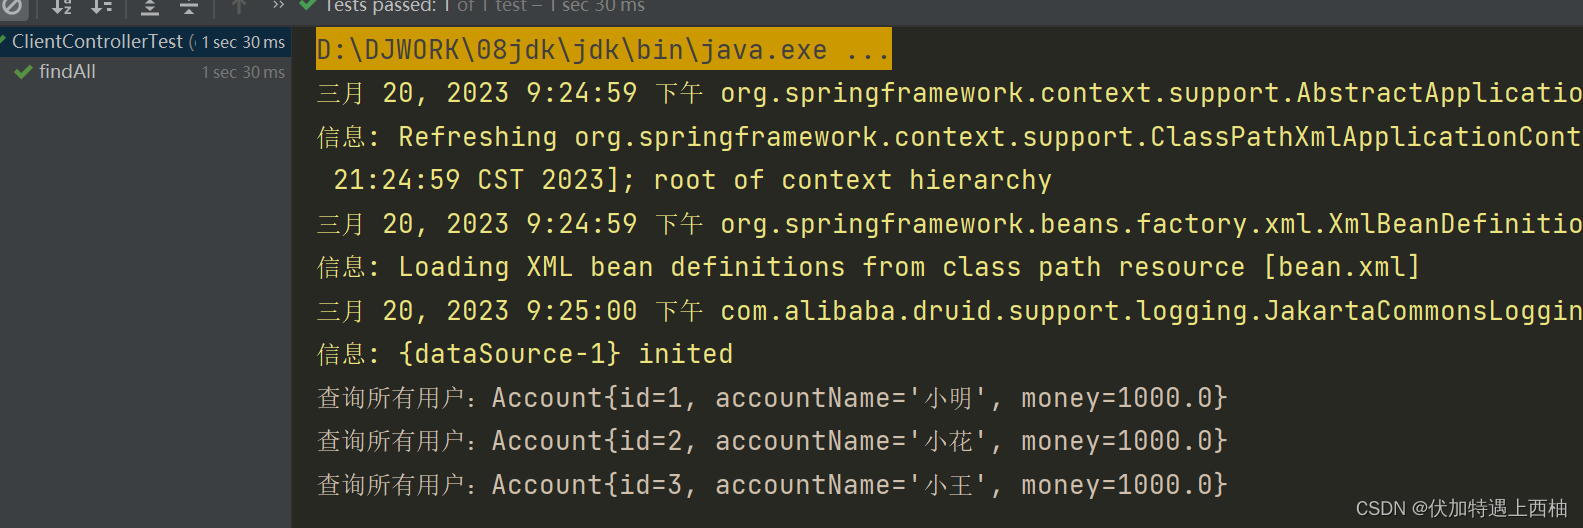
执行AccountControllerTest的findAll()测试
此时AccountDao只有一个实现类AccountDaoImpl,AccountServiceImpl直接按照AccountDao这个类型注入
【1.2.3】新增AccountDaoImplB
指定@Repository(“accountDaoB”)
package com.test.spring.dao.impl;import com.test.spring.dao.AccountDao;
import com.test.spring.mapper.AccountMapper;
import com.test.spring.pojo.Account;
import org.springframework.beans.factory.annotation.Autowired;
import org.springframework.jdbc.core.BeanPropertyRowMapper;
import org.springframework.jdbc.core.JdbcTemplate;
import org.springframework.stereotype.Repository;import java.util.List;/*** @Description:查询所有用户B*/
@Repository("accountDaoB")
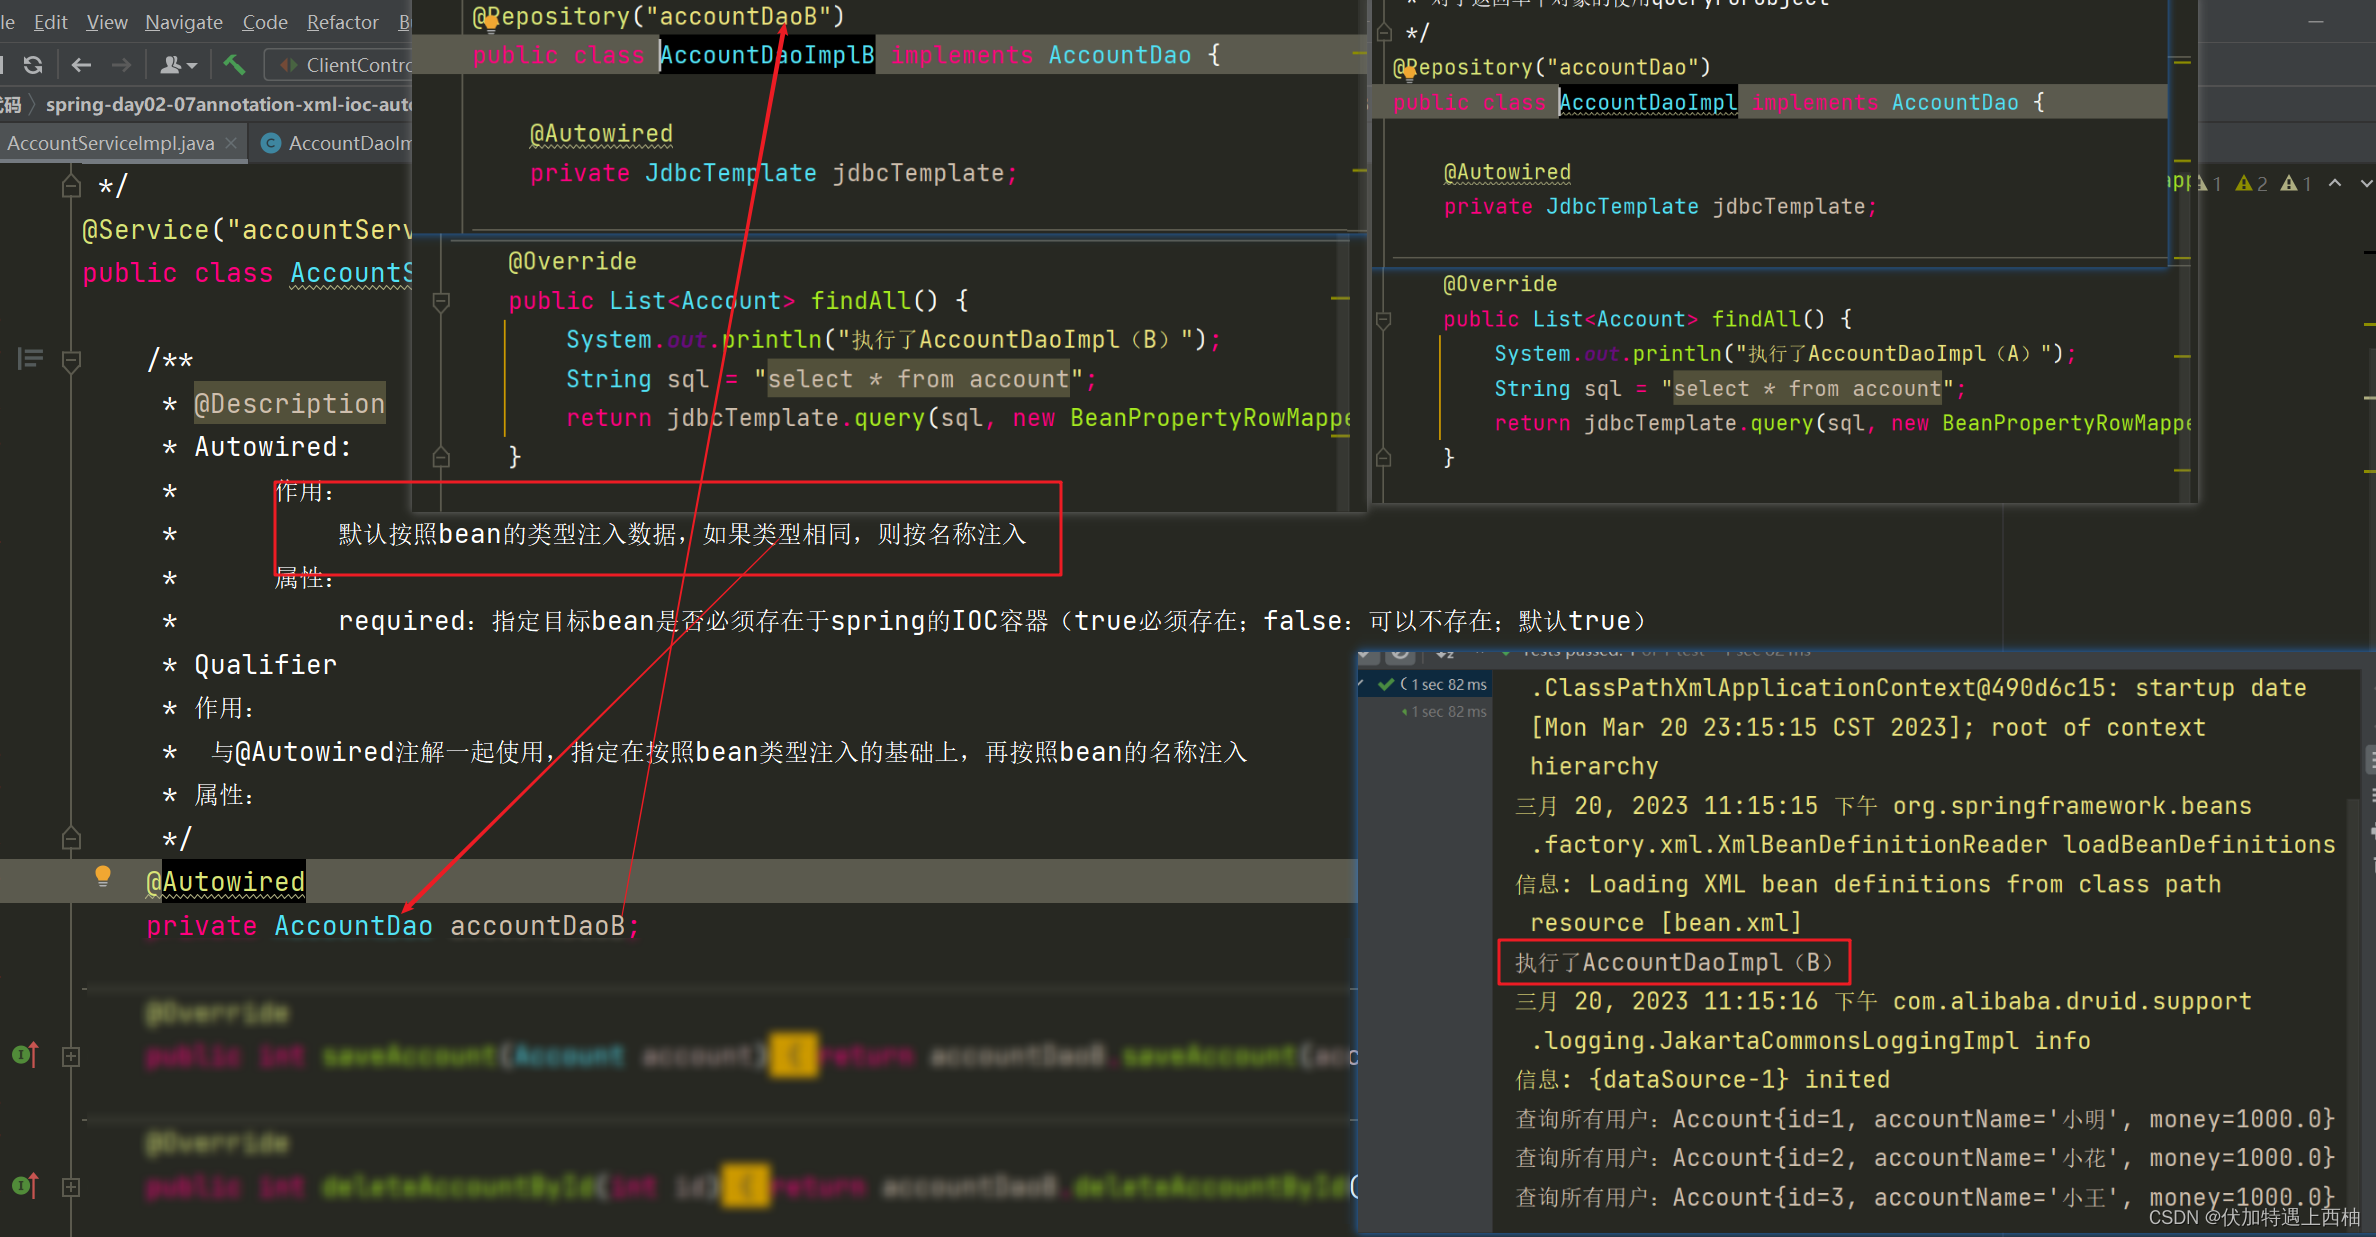
public class AccountDaoImplB implements AccountDao {@Autowiredprivate JdbcTemplate jdbcTemplate;@Overridepublic int saveAccount(Account account) {String sql = "INSERT INTO `account` ( `account_name`, `money`) VALUES ( ?, ?)";return jdbcTemplate.update(sql, account.getAccountName(),account.getMoney());}@Overridepublic int deleteAccountById(int id) {String sql = "delete from `account` where id =?";return jdbcTemplate.update(sql,id);}@Overridepublic int updateAccountById(Account account) {String sql = "update account set account_name=?,money=? where id = ?";return jdbcTemplate.update(sql, account.getAccountName(),account.getMoney(),account.getId());}@Overridepublic Account findAccountById(int id) {String sql = "select * from account where id =?";return jdbcTemplate.queryForObject(sql, new AccountMapper(),id);}@Overridepublic List findAll() {System.out.println("执行了AccountDaoImpl(B)");String sql = "select * from account";return jdbcTemplate.query(sql, new BeanPropertyRowMapper<>(Account.class));}@Overridepublic Integer countAccount() {String sql = "select count(1) from account";return jdbcTemplate.queryForObject(sql, Integer.class);}public void setJdbcTemplate(JdbcTemplate jdbcTemplate) {this.jdbcTemplate = jdbcTemplate;}} 【1.2.4】修改AccountServiceImpl
@Service("accountService")
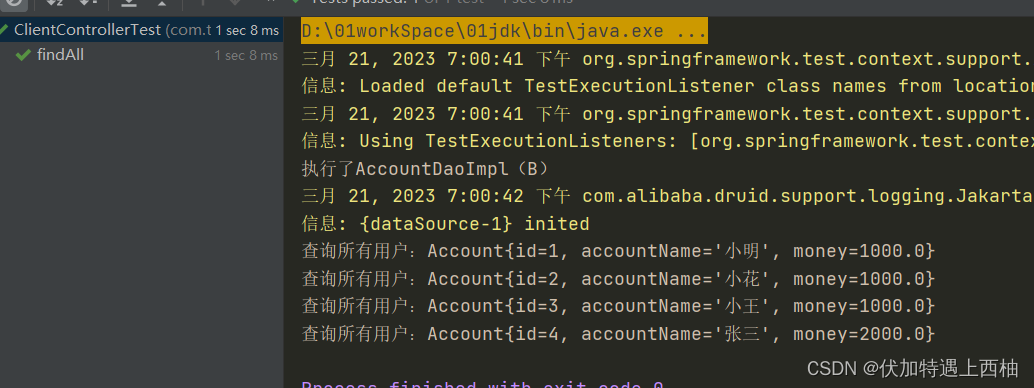
public class AccountServiceImpl implements AccountService {/*** @Description* Autowired:* 作用:* 默认按照bean的类型注入数据,如果类型相同,则按名称注入* 属性:* required:指定目标bean是否必须存在于spring的IOC容器(true必须存在;false:可以不存在;默认true)* Qualifier* 作用:* 与@Autowired注解一起使用,指定在按照bean类型注入的基础上,再按照bean的名称注入* 属性:*/@Autowiredprivate AccountDao accountDaoB;@Overridepublic int saveAccount(Account account) {return accountDaoB.saveAccount(account);}@Overridepublic int deleteAccountById(int id) {return accountDaoB.deleteAccountById(id);}@Overridepublic int updateAccountById(Account account) {return accountDaoB.updateAccountById(account);}@Overridepublic Account findAccountById(int id) {return accountDaoB.findAccountById(id);}@Overridepublic List findAll() {return accountDaoB.findAll();}@Overridepublic Integer countAccount() {return accountDaoB.countAccount();}} 【1.2.5】第二次运行
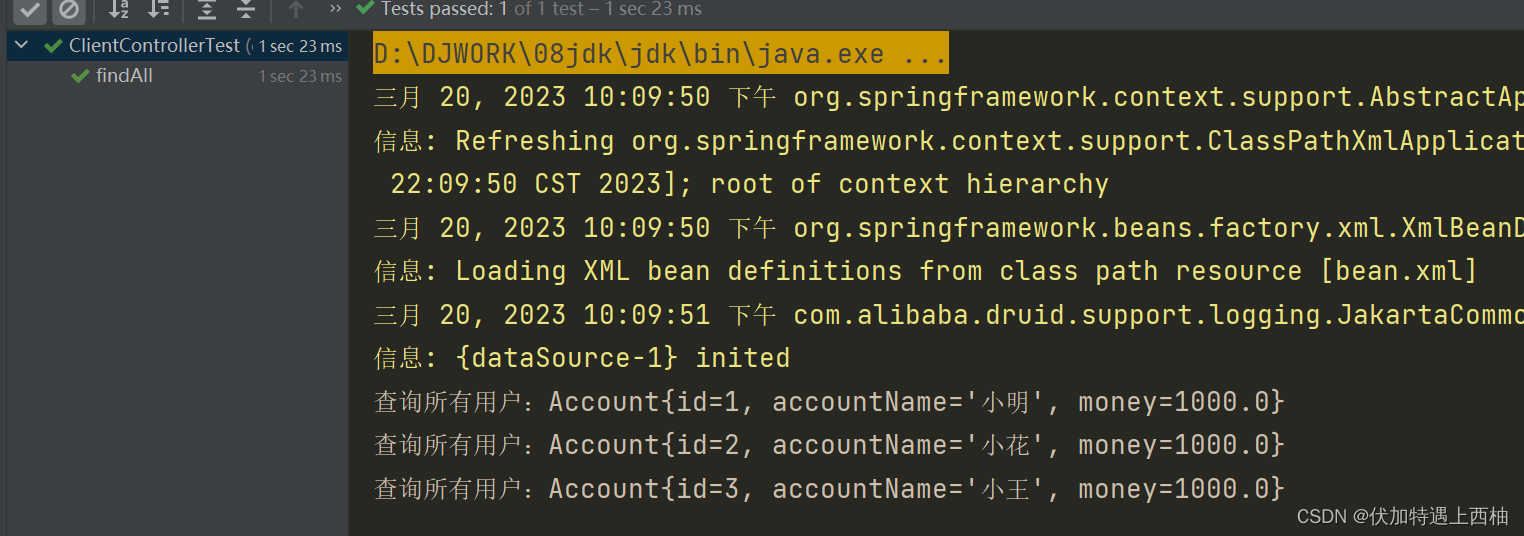
执行AccountControllerTest的findAll()测试
此时AccountDao的实现类有2个:AccountDaoImpl和AccountDaoImplB,但是AccountDaoImplB由注解@Repository(“accountDaoB”)指定的名称为“accountDaoB”,AccountServiceImpl中的属性名称为accountDaoB,所以注入的为:AccountDaoImplB
【1.2.6】再次修改AccountServiceImpl
/*** @Description:业务实现类*/
@Service("accountService")
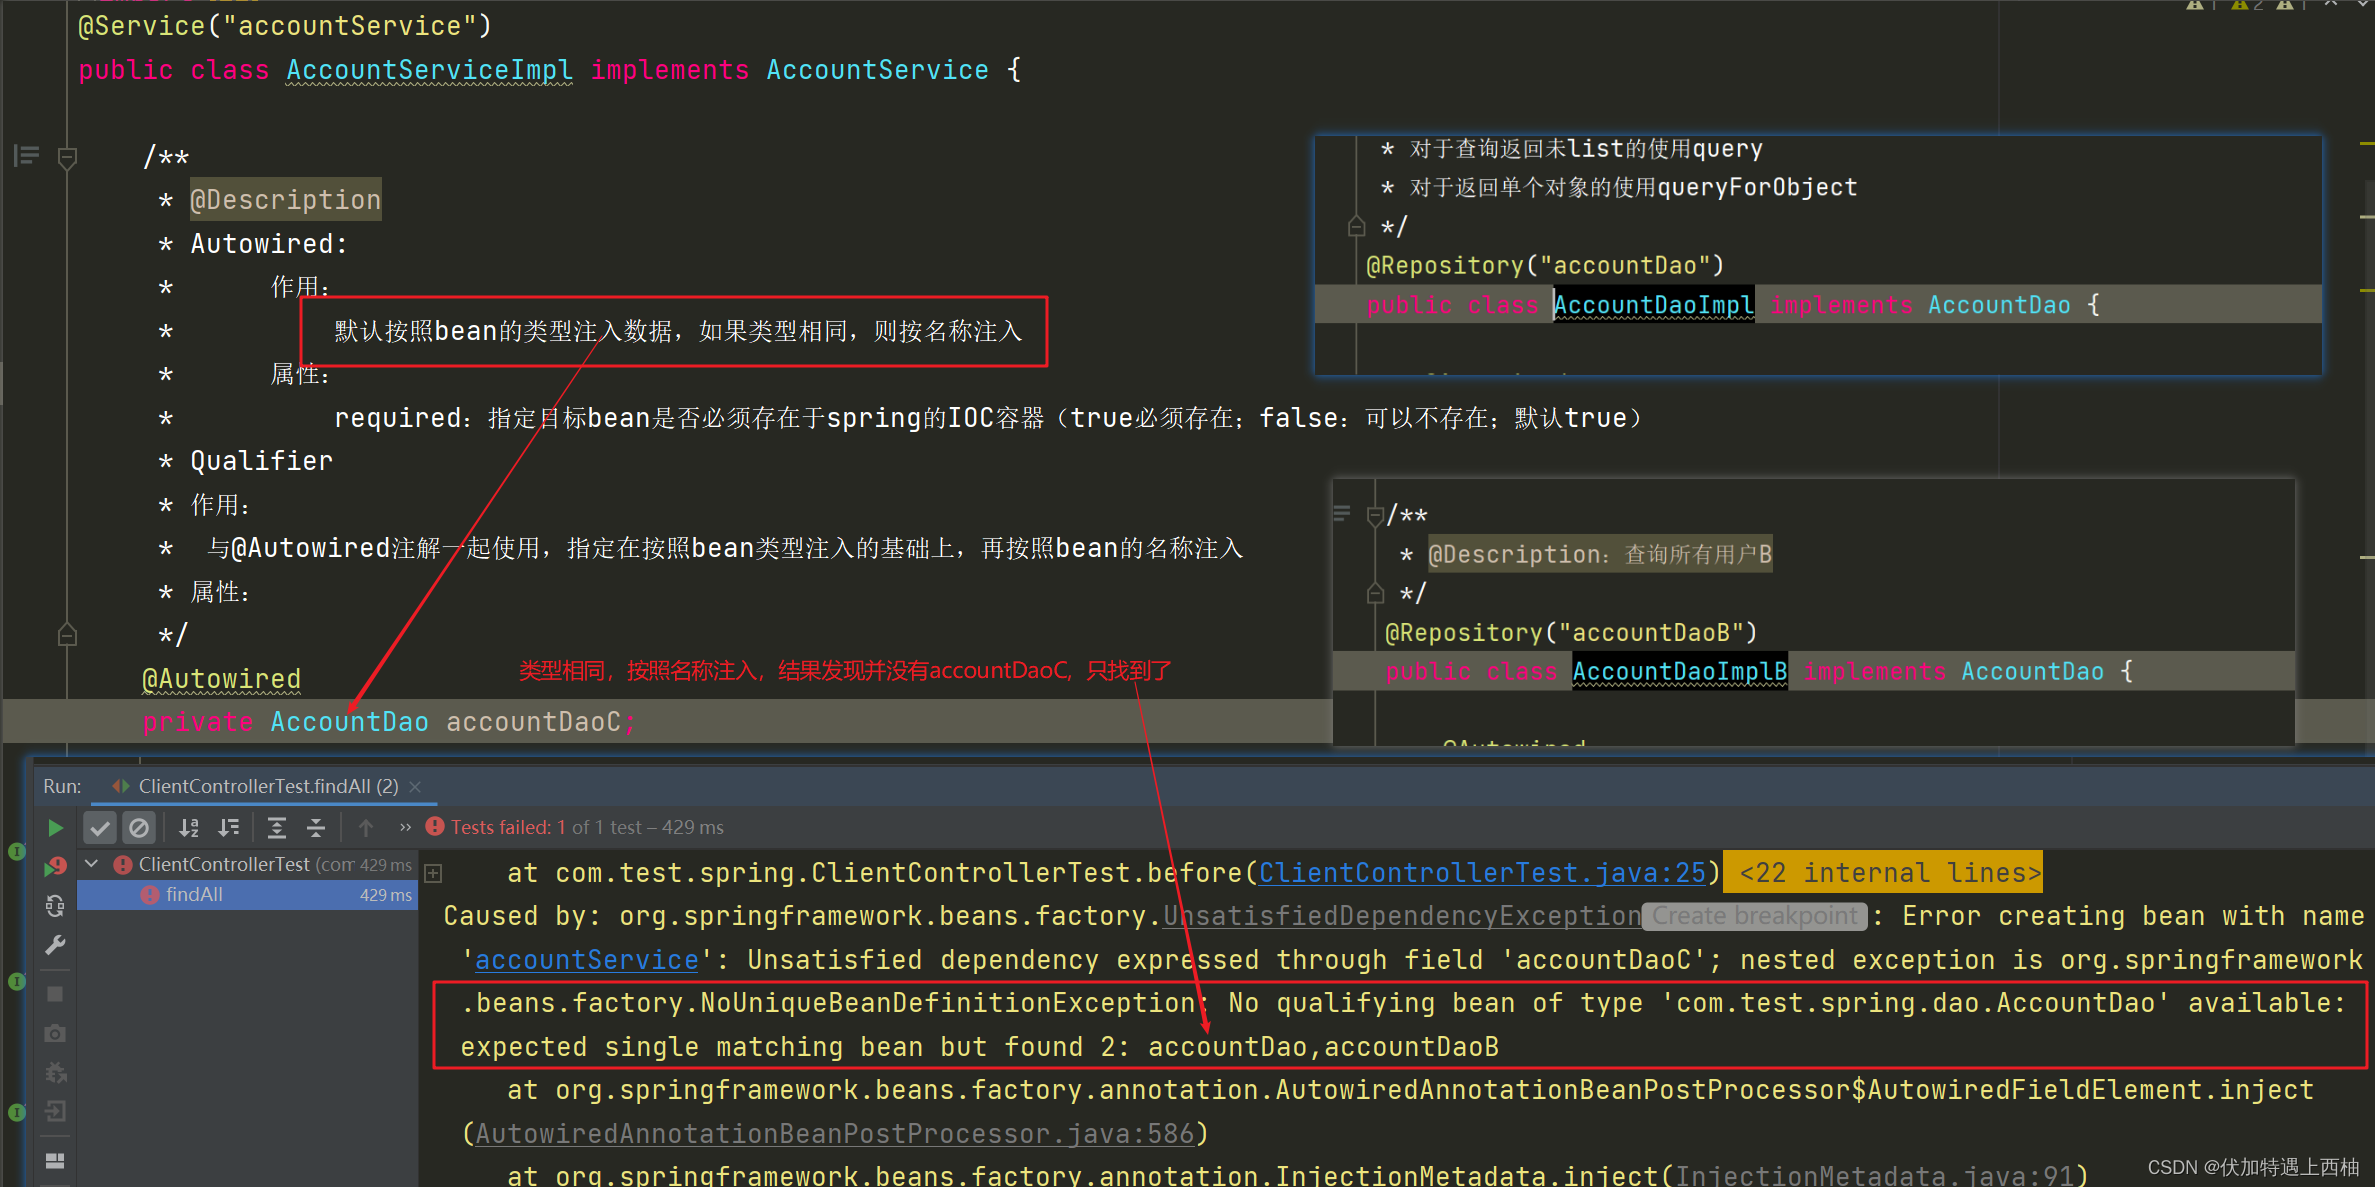
public class AccountServiceImpl implements AccountService {/*** @Description* Autowired:* 作用:* 默认按照bean的类型注入数据,如果类型相同,则按名称注入* 属性:* required:指定目标bean是否必须存在于spring的IOC容器(true必须存在;false:可以不存在;默认true)* Qualifier* 作用:* 与@Autowired注解一起使用,指定在按照bean类型注入的基础上,再按照bean的名称注入* 属性:*/@Autowiredprivate AccountDao accountDaoC;@Overridepublic int saveAccount(Account account) {return accountDaoC.saveAccount(account);}@Overridepublic int deleteAccountById(int id) {return accountDaoC.deleteAccountById(id);}@Overridepublic int updateAccountById(Account account) {return accountDaoC.updateAccountById(account);}@Overridepublic Account findAccountById(int id) {return accountDaoC.findAccountById(id);}@Overridepublic List findAll() {return accountDaoC.findAll();}@Overridepublic Integer countAccount() {return accountDaoC.countAccount();}} 【1.2.7】第三次运行
此时AccountDao的实现类有2个:AccountDaoImpl和AccountDaoImplB,AccountServiceImpl中的属性名称为accountDaoC,而AccountDaoImpl和AccountDaoImplB指定的名称为:accountDao、accountDaoB,并没有accountDaoC,所以报错
【1.2.8】再次修改AccountServiceImpl
添加@Qualifier(“accountDao”)
/*** @Description:业务实现类*/
@Service("accountService")
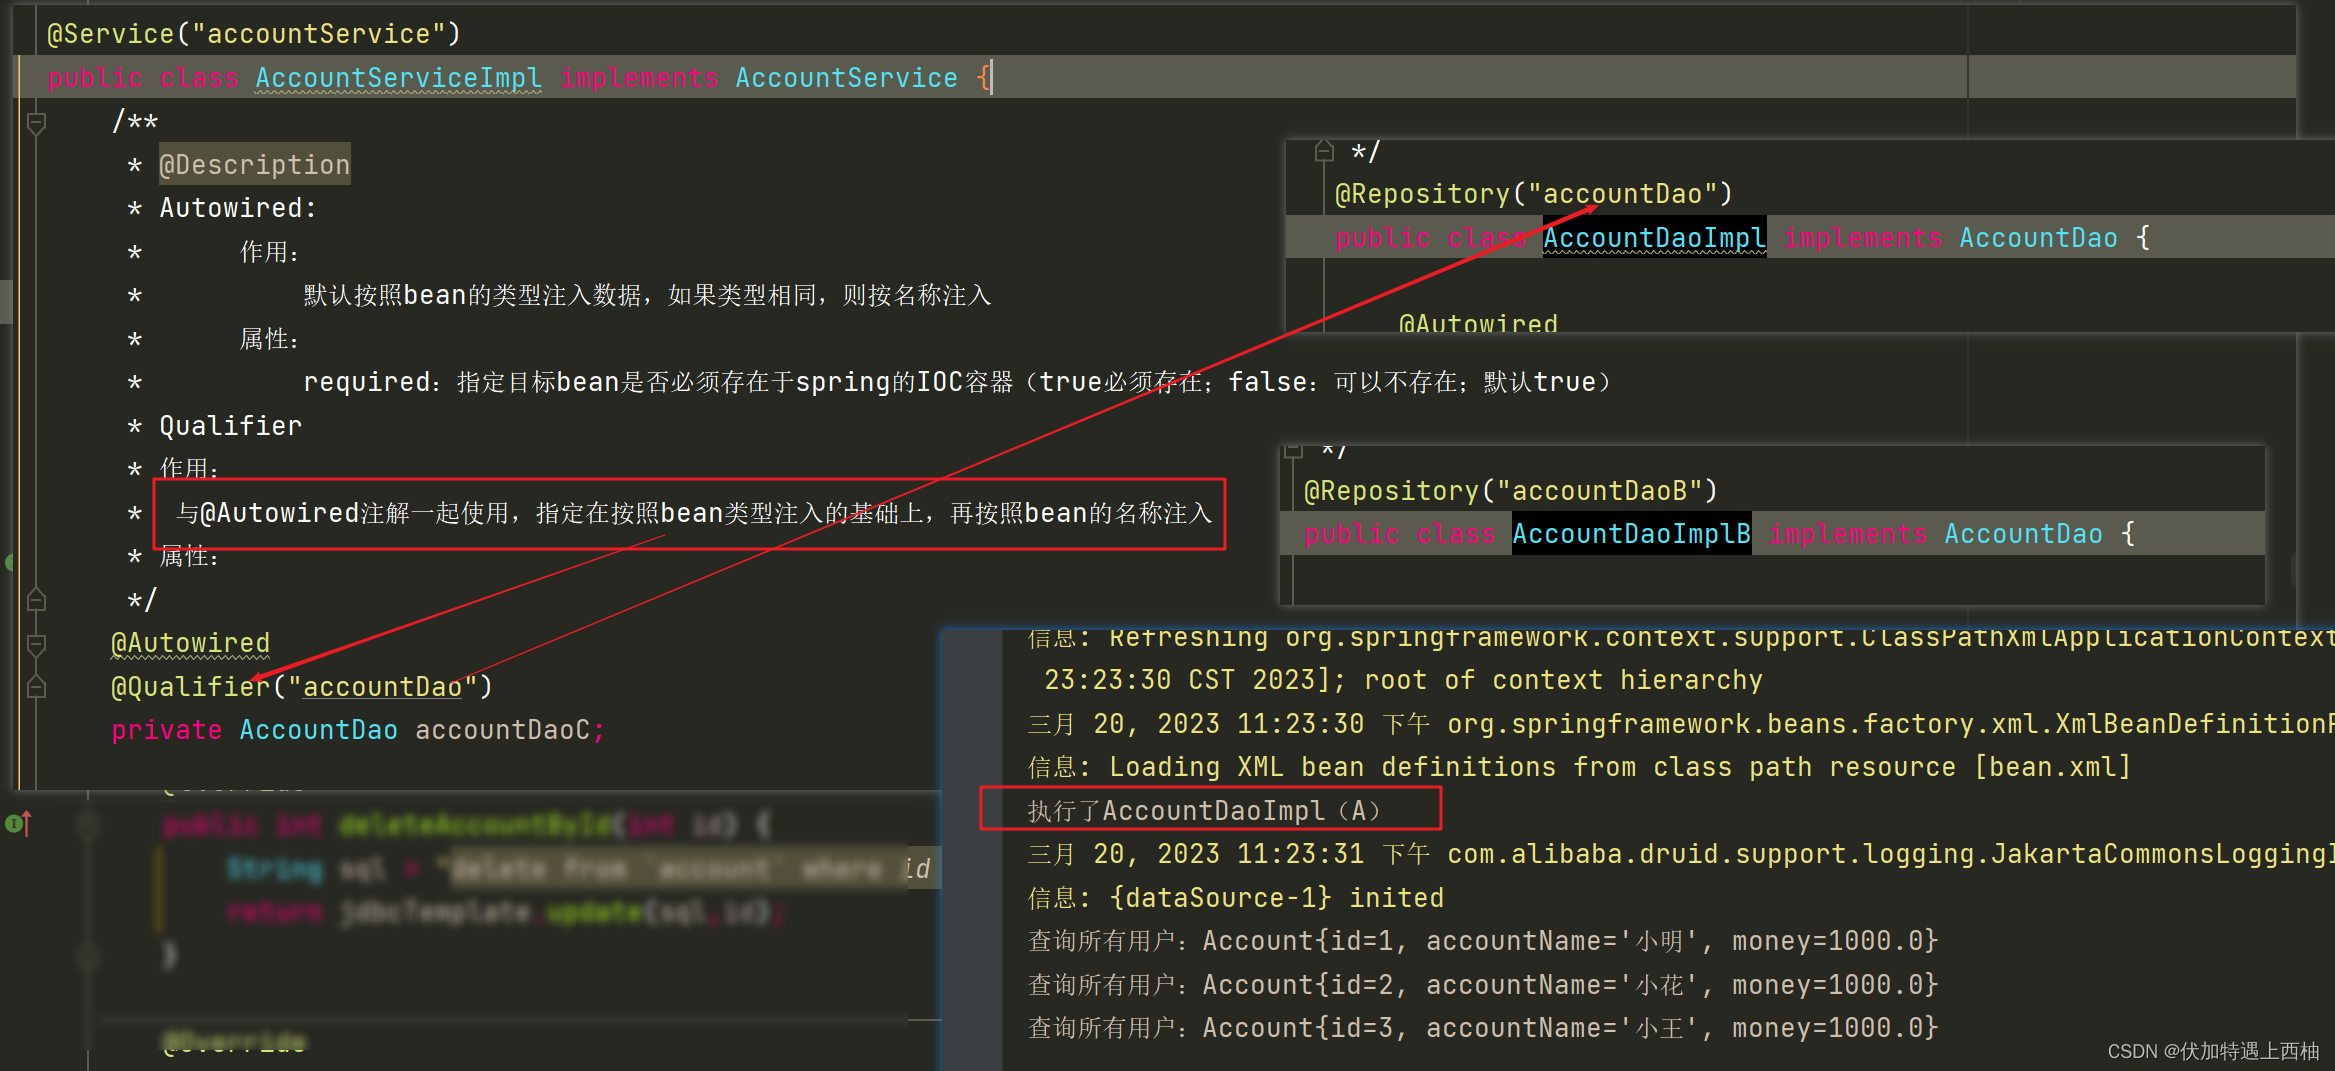
public class AccountServiceImpl implements AccountService {/*** @Description* Autowired:* 作用:* 默认按照bean的类型注入数据,如果类型相同,则按名称注入* 属性:* required:指定目标bean是否必须存在于spring的IOC容器(true必须存在;false:可以不存在;默认true)* Qualifier* 作用:* 与@Autowired注解一起使用,指定在按照bean类型注入的基础上,再按照bean的名称注入* 属性:*/@Autowired@Qualifier("accountDao")private AccountDao accountDaoC;@Overridepublic int saveAccount(Account account) {return accountDaoC.saveAccount(account);}@Overridepublic int deleteAccountById(int id) {return accountDaoC.deleteAccountById(id);}@Overridepublic int updateAccountById(Account account) {return accountDaoC.updateAccountById(account);}@Overridepublic Account findAccountById(int id) {return accountDaoC.findAccountById(id);}@Overridepublic List findAll() {return accountDaoC.findAll();}@Overridepublic Integer countAccount() {return accountDaoC.countAccount();}} 【1.2.9】第四次运行
执行AccountControllerTest的findAll()测试
此时使用 @Autowired注入类型为AccountDao,这个时候bean名称不再为accountDao2,而是根据@Qualifier指定的名称accountDao
【1.3】@Autowired、@Qualifier小结
@Autowired
作用:默认按照bean的类型注入数据
属性:required:指定目标bean是否必须存在于spring的IOC容器(true必须存在;false:可以不存在;默认true)
细节:1.在spring容器中,如果同一个类型存在多个bean实例对象2.则先按照bean的类型进行注入,再按照bean的名称进行匹配3.匹配上注入成功;匹配不上注入失败@Qualifier
作用:与@Autowired注解一起使用,指定在按照bean类型注入的基础上,再按照bean的名称注入
属性:value:指定bean的名称
细节:1.在类的成员变量上,不能单独使用。需要与@Autowired注解一起使用2.在方法的成员变量上,可以单独使用
【2】@Resource(8)
@Resource
作用:
默认按照bean的名称注入数据,如果同一个接口有多个实现,可以通过指定属性进行注入
属性:
name:指定bean的名称注入数据
type:指定bean的类型注入数据
细节:
默认按照bean的名称匹配注入数据。如果注入失败,再按照bean的类型注入
【2.1】目标
使用@Resource,且理解他的匹配方式
【2.2】实现
【2.2.1】创建项目
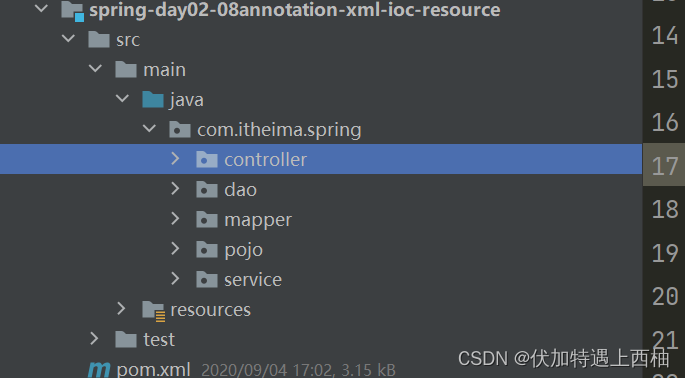
创建spring-day02-08annotation-xml-ioc-resource
【2.2.2】修改AccountServiceImpl
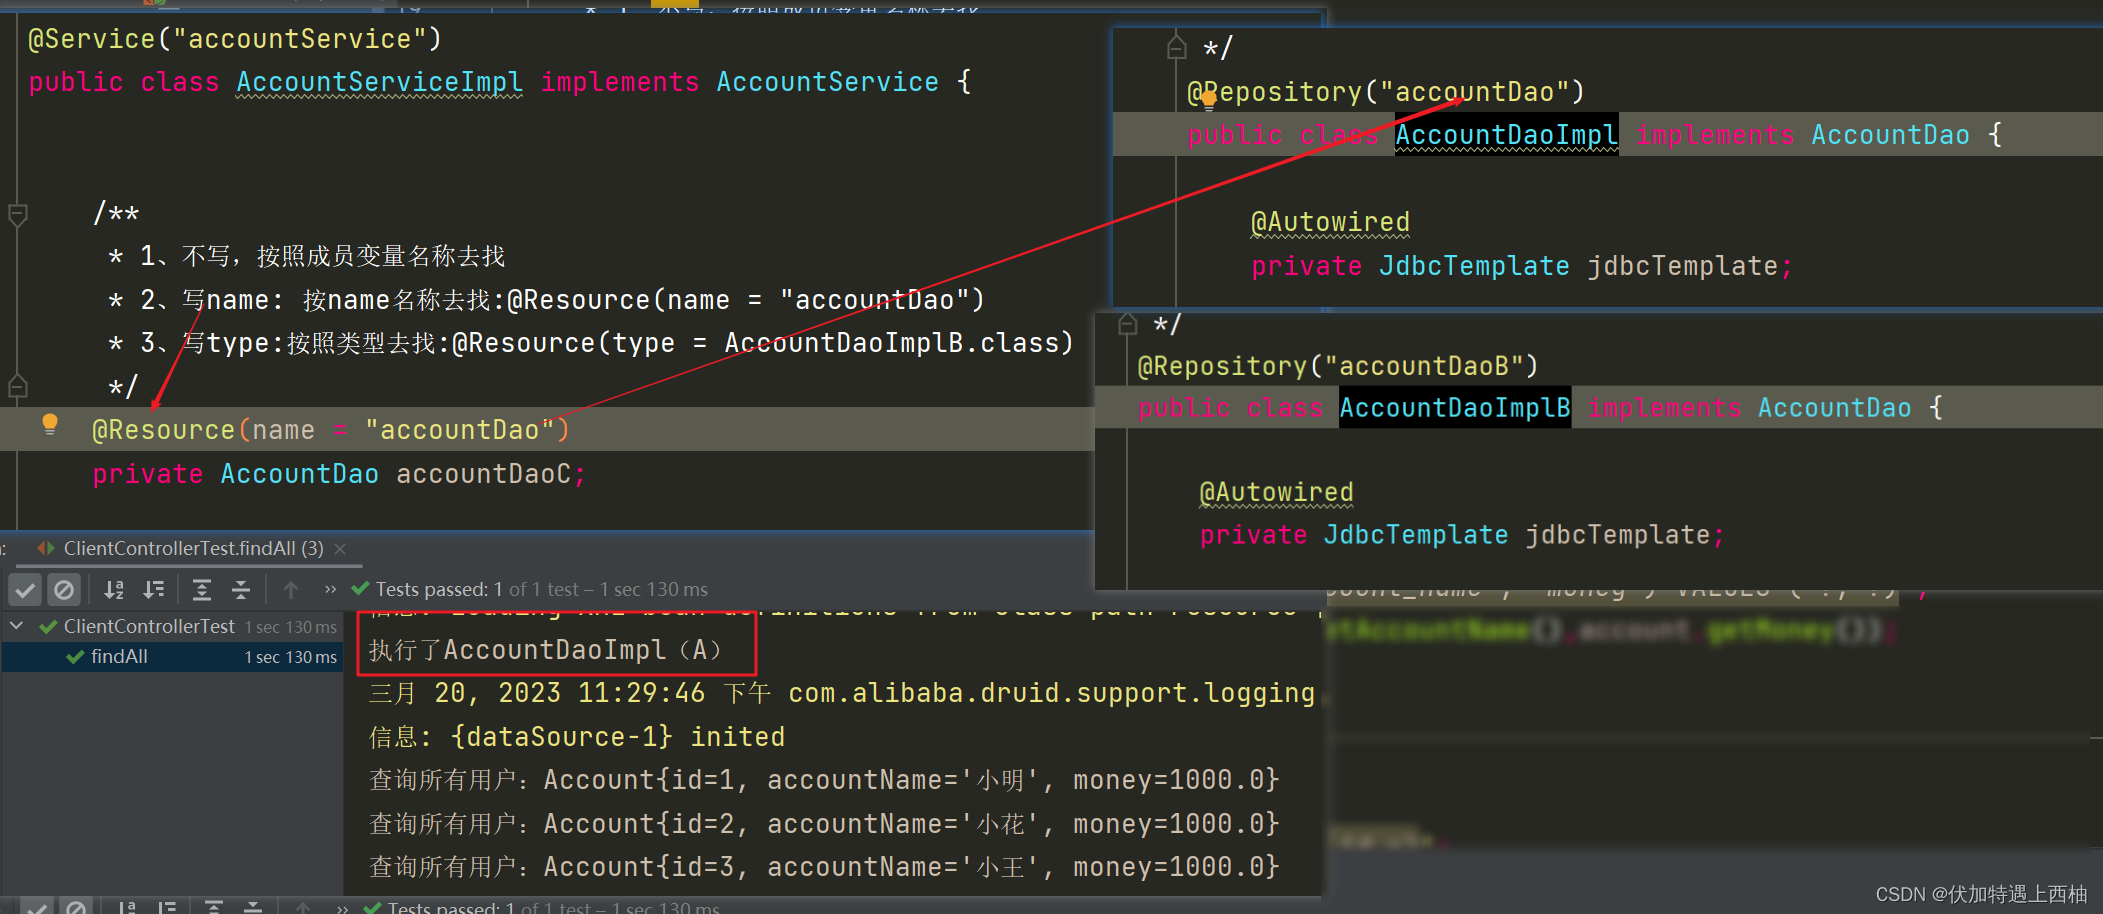
此时@Resource按name="accountDao"注入
/*** @Description:业务实现类*/
@Service("accountService")
public class AccountServiceImpl implements AccountService {/*** 1、不写,按照成员变量名称去找* 2、写name: 按name名称去找:@Resource(name = "accountDao")* 3、写type:按照类型去找:@Resource(type = AccountDaoImplB.class)*/@Resource(name = "accountDao")private AccountDao accountDaoC;@Overridepublic int saveAccount(Account account) {return accountDaoC.saveAccount(account);}@Overridepublic int deleteAccountById(int id) {return accountDaoC.deleteAccountById(id);}@Overridepublic int updateAccountById(Account account) {return accountDaoC.updateAccountById(account);}@Overridepublic Account findAccountById(int id) {return accountDaoC.findAccountById(id);}@Overridepublic List findAll() {return accountDaoC.findAll();}@Overridepublic Integer countAccount() {return accountDaoC.countAccount();}public void setAccountDao(AccountDao accountDao) {this.accountDaoC = accountDao;}
}
【2.2.3】第一次运行
此时AccountDao按照@Resource中的name="accountDao"注入
【2.2.4】再次修改AccountServiceImpl
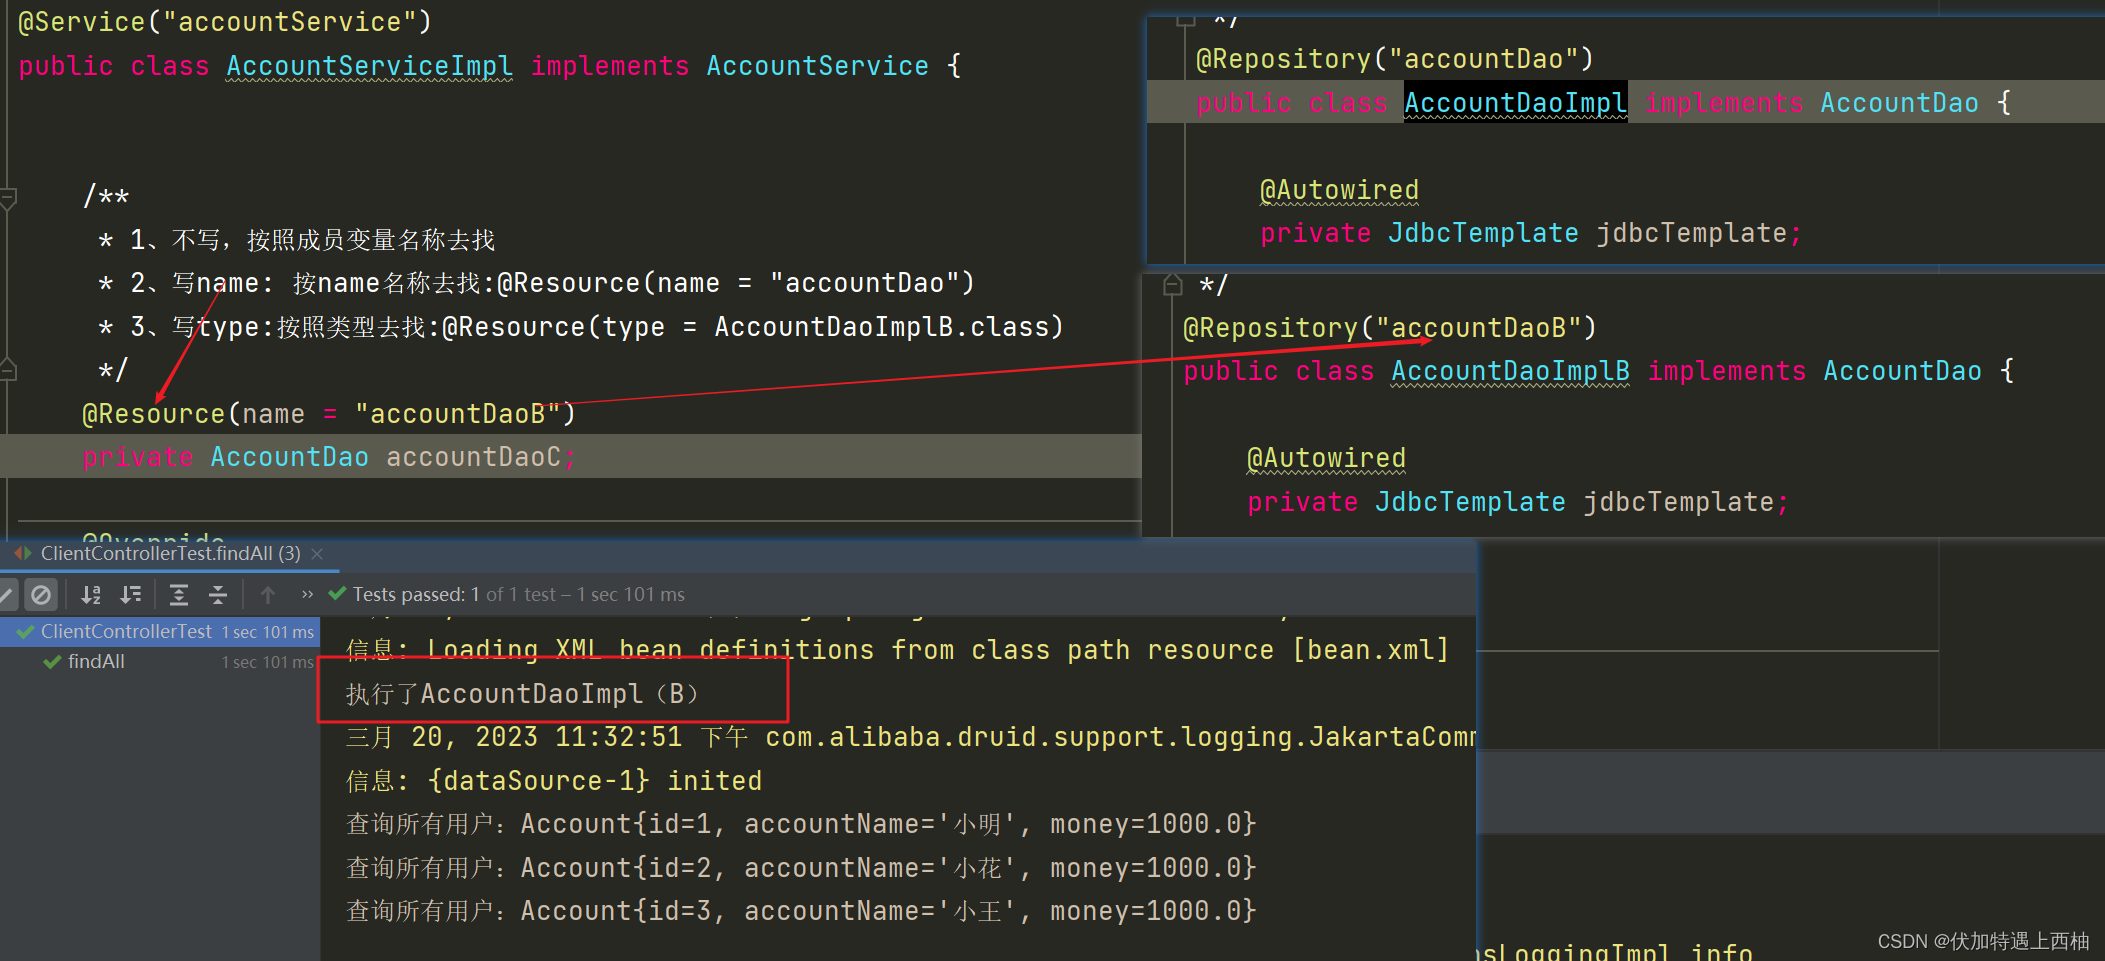
此时@Resource按name="accountDaoB"注入
/*** @Description:业务实现类*/
@Service("accountService")
public class AccountServiceImpl implements AccountService {/*** 1、不写,按照成员变量名称去找* 2、写name: 按name名称去找:@Resource(name = "accountDao")* 3、写type:按照类型去找:@Resource(type = AccountDaoImplB.class)*/@Resource(name = "accountDaoB")private AccountDao accountDaoC;@Overridepublic int saveAccount(Account account) {return accountDaoC.saveAccount(account);}@Overridepublic int deleteAccountById(int id) {return accountDaoC.deleteAccountById(id);}@Overridepublic int updateAccountById(Account account) {return accountDaoC.updateAccountById(account);}@Overridepublic Account findAccountById(int id) {return accountDaoC.findAccountById(id);}@Overridepublic List findAll() {return accountDaoC.findAll();}@Overridepublic Integer countAccount() {return accountDaoC.countAccount();}public void setAccountDao(AccountDao accountDao) {this.accountDaoC = accountDao;}
}
【2.2.5】第二次运行
此时AccountDao按照@Resource中的name="accountDaoB"注入
【2.2.6】修改dao层
去除AccountDaoImpl和AccountDaoImplB中的@Repository的name值:accountDao、accountDaoB
@Repository
public class AccountDaoImpl implements AccountDao {@Autowiredprivate JdbcTemplate jdbcTemplate;@Overridepublic int saveAccount(Account account) {String sql = "INSERT INTO `account` ( `account_name`, `money`) VALUES ( ?, ?)";return jdbcTemplate.update(sql, account.getAccountName(),account.getMoney());}@Overridepublic int deleteAccountById(int id) {String sql = "delete from `account` where id =?";return jdbcTemplate.update(sql,id);}@Overridepublic int updateAccountById(Account account) {String sql = "update account set account_name=?,money=? where id = ?";return jdbcTemplate.update(sql, account.getAccountName(),account.getMoney(),account.getId());}@Overridepublic Account findAccountById(int id) {String sql = "select * from account where id =?";return jdbcTemplate.queryForObject(sql, new AccountMapper(),id);}@Overridepublic List findAll() {System.out.println("执行了AccountDaoImpl(A)");String sql = "select * from account";return jdbcTemplate.query(sql, new BeanPropertyRowMapper<>(Account.class));}@Overridepublic Integer countAccount() {String sql = "select count(1) from account";return jdbcTemplate.queryForObject(sql, Integer.class);}public void setJdbcTemplate(JdbcTemplate jdbcTemplate) {this.jdbcTemplate = jdbcTemplate;}}
@Repository
public class AccountDaoImplB implements AccountDao {@Autowiredprivate JdbcTemplate jdbcTemplate;@Overridepublic int saveAccount(Account account) {String sql = "INSERT INTO `account` ( `account_name`, `money`) VALUES ( ?, ?)";return jdbcTemplate.update(sql, account.getAccountName(),account.getMoney());}@Overridepublic int deleteAccountById(int id) {String sql = "delete from `account` where id =?";return jdbcTemplate.update(sql,id);}@Overridepublic int updateAccountById(Account account) {String sql = "update account set account_name=?,money=? where id = ?";return jdbcTemplate.update(sql, account.getAccountName(),account.getMoney(),account.getId());}@Overridepublic Account findAccountById(int id) {String sql = "select * from account where id =?";return jdbcTemplate.queryForObject(sql, new AccountMapper(),id);}@Overridepublic List findAll() {System.out.println("执行了AccountDaoImpl(B)");String sql = "select * from account";return jdbcTemplate.query(sql, new BeanPropertyRowMapper<>(Account.class));}@Overridepublic Integer countAccount() {String sql = "select count(1) from account";return jdbcTemplate.queryForObject(sql, Integer.class);}public void setJdbcTemplate(JdbcTemplate jdbcTemplate) {this.jdbcTemplate = jdbcTemplate;}} 【2.2.7】再次修改AccountServiceImpl
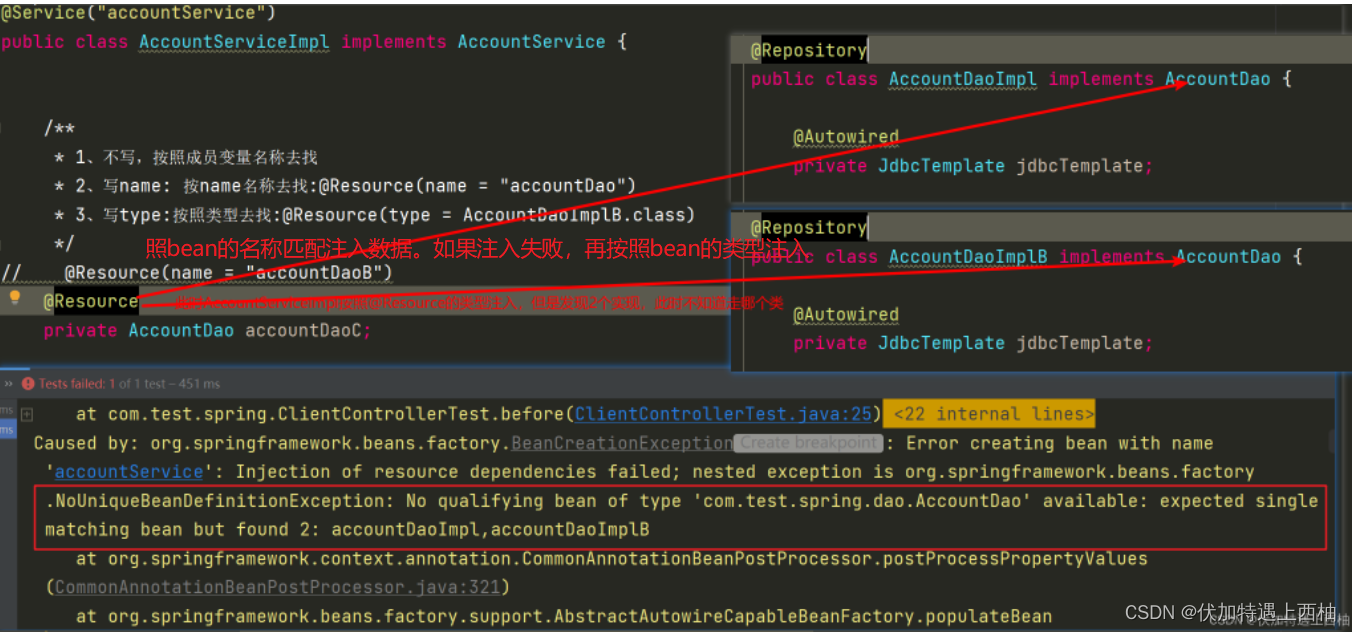
添加@Resource(type = AccountDaoImpl.class)
@Service("accountService")
public class AccountServiceImpl implements AccountService {/*** 1、不写,按照成员变量名称去找* 2、写name: 按name名称去找:@Resource(name = "accountDao")* 3、写type:按照类型去找:@Resource(type = AccountDaoImplB.class)*/
//    @Resource(name = "accountDaoB")@Resourceprivate AccountDao accountDaoC;@Overridepublic int saveAccount(Account account) {return accountDaoC.saveAccount(account);}@Overridepublic int deleteAccountById(int id) {return accountDaoC.deleteAccountById(id);}@Overridepublic int updateAccountById(Account account) {return accountDaoC.updateAccountById(account);}@Overridepublic Account findAccountById(int id) {return accountDaoC.findAccountById(id);}@Overridepublic List findAll() {return accountDaoC.findAll();}@Overridepublic Integer countAccount() {return accountDaoC.countAccount();}public void setAccountDao(AccountDao accountDao) {this.accountDaoC = accountDao;}
}
【2.2.8】第三次运行
默认按照bean的名称匹配注入数据。如果注入失败,再按照bean的类型注入
此时AccountServiceImpl按照@Resource的类型注入,但是发现2个实现,此时不知道走哪个类
只有一个实现类的情况下
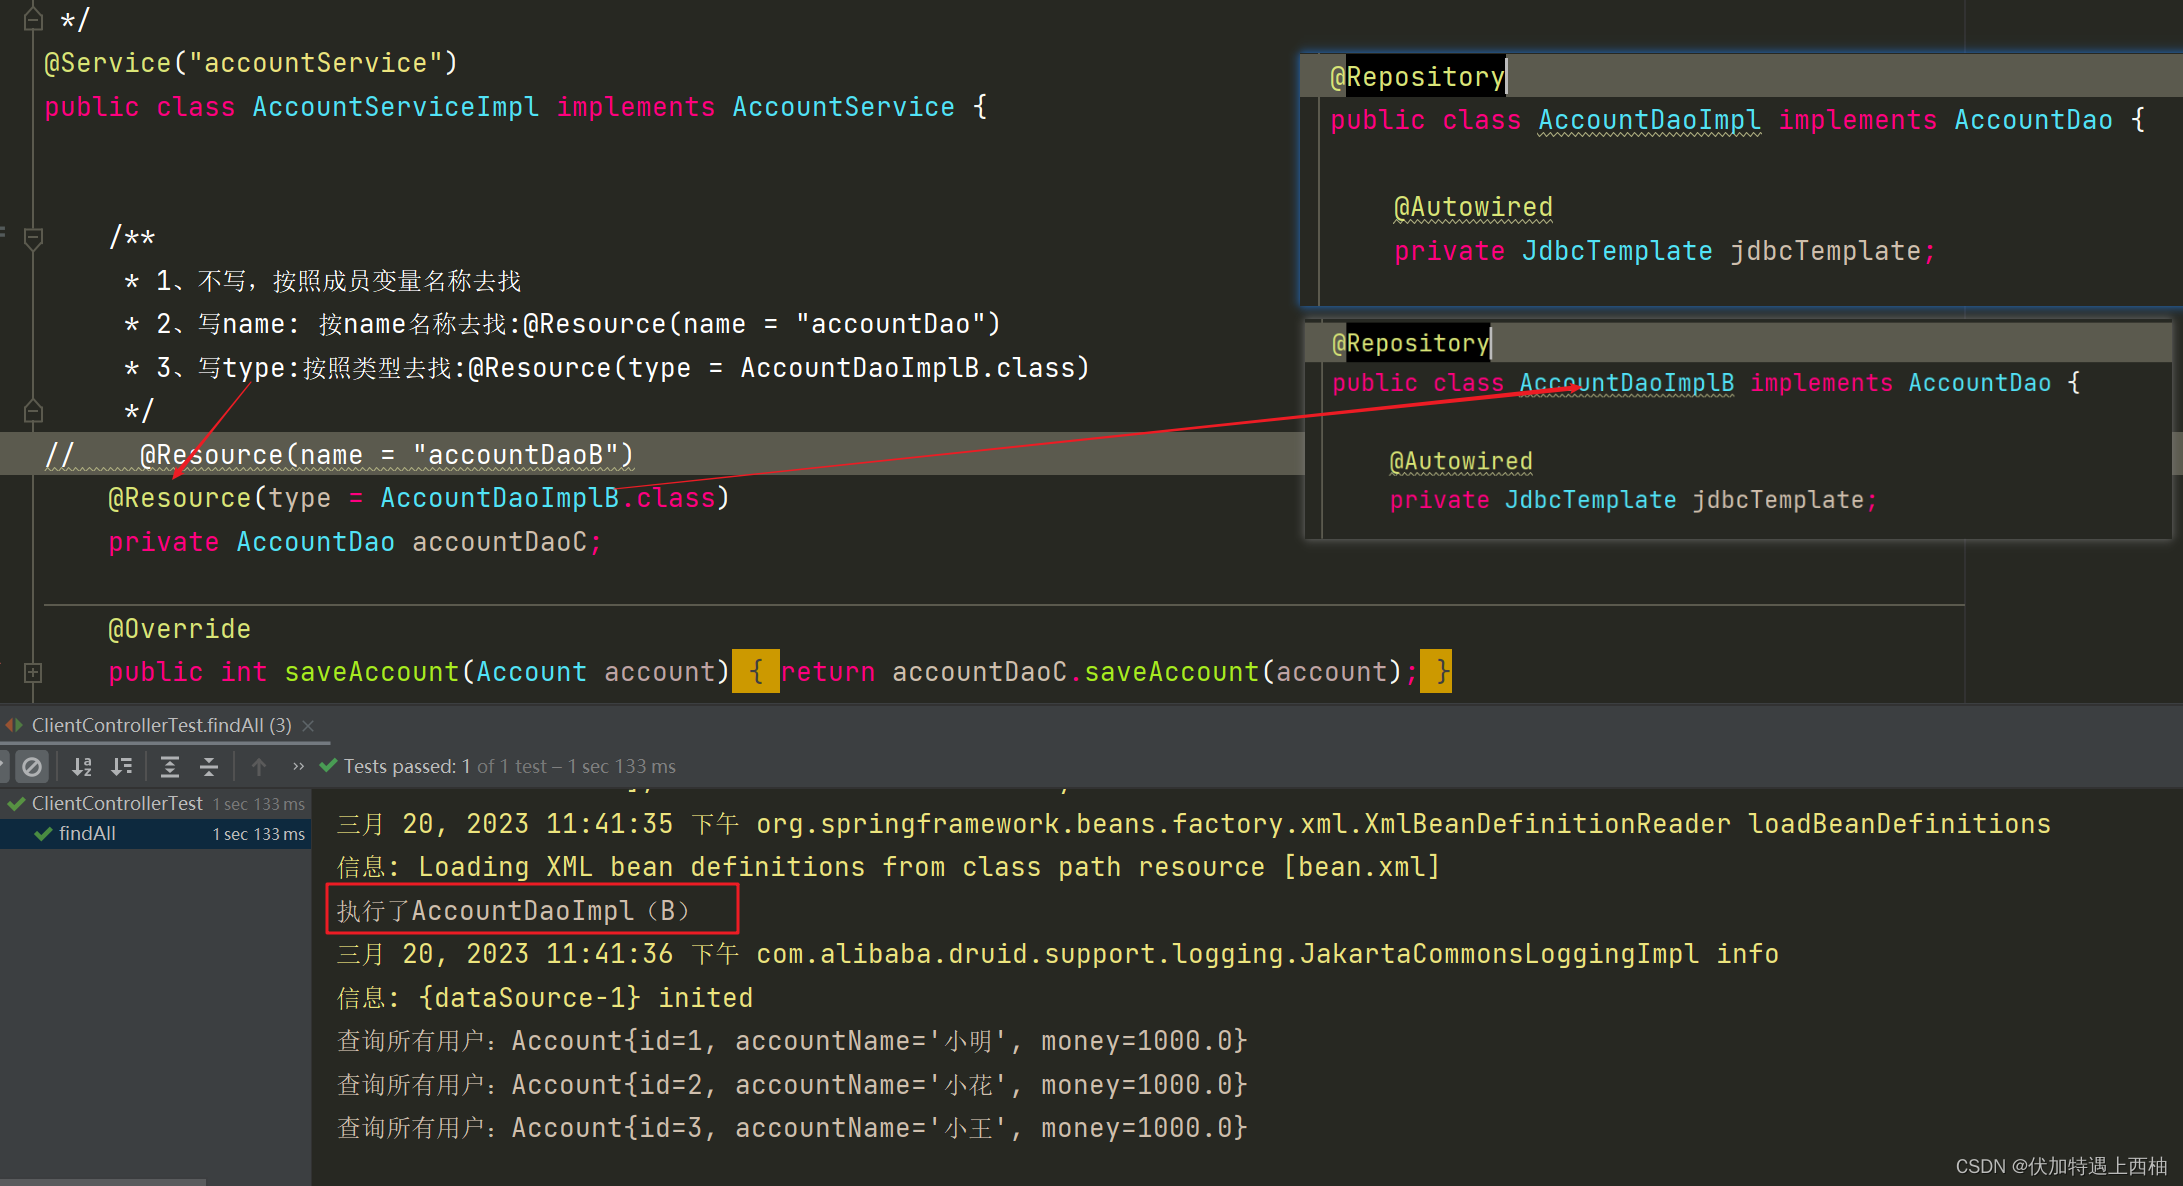
【2.2.9】再次修改AccountServiceImpl
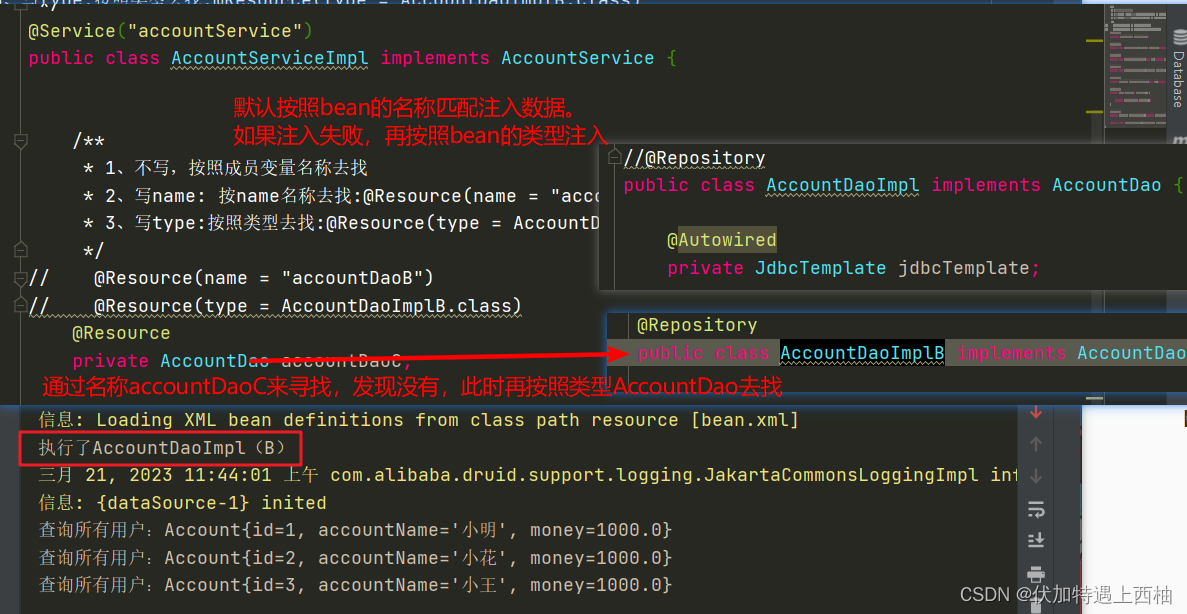
此时@Resource按type = AccountDaoImplB.class注入
@Service("accountService")
public class AccountServiceImpl implements AccountService {/*** 1、不写,按照成员变量名称去找* 2、写name: 按name名称去找:@Resource(name = "accountDao")* 3、写type:按照类型去找:@Resource(type = AccountDaoImplB.class)*/
//    @Resource(name = "accountDaoB")@Resource(type = AccountDaoImplB.class)private AccountDao accountDaoC;@Overridepublic int saveAccount(Account account) {return accountDaoC.saveAccount(account);}@Overridepublic int deleteAccountById(int id) {return accountDaoC.deleteAccountById(id);}@Overridepublic int updateAccountById(Account account) {return accountDaoC.updateAccountById(account);}@Overridepublic Account findAccountById(int id) {return accountDaoC.findAccountById(id);}@Overridepublic List findAll() {return accountDaoC.findAll();}@Overridepublic Integer countAccount() {return accountDaoC.countAccount();}public void setAccountDao(AccountDao accountDao) {this.accountDaoC = accountDao;}
}
【2.2.10】第四次运行
此时AccountServiceImpl按照@Resource按type = AccountDaoImpB.class注入
【2.3】@Resource小结
@Resource
作用:默认按照bean的名称注入数据,如果同一个接口有多个实现,可以通过指定类型进行注入
属性:name:指定bean的名称注入数据type:指定bean的类型注入数据
细节:默认按照bean的名称匹配注入数据。如果注入失败,再按照bean的类型注入
【3】@Value(9)
@Value
作用:给基本数据类型赋值
使用:适合配置属性文件的读取
【3.1】创建项目
创建spring-day02-09annotation-xml-ioc-value
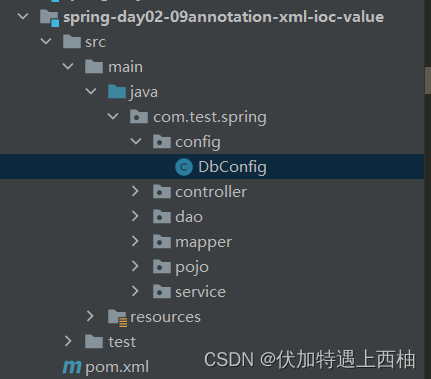
【3.2】添加DbConfig类
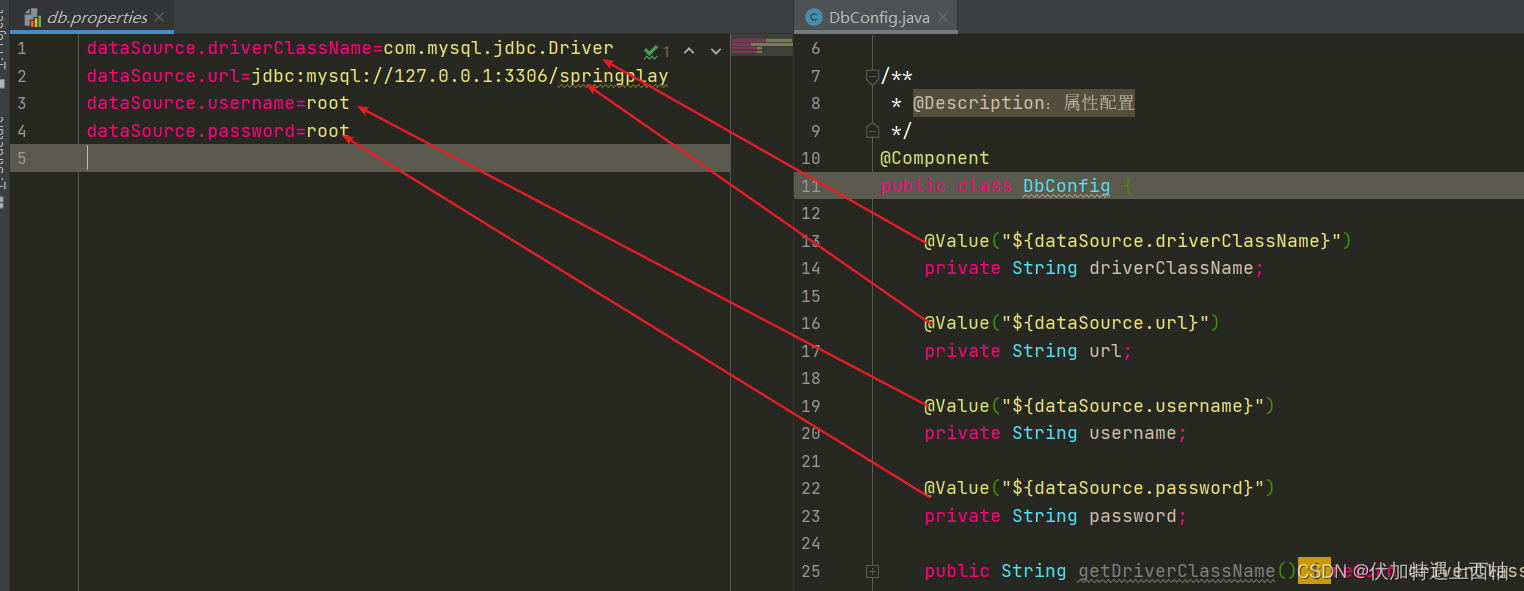
/*** @Description:属性配置*/
@Component
public class DbConfig {@Value("${dataSource.driverClassName}")private String driverClassName;@Value("${dataSource.url}")private String url;@Value("${dataSource.username}")private String username;@Value("${dataSource.password}")private String password;public String getDriverClassName() {return driverClassName;}public void setDriverClassName(String driverClassName) {this.driverClassName = driverClassName;}public String getUrl() {return url;}public void setUrl(String url) {this.url = url;}public String getUsername() {return username;}public void setUsername(String username) {this.username = username;}public String getPassword() {return password;}public void setPassword(String password) {this.password = password;}@Overridepublic String toString() {return "Dbconfig{" +"driverClassName='" + driverClassName + '\'' +", url='" + url + '\'' +", username='" + username + '\'' +", password='" + password + '\'' +'}';}
}
【3.3】添加DbConfigTest测试
package com.itheima.spring;import com.itheima.spring.config.DbConfig;
import com.itheima.spring.controller.ClientController;
import org.junit.Before;
import org.junit.Test;
import org.springframework.context.ApplicationContext;
import org.springframework.context.support.ClassPathXmlApplicationContext;/*** @Description:测试*/
public class DbConfigTest {private DbConfig dbConfig;@Beforepublic void before(){ApplicationContext applicationContext = new ClassPathXmlApplicationContext("bean.xml");dbConfig = (DbConfig) applicationContext.getBean("dbConfig");}@Testpublic void test(){System.out.println("dbConfig配置文件内容:"+dbConfig.toString());}
}
【3.4】运行结果

【3.5】@Value小结
【作用】1、基础数据类型的注入,2、我们常用的配置文件可以直接使用这种方式加载
4、bean作用域@Scope (10)
【1】目标
使用@Scope设置bean的作用范围。相当于xml配置方式中bean标签的scope属性【2】实现
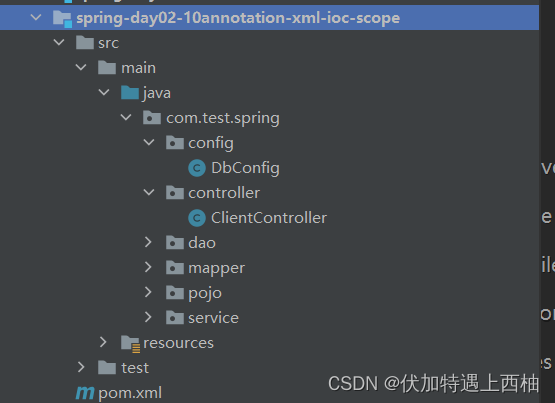
【2.1】创建项目
创建spring-day02-10annotation-xml-ioc-scope
【2.2】修改DbConfig
添加@Scope(value = “prototype”)
/*** @Description:配置*/
@Component("dbConfig")
@Scope(value = "prototype")
public class DbConfig {@Value("${dataSource.driverClassName}")private String driverClassName;@Value("${dataSource.url}")private String url;@Value("${dataSource.username}")private String username;@Value("${dataSource.password}")private String password;public DbConfig() {}public String getDriverClassName() {return driverClassName;}public void setDriverClassName(String driverClassName) {this.driverClassName = driverClassName;}public String getUrl() {return url;}public void setUrl(String url) {this.url = url;}public String getUsername() {return username;}public void setUsername(String username) {this.username = username;}public String getPassword() {return password;}public void setPassword(String password) {this.password = password;}@Overridepublic String toString() {return "DbConfig{" +"driverClassName='" + driverClassName + '\'' +", url='" + url + '\'' +", username='" + username + '\'' +", password='" + password + '\'' +'}';}
}
【2.3】修改DbConfigTest
/*** @Description:测试*/
public class DbConfigTest {private DbConfig dbConfigA;private DbConfig dbConfigB;@Beforepublic void before(){ApplicationContext applicationContext = new ClassPathXmlApplicationContext("bean.xml");dbConfigA = (DbConfig) applicationContext.getBean("dbConfig");dbConfigB = (DbConfig) applicationContext.getBean("dbConfig");}@Testpublic void test(){System.out.println("dbConfigA内存地址:"+dbConfigA.hashCode());System.out.println("dbConfigB内存地址:"+dbConfigB.hashCode());}
}
【2.4】运行DbConfigTest
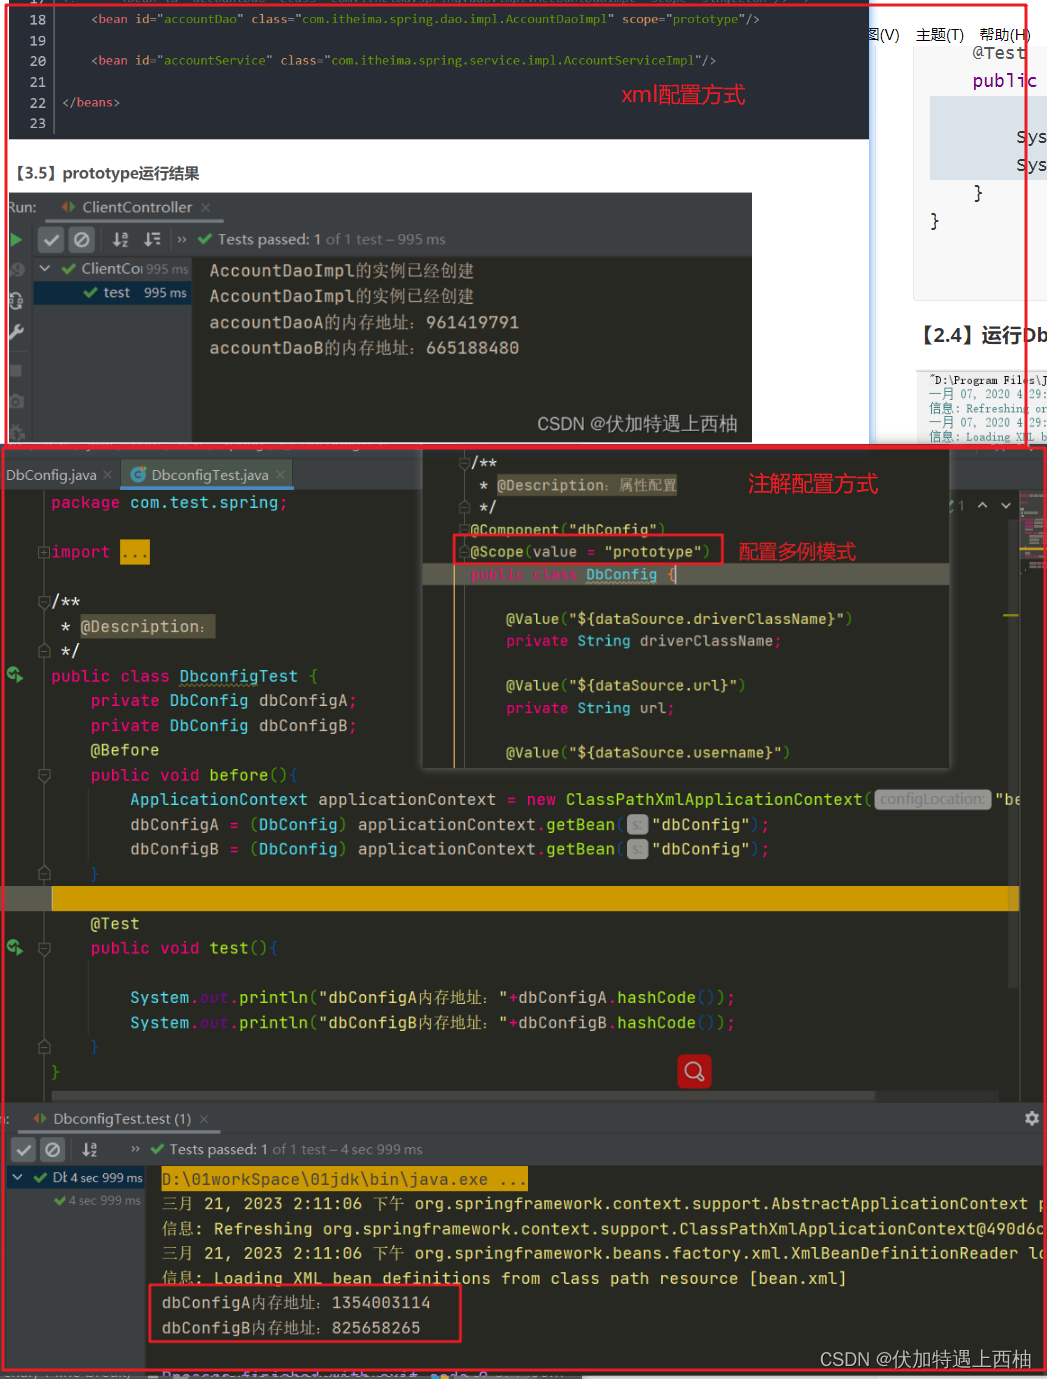
【3】作用域@Scope小结
@Scope
作用:设置bean的作用范围。相当于xml配置方式中bean标签的scope属性属性:value:指定作用范围取值属性取值:singleton:单例。默认值prototype:多例request:web项目中,把bean对象存入request域中【了解】session:web项目中,把bean对象存入session域中【了解】globalsession:web项目中,把bean对象存入全局session域中【了解】
5、bean生命周期(11)
@PostConstruct:初始化后bean之前进行的操作
@PreDestroy :销毁bean之后进行的操作
【1】目标
1、@PostConstruct替换xml配置方式中bean标签的init-method属性
2、@PreDestroy替换xml配置方式中bean标签的destroy-method属性
【2】实现
【2.1】创建项目
创建spring-day02-11annotation-xml-ioc-life

【2.2】修改DbConfig
/*** @Description:配置*/
@Component("dbConfig")
public class DbConfig {@Value("${dataSource.driverClassName}")private String driverClassName;@Value("${dataSource.url}")private String url;@Value("${dataSource.username}")private String username;@Value("${dataSource.password}")private String password;public DbConfig() {System.out.println("开始创建");}@PostConstructpublic void init(){System.out.println("初始化");}@PreDestroypublic void destroy(){System.out.println("回收");}public String getDriverClassName() {return driverClassName;}public void setDriverClassName(String driverClassName) {this.driverClassName = driverClassName;}public String getUrl() {return url;}public void setUrl(String url) {this.url = url;}public String getUsername() {return username;}public void setUsername(String username) {this.username = username;}public String getPassword() {return password;}public void setPassword(String password) {this.password = password;}@Overridepublic String toString() {return "DbConfig{" +"driverClassName='" + driverClassName + '\'' +", url='" + url + '\'' +", username='" + username + '\'' +", password='" + password + '\'' +'}';}
}
【2.3】修改DbConfigTest
package com.itheima.spring;import com.itheima.spring.config.DbConfig;
import com.itheima.spring.controller.ClientController;
import org.junit.Before;
import org.junit.Test;
import org.springframework.context.ApplicationContext;
import org.springframework.context.support.ClassPathXmlApplicationContext;/*** @Description:测试*/
public class DbConfigTest {private DbConfig dbConfigA;private DbConfig dbConfigB;ApplicationContext applicationContext;@Beforepublic void before(){applicationContext = new ClassPathXmlApplicationContext("bean.xml");dbConfigA = (DbConfig) applicationContext.getBean("dbConfig");dbConfigB = (DbConfig) applicationContext.getBean("dbConfig");}@Testpublic void test(){System.out.println("dbConfigA内存地址:"+dbConfigA.hashCode());System.out.println("dbConfigB内存地址:"+dbConfigB.hashCode());}@Testpublic void testB(){System.out.println("dbConfigA的内容"+dbConfigB.toString());((ClassPathXmlApplicationContext)applicationContext).close();}}
【2.4】运行结果
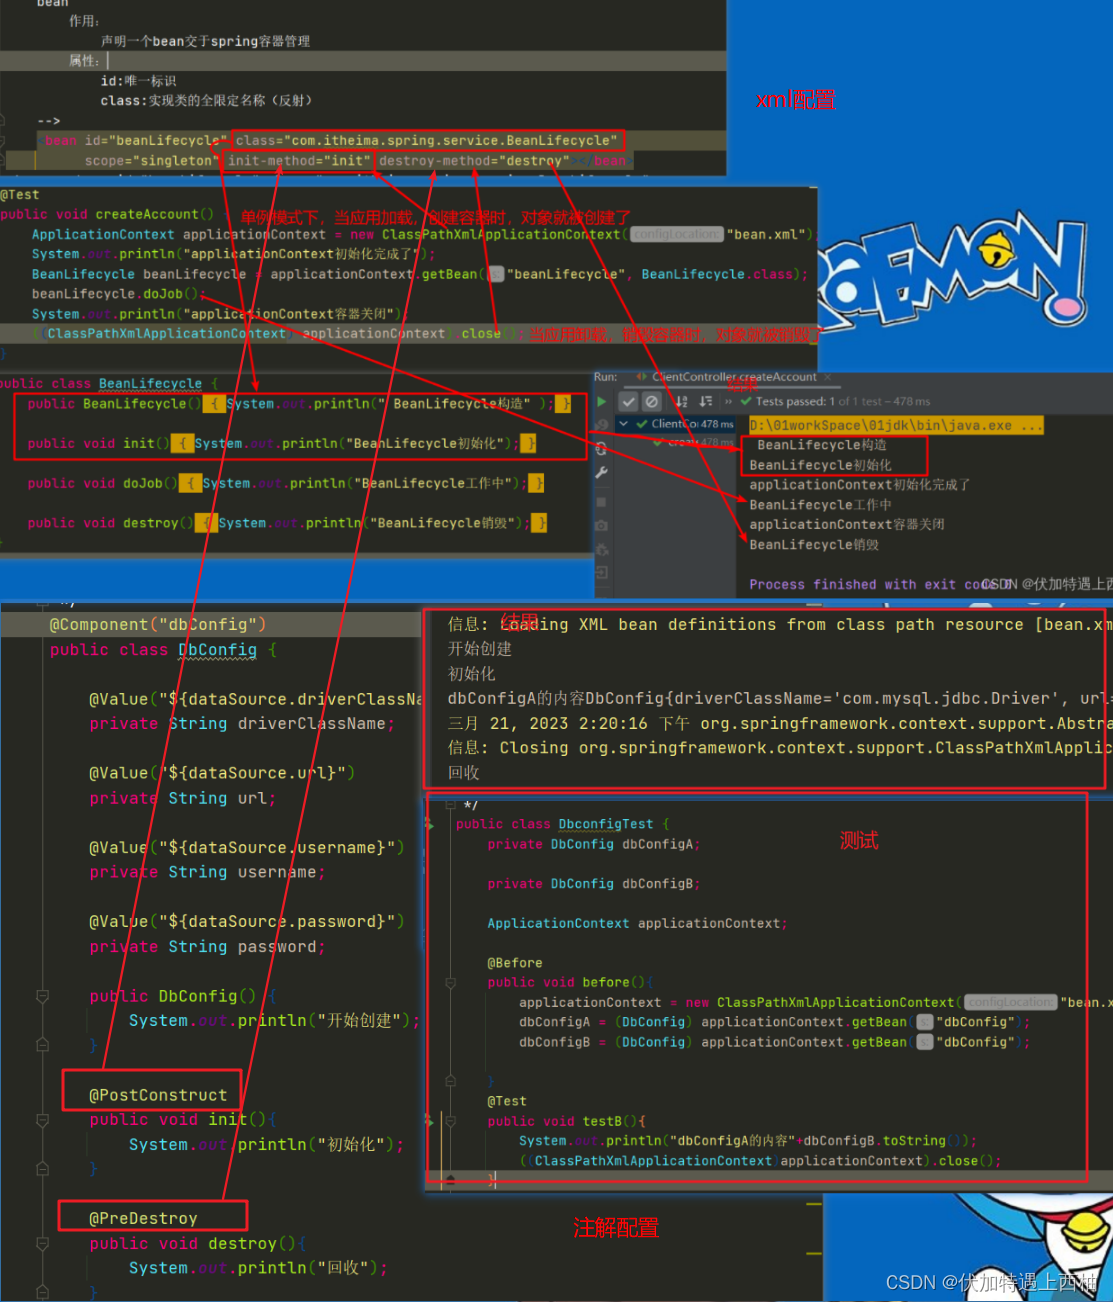
【3】bean生命周期小结
@PostConstruct:热加载数据初始化操作,相当于xml配置方式中bean标签的init-method属性@PreDestroy:资源回收销毁操作,相当于xml配置方式中bean标签的destroy-method属性第四章 基于全Annotation的spring-IOC【重点】
1、思考
前面我们使用了annotation+xml的混合模式配置了springIOC,但是一会配置注解,一会又配置XML,同学们是不是感觉挺麻烦?那下面的xml:
能不能完全舍弃呢?
2、annotation案例(12)
annotation案例中使用到的annotation和xml标签对照表
【1】配置类注解与XML对照表
| XML | Annotation | 说明 |
|---|---|---|
| < context:property-placeholder > | @PropertySource | 导入外部资源文件 |
| < context:component-scan > | @ComponentScan | 扫描包,约定大于配置 |
| jdbcTemplate、dataSource非自定配置类 | @Bean | 声明bean装配到SpringIOC中 |
| bean.xml | @Configuration | 声明配置类,代替bean.xml的作用 |
| @Import(了解) | 引入其他配置类 |
【2】加载方式
使用bean.xml的时候我们加载配置文件的方式
ApplicationContext applicationContext = new ClassPathXmlApplicationContext("bean.xml");
全注解加载方式:
ApplicationContext applicationContext = new AnnotationConfigApplicationContext(SpringConfig.class);
【3】目标
·
1、使用配置类代替bean.xml配置文件,完成纯注解的配置方式,脱离xml的配置。
【4】实现
【4.1】创建项目
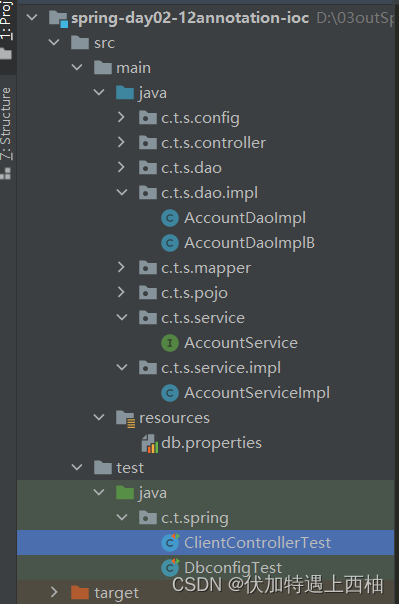
创建spring-day02-12annotation-ioc
【4.2】编写SpringConfig类
SpringConfig的@Configuration注解替换bean.xml
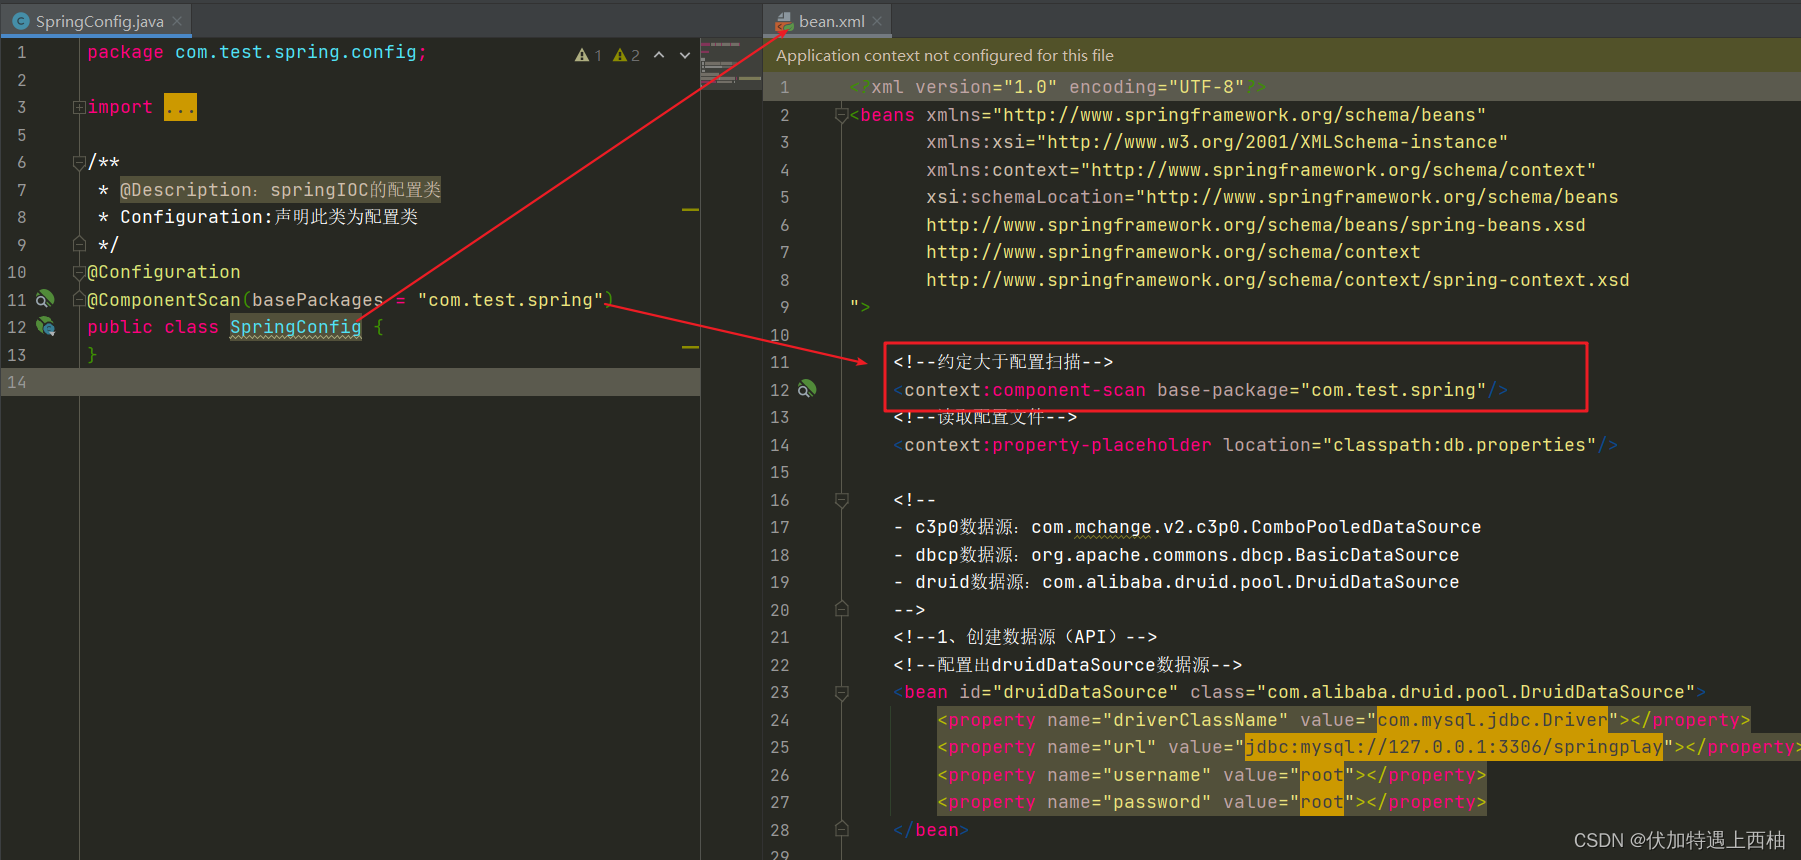
SpringConfig的@ComponentScan(value = {"com.test.spring"})注解替换如下:
完整SpringConfig
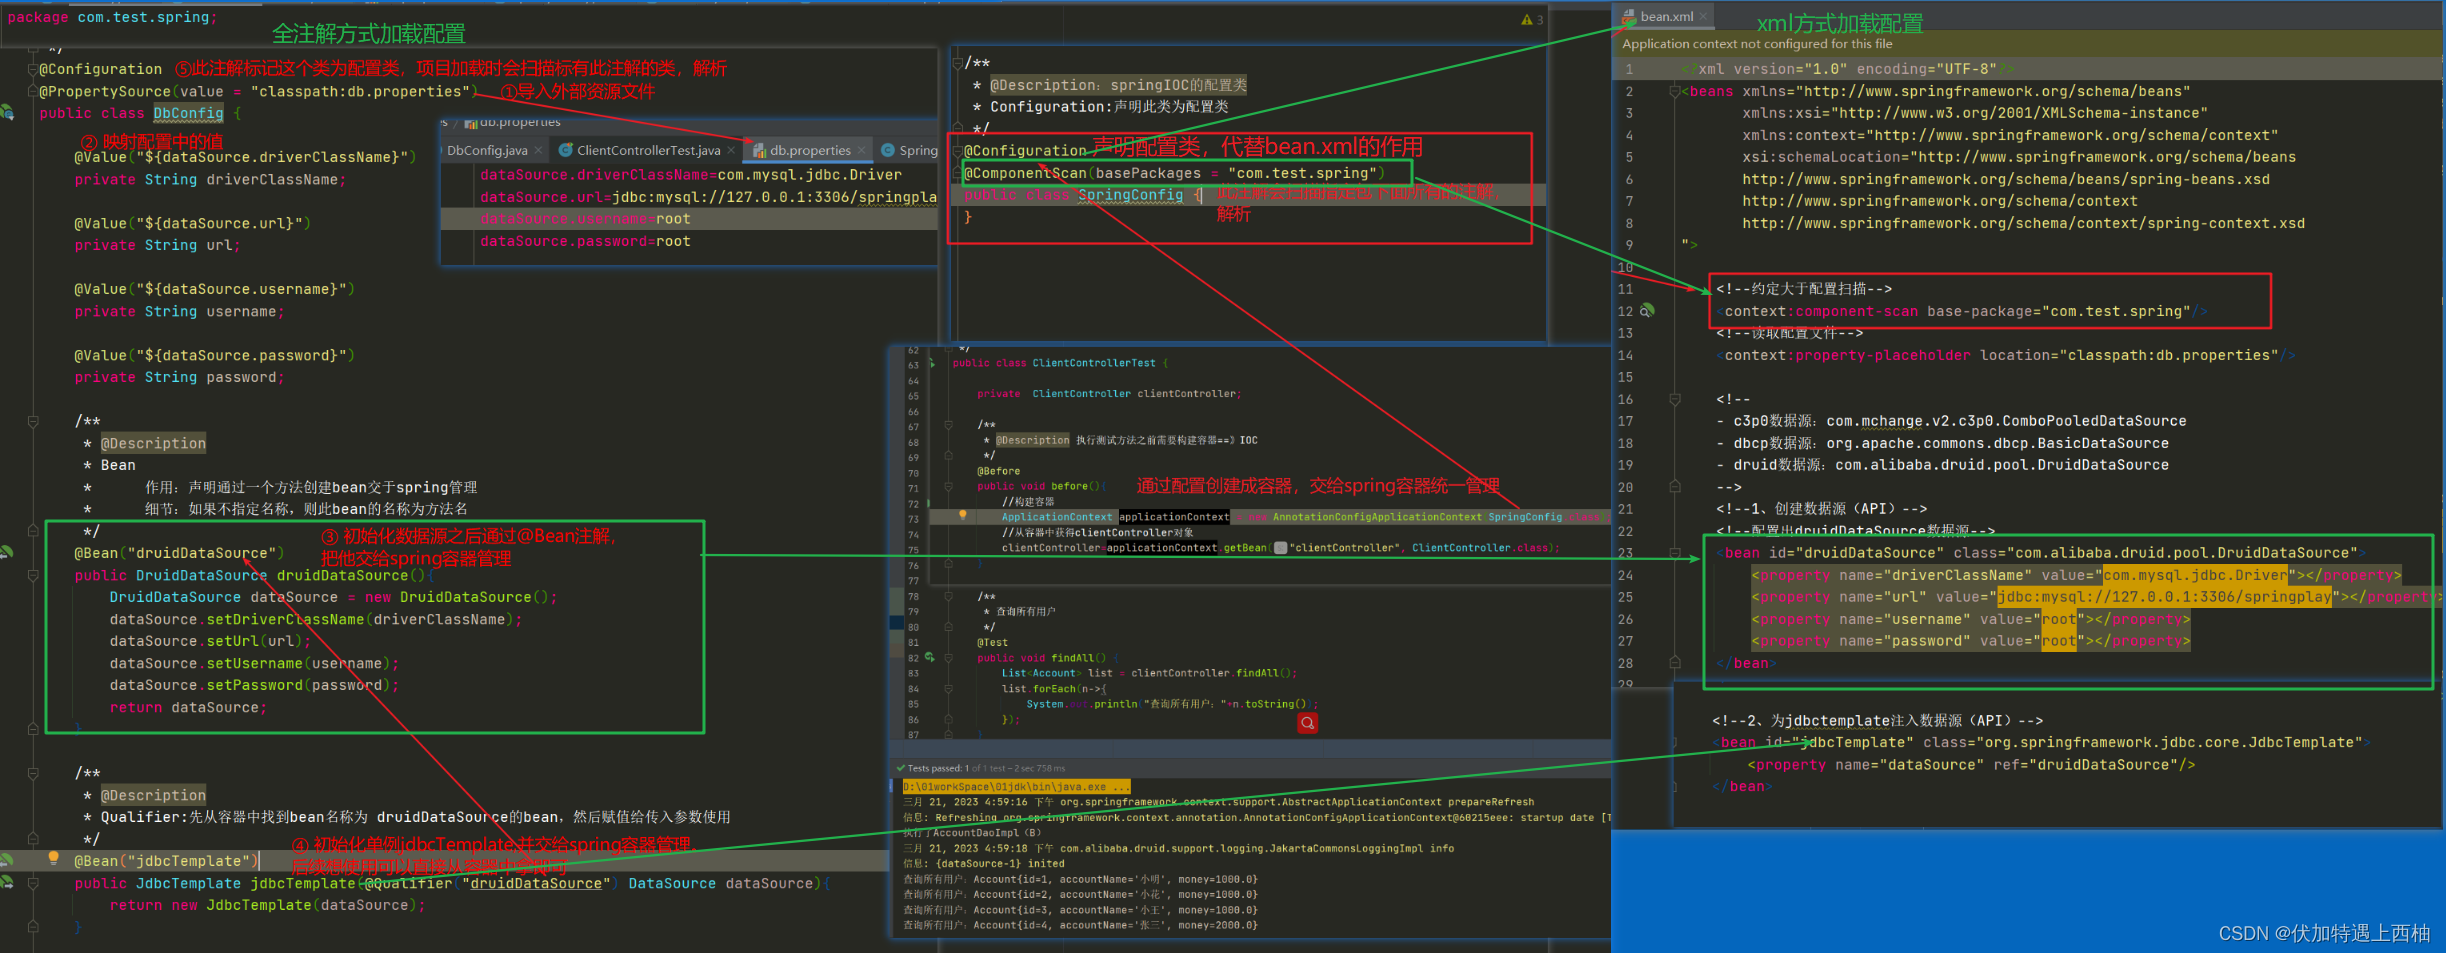
/*** @Description:springIOC的配置类* Configuration:声明此类为配置类*/
@Configuration
@ComponentScan(basePackages = "com.test.spring")
public class SpringConfig {
}
【4.3】编写DbConfig类
DbConfig的@Configuration声明是个配置类
@PropertySource(value={"classpath:db.properties"})导入外部文件
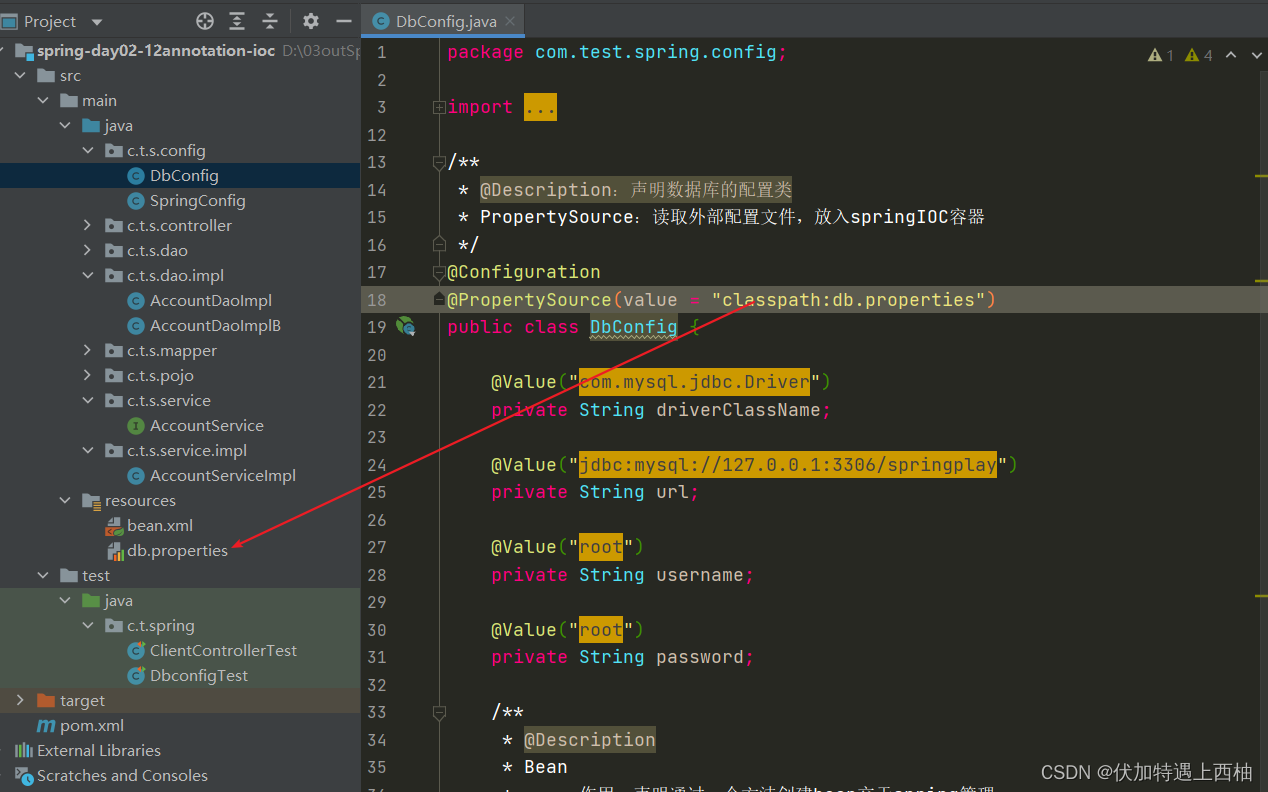
DbConfig的@Bean替换非自定义的配置类

DbConfig代码
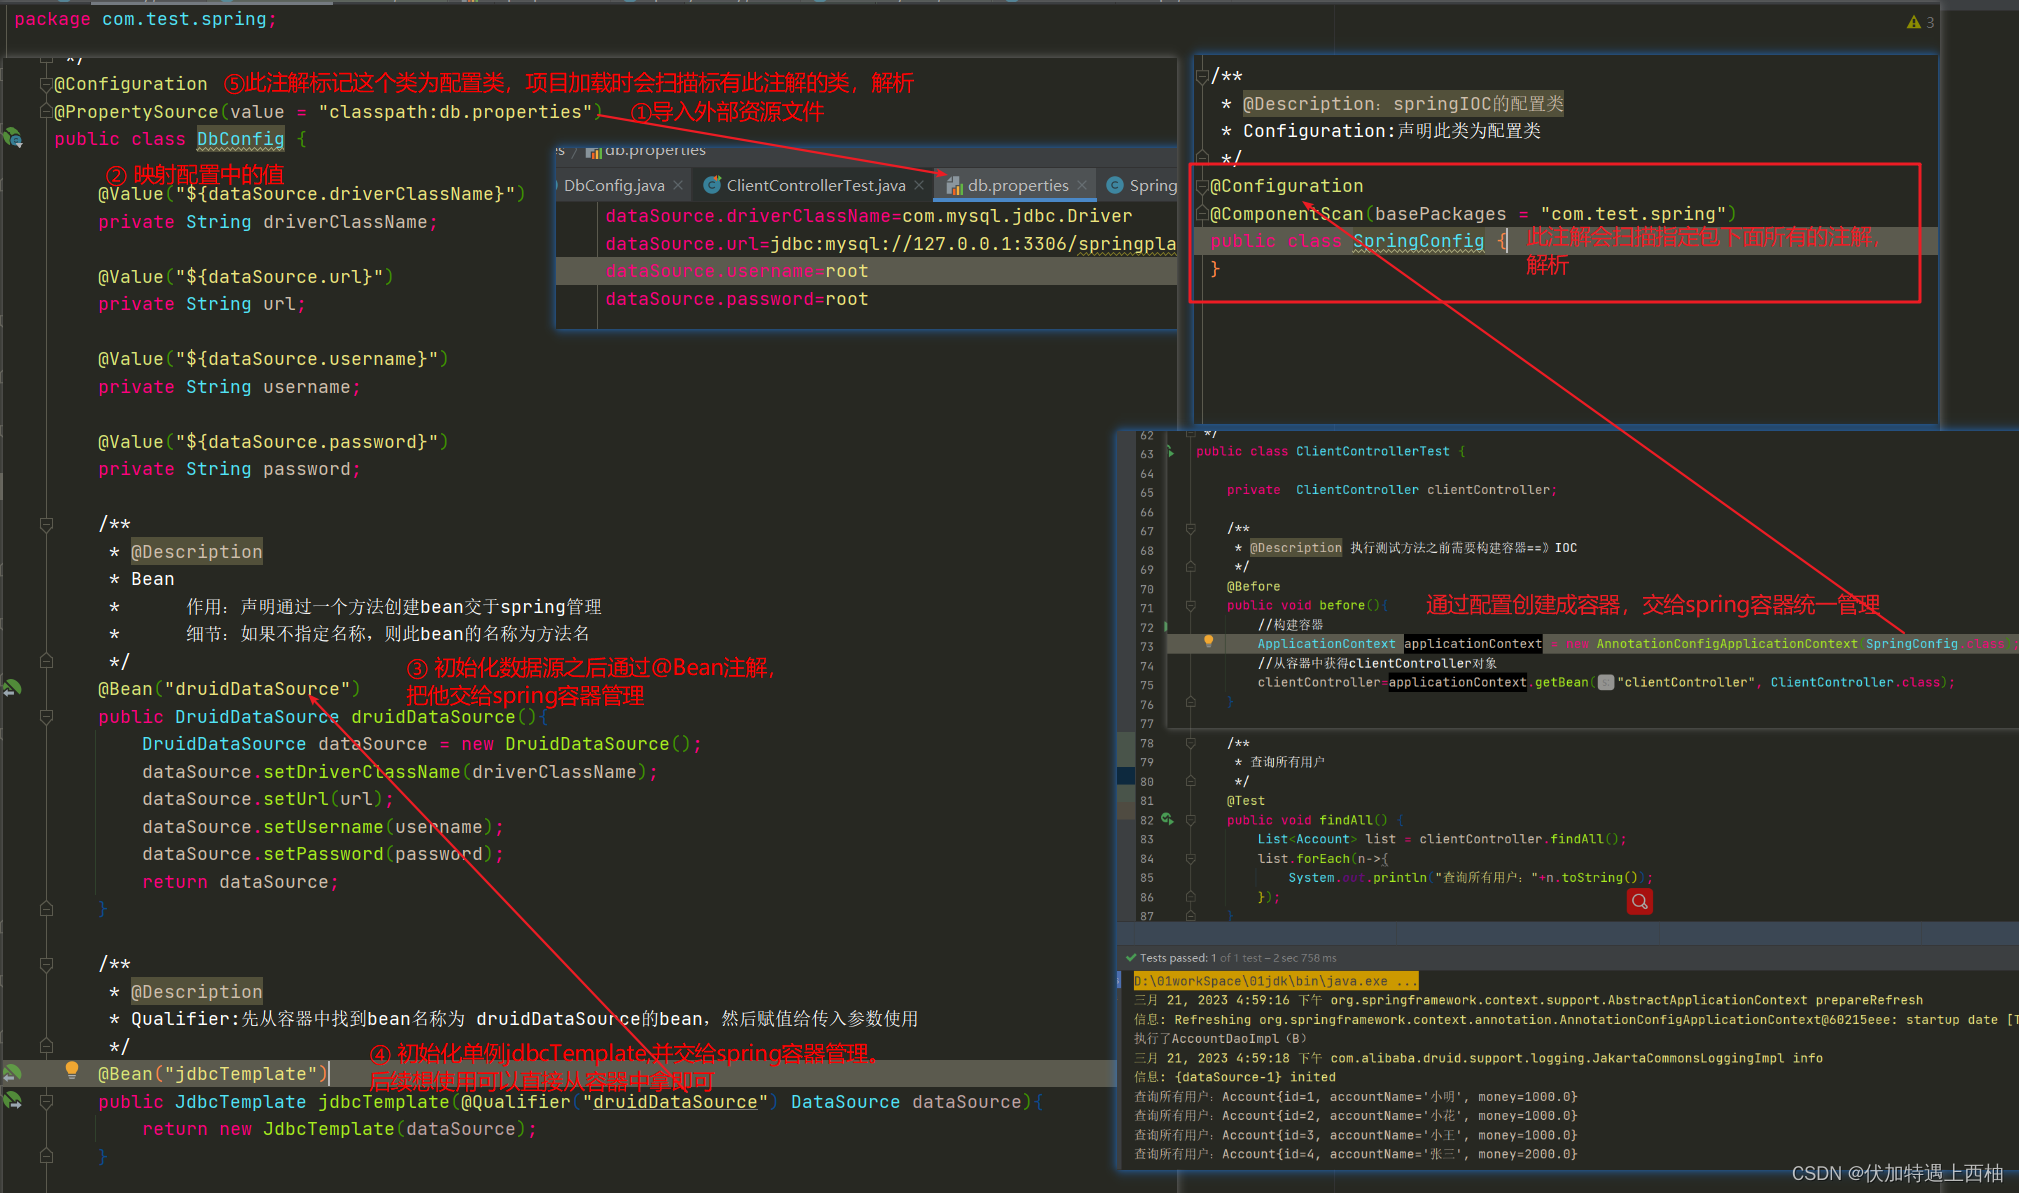
/*** @Description:声明数据库的配置类* PropertySource:读取外部配置文件,放入springIOC容器*/
@Configuration
@PropertySource(value = "classpath:db.properties")
public class DbConfig {@Value("${dataSource.driverClassName}")private String driverClassName;@Value("${dataSource.url}")private String url;@Value("${dataSource.username}")private String username;@Value("${dataSource.password}")private String password;/*** @Description* Bean*      作用:声明通过一个方法创建bean交于spring管理*      细节:如果不指定名称,则此bean的名称为方法名*/@Bean("druidDataSource")public DruidDataSource druidDataSource(){DruidDataSource dataSource = new DruidDataSource();dataSource.setDriverClassName(driverClassName);dataSource.setUrl(url);dataSource.setUsername(username);dataSource.setPassword(password);return dataSource;}/*** @Description* Qualifier:先从容器中找到bean名称为 druidDataSource的bean,然后赋值给传入参数使用*/@Bean("jdbcTemplate")public JdbcTemplate jdbcTemplate(@Qualifier("druidDataSource") DataSource dataSource){return new JdbcTemplate(dataSource);}}
【4.4】修改ClientControllergTest
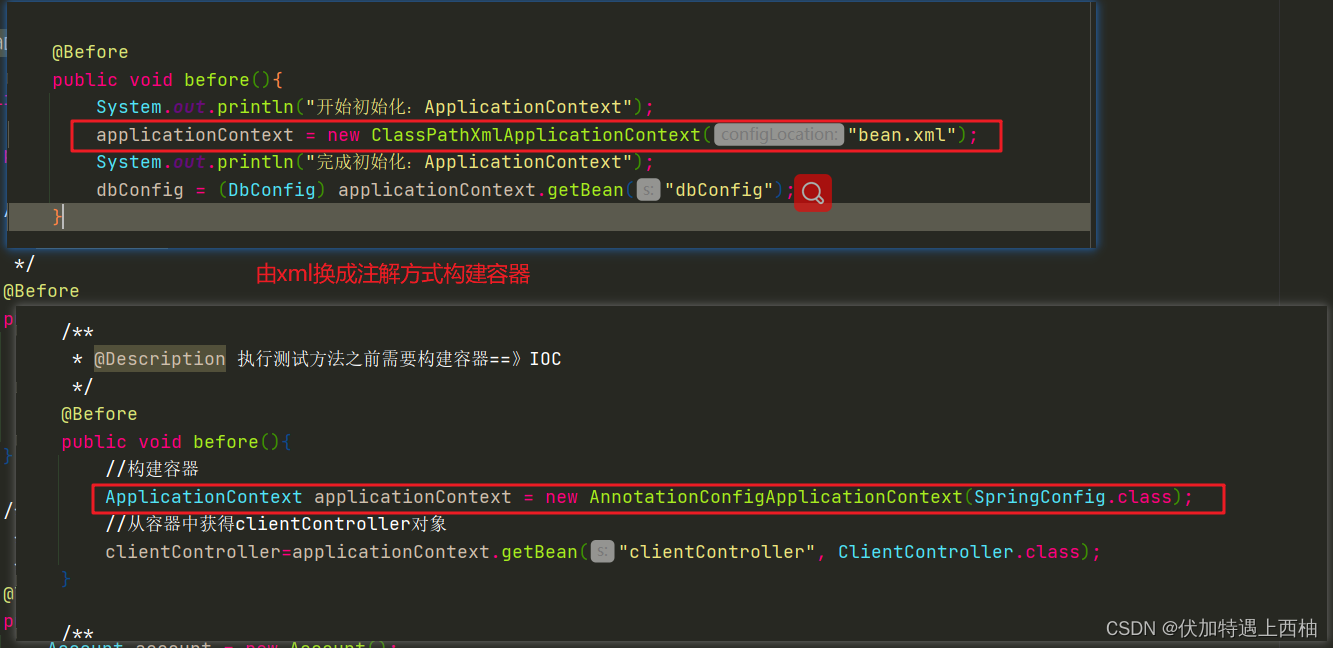
/*** @Description:测试类*/
public class ClientControllerTest {private  ClientController clientController;/*** @Description 执行测试方法之前需要构建容器==》IOC*/@Beforepublic void before(){//构建容器ApplicationContext applicationContext = new AnnotationConfigApplicationContext(SpringConfig.class);//从容器中获得clientController对象clientController=applicationContext.getBean("clientController", ClientController.class);}/*** 创建用户*/@Testpublic void saveAccount() {Account account = new Account();account.setAccountName("张三");account.setMoney(2000F);int flag = clientController.saveAccount(account);System.out.println("创建用户受影响行数:"+flag);}/*** 删除用户*/@Testpublic void deleteAccountById() {int id = 21;int flag =clientController.deleteAccountById(id);System.out.println("删除用户受影响行数:"+flag);}/*** 修改用户*/@Testpublic void updateAccountById() {Account account = new Account();account.setId(5);account.setAccountName("张三");account.setMoney(2000F);int flag =clientController.updateAccountById(account);System.out.println("修改用户受影响行数:"+flag);}/*** 按ID查询用户*/@Testpublic void findAccountById() {int id = 5;Account account =clientController.findAccountById(id);System.out.println("按ID查询用户:"+account.toString());}/*** 查询所有用户*/@Testpublic void findAll() {List list = clientController.findAll();list.forEach(n->{System.out.println("查询所有用户:"+n.toString());});}/*** 统计用户个数*/@Testpublic void countAccount() {int flag =  clientController.countAccount();System.out.println("统计用户个数:"+flag);}
}
【4.5】测试
3、小结
配置类相关注解:
1、@Configuration:声明配置类,代替bean.xml的作用
2、@ComponentScan:配置注解扫描
3、@Bean:将方法的返回值装配到IOC容器中
4、@PropertySource:加载外部资源文件
5、@Import:引入其他配置类
加载配置类,初始化IOC容器,获取工厂:
ApplicationContext ac = new AnnotationConfigApplicationContext(SpringConfiguration.class);
第五章 Spring整合junit【掌握】
1、思考
在以上的课程中我们一直使用junit方式测试程序:
/*** @Description:测试类*/
public class ClientControllerTest {private  ClientController clientController;/*** @Description 执行测试方法之前需要构建容器==》IOC*/@Beforepublic void before(){//构建容器ApplicationContext applicationContext = new AnnotationConfigApplicationContext(SpringConfig.class);//从容器中获得clientController对象clientController=applicationContext.getBean("clientController", ClientController.class);}/*** 创建用户*/@Testpublic void saveAccount() {Account account = new Account();account.setAccountName("张三");account.setMoney(2000F);int flag = clientController.saveAccount(account);System.out.println("创建用户受影响行数:"+flag);}/*** 删除用户*/@Testpublic void deleteAccountById() {int id = 21;int flag =clientController.deleteAccountById(id);System.out.println("删除用户受影响行数:"+flag);}/*** 修改用户*/@Testpublic void updateAccountById() {Account account = new Account();account.setId(5);account.setAccountName("张三");account.setMoney(2000F);int flag =clientController.updateAccountById(account);System.out.println("修改用户受影响行数:"+flag);}/*** 按ID查询用户*/@Testpublic void findAccountById() {int id = 5;Account account =clientController.findAccountById(id);System.out.println("按ID查询用户:"+account.toString());}/*** 查询所有用户*/@Testpublic void findAll() {List list = clientController.findAll();list.forEach(n->{System.out.println("查询所有用户:"+n.toString());});}/*** 统计用户个数*/@Testpublic void countAccount() {int flag =  clientController.countAccount();System.out.println("统计用户个数:"+flag);}
}
但是在测试之前我们需要使用@Before注解去提前加载ApplicationContext容器和获得bean
/*** 提前加载配置文件*/@Beforepublic void beforeLoadConfig(){ApplicationContext applicationContext =new ClassPathXmlApplicationContext("classpath:bean.xml");accountController = (AccountController) applicationContext.getBean("accountController");}
这样的操作是不是特别累赘?在最初介绍spring架构的时候我们是不是说到spring本身提供一个test工具,他可以给我们提供了一个运行器,可以读取配置文件(或注解)来创建容器。我们只需要告诉它配置文件在哪就行了。
2、测试注解说明
| 注解 | 说明 |
|---|---|
| @RunWith(SpringJUnit4ClassRunner.class) | 替换底层运行器 |
| @ContextConfiguration(value = {“bean.xml”}) | Xml方式加载一个运行容器 |
| @ContextConfiguration(classes = {SpringConfig.class}) | 注解方式加载一个运行容器 |
3、XML方式(13)
【1】目标
1、掌握spring-test读取xml方式集成测试工具
【2】实现
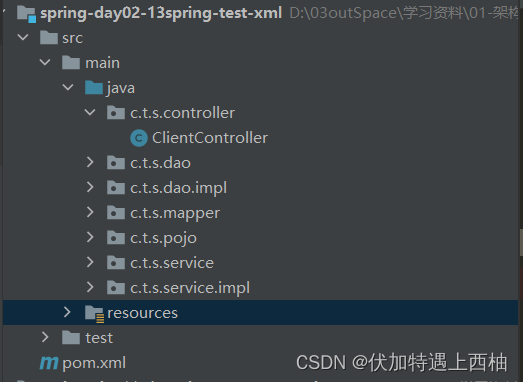
【2.1】创建项目
创建spring-day02-13spring-test-xml
【2.2】导入spring-test依赖
org.springframework spring-test ${spring.version} junit junit 4.12 test 【2.3】修改ClientControllerTest
添加
@RunWith(SpringJUnit4ClassRunner.class)
@ContextConfiguration(value = {“classpath:bean.xml”})
此时springIOC容器已经加载,我们可以使用
@Autowired
private ClientController clientController;
注入属性值
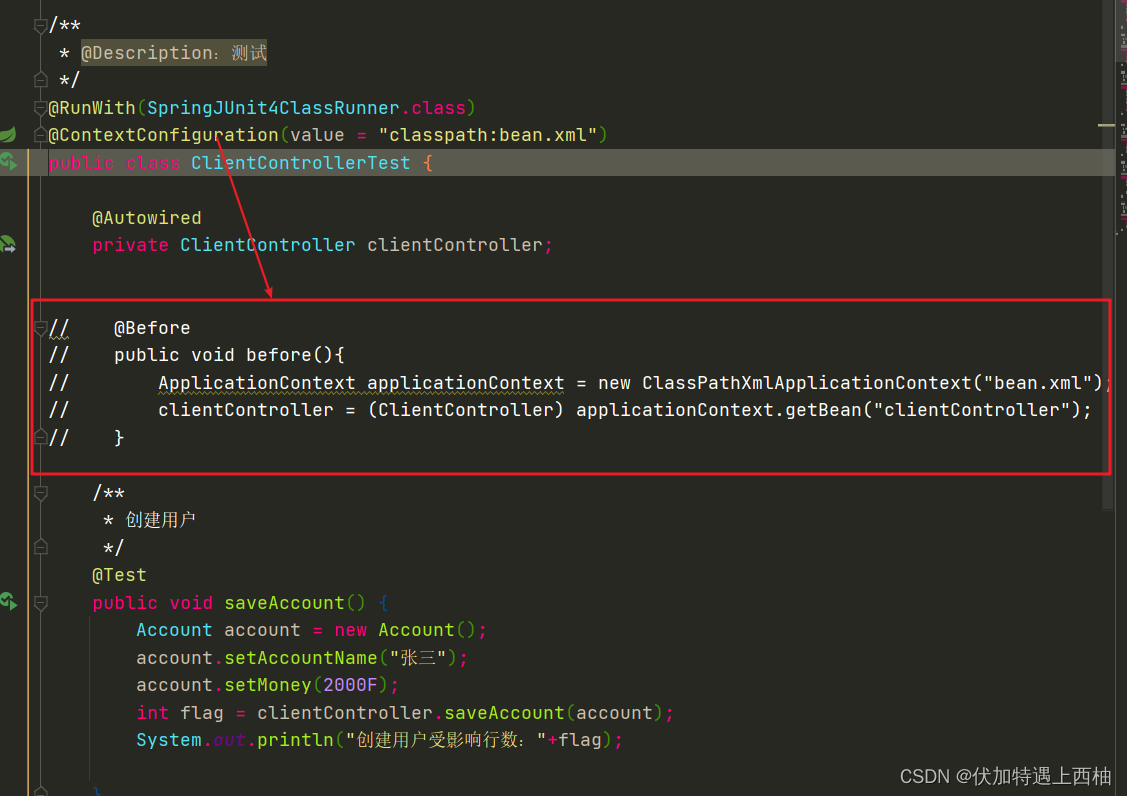
/*** @Description:测试*/
@RunWith(SpringJUnit4ClassRunner.class)
@ContextConfiguration(value = "classpath:bean.xml")
public class ClientControllerTest {@Autowiredprivate ClientController clientController;//    @Before
//    public void before(){
//        ApplicationContext applicationContext = new ClassPathXmlApplicationContext("bean.xml");
//        clientController = (ClientController) applicationContext.getBean("clientController");
//    }/*** 创建用户*/@Testpublic void saveAccount() {Account account = new Account();account.setAccountName("张三");account.setMoney(2000F);int flag = clientController.saveAccount(account);System.out.println("创建用户受影响行数:"+flag);}/*** 删除用户*/@Testpublic void deleteAccountById() {int id = 7;int flag =clientController.deleteAccountById(id);System.out.println("删除用户受影响行数:"+flag);}/*** 修改用户*/@Testpublic void updateAccountById() {Account account = new Account();account.setId(5);account.setAccountName("张三");account.setMoney(2000F);int flag =clientController.updateAccountById(account);System.out.println("修改用户受影响行数:"+flag);}/*** 按ID查询用户*/@Testpublic void findAccountById() {int id = 5;Account account =clientController.findAccountById(id);System.out.println("按ID查询用户:"+account.toString());}/*** 查询所有用户*/@Testpublic void findAll() {List list = clientController.findAll();list.forEach(n->{System.out.println("查询所有用户:"+n.toString());});}/*** 统计用户个数*/@Testpublic void countAccount() {int flag =  clientController.countAccount();System.out.println("统计用户个数:"+flag);}
}
【2.4】测试结果
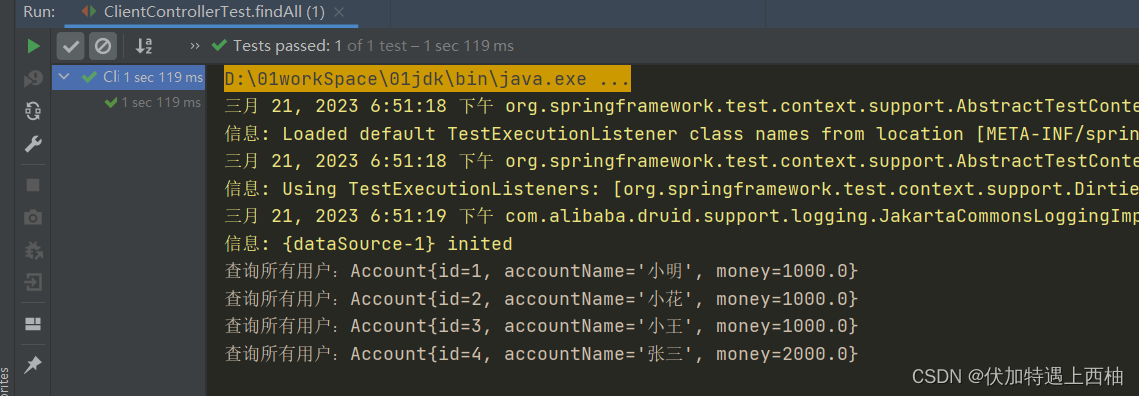
【3】小结
1、添加spring-test的依赖,使用@RunWith注解替换底层运行器
2、使用ContextConfiguration注解加载xml配置文件
3、在测试用例中直接使用注入bean的注解如:@Autowired将所需的bean对象注入到测试用例中即可
4、全注解方式(14)
【1】目标
1、掌握spring-test读取annotation方式集成测试工具
【2】实现
【2.1】创建项目
创建spring-day02-14spring-test-annotation
【2.2】导入spring-test依赖
org.springframework spring-test ${spring.version} junit junit 4.12 test 【2.3】修改AccountControllerTest
添加
@RunWith(SpringJUnit4ClassRunner.class)
@ContextConfiguration(classes={SpringConfig.class})
此时springIOC容器已经加载,我们可以使用
@Autowired
private AccountController accountController;
注入属性值
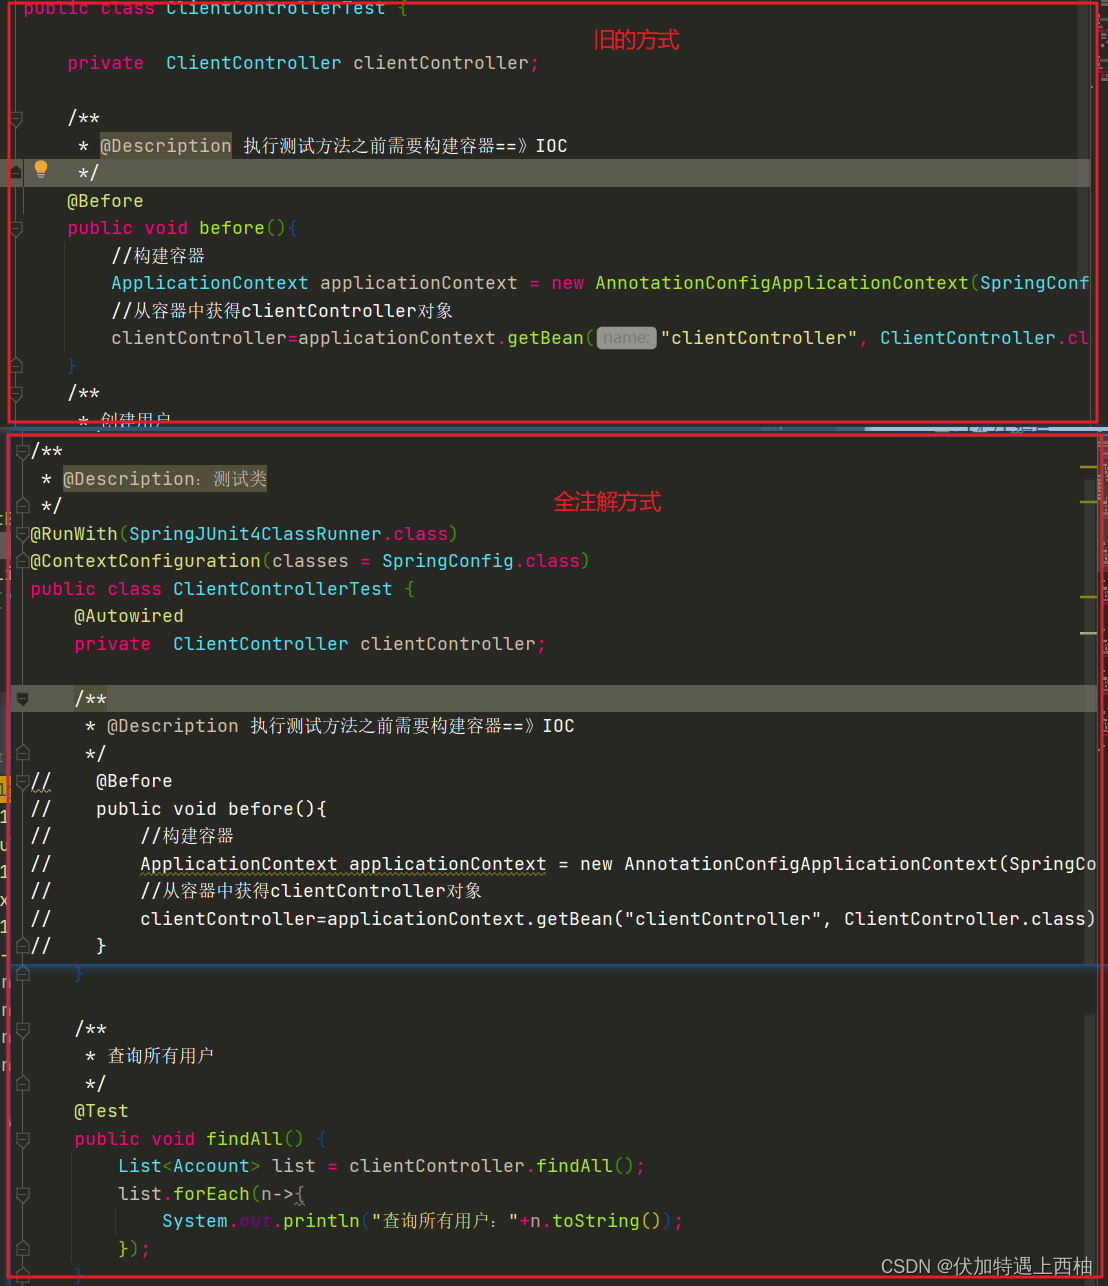
/*** @Description:测试类*/
@RunWith(SpringJUnit4ClassRunner.class)
@ContextConfiguration(classes = SpringConfig.class)
public class ClientControllerTest {@Autowiredprivate  ClientController clientController;/*** @Description 执行测试方法之前需要构建容器==》IOC*/
//    @Before
//    public void before(){
//        //构建容器
//        ApplicationContext applicationContext = new AnnotationConfigApplicationContext(SpringConfig.class);
//        //从容器中获得clientController对象
//        clientController=applicationContext.getBean("clientController", ClientController.class);
//    }/*** 创建用户*/@Testpublic void saveAccount() {Account account = new Account();account.setAccountName("张三");account.setMoney(2000F);int flag = clientController.saveAccount(account);System.out.println("创建用户受影响行数:"+flag);}/*** 删除用户*/@Testpublic void deleteAccountById() {int id = 21;int flag =clientController.deleteAccountById(id);System.out.println("删除用户受影响行数:"+flag);}/*** 修改用户*/@Testpublic void updateAccountById() {Account account = new Account();account.setId(5);account.setAccountName("张三");account.setMoney(2000F);int flag =clientController.updateAccountById(account);System.out.println("修改用户受影响行数:"+flag);}/*** 按ID查询用户*/@Testpublic void findAccountById() {int id = 5;Account account =clientController.findAccountById(id);System.out.println("按ID查询用户:"+account.toString());}/*** 查询所有用户*/@Testpublic void findAll() {List list = clientController.findAll();list.forEach(n->{System.out.println("查询所有用户:"+n.toString());});}/*** 统计用户个数*/@Testpublic void countAccount() {int flag =  clientController.countAccount();System.out.println("统计用户个数:"+flag);}
}
【2.4】测试结果
【3】小结
1、添加spring-test的依赖,使用@RunWith注解替换底层运行器
2、使用ContextConfiguration注解加载配置类
3、在测试用例中直接使用注入bean的注解如:@Autowired将所需的bean对象注入到测试用例中即可。