
OpenCV 透视变换
OpenCV 透视变换
- 1. 简介
- 2. 仿射变换
- 2.1. 平移
- 2.2. 旋转
- 2.3. 放缩
- 2.4. 错切
- 2.5. 仿射变换
- 3. 透视变换
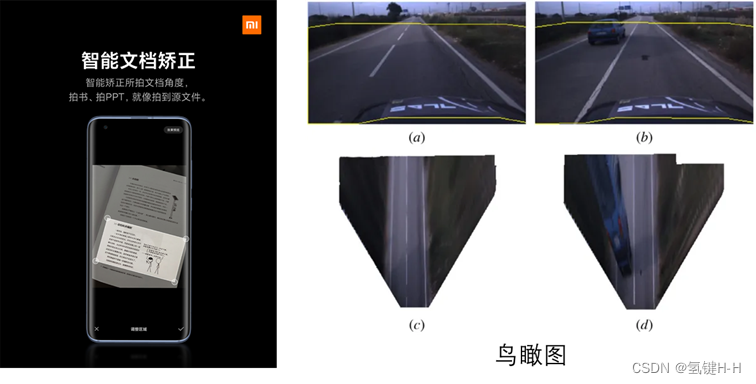
1. 简介
汽车的360度全景影像,从拍照视角变成鸟瞰图
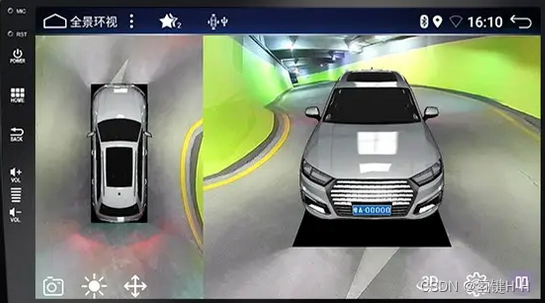
这种变换常常用到透视变换
在了解透视变换前,需要了解一下其他的变换,包括 平移,旋转,放缩,错切,以及仿射变换
2. 仿射变换
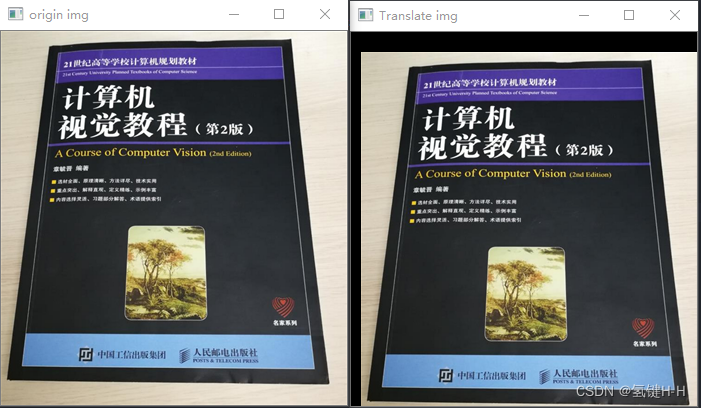
2.1. 平移
对每一个像素点坐标平移
可以让每一个像素点的 x,yx, yx,y 坐标都加一个变量 TTT
矩阵形式表示:
[10Tx01Ty001][XY1]=[X+TxY+Ty1]\left[ \begin{matrix} 1 &0 &T_x \\ 0 &1 &T_y\\ 0 &0 &1 \end{matrix} \right] \left[ \begin{matrix} X \\ Y\\ 1 \end{matrix} \right] = \left[\begin{matrix} X+ T_x \\ Y + T_y \\ 1 \end{matrix} \right] ⎣⎡100010TxTy1⎦⎤⎣⎡XY1⎦⎤=⎣⎡X+TxY+Ty1⎦⎤
等式左边[X,Y,1][X,Y,1][X,Y,1]是像素坐标的齐次形式
等式右边是平移之后的坐标
from cv2 import cv2
import numpy as np# 读取图片文件
demo_file_path = 'img.png'
img = cv2.imdecode(np.fromfile(demo_file_path, dtype=np.uint8), cv2.IMREAD_UNCHANGED)
cv2.imshow('origin img', img)# 平移变量
T_x, T_y = 10, 20 # 构造移动矩阵H 2*3
H = np.float32([[1, 0, T_x],[0, 1, T_y]])# 平移变换
new_img = cv2.warpAffine(img, H, (img.shape[1], img.shape[0]))cv2.imshow('Translate img', new_img)
cv2.waitKey(0)
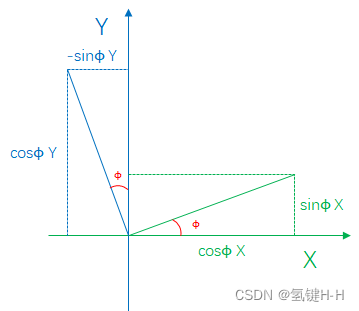
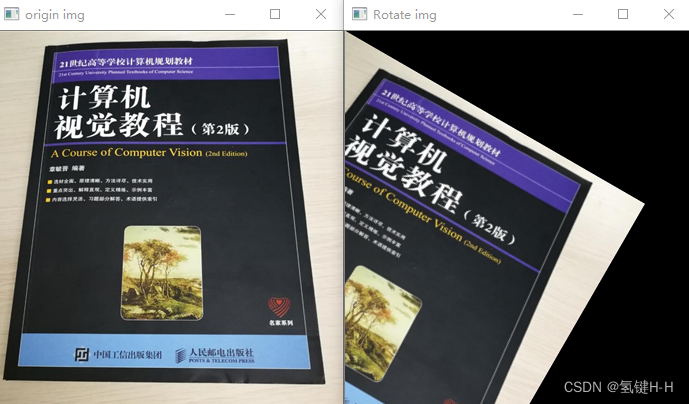
2.2. 旋转
对每一个像素点坐标旋转
假设初始旋转角度为 ϕ\phiϕ,可以用(1,0)(1, 0)(1,0)和(0,1)(0, 1)(0,1)基向量旋转理解
矩阵形式表示:
[cosϕ−sinϕ0sinϕcosϕ0001][XY1]=[cosϕX−sinϕYsinϕX+cosϕY1]\left[ \begin{matrix} cos\phi & -sin\phi &0 \\ sin\phi & cos\phi & 0\\ 0 &0 &1 \end{matrix} \right] \left[ \begin{matrix} X \\ Y\\ 1\end{matrix} \right] = \left[ \begin{matrix} cos\phi X-sin\phi Y \\ sin\phi X+cos\phi Y \\ 1 \end{matrix} \right] ⎣⎡cosϕsinϕ0−sinϕcosϕ0001⎦⎤⎣⎡XY1⎦⎤=⎣⎡cosϕX−sinϕYsinϕX+cosϕY1⎦⎤
from cv2 import cv2
import numpy as np# 读取图片文件
demo_file_path = 'img.png'
img = cv2.imdecode(np.fromfile(demo_file_path, dtype=np.uint8), cv2.IMREAD_UNCHANGED)
cv2.imshow('origin img', img)# 旋转变量 30°
sin_phi, cos_phi = 0.5, 0.866# 构造旋转矩阵H 2*3
H = np.float32([[cos_phi, -sin_phi, 0],[sin_phi, cos_phi, 0]])# 平移变换
new_img = cv2.warpAffine(img, H, (img.shape[1], img.shape[0]))cv2.imshow('Rotate img', new_img)
cv2.waitKey(0)
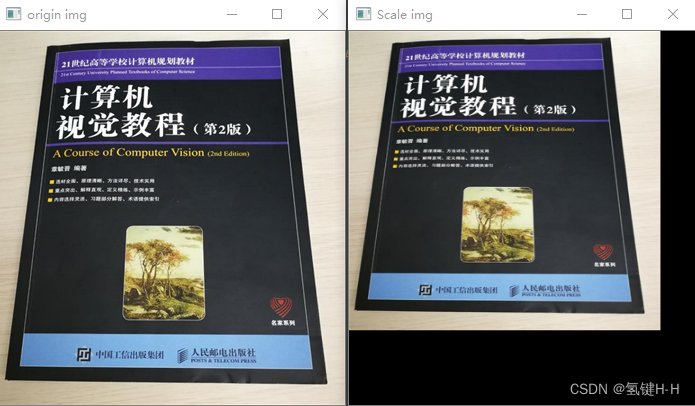
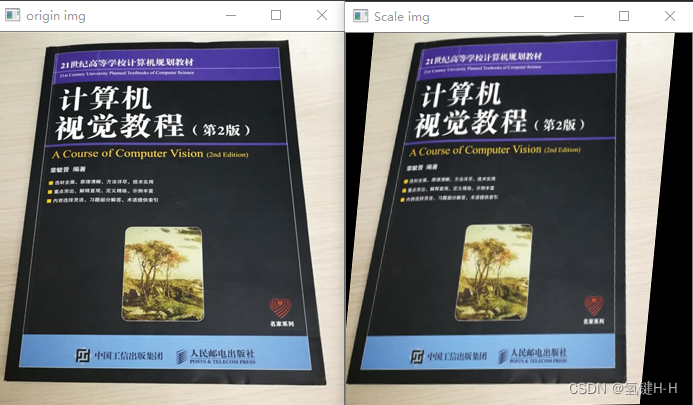
2.3. 放缩
进行放缩,就是将矩形(图像)放缩n倍,也就是长宽各乘一个变量
矩阵形式表示:
[Nx000Ny0001][XY1]=[NxXNyY1]\left[ \begin{matrix} N_x &0 &0 \\ 0 &N_y & 0\\ 0 &0 &1 \end{matrix} \right] \left[ \begin{matrix} X \\ Y\\ 1 \end{matrix} \right] = \left[\begin{matrix} N_x X\\N_y Y \\ 1 \end{matrix} \right] ⎣⎡Nx000Ny0001⎦⎤⎣⎡XY1⎦⎤=⎣⎡NxXNyY1⎦⎤
from cv2 import cv2
import numpy as np# 读取图片文件
demo_file_path = 'img.png'
img = cv2.imdecode(np.fromfile(demo_file_path, dtype=np.uint8), cv2.IMREAD_UNCHANGED)
cv2.imshow('origin img', img)# 缩放变量
N_x, N_y = 0.9, 0.8# 构造缩放矩阵H 2*3
H = np.float32([[N_x, 0, 0],[0, N_y, 0]])# 缩放变换
new_img = cv2.warpAffine(img, H, (img.shape[1], img.shape[0]))cv2.imshow('Scale img', new_img)
cv2.waitKey(0)
2.4. 错切
错切是在某方向上,按照一定的比例对图形的每个点到某条平行于该方向的直线的有向距离做放缩得到的平面图形
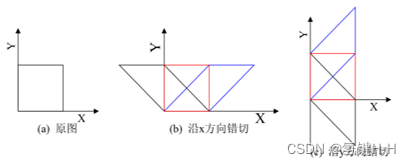
X轴上的错切:
[1tanθ0010001][XY1]=[X+tanθYY1]\left[ \begin{matrix} 1 &tan\theta &0 \\ 0 &1 & 0\\ 0 &0 &1 \end{matrix} \right] \left[ \begin{matrix} X \\ Y\\ 1 \end{matrix} \right] = \left[\begin{matrix} X + tan\theta Y\\ Y \\ 1 \end{matrix} \right] ⎣⎡100tanθ10001⎦⎤⎣⎡XY1⎦⎤=⎣⎡X+tanθYY1⎦⎤
Y轴上的错切:
[100tanφ10001][XY1]=[XY+tanφX1]\left[ \begin{matrix} 1 & 0 &0 \\ tan\varphi & 1 & 0\\ 0 &0 &1 \end{matrix} \right] \left[ \begin{matrix} X \\ Y\\ 1 \end{matrix} \right] = \left[\begin{matrix} X \\ Y +tan\varphi X \\ 1 \end{matrix} \right] ⎣⎡1tanφ0010001⎦⎤⎣⎡XY1⎦⎤=⎣⎡XY+tanφX1⎦⎤
整合起来即:
[1tanθ0tanφ10001][XY1]=[X+tanθYY+tanφX1]\left[ \begin{matrix} 1 & tan\theta &0 \\ tan\varphi & 1& 0\\ 0 &0 &1 \end{matrix} \right] \left[ \begin{matrix} X \\ Y\\ 1 \end{matrix} \right] = \left[\begin{matrix} X+ tan\theta Y \\ Y +tan\varphi X \\ 1 \end{matrix} \right] ⎣⎡1tanφ0tanθ10001⎦⎤⎣⎡XY1⎦⎤=⎣⎡X+tanθYY+tanφX1⎦⎤
from cv2 import cv2
import numpy as np# 读取图片文件
demo_file_path = 'img.png'
img = cv2.imdecode(np.fromfile(demo_file_path, dtype=np.uint8), cv2.IMREAD_UNCHANGED)
cv2.imshow('origin img', img)# 错切变量 10° 20°
tan_theta, tan_varphi = 0.176, 0.364# 构造错切矩阵H 2*3
H = np.float32([[1, tan_theta, 0],[tan_varphi, 1, 0]])# 错切变换
new_img = cv2.warpAffine(img, H, (img.shape[1], img.shape[0]))cv2.imshow('Scale img', new_img)
cv2.waitKey(0)
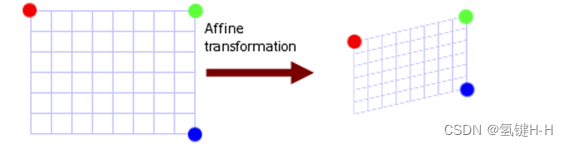
2.5. 仿射变换
[a0a1b0a2a3b1001][XY1]=[XtYt1]\left[ \begin{matrix} a_0 &a_1 &b_0 \\ a_2 & a_3& b_1\\ 0 &0 &1 \end{matrix} \right] \left[ \begin{matrix} X \\ Y\\ 1 \end{matrix} \right] = \left[\begin{matrix} X_t\\ Y_t \\ 1 \end{matrix} \right] ⎣⎡a0a20a1a30b0b11⎦⎤⎣⎡XY1⎦⎤=⎣⎡XtYt1⎦⎤
仿射变换矩阵,是由原图像平移,旋转,放缩,错切之后得来的,即
如果用2*2的矩阵和2D坐标表示,无法将平移和其他操作一起运算,那么需要“升维”
引入“齐次坐标”,将图像从平面2D坐标变成3D坐标
把缩放,旋转,平移等变换都统一起来,都表示成一连串的矩阵相乘的形式,保证了形式上的线性一致性
目的主要是合并矩阵运算中的乘法和加法
[1tanθ0tanφ10001][Nx000Ny0001][cosϕ−sinϕ0sinϕcosϕ0001][10Tx01Ty001]=[a0a1b0a2a3b1001]\left[ \begin{matrix} 1 & tan\theta &0 \\ tan\varphi & 1& 0\\ 0 &0 &1 \end{matrix} \right] \left[ \begin{matrix} N_x &0 &0 \\ 0 &N_y & 0\\ 0 &0 &1 \end{matrix} \right] \left[ \begin{matrix} cos\phi & -sin\phi &0 \\ sin\phi & cos\phi & 0\\ 0 &0 &1 \end{matrix} \right] \left[ \begin{matrix} 1 &0 &T_x \\ 0 &1 &T_y\\ 0 &0 &1 \end{matrix} \right] = \left[ \begin{matrix} a_0 &a_1 &b_0 \\ a_2 & a_3& b_1\\ 0 &0 &1 \end{matrix} \right] ⎣⎡1tanφ0tanθ10001⎦⎤⎣⎡Nx000Ny0001⎦⎤⎣⎡cosϕsinϕ0−sinϕcosϕ0001⎦⎤⎣⎡100010TxTy1⎦⎤=⎣⎡a0a20a1a30b0b11⎦⎤
将矩形变换成平行四边形(即变换后各边依旧平行)
上面公式里有六个变量,因此自然需要至少列六个等式才可计算出该矩阵
所以需要输入至少三对点集
from cv2 import cv2
import numpy as np# 读取图片文件
demo_file_path = 'img.png'
img = cv2.imdecode(np.fromfile(demo_file_path, dtype=np.uint8), cv2.IMREAD_UNCHANGED)
cv2.imshow('origin img', img)# 定义对应的点 原始1(书本的3个角落坐标)、变换2
pts1 = np.float32([[290, 9], [6, 348], [328, 353]])
pts2 = np.float32([[280, 0], [0, 350], [280, 350]])# 计算得到转换矩阵 2*2
H = cv2.getAffineTransform(pts1, pts2)# 错切变换
new_img = cv2.warpAffine(img, H, (img.shape[1], img.shape[0]))cv2.imshow('Scale img', new_img)
cv2.waitKey(0)
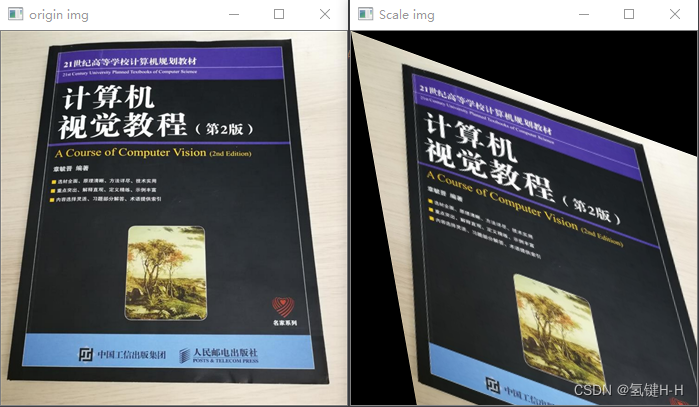
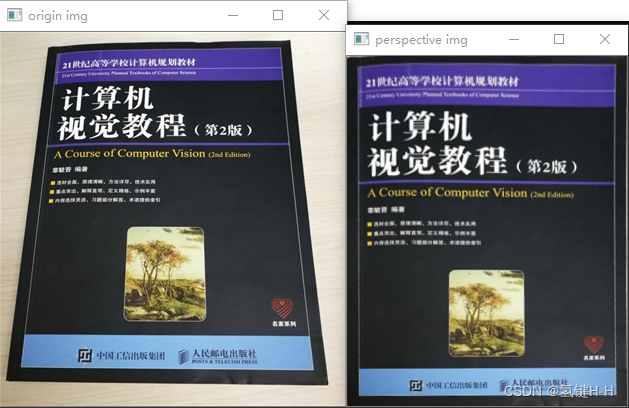
3. 透视变换
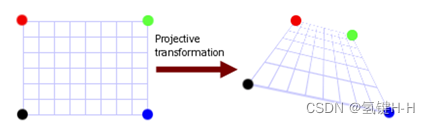
常见的有文档矫正和汽车摄像头转成鸟瞰图,因为视角的原因,近处宽远处窄,呈不规则的四边形
仿射变换是单纯对图片进行平移,缩放,错切(倾斜)和旋转,而这几个操作都不会改变图片线之间的平行关系
仿射变换是在二维空间中,而透视变换则是在三维空间中视角的变化
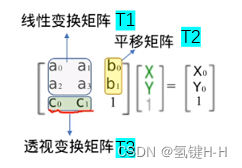
T1为线性变换完成旋转,错切和放缩,T2完成平移操作,T3就是设了两个变量来表示映射关系
需要选取原图上的四个点以上的点集,并计算出该点集变换后的位置
from cv2 import cv2
import numpy as np# 读取图片文件
demo_file_path = 'img.png'
img = cv2.imdecode(np.fromfile(demo_file_path, dtype=np.uint8), cv2.IMREAD_UNCHANGED)
cv2.imshow('origin img', img)# 定义对应的点 原始1(书本的4个角落坐标)、变换2
pts1 = np.float32([[49, 14], [290, 9], [6, 348], [328, 353]])
pts2 = np.float32([[0, 0], [280, 0], [0, 350], [280, 350]])# 计算得到转换矩阵 3*3
M = cv2.getPerspectiveTransform(pts1, pts2)# 透视变换
new_img = cv2.warpPerspective(img, M, (280, 350))cv2.imshow('perspective img', new_img)
cv2.waitKey(0)
谢谢