
无痕埋点在Android中的实现
无痕埋点在Android中的实现
目标
- 解决手动打点效率低下问题
- 自动化埋点
本篇技术实现主要是运行是代理,不涉及到插桩技术,不引入插件,对业务影响点最小
技术难点
1. 如何拦截到所有的view的点击事件
view有个setAccessibilityDelegate方法可以通过自定义一个全局的AccessibilityDelegate对象来监听view的点击事件
object EventTrackerAccessibilityDelegate : View.AccessibilityDelegate() {override fun sendAccessibilityEvent(host: View?, eventType: Int) {super.sendAccessibilityEvent(host, eventType)if (eventType == AccessibilityEvent.TYPE_VIEW_CLICKED) {host?.let {// 统一做埋点}}}
}
通过给每个View设置上述单例对象,这样每当View被点击时,View.performClick内部就会触发上述方法。这样就能够拦截view的点击事件,而不用修改业务层代码。
2. 如何对app所有的view设置setAccessibilityDelegate
解决这个问题,就得拦截到app中view的创建。我们先要对Android中View的创建流程需要明白,对于android中的view创建,我们先从AppCompatActivity.onCreate方法入手
@Override
protected void onCreate(@Nullable Bundle savedInstanceState) {final AppCompatDelegate delegate = getDelegate();delegate.installViewFactory(); //重点delegate.onCreate(savedInstanceState);super.onCreate(savedInstanceState);
}
我们重点看installViewFactory方法,delegate返回的实际类型为AppCompatDelegateImpl,它继承了AppCompatDelegate抽象类
// AppCompatDelegateImpl.java
@Override
public void installViewFactory() {LayoutInflater layoutInflater = LayoutInflater.from(mContext);if (layoutInflater.getFactory() == null) {LayoutInflaterCompat.setFactory2(layoutInflater, this);} else {if (!(layoutInflater.getFactory2() instanceof AppCompatDelegateImpl)) {Log.i(TAG, "The Activity's LayoutInflater already has a Factory installed"+ " so we can not install AppCompat's");}}
}
这里面可以看到内部调用了LayoutInflaterCompat**.setFactory2方法,第二个参数传入了this;其实可以理解view的创建托管给了AppCompatDelegateImpl.onCreateView了;我们继续看onCreateView**内部做了什么
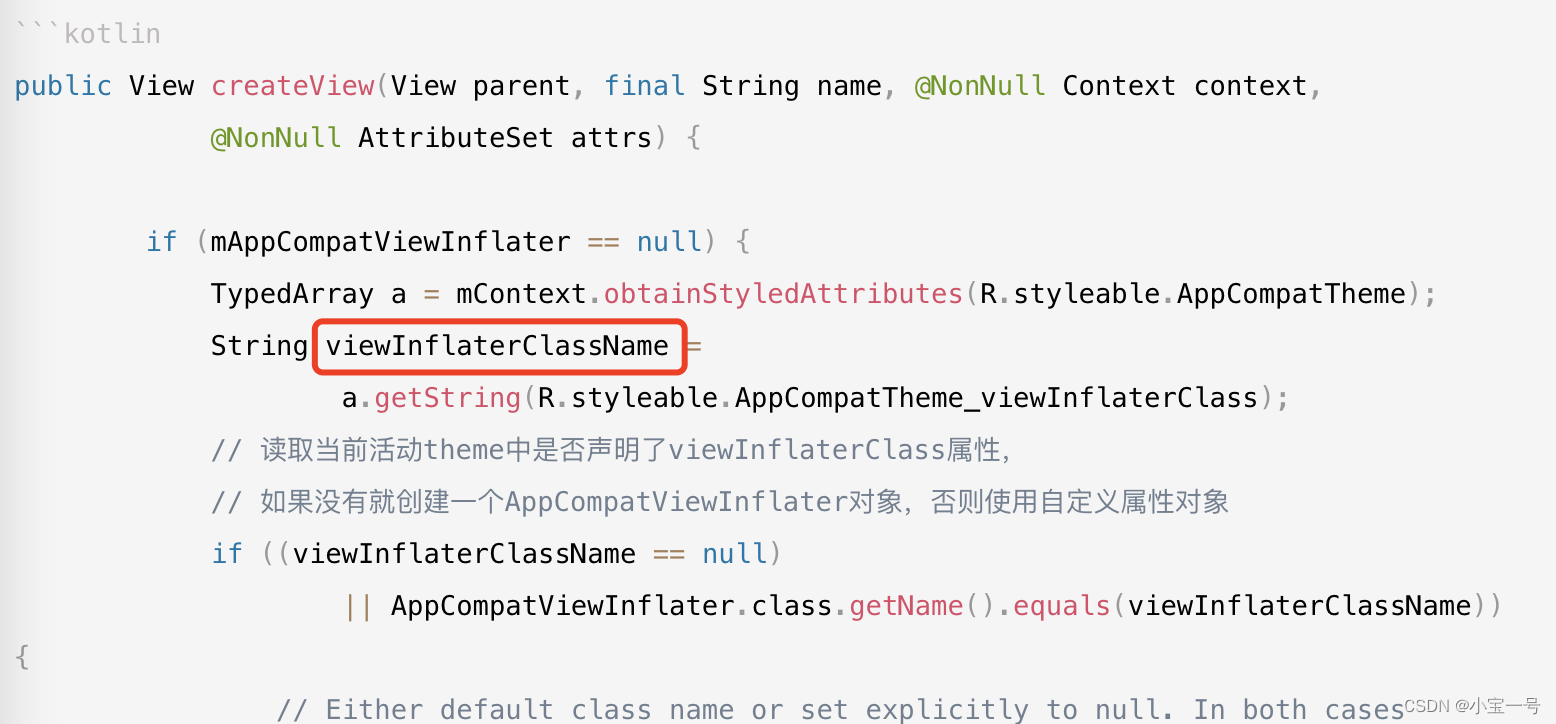
public View createView(View parent, final String name, @NonNull Context context,@NonNull AttributeSet attrs) {if (mAppCompatViewInflater == null) {TypedArray a = mContext.obtainStyledAttributes(R.styleable.AppCompatTheme);String viewInflaterClassName =a.getString(R.styleable.AppCompatTheme_viewInflaterClass);// 读取当前活动theme中是否声明了viewInflaterClass属性,// 如果没有就创建一个AppCompatViewInflater对象,否则使用自定义属性对象if ((viewInflaterClassName == null)|| AppCompatViewInflater.class.getName().equals(viewInflaterClassName)) {// Either default class name or set explicitly to null. In both cases// create the base inflater (no reflection)mAppCompatViewInflater = new AppCompatViewInflater();} else {try {Class viewInflaterClass = Class.forName(viewInflaterClassName);mAppCompatViewInflater =(AppCompatViewInflater) viewInflaterClass.getDeclaredConstructor().newInstance();} catch (Throwable t) {Log.i(TAG, "Failed to instantiate custom view inflater "+ viewInflaterClassName + ". Falling back to default.", t);mAppCompatViewInflater = new AppCompatViewInflater();}}}...// 返回viewreturn mAppCompatViewInflater.createView(parent, name, context, attrs, inheritContext,IS_PRE_LOLLIPOP, /* Only read android:theme pre-L (L+ handles this anyway) */true, /* Read read app:theme as a fallback at all times for legacy reasons */VectorEnabledTintResources.shouldBeUsed() /* Only tint wrap the context if enabled */);}
从上述代码可以看到负责view的创建的其实是mAppCompatViewInflater对象;思路来了,我们可以通过自定义主题样式中viewInflaterClass属性,来接管view的创建
Style.xml中添加配置
view创建
@Keep
class DBSAppCompatViewInflater : AppCompatViewInflater() {private val mViewCreateHelper by lazy { ViewCreateHelper() }override fun createView(context: Context?, name: String?, attrs: AttributeSet?): View? {return when (name) {try {mViewCreateHelper.createViewFromTag(context, name, attrs)} catch (e: Exception) {// noNeed throw exception, just return nullnull}}}
}
ViewCreateHelper主要是通过全路径名以反射形式创建view;你可以参考AppCompatViewInflater类中实现
DBSAppCompatViewInflater方法我们实现了自定义view的方法;(但它只是view创建的一部分,所以此处没有对view设置EventTrackerAccessibilityDelegate),外部调用的只是AppCompatViewInflater.createView;
所以为了拦截所有view的创建,我们需要对activity中getDelagate方法做包装; 有人可能会想能不能自定义Delegate,自己实现AppCompatDelegate抽象类吗?;答案是不行(抽象类中声明了私有方法,子类直接继承编译报错)也不建议这样做,自定义类去做需要实现许多方法,稳定性太差;能不能直接继承AppCompatDelegateImpl类呢?答案也是不行
@RestrictTo(LIBRARY)
class AppCompatDelegateImpl extends AppCompatDelegateimplements MenuBuilder.Callback, LayoutInflater.Factory2 {
}
从源码可以看出compat包中对AppCompatDelegateImpl类做了限制,只能用在那个库中LIBRARY中使用
Restrict usage to code within the same library (e.g. the same gradle group ID and artifact ID).
所以我们只能对Delegate增加一层包装,delegate现在已经拥有创建view的能力,我们只要在install之前对LayoutInflater设置Factory2中方法,在方法中直接引用delegate对象创建view就可以了;
实现一个LayoutIInflater.Factory2接口
class AppLayoutInflaterFactory2Proxy(private val delegate: AppCompatDelegate): LayoutInflater.Factory2 {override fun onCreateView(parent: View?, name: String?, context: Context?, attrs: AttributeSet): View? {context ?: return nulldelegate.createView(parent, name, context, attrs)?.apply {// 无痕埋点启用,则绑定,否则不做处理if (EventAutoTrackerCfg.enable) {if (ViewCompat.getAccessibilityDelegate(this) == null) {accessibilityDelegate = EventTrackerAccessibilityDelegate}}}}override fun onCreateView(name: String?, context: Context?, attrs: AttributeSet): View? {return onCreateView(null, name, context, attrs)}
}
Activity基类中复写getDelegate方法
override fun getDelegate(): AppCompatDelegate {val delegate = super.getDelegate()try {val inflater = LayoutInflater.from(this)// avoid throw exception when invoking method multiple timesif (inflater.factory == null) {LayoutInflaterCompat.setFactory2(inflater, MKAppLayoutInflaterFactory2Proxy(delegate) )}} catch (e: Exception) {// do nothing}return delegate}
这样整个无痕埋点技术实现方案已经完成了
可以优化的点
- 当前技术实现中需要在Style.xml中添加相关viewInflaterClass配置,有些耦合
优化技术实现方案:可以通过插桩方式修改viewInflaterClassName的值,对于我们自己业务类(通过context判断)设置我们自定义的InflaterClassName,第三方sdk可以控制保持不变
上一篇:第一章.感知机