
2023-03-15 ElasticSearch
ElasticSearch
1.Docker安装ElasticSearch
1.1. es及kibana下载
docker pull elasticsearch:7.4.2
docker pull kibana:7.4.2
创建映射文件:
mkdir -p /elasticsearch/configmkdir -p /elasticsearch/datamkdir -p /elasticsearch/plugins
在config下执行 vim elasticsearch.yml
network.host: 0.0.0.0
elasticsearch.yml配置文件
1.1、cluster.name: elasticsearch
配置es的集群名称,默认是elasticsearch,es会自动发现在同一网段下的es,如果在同一网段下有多个集群,就可以用这个属性来区分不同的集群。
1.2、node.name:"Franz Kafka"
节点名,默认随机指定一个name列表中名字,该列表在es的jar包中config文件夹里name.txt文件中,其中有很多作者添加的有趣名字。
1.3、node.master: true
指定该节点是否有资格被选举成为node,默认是true,es是默认集群中的第一台机器为master,如果这台机挂了就会重新选举master。
1.4、node.data: true
指定该节点是否存储索引数据,默认为true。
1.5、index.number_of_shards: 5
设置默认索引分片个数,默认为5片。
1.6、index.number_of_replicas: 1
设置默认索引副本个数,默认为1个副本。
1.7、path.conf: /path/to/conf
设置配置文件的存储路径,默认是es根目录下的config文件夹。
1.8、path.data: /path/to/data
设置索引数据的存储路径,默认是es根目录下的data文件夹,可以设置多个存储路径,用逗号隔开,例:path.data: /path/to/data1,/path/to/data2
1.9、path.work: /path/to/work
设置临时文件的存储路径,默认是es根目录下的work文件夹。
1.10、path.logs: /path/to/logs
设置日志文件的存储路径,默认是es根目录下的logs文件夹
1.11、path.plugins: /path/to/plugins
设置插件的存放路径,默认是es根目录下的plugins文件夹
1.12、bootstrap.mlockall: true
设置为true来锁住内存。因为当jvm开始swapping时es的效率会降低,所以要保证它不swap,可以把ES_MIN_MEM和 ES_MAX_MEM两个环境变量设置成同一个值,并且保证机器有足够的内存分配给es。同时也要允许elasticsearch的进程可以锁住内存,linux下可以通过ulimit -l unlimited命令。
1.13、network.bind_host: 192.168.0.1
设置绑定的ip地址,可以是ipv4或ipv6的,默认为0.0.0.0。
1.14、network.publish_host: 192.168.0.1
设置其它节点和该节点交互的ip地址,如果不设置它会自动判断,值必须是个真实的ip地址。
1.15、network.host: 192.168.0.1
这个参数是用来同时设置bind_host和publish_host上面两个参数。
1.16、transport.tcp.port: 9300
设置节点间交互的tcp端口,默认是9300。
1.17、transport.tcp.compress: true
设置是否压缩tcp传输时的数据,默认为false,不压缩。
1.18、http.port: 9200
设置对外服务的http端口,默认为9200。
1.19、http.max_content_length: 100mb
设置内容的最大容量,默认100mb
1.20、http.enabled: false
是否使用http协议对外提供服务,默认为true,开启。
1.21、gateway.type: local
gateway的类型,默认为local即为本地文件系统,可以设置为本地文件系统,分布式文件系统,Hadoop的HDFS,和amazon的s3服务器。
1.22、gateway.recover_after_nodes: 1
设置集群中N个节点启动时进行数据恢复,默认为1。
1.23、gateway.recover_after_time: 5m
设置初始化数据恢复进程的超时时间,默认是5分钟。
1.24、gateway.expected_nodes: 2
设置这个集群中节点的数量,默认为2,一旦这N个节点启动,就会立即进行数据恢复。
1.25、cluster.routing.allocation.node_initial_primaries_recoveries: 4
初始化数据恢复时,并发恢复线程的个数,默认为4。
1.26、cluster.routing.allocation.node_concurrent_recoveries: 2
       添加删除节点或负载均衡时并发恢复线程的个数,默认为4。
1.27、indices.recovery.max_size_per_sec: 0
       设置数据恢复时限制的带宽,如入100mb,默认为0,即无限制。
1.28、indices.recovery.concurrent_streams: 5
设置这个参数来限制从其它分片恢复数据时最大同时打开并发流的个数,默认为5。
1.29、discovery.zen.minimum_master_nodes: 1
设置这个参数来保证集群中的节点可以知道其它N个有master资格的节点。默认为1,对于大的集群来说,可以设置大一点的值(2-4)
1.30、discovery.zen.ping.timeout: 3s
设置集群中自动发现其它节点时ping连接超时时间,默认为3秒,对于比较差的网络环境可以高点的值来防止自动发现时出错。
1.31、discovery.zen.ping.multicast.enabled: false
设置是否打开多播发现节点,默认是true。
1.32、discovery.zen.ping.unicast.hosts: ["host1", "host2:port", "host3[portX-portY]"]
设置集群中master节点的初始列表,可以通过这些节点来自动发现新加入集群的节点。
下面是一些查询时的慢日志参数设置
index.search.slowlog.level: TRACE
index.search.slowlog.threshold.query.warn: 10s
index.search.slowlog.threshold.query.info: 5s
index.search.slowlog.threshold.query.debug: 2s
index.search.slowlog.threshold.query.trace: 500ms
index.search.slowlog.threshold.fetch.warn: 1s
index.search.slowlog.threshold.fetch.info: 800ms
index.search.slowlog.threshold.fetch.debug:500ms
index.search.slowlog.threshold.fetch.trace: 200ms
2.ES启动
docker run --name es -p 9200:9200 -p 9300:9300 \
-e "discovery.type=single-node" \
-e ES_JAVA_OPTS="-Xms128m -Xmx512m" \
-v /dockerData/elasticsearch/config/elasticsearch.yml:/usr/share/elasticsearch/config/elasticsearch.yml \
-v /dockerData/elasticsearch/data:/usr/share/elasticsearch/data \
-v /dockerData/elasticsearch/plugins:/usr/share/elasticsearch/plugins \
-d elasticsearch:7.4.2
network.host: 0.0.0.0
Kibana启动
docker run --name kibana -e ELASTICSEARCH_HOSTS=http://192.168.25.100:9200 -p 5601:5601 -d kibana:7.4.2
docker start es
docker start kibana
# 如果没有nginx,启动时会自动下载
docker exec -it es /bin/bash
docker run -p 80:80 --name nginx -d nginx:latest
# 将docker容器内部文件拷贝到宿主机
docker container cp nginx:/etc/nginx .
3.9200端口ES查看节点信息
_cat/_cat/nodes 查看所有节点信息/_cat/health 节点健康状况/_cat/master 主节点信息/_cat/indices 查看所有索引
4.索引文档
4.1.put方式发送
PUT news/_doc/1
{"username":"zhangsan","age":10
}
执行结果:
{"_index" : "news","_type" : "_doc","_id" : "1","_version" : 1,"result" : "created","_shards" : {"total" : 2,"successful" : 1,"failed" : 0},"_seq_no" : 0,"_primary_term" : 1
}
4.2.post方式发送
POST news/_doc/2
{"username":"lisi","age":19
}
结果
{"_index" : "news","_type" : "_doc","_id" : "2","_version" : 1,"result" : "created","_shards" : {"total" : 2,"successful" : 1,"failed" : 0},"_seq_no" : 1,"_primary_term" : 1
}
4.3.查看文档
GET news/_doc/2
结果:
{"_index" : "news","_type" : "_doc","_id" : "2","_version" : 1,"_seq_no" : 1,"_primary_term" : 1,"found" : true,"_source" : {"username" : "lisi","age" : 19}
}
4.4.更新文档
POST news/_doc/1/_update
{"doc":{"username":"aaa"}
}
结果:
#! Deprecation: [types removal] Specifying types in document update requests is deprecated, use the endpoint /{index}/_update/{id} instead.
{"_index" : "news","_type" : "_doc","_id" : "1","_version" : 2,"result" : "updated","_shards" : {"total" : 2,"successful" : 1,"failed" : 0},"_seq_no" : 3,"_primary_term" : 1
}
使用_update更新文档必须携带doc.
post的_update会有检查功能,如果执行的语句与数据没有变化时是不会更新数据而且任何版本号也不会更新.
4.5.删除文档&索引
删除文档语法:
结果:
删除索引语法:
执行结果:
4.6.批量添加数据_bulk
PUT news/_doc/_bulk
{"index":{"_id":1}}
{"username":"zhangsan1"}
{"address":"Beijing"}
{"index":{"_id":2}}
{"username":"lisi"}
{"index":{"_id":3}}
{"username":"wangwu"}
结果:
{"took" : 6,"errors" : false,"items" : [{"index" : {"_index" : "news","_type" : "_doc","_id" : "1","_version" : 7,"result" : "updated","_shards" : {"total" : 2,"successful" : 1,"failed" : 0},"_seq_no" : 8,"_primary_term" : 1,"status" : 200}},{"index" : {"_index" : "news","_type" : "_doc","_id" : "2","_version" : 3,"result" : "updated","_shards" : {"total" : 2,"successful" : 1,"failed" : 0},"_seq_no" : 9,"_primary_term" : 1,"status" : 200}},{"index" : {"_index" : "news","_type" : "_doc","_id" : "3","_version" : 1,"result" : "created","_shards" : {"total" : 2,"successful" : 1,"failed" : 0},"_seq_no" : 10,"_primary_term" : 1,"status" : 201}}]
}
5.进阶数据检索
5.1.url 检索数据语法
GET bank/_search?q=*&sort=account_number:asc
5.2.Query DLS(查询领域对象语言)
GET bank/_search
{"query": {"match_all": {}}
}
1.查询全部数据并排序
GET bank/_search
{"query": {"match_all": {}},"sort": [{"age": {"order": "desc"}}]
}
2.查询全部数据排序并分页
GET bank/_search
{"query": {"match_all": {}},"sort": [{"age": {"order": "desc"}}],"from": 0,"size": 50
}
3.区间查询
GET bank/_search
{"query": {"range": {"age": {"gte": 10,"lte": 20}}}
}
4.全文检索 match
match会针对text内容进行分词检索
GET bank/_search
{"query": {"match": {"address": "mill"}}
}
5.短语匹配 match_phrase
GET bank/_search
{"query": {"match_phrase": {"address": "mill lane"}}
}
6.multi_match 多字段匹配
要查询的内容为mill 可以设置某几个字段是否包含该值
GET /bank/_search
{"query": {"multi_match": {"query": "mill","fields": ["email","address","city"]}}
}
7.bool复合查询 多个条件进行匹配查询
must是必须满足
must_not必须不满足
GET bank/_search
{"query": {"bool": {"must": [{"match": {"address": "mill"}},{"match": {"gender": "M"}}],"must_not": [{"match": {"state": "KY"}}]}}
}
should 条件可以满足也可以不满足,在查询中如果有满足should的条件就会增加相关性得分.
GET bank/_search
{"query": {"bool": {"must": [{"match": {"address": "mill"}},{"match": {"gender": "M"}}],"must_not": [{"match": {"state": "KY"}}],"should": [{"match": {"state": "IL"}}]}}
}
8.filter结果过滤
区间查询:
GET /bank/_search
{"query": {"bool": {"must": [{"range": {"age": {"gte": 10,"lte": 50}}}]}},"from": 0,"size":44
}
GET /bank/_search
{"query": {"bool": {"filter": {"range": {"age": {"gte": 10,"lte": 50}}}}}
}
9.term 非全文检索
对于数字型的值推荐使用term,但是如果是text进行分词检索的内容不要使用term,当使用term中进行文本内容的全量检索时term不会检索任何内容
查询内容只是为数字时 推荐使用term 进行检索 ,但是 text文本内容进行检索时不要使用term
GET /bank/_search
{"query": {"term": {"age": {"value": "40"}}}
}
//当检索的内容非数字的类型时:不会检索到任何结果
GET /bank/_search
{"query": {"term": {"address": {"value": "990 Mill Road"}}}
}
6.Mapping
查看该索引下的字段映射类型
GET bank/_mapping
在ES中会根据数据自动猜测属性的类型(mapping)
同时可以在创建索引时手动的去维护创建映射的类型,Es如果是自动时 会将一些不需要进行全文检索的字段属性都映射为text
Es会根据索引的内容进行自动推断类型 ,
给索引的数据字段设置类型
当es索引类型后不能更改 映射类型 ,如果需要变更 要新的数据迁移 将原有的index删除掉 在重新导入,
创建新的index设计映射类型 再去将数据进行迁移
6.1.创建索引和字段映射类型
作者来源(精确匹配 keyword)
新闻类型(keyword)
新闻封面图片(不做检索不做索引)
PUT news
{"mappings": {"properties": {"title":{"type": "text"},"author":{"type": "keyword"},"readnum":{"type": "long"}}}
}
在创建映射类型时ES会默认给字段后加入index属性并设置为true,这样就是认为该字段会进行索引也就是能够对该字段进行全文检索,如果一个字段不需进行全文检索就显示的设置为false
6.2.新增映射字段类型
在新增字段映射类型时不能够在原有的语句上继续执行,需要额外编写新的语句
PUT news/_mapping{ "properties":{"admins":{"type":"keyword"}}
}
7.数据迁移
将测试数据bank/account进行设置新的映射类型,将一些不需要全文检索的字段从新设置.
put /newindex{"mappings":{	"properties":{将原来的mapping放进来修改}}
}
数据迁移前先需要创建一个新的索引并且修改映射类型
POST _reindex
{"source": {"index": "bank","type": "account"},"dest": {"index": "newbank"}
}
8.分词
搜索引擎的核心是倒排索引,而倒排索引的基础就是分词。所谓分词可以简单理解为将一个完整的句子切割为一个个单词的过程。在 es 中单词对应英文为 term
实际上 ES 的分词不仅仅发生在文档创建的时候,也发生在搜索的时候
8.1.分词器
ES 中处理分词的部分被称作分词器,英文是Analyzer,它决定了分词的规则。ES 自带了很多默认的分词器,比如Standard、Keyword、Whitespace等等,默认是Standard。当我们在读时或者写时分词时可以指定要使用的分词器
测试hello world 是如何分词的 采用的是 standard 默认分词器
tokenlyzer 分词器
analyzer 分析器
POST _analyze
{"analyzer": "standard", "text": "hello world"
}
8.2.ES中默认分词器
- Standard Analyzer - 默认分词器,按词切分,小写处理
- Simple Analyzer - 按照非字母切分(符号被过滤), 小写处理
- Stop Analyzer - 小写处理,停用词过滤(the,a,is)
- Whitespace Analyzer - 按照空格切分,不转小写
- Keyword Analyzer - 不分词,直接将输入当作输出
- Patter Analyzer - 正则表达式,默认\W+(非字符分割)
- Language - 提供了30多种常见语言的分词器
- Customer Analyzer 自定义分词器
查看地址列分词情况:
GET bank/_analyze
{"field": "address","text": "198 mill lane"
}
结果:
"tokens" : [{"token" : "198","start_offset" : 0,"end_offset" : 3,"type" : "","position" : 0},{"token" : "mill","start_offset" : 4,"end_offset" : 8,"type" : "","position" : 1},{"token" : "lane","start_offset" : 9,"end_offset" : 13,"type" : "","position" : 2}]
}
这些分词器默认都是对英文进行分词,如果是中文就会出现每个汉字进行分词
POST _analyze
{"analyzer": "standard", "text": "xxxx"
}
9.安装IK分词器
下载地址:
https://github.com/medcl/elasticsearch-analysis-ik/releases/tag/v7.4.2
docker中挂载ES的插件包中
1.下载后通过文件上传工具将分词器上传到Docker的ES映射挂载目录plugins下
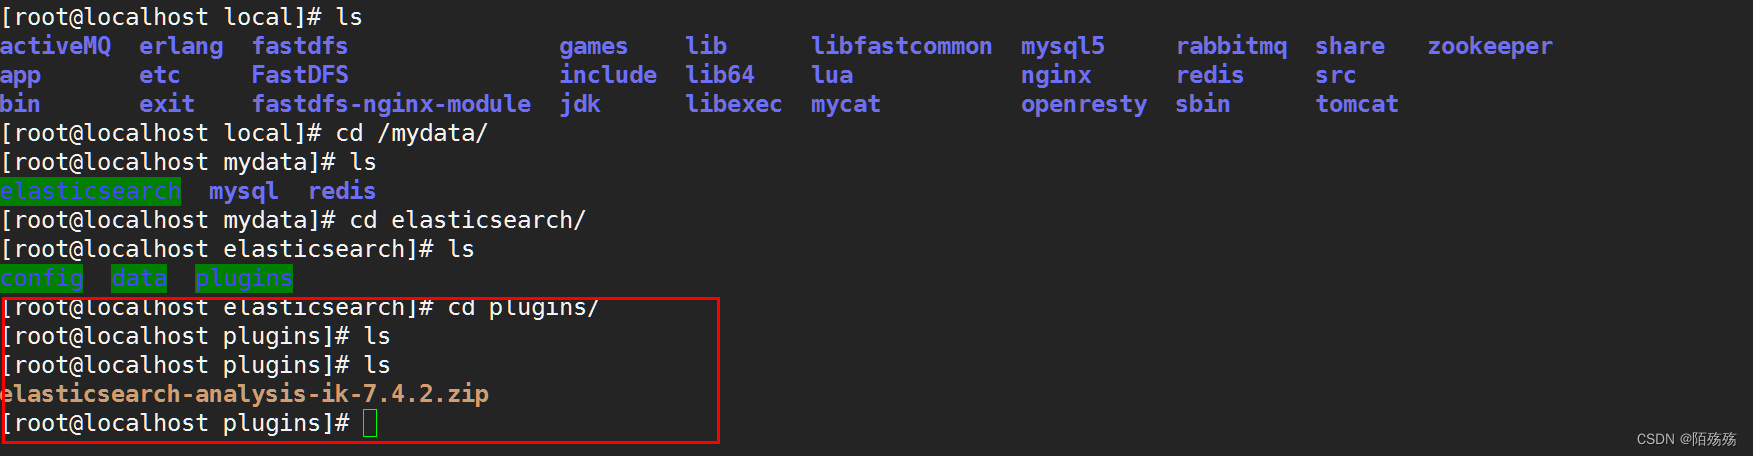
2.解压该文件
yum install -y unziptar gz
unzip elasticsearch-analysis-ik-7.4.2.zip
宿主机内的解压:

进入容器内部查看:
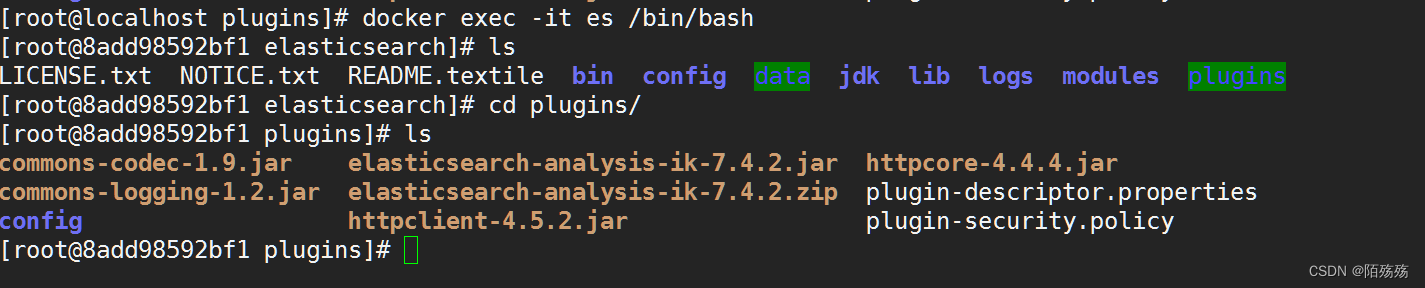
注意:
3.解压后需要在plugins下创建一个ik 的目录将所有文件都移动到ik目录下,不然执行会报异常
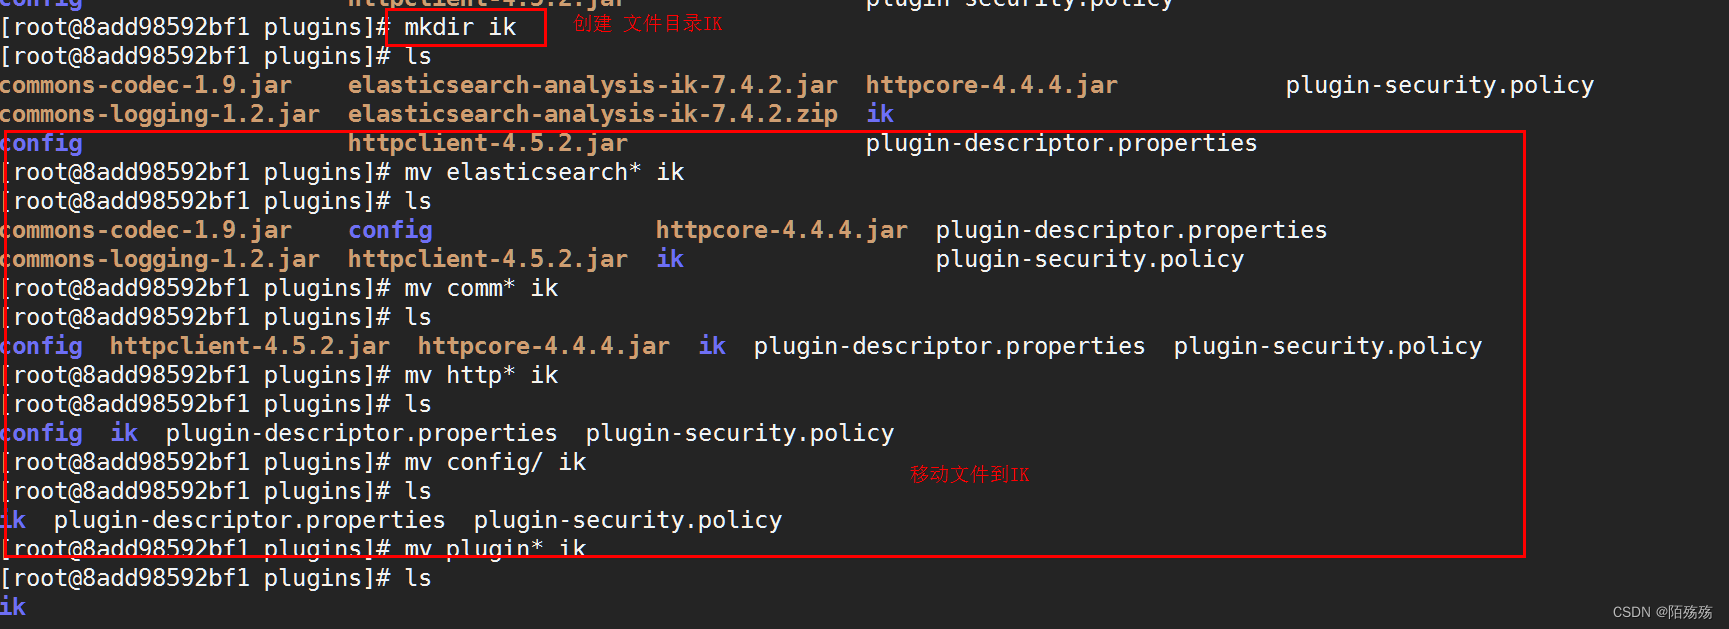
4.执行完成后前往ES的bin路径下通过Es的plugins执行文件查看当前插件是否被启用

5.重启ES与Kibana
9.1.ik_smart分词
ik_smart叫智能分词,会做最粗粒度的拆分
POST _analyze
{"analyzer": "ik_smart", "text": "我是中国人"
}
9.2.ik_max_word
ik_max_word最细粒度拆分
9.3.自定义分词器
1.启动安装nginx容器
启动docker下nginx,启动nginx其实就是为了要里面的配置文件
docker中拉取镜像时 一般情况下 要检索 docker search 镜像资源名称 docker hub上去检索官方镜像
docker pull 镜像名称 拉取镜像到本地 docker run
1.本地中是否有镜像资源 ,如果没有则拉取该镜像
docker run -p 80:80 --name nginx -d nginx:latest
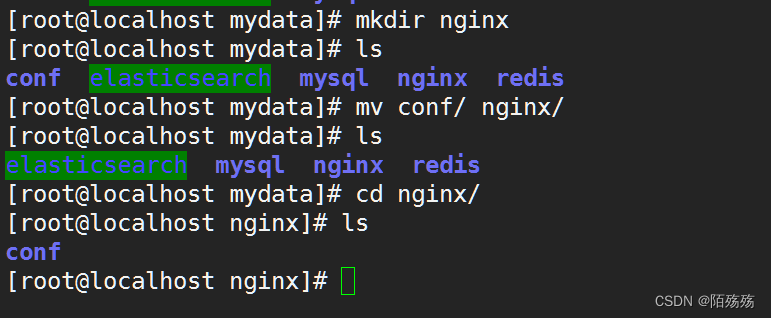
2.创建nginx目录

3.当nginx容器启动后将nginx容器内的文件复制到宿主机中挂载的nginx文件里面
docker container cp nginx:/etc/nginx .
**一定需要注意执行这个命令时是在宿主机挂载的目录下,也就是我们在使用docker时创建的/mydata目录下,需要先创建nginx目录**

4.执行完成后进入nginx 目录查看

5.ngxin -> conf ->文件
复制完文件后就可以停止nginx容器并移除该容器,更改nginx目录名称为conf,然后在创建一个nginx目录将conf/目录移动至nginx目录中.
6.docker stop nginx 停止
7.docker rm nginx 移除
8.创建新的nginx容器并指定挂载目录
docker run -p 80:80 --name nginx \
-v /mydata/nginx/html:/usr/share/nginx/html \
-v /mydata/nginx/logs:/var/log/nginx \
-v /mydata/nginx/conf:/etc/nginx \
-d nginx:latest
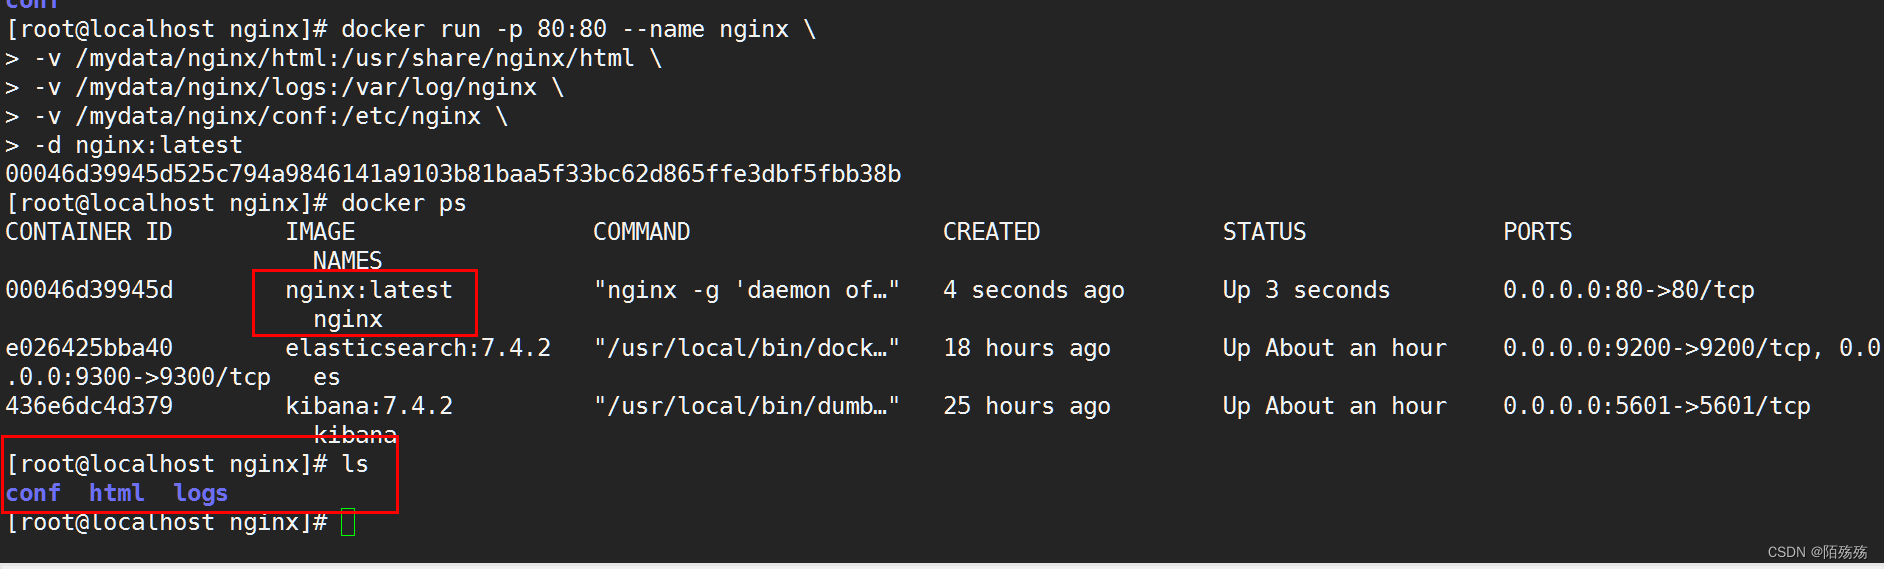
9.启动完成后进入挂载的nginx目录下html/中创建一个新的文件目录为es然后进入.通过vim创建一个分词文件,录入中文
vim mytokenizer.txt
测试访问,直接通过nginx下的html路径即可
2.修改ik分词配置
1.进入ES挂载的目录找到ik插件位置
cd /mydata/elasticsearch/plugins/ik
2.在这个目录下有个config文件目录进入

3.进入之后编辑修改IkAnalyzer.cfg.xml文件

4.将该文件内容的远程扩展词库打开并编写刚刚测试的地址
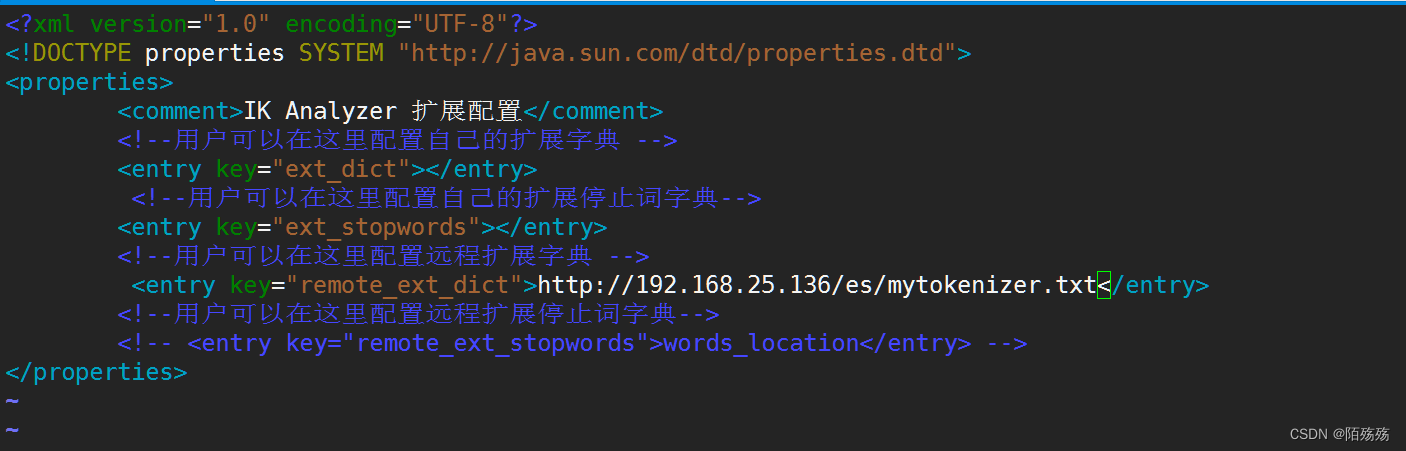
5.更改后保存退出并重启ES测试分词结果
//设置news索引并配置mapping类型与分词策略
PUT news
{"mappings": {"properties": {"title":{"type": "text","analyzer": "ik_max_word"},"category":{"type": "keyword"},"author":{"type": "keyword"},"newsimage":{"type": "keyword","index": false}}}
}
10.springboot集成ElasticSearch
1.使用ElasticSearch-Rest-Client 进行ES操作
http:// 9200
1.创建检索模块导入依赖
org.elasticsearch.client elasticsearch-rest-high-level-client 7.4.2 2.在ES中使用API时还需要额外引入jackson组件包并且版本与父工程不一致需要单独引入
com.fasterxml.jackson.core jackson-core 2.8.3 com.fasterxml.jackson.dataformat jackson-dataformat-smile 2.8.3 3.配置类
@Configuration
public class ElasticSearchConfig {//请求设置项public static final RequestOptions COMMON_OPTIONS;static {//基于默认规则设置RequestOptions.Builder builder = RequestOptions.DEFAULT.toBuilder();COMMON_OPTIONS = builder.build();}@Beanpublic RestHighLevelClient esRestClient(){RestHighLevelClient client=new RestHighLevelClient(RestClient.builder(new HttpHost("192.168.25.100",9200,"http")));return client;}
}
4.测试
@Autowiredprivate ElasticSearchConfig elasticSearchConfig;@Testpublic void testEsClient(){System.out.println(elasticSearchConfig.esRestClient());}
5.添加请求默认设置项
//请求设置项public static final RequestOptions COMMON_OPTIONS;static {//基于默认规则设置RequestOptions.Builder builder = RequestOptions.DEFAULT.toBuilder();COMMON_OPTIONS = builder.build();}
1.添加索引数据
@Testpublic void indexTest(){IndexRequest indexRequest=new IndexRequest("users");Users users=new Users(1,"zhangsan","男",new Date());indexRequest.id(users.getId()+"");String json=JSONObject.toJSONString(users);indexRequest.source(json, XContentType.JSON);try {IndexResponse indexResponse=elasticSearchConfig.esRestClient().index(indexRequest,ElasticSearchConfig.COMMON_OPTIONS);System.out.println(indexResponse);} catch (IOException e) {e.printStackTrace();}}
2.检索数据
@Testpublic void searchTest(){//1、创建查询请求,规定查询的索引SearchRequest searchRequest=new SearchRequest();//2.指定索引searchRequest.indices("bank");SearchSourceBuilder searchSourceBuilder=new SearchSourceBuilder();//3.构建查询条件 searchSourceBuilder.query(QueryBuilders.matchQuery("address","mill"));//指定DSLsearchRequest.source(searchSourceBuilder);try {SearchResponse response = elasticSearchConfig.esRestClient().search(searchRequest, ElasticSearchConfig.COMMON_OPTIONS);System.out.println(response);} catch (IOException e) {e.printStackTrace();}}
3.结果分析中获取数据
@Testpublic void searchTest(){SearchRequest searchRequest=new SearchRequest();//指定索引searchRequest.indices("bank");SearchSourceBuilder searchSourceBuilder=new SearchSourceBuilder();//构建查询条件searchSourceBuilder.query(QueryBuilders.matchQuery("address","mill"));//指定DSLsearchRequest.source(searchSourceBuilder);try {SearchResponse response = elasticSearchConfig.esRestClient().search(searchRequest, ElasticSearchConfig.COMMON_OPTIONS);//结果分析获取SearchHits hits = response.getHits();SearchHit[] hitsHits = hits.getHits();for (SearchHit hit : hitsHits) {//元信息// hit.getScore() hit.getSeqNo() hit.getShard() hit.getId();//获取数据信息String sourceAsString = hit.getSourceAsString();System.out.println(sourceAsString);}} catch (IOException e) {e.printStackTrace();}}
4.查询结果根据关键字高亮展示
@Testpublic void searchTest(){SearchRequest searchRequest=new SearchRequest();//指定索引searchRequest.indices("bank");SearchSourceBuilder searchSourceBuilder=new SearchSourceBuilder();//高亮HighlightBuilder highlightBuilder=new HighlightBuilder();highlightBuilder.field("address");highlightBuilder.preTags(""); //高亮设置highlightBuilder.postTags("");searchSourceBuilder.highlighter(highlightBuilder);//构建查询条件searchSourceBuilder.query(QueryBuilders.matchQuery("address","mill"));//指定DSLsearchRequest.source(searchSourceBuilder);try {SearchResponse response = elasticSearchConfig.esRestClient().search(searchRequest, ElasticSearchConfig.COMMON_OPTIONS);//结果分析获取SearchHits hits = response.getHits();SearchHit[] hitsHits = hits.getHits();List list=new ArrayList<>();for (SearchHit hit : hitsHits) {String sourceAsString = hit.getSourceAsString();Bank bank=JSONObject.parseObject(sourceAsString,Bank.class);HighlightField highlightField=hit.getHighlightFields().get("address");String highlinghFiled=null;if(highlightField!=null){highlinghFiled=highlightField.getFragments()[0].string();bank.setAddress(highlinghFiled);}list.add(bank);}list.stream().forEach(System.out::println);} catch (IOException e) {e.printStackTrace();}}
//页面中高亮语法
GET /news/_search
{"query": {"match": {"title": "中国"}},"highlight": {"pre_tags": [""],"post_tags": [""],"fields": {"title": {}}}
}
2.springboot集成操作
1.pom依赖
org.springframework.boot spring-boot-starter-data-elasticsearch 2.yml配置
spring:data:elasticsearch:client:reactive:connection-timeout: 60000 #连接elasticsearch超时时间endpoints: 192.168.25.100:9300 #连接elasticsearch地址password: ''username: ''cluster-name: data-lakescluster-nodes: 192.168.25.100:9300,192.168.25.100:9301,192.168.25.100:9302repositories:enabled: true #打开elasticsearch仓库,默认trueelasticsearch:rest:uris: http://192.168.25.100:9200
3.查询mapper层接口继承ElasticsearchRepository
泛型参数,第一个参数是查询到的返回实体对象
4.配置类
@Configuration
public class ElasticsearchConfig {@Beanpublic ElasticsearchTemplate elasticsearchTemplate(Client client) throws UnknownHostException {return new ElasticsearchTemplate(client, new ElasticCustomEntityMapper());}private class ElasticCustomEntityMapper implements EntityMapper {private ObjectMapper mapper;@Autowiredprivate ElasticCustomEntityMapper() {this.mapper = new ObjectMapper();mapper.disable(DeserializationFeature.FAIL_ON_UNKNOWN_PROPERTIES);mapper.disable(SerializationFeature.WRITE_DATES_AS_TIMESTAMPS);mapper.registerModule(new JavaTimeModule());}@Overridepublic String mapToString(Object object) throws IOException {return mapper.writeValueAsString(object);}@Overridepublic  T mapToObject(String source, Class clazz) throws IOException {return mapper.readValue(source, clazz);}}
}
5.ElasticsearchRepository接口中的内置方法
S index(S entity);Iterable search(QueryBuilder query);Page search(QueryBuilder query, Pageable pageable);Page search(SearchQuery searchQuery);Page searchSimilar(T entity, String[] fields, Pageable pageable);void refresh();Class getEntityClass();
分别对es的基本查询操作
6.使用时只需注入mapper,调用继承的方法即可
7.也可直接注入
@Resource
private ElasticsearchTemplate elasticsearchTemplate;
8.返回实体对应注解
@Document(indexName ="new",type = "doc",useServerConfiguration = true,createIndex = false)
@Id
@Field(type = FieldType.Keyword)
可选字段
public enum FieldType {Text,Integer,Long,Date,Float,Double,Boolean,Object,Auto,Nested,Ip,Attachment,Keyword
}
@GeoPointField  //地理位置类型字段
private GeoPoint location;
@Field(index = false) //不查找的字段
@Field(type = FieldType.Text,analyzer = "ik_max_word")//指定分词器
上一篇:软件实施面试专业技能试题
下一篇:01-ECU和域控制器(摘)